A/C Clutch, Sanden Assembly Overview
A/C Clutch, Sanden Assembly Overview
• Refrigerant circuit does not need to be discharged to service A/C Clutch.
• If A/C Clutch is to be serviced with compressor installed, first do the following:
• Remove ribbed belt
• Remove intercooler (engine code ALH only)
• If A/C Clutch is to be serviced with compressor removed, first do the following:
• Discharge refrigerant system => [ A/C Refrigerant System, Discharging ] A/C Refrigerant System, Discharging.
• A/C Clutch, removing and installing => [ A/C Clutch ] A/C Clutch.
• A/C refrigerant system, servicing => [ A/C Refrigerant System ] A/C Refrigerant System.
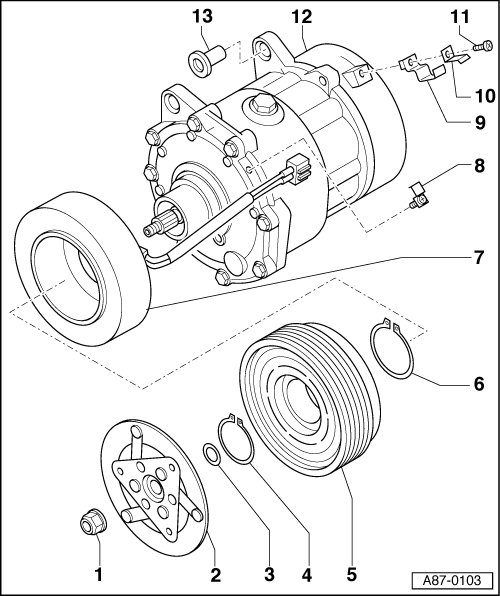
1 Hex nut
• Self-locking
• Always replace
• 15 Nm
2 Clutch plate
• Removing and Installing => [ A/C Clutch ] A/C Clutch
• Checking clutch plate gap => [ Clutch Plate Gap ] A/C Clutch
3 Shims
• Used to adjust gap between clutch plate and pulley
• Gap: 0.4 - 0.8 mm (0.015 - 0.023 in)
4 Circlip
• Always replace
• Install correctly: Flat side faces compressor.
• Ensure correct seating in groove
5 Clutch pulley
• Removing and Installing => [ A/C Clutch ] A/C Clutch
6 Circlip
• Replacing
• Install correctly: Flat side faces compressor
• Ensure correct seating in groove
7 Clutch coil
• Installing => [ Clutch Coil ] A/C Clutch
• A thermo-fuse integrated into the clutch coil protects the A/C Clutch in the event of overheating (e.g.: due to a binding compressor). The clutch coil circuit is interrupted.
8 Connector clip
• With screw
9 Harness clip
10 Harness clip
11 Screw
12 Compressor
13 Threaded bushing