6.3L
Generator
Observe notes on contact corrosion. Refer to=> [ Contact Corrosion ] Contact Corrosion.
Removing
- Turn off the ignition and disconnect the ground cable from the battery. Refer to => [ Battery, Disconnecting and Connecting ] Battery, Disconnecting and Connecting.
- Remove the right front coolant pipe.
- Remove the lower longitudinal member and the deflector plate.
- Remove the engine oil cooler.
- Release the tension on the ribbed belt and remove it from the generator pulley.
- Loosen the clamp - 1 - and remove the coolant hose.
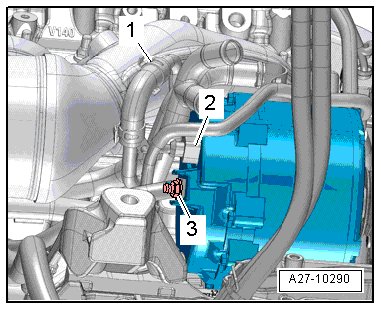
- Disconnect the electrical connector - 2 -.
- Remove the nut and the B+ wire - 3 -.-
- Loosen the generator bolts - arrows - approximately 6 turns.
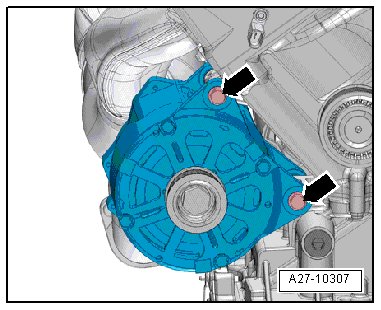
- Using a hammer, carefully tap the bolt heads to loosen the generator mount bushings.
- Remove the bolts completely.
- Remove the generator to the right.
Installing
• Tightening specifications. Refer to=> [ Generator with Bushings Overview ] Generator with Bushings Overview.
Install in reverse order of removal. Note the following:
• Secure all hose connections using standard hose clamps. Refer to Electronic Parts Catalog (ETKA).
• Because the clamping force of a tight bushing is too low despite correct torque, bushings must be loosened.
- Move the bushings slightly toward the back to make is easier to install the generator.
- Install the ribbed belt.
- Install the engine oil cooler.
- Install the lower longitudinal member and the deflector plate.
- Install the right front coolant pipe.
- Connect the battery. Required actions, refer to=> [ Connecting ] Battery, Disconnecting and Connecting.
- Start engine and check belt routing.