Timing Chain Cover Overview
Timing Chain Cover Overview
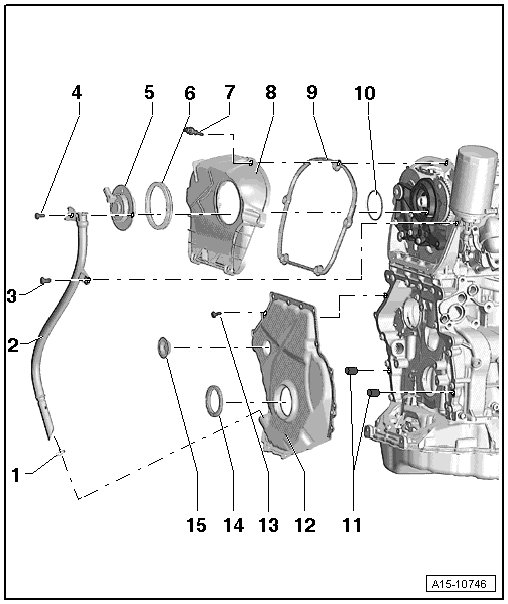
1 O-ring
• Always replace.
• Coat with oil before installing.
2 Oil Dipstick Guide Tube
3 Bolt
• 9 Nm
4 Bolt
• 9 Nm
5 Camshaft Adjustment Valve 1 (N205)
• Removing and installing, refer to => [ Camshaft Adjustment Valve 1 (N205) ] Service and Repair.
6 Seal
• Replace if damaged.
• Coat with oil before installing.
7 Bolt
• Tightening sequence and specification, refer to => [ Upper Timing Chain Cover Bolt Tightening Sequence and Specification ].
8 Upper Timing Chain Cover
• Removing and installing, refer to => [ Upper Timing Chain Cover ] Upper Timing Chain Cover.
• Tightening sequence, refer to => [ Upper Timing Chain Cover Bolt Tightening Sequence and Specification ].
9 Gasket
• Replace if damaged.
10 O-ring
• Always replace.
• Coat with oil before installing.
11 Alignment Pins
• For centering the cover.
12 Lower Timing Chain Cover
• Removing and installing, refer to => [ Lower Timing Chain Cover ] Lower Timing Chain Cover.
13 Bolt
• Always replace.
• Tightening sequence and specification, refer to => [ Lower Timing Chain Cover Bolt Tightening Sequence and Specification ].
14 Seal
• For the vibration damper.
• Removing and installing, refer to => [ Vibration Damper Seal ] Service and Repair.
15 Plug
• Always replace.
Upper Timing Chain Cover Bolt Tightening Sequence and Specification
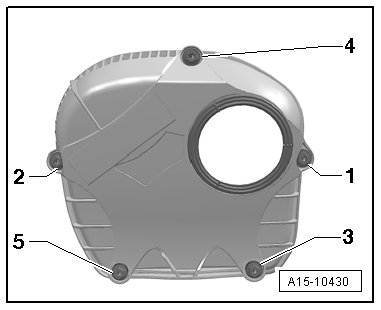
Special tools, testers and auxiliary items required
• Torque Wrench (V.A.G 1783)
• Open End Spanner Insert AF 10 (V.A.G 1783/1)
Procedure
- Tighten the bolts in 2 passes in sequence - 1 through 5 - as follows:
- Tighten the bolts by hand.
- Tighten the bolts to 9 Nm.
Lower Timing Chain Cover Bolt Tightening Sequence and Specification
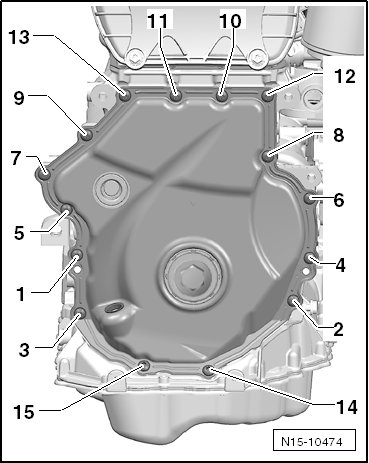
Special tools, testers and auxiliary items required
• Torque wrench (V.A.G 1331)
Procedure
- Tighten the new bolts in three passes in sequence - 1 through 15 - as follows:
1. Tighten the bolts by hand.
2. Tighten the bolts to 8 Nm.
3. Tighten the bolts an additional 45° (1/8) turn.