Center Console
Center Console
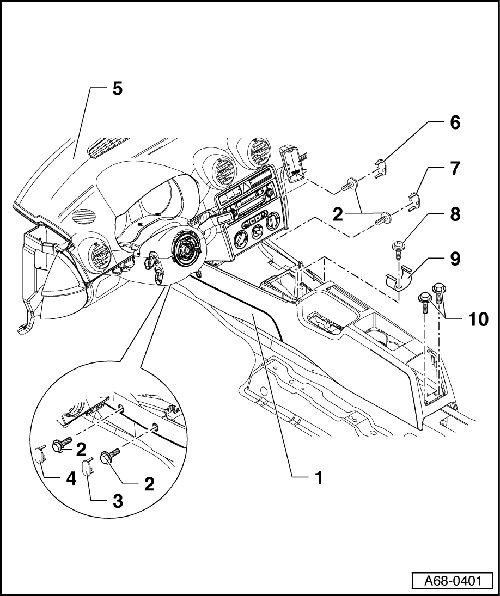
1 Center Console
Removing
• For clarity, the parking brake lever, securing frame with selector lever boot and accompanying cover are not shown.
• Identify connectors before disconnecting to prevent confusion or for better allocation.
- Position front seat as far back as possible.
- Switch off all electrical consumers.
- Remove ignition key.
- Engage parking brake.
Center Console with Ashtray:
- Unclip front compartment cover. Refer to => [ Storage Compartments, Version 1 with Smoking Package ] Storage Compartments, Version 1 With Smoking Package or => [ Storage Compartments, Version 2 with Smoking Package ] Storage Compartments, Version 2 With Smoking Package.
- Unclip storage compartment cover. Refer to => [ Storage Compartments, Version 1 with Smoking Package ] Storage Compartments, Version 1 With Smoking Package.
- Remove front ashtray => [ Storage Compartments, Version 1 with Smoking Package ] Storage Compartments, Version 1 With Smoking Package => [ Storage Compartments, Version 2 with Smoking Package ] Storage Compartments, Version 2 With Smoking Package.
Center Console without Ashtray:
- Unclip front storage compartment cover. Refer to => [ Storage Compartments, Version 1 with Non-Smoking Package ] Storage Compartments, Version 1 With Non-Smoking Package.
- Remove lining mat. Refer to => [ Storage Compartments, Version 1 with Non-Smoking Package ] Storage Compartments, Version 1 With Non-Smoking Package or => [ Storage Compartments, Version 2 with Non-Smoking Package ] Storage Compartments, Version 2 With Non-Smoking Package.
All:
- Unclip shift mechanism cover for manual or automatic transmission. Refer to => [ Shift Mechanism Cover and Securing Frame with Selector Lever Boot ] Shift Mechanism Cover and Securing Frame With Selector Lever Boot.
Manual Transmission:
- Remove cover with selector lever boot.
Automatic Transmission:
- Version I: remove the selector lever cover.
- Version II: remove the selector boot and cover.
All:
- Remove left and right grab handles. Refer to => [ Left and Right Grab Handle ] Left and Right Grab Handle.
- Unclip parking brake cover. Refer to => [ Parking Brake Cover ] Parking Brake Cover.
Center Console with Cigarette Lighter or 12 Volt Socket In Storage Compartment:
- Remove cigarette lighter or 12 Volt socket. Refer to => [ Cigarette Lighter ] Cigarette Lighter or => [ 12 Volt Socket ] 12 Volt Socket.
Mount with Cigarette Lighter and 12V Outlet Inside the Storage Compartment:
- Remove cigarette lighter and 12 Volt socket. Refer to => [ Cigarette Lighter and 12V Outlet Mount ] Cigarette Lighter and 12V Outlet Mount.
Center Console with Function Selector Switch II (E272) and Cigarette Lighter:
- Remove the Function Selector Switch II (E272)=> Communication 91 Removal and Installation.
All:
- Remove rear ashtray. Refer to => [ Rear Ashtray ] Rear Ashtray.
Center Console with Rear Storage Compartment:
- Remove rear storage compartment. Refer to => [ Rear Storage Compartment ] Rear Storage Compartment.
Mount with Left/Right Heated Rear Seat Control Module:
- Remove mount with left/right heated rear seat control module. Refer to => [ Mount with Left and Right Rear Heated Seat Control Module ] Mount With Left and Right Rear Heated Seat Control Module.
Mount for the Central Locking Switch
- Remove central locking switch mount. Refer to => [ Rear Central Locking Switch Mount ] Rear Central Locking Switch Mount.
Vehicles with Center Armrest:
- Remove center armrest. Refer to => [ Center Armrest ] Center Armrest.
All:
- Identify allocation of cover - 3 -, - 4 -, - 6 - and - 7 -.
- Using a flat head screwdriver, pry out cover - 3 -, - 4 -, - 6 - and - 7 -.
- Remove screws - 2 - (quantity: 4).
- Remove bolts - 8 - (quantity: 2).
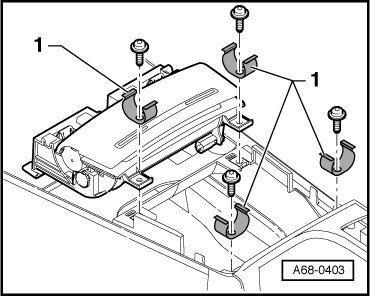
- Remove omega clips - 9 - (quantity: 2).
- Remove bolts - 10 - (quantity: 2).
- Tip rear center console upward.
- Disconnect electrical connectors that are still present.
- Remove center console - 1 -.
Installation
Installation is reverse of removal, but note the following:
- Install left and right grab handles before installing front storage compartment cover and storage compartment. Refer to => [ Left and Right Grab Handle ] Left and Right Grab Handle.
- Ensure omega clips are positioned correctly - 9 -.
- When installing covers - 3 -, - 4 -, - 6 - and - 7 -, ensure allocation is correct (all covers are constructed differently).
- Make sure the covers - 3 -, - 4 -, - 6 - and - 7 - correctly (audibly) engage.
2 Bolts
3 Nm
• Quantity: 4
3 Cover
• Clipped in
• Note location
4 Cover
• Clipped in
• Note location
5 Instrument Panel
6 Cover
• Clipped in
• Note location
7 Cover
• Clipped in
• Note location
8 Bolt
3.5 Nm
• Quantity: 2
9 Omega Clips
• Note location.
10 Bolts
3 Nm
• Quantity: 2
Cover with Selector Lever Boot, Removing and Installing
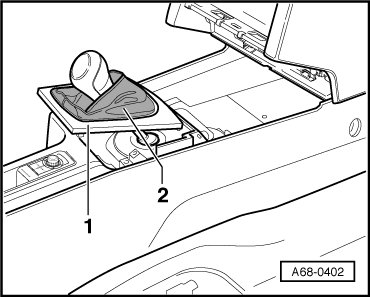
- Open ashtray in center console.
- Remove cover - 1 - with selector lever boot - 2 - upward.
To install, perform the steps used in removal in reverse order.
Version I: Removing and Installing the Selector Lever Cover
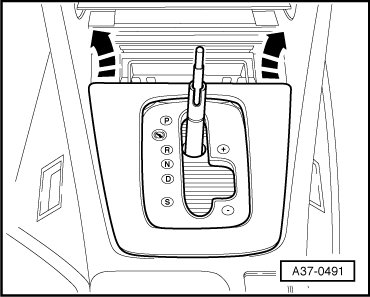
- Open ashtray in center console.
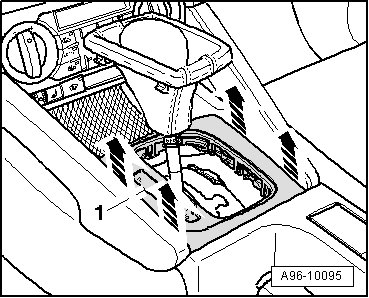
- Remove selector lever cover upward - arrows -.
To install, perform the steps used in removal in reverse order.
Version II: Removing and Installing the Selector Lever Boot and Cover
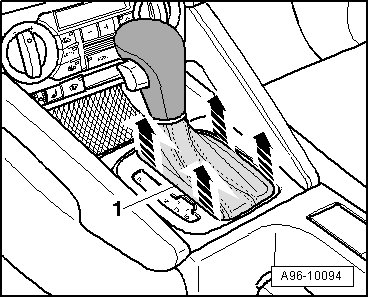
- Unclip selector lever boot - 1 - on both sides and remove upward - arrows -.
- Grasp through opening and remove cover - 1 - upward - arrows -.
- Disconnect electrical connector.
To install, perform the steps used in removal in reverse order.
Omega Clips, Installation Location
1. Omega clips