Subframe Overview
Subframe Overview
• Welding and straightening work on supporting or wheel carrying components of the suspension is not permitted.
• Always replace self-locking nuts.
• Always replace corroded bolts/nuts.
• Bonded rubber bushings can only be turned to a limited extent. Therefore, the threaded connections of the components with bonded rubber bushings should only be tightened when the wheel bearing housing is lifted (curb weight position. Refer to => [ Front Axle, Lifting to Curb Weight Position ] Front Axle, Lifting to Curb Weight Position.
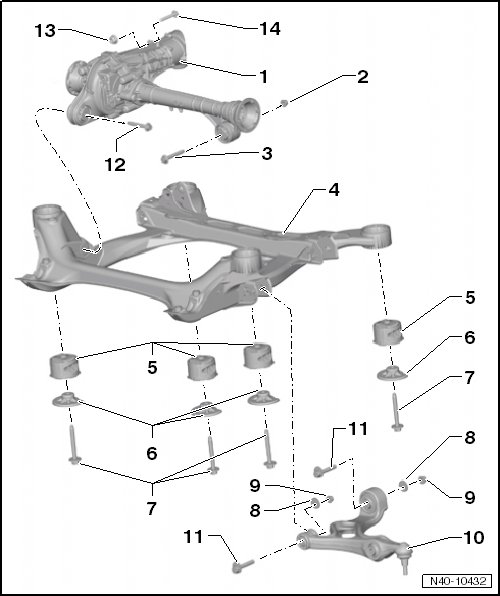
1 Front Final Drive
2 Nut
• 90 Nm + 90° turn
• Always replace if removed.
3 Bolt
• Always replace if removed.
4 Subframe
• Securing, refer to => [ Subframe, Securing ] Description and Operation.
• Removing and Installing, refer to => [ Subframe ] Subframe.
• Replacing, bonded rubber mount in the forward direction of travel, refer to => [ Subframe Bonded Rubber Bushing, in the Forward Direction of Travel ] Subframe Bonded Rubber Bushing, in the Forward Direction of Travel.
• Replacing, bonded rubber mount in the backward direction of travel, refer to => [ Subframe Bonded Rubber Bushing, in the Backward Direction of Travel ] Subframe Bonded Rubber Bushing, in the Backward Direction of Travel.
5 Bonded Rubber Mount
• Removal and installation, in the forward direction of travel, refer to => [ Subframe Bonded Rubber Bushing, in the Forward Direction of Travel ] Subframe Bonded Rubber Bushing, in the Forward Direction of Travel.
• Removal and installation, in the backward direction of travel, refer to => [ Subframe Bonded Rubber Bushing, in the Backward Direction of Travel ] Subframe Bonded Rubber Bushing, in the Backward Direction of Travel.
6 Thrust Washer
• The opening points opposite the direction of travel.
• Only V8 TDI
• For the correct allocation, refer to the Electronic Parts Catalog.
7 Bolt
• 120 Nm + 180° turn
• Always replace if removed.
8 Eccentric Washer
• Inner bore with tab.
9 Nut
• 170 Nm
• Always replace if removed.
10 Lower Control Arm
• Removing and Installing, refer to => [ Lower Control Arm ] Lower Control Arm.
• Conical pin must be free of grease and oil.
• If necessary, clean using dry rag, do not use cleaning agents.
11 Eccentric Bolt
• Perform a vehicle alignment after loosening.
• Do not turn more than 90° right or left (that is smallest to largest possible adjustment).
12 Bolt
• 90 Nm + 90° turn
• Always replace if removed.
13 Nut
• 90 Nm + 90° turn
• Always replace if removed.
14 Bolt
• Always replace if removed.