Heater Unit
Heater Unit
Special tools, testers and auxiliary items required
• Drip Tray For Shop Crane (VAS 6208)
• Hose Clamps Up To 40 mm Diameter (3093)
• Torque Wrench (V.A.G 1331)
• Compressed air gun, commercially available
Removing
• To improve accessibility, additional components such as the engine cover must be removed (depending on engine version).
- Remove the instrument panel..
- Loosen the clips- 2 - and remove the intermediate defrost piece - 1 - from heater and A/C unit.
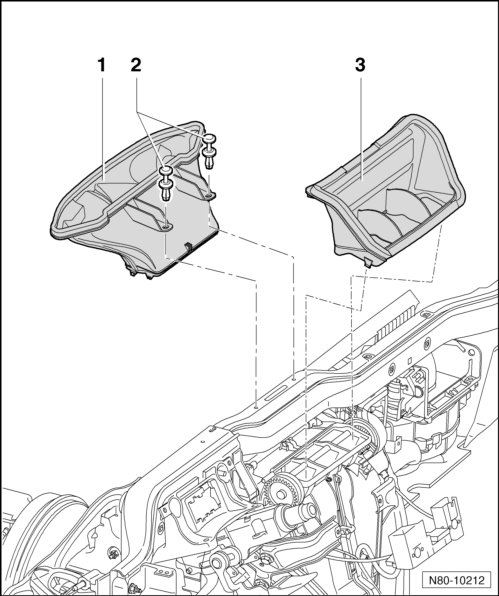
- Remove the intermediate piece - 3 - from the heater and A/C unit.
- Remove the subframe..
- Remove the rear channels from the right and left footwells. Refer to => [ Rear Footwell Channel ] Rear Footwell Channel
- Place (VAS 6208) under the engine.
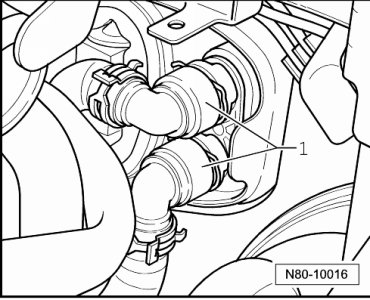
- Mark the coolant hoses - 1 -.
Contact with hot engine coolant can cause severe scalding.
Coolant temperature can be above 100 °C (212° F) with a warm engine. The cooling system is under pressure.
If necessary, reduce pressure and temperature before repairs.
- Clamp the coolant hoses - 1 - using the (3093) and remove the coolant hoses from the heater core.
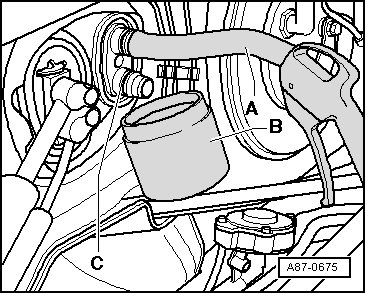
- Connect a section of hose - A - to the upper connection on the heater core.
- Hold a container - B - under the lower connection - C -.
- Using a compressed air gun, carefully blow residual coolant out of heater core at heater core connection.
- Cover the carpet inside the passenger compartment with waterproof foil and water absorbing paper.
• When removing the bolts, make note of the lengths and allocation.
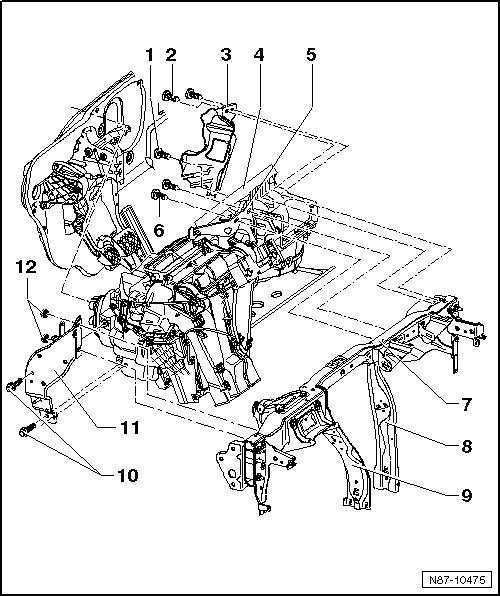
1 Screw
• 4.5 +/- 0.7 Nm
2 Screws
• Quantity: 2
• 4.5 +/- 0.7 Nm
3 Cable Bracket
4 Heater Unit
Removing
All cable ties opened or cut during removal of the A/C system must be reinstalled at the same locations during installation.
The heater wiring harness is removed with the heater.
The tunnel braces - 8 - and - 9 - are welded to the assembly carrier - 7 -.
- Remove the subframe..
- Disconnect the connectors from the heater.
- Remove the bolts - 6 - and - 5 -.
- Remove the bolts - 10 - and nuts - 12 - and bracket - 11 -.
- Remove the bolts - 1 - and - 2 - from the cable bracket - 3 -.
• All cable ties opened or cut during removal of the A/C system must be reinstalled at the same locations during installation.
• Pull the heater on the driver side slightly from the bulkhead in order to access the bolt - 1 -.
• When removing heat unit, make sure the two coolant pipes of the heater core do not get caught and bent or damaged on plenum chamber or noise insulation pan.
• Observe wiring harness, individual electrical wiring connections may get damaged when pulling on harness.
- Remove the heater.
Installing
Installation is carried out in the reverse order while noting the following:
• A second technician is necessary to install the heater.
- When inserting heater unit, have the second technician guide the coolant pipes to heater core through the seal (from engine compartment). Refer to => [ Seal Between Heater and Engine Compartment ].
- Fill the coolant.
5 Bracket
6 Screws
• 8 Nm
7 Subframe
8 Right Support
• Secure it to the subframe.
9 Left Support
• Secure it to the subframe.
10 Screws
• Quantity: 2
• 9 +/- 1.3 Nm
11 Bracket
12 Nut
• Quantity: 2
• 9 +/- 1.3 Nm
Seal Between Heater and Engine Compartment
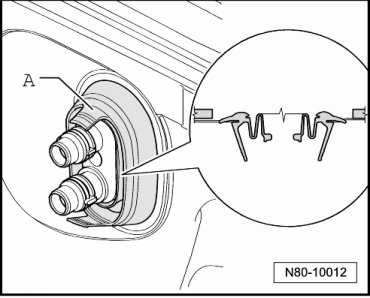
• Make sure the seal - A - is installed correctly.
Installing
- Install in reverse order of removal.