Subframe, Transverse Link and Tie Rod Overview
Subframe, Transverse Link and Tie Rod Overview
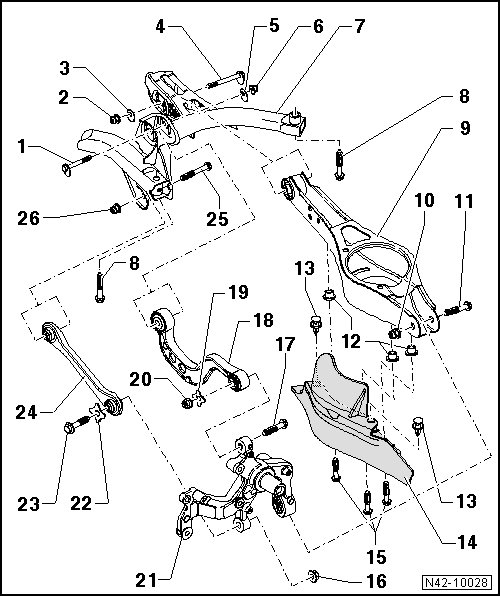
1 Eccentric Bolt
• For camber setting.
• After loosening, perform vehicle alignment. Refer to => [ Wheel Alignment, with Torsion Beam Rear Suspension ] Wheel Alignment, with Torsion Beam Rear Suspension or => [ Wheel Alignment, Vehicles with Multi-Link Rear Suspension ] Wheel Alignment, Vehicles with Multi-Link Rear Suspension.
2 Nut
• 95 Nm
• Self-locking
• Always replace if removed.
• Always tighten threaded connections in curb weight position. Refer to => [ Rear Axle, Lifting to Curb Weight Position ] Rear Suspension.
3 Eccentric Washer
• Inner bore with tab.
4 Eccentric Bolt
• For toe setting.
• After loosening, perform vehicle alignment. Refer to => [ Wheel Alignment, with Torsion Beam Rear Suspension ] Wheel Alignment, with Torsion Beam Rear Suspension or => [ Wheel Alignment, Vehicles with Multi-Link Rear Suspension ] Wheel Alignment, Vehicles with Multi-Link Rear Suspension.
5 Eccentric Washer
• Inner bore with tab.
6 Nut
• 95 Nm
• Self-locking
• Always replace if removed.
• Always tighten threaded connections in curb weight position. Refer to => [ Rear Axle, Lifting to Curb Weight Position ] Rear Suspension.
• Adjust the torque wrench (V.A.G 1332) to 80 Nm to tighten the nut.
• This tightening specification does only apply in conjunction with insert tool 18 mm (T10179).
7 Subframe
8 Bolt
• Follow the tightening sequence:
• 1. 90 Nm + 90° turn
• 2. Loosen one full turn (360°)
• 3. 90 Nm + 90° turn
• Always replace if removed.
9 Lower Transverse Link
• Removing and installing, refer to => [ Lower Transverse Link ] Lower Transverse Link.
10 Nut
• 90 Nm + 90° turn
• Self-locking
• Always replace if removed.
• Always tighten threaded connections in curb weight position. Refer to => [ Rear Axle, Lifting to Curb Weight Position ] Rear Suspension.
11 Bolt
• Always replace if removed.
12 Threaded Rivet
• M6
13 Expanding Rivet
14 Stone Protection Plate
• For the correct allocation, refer to the Electronic Parts Catalog (ETKA).
15 Bolt
• 8 Nm
16 Nut
• 130 Nm + 90° turn
• Self-locking
• Always replace if removed.
• Always tighten threaded connections in curb weight position. Refer to => [ Rear Axle, Lifting to Curb Weight Position ] Rear Suspension.
17 Bolt
• Always replace if removed.
• Always tighten threaded connections in curb weight position. Refer to => [ Rear Axle, Lifting to Curb Weight Position ] Rear Suspension.
18 Upper Transverse Link
• Removing and installing, refer to => [ Upper Transverse Link ] Upper Transverse Link.
19 Washer
20 Nut
• 130 Nm + 90° turn
• Self-locking
• Always replace if removed.
• Always tighten threaded connections in curb weight position. Refer to => [ Rear Axle, Lifting to Curb Weight Position ] Rear Suspension.
21 Wheel Bearing Housing
• Removing and installing, refer to => [ Wheel Bearing Housing ] Wheel Bearing Housing.
22 Washer
23 Bolt
• Always replace if removed.
• Always tighten threaded connections in curb weight position. Refer to => [ Rear Axle, Lifting to Curb Weight Position ] Rear Suspension.
24 Tie Rod
• Opened downward (the right and left tie rods are the same).
• For the correct allocation, refer to the Electronic Parts Catalog (ETKA).
• Removing and installing, refer to => [ Tie Rod ] Tie Rod.
25 Bolt
• Always replace if removed.
26 Nut
• 90 Nm + 90° turn
• Self-locking
• Always replace if removed.
• Always tighten threaded connections in curb weight position. Refer to => [ Rear Axle, Lifting to Curb Weight Position ] Rear Suspension.