Axle Beam, Subframe and Crossbrace Overview
Axle Beam, Subframe and Crossbrace Overview
• Welding and straightening work on supporting or wheel carrying components of the suspension is not permitted.
• Always replace self-locking nuts.
• Always replace corroded bolts/nuts.
• Bonded rubber bushings can only be turned to a limited extent. Therefore, the threaded connections of the components with bonded rubber bushings should only be tightened when the wheel bearing housing is lifted (curb weight position). Refer to => [ Rear Axle, Lifting to Curb Weight Position ] Rear Suspension.
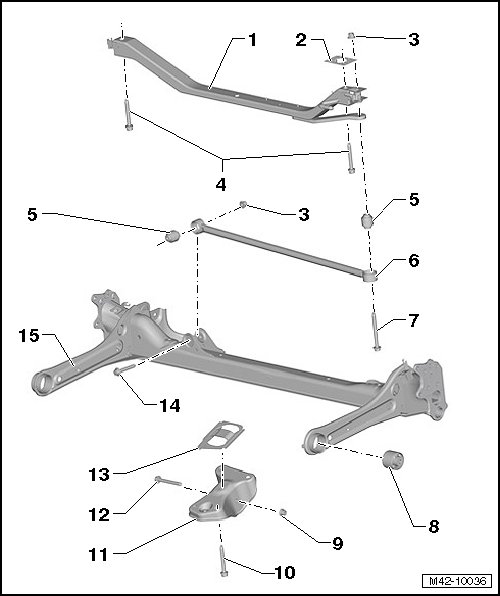
1 Subframe
2 Backing Plate
3 Nut
• 70 Nm + 90° turn
• Always replace if removed.
4 Bolt
• Follow the tightening sequence:
• 1. 90 Nm + 90° turn
• 2. Loosen one full turn (360°).
• 3. 90 Nm + 90° turn
• Always replace if removed.
5 Bonded Rubber Bushing
• Ejecting and pressing in, refer to => [ Crossbrace Bonded Rubber Bushing ] Service and Repair.
6 Crossbrace
• Removing and installing, refer to => [ Crossbrace ] Crossbrace.
• Servicing, refer to => [ Crossbrace Bonded Rubber Bushing ] Service and Repair.
7 Bolt
• Always replace if removed.
8 Bonded Rubber Bushing
• Removing and installing, refer to => [ Axle Beam Bonded Rubber Bushing ] Axle Beam Bonded Rubber Bushing.
9 Nut
• 70 Nm + 90° turn
• Always replace if removed.
10 Bolt
• 50 Nm + 90° turn
• Always replace if removed.
11 Mounting Bracket
12 Bolt
• Always replace if removed.
13 Cover
14 Bolt
• Always replace if removed.
15 Axle Beam
• Assembly surface and threaded hole for stub axle free of paint and dirt.
• Removing and installing, refer to => [ Axle Beam ] Axle Beam.