Power Distribution Module: Service and Repair
Vehicle Electrical System Control Module (J519)
• If the vehicle electrical system control module is being replaced, always perform the procedure => [ Replacing Vehicle Electrical System Control Module (J519) ] Replacing Vehicle Electrical System Control Module (J519) to read out the codes stored in the module
Removal
- Switch off the ignition and all electrical consumers and remove the ignition key.
- Remove the cover in the driver footwell.
- Remove the trim on the driver side.
- Press both latching mechanisms - arrows - and tilt the vehicle electrical system control module slightly downward.
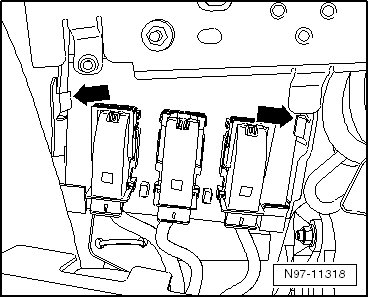
- Pull the vehicle electrical system control module downward and opposite the direction of travel and remove it from the bracket.
- Turn the vehicle electrical system control module while paying attention to the connected wires.
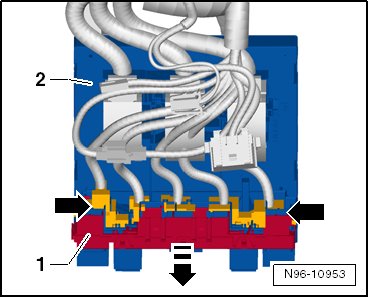
- Release both latching mechanisms - arrows - and remove the relay carrier - 1 - in the - direction of the arrow - from the vehicle electrical system control module - 2 -.
- Release and disconnect the three harness connectors - arrows -.
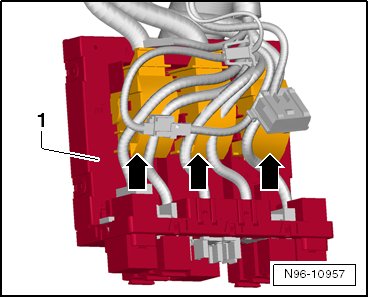
- Remove the vehicle electrical system control module - 1 -.
Installation
Installation is performed in the reverse order of removal. Note the following:
- Insert the vehicle electrical system control module (J519) first with the back of the module into the bracket and then push it up until it audibly latches in the bracket.
• During installation, ensure secure latching of the vehicle electrical system control module in the bracket.
- Connect the 3 harness connectors - arrows - to the vehicle electrical system control module and lock it in place.
- Connect the relay carrier - 1 - to the vehicle electrical system control module - 2 - and latch it in place.