Rear Disc Brake Assembly Overview, Multi-Link Rear Axle
Rear Disc Brake Assembly Overview, Multi-Link Rear Axle
• After replacing brake pads, depress brake pedal firmly several times with vehicle stationary so that the brake pads are properly seated in their normal operating position.
• Use Brake Charger/Bleeder Unit (VAS 5234) to extract brake fluid from brake fluid reservoir.
• Before removing a brake caliper or disconnecting a brake hose, the brake pedal loading device (V.A.G 1869/2) should be installed (relieve pressure).
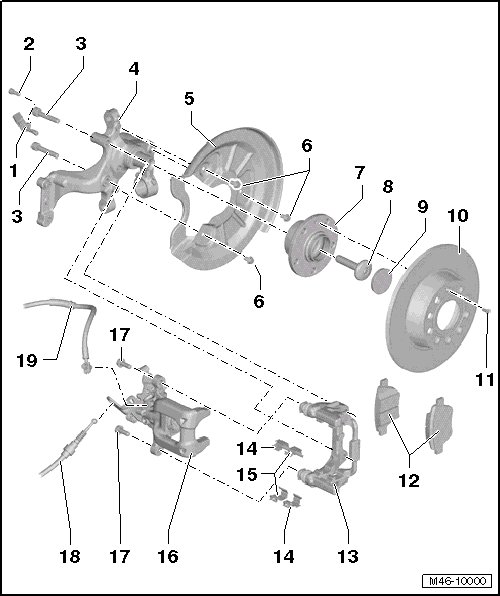
1 Rear ABS Wheel Speed Sensor
• Clean the inside of the hole and coat it with hot bolt paste (G 052 112 A3) before installing the sensor.
• Removing and installing, refer to => [ Rear Wheel Speed Sensor, Multi-Link Suspension ] Rear Wheel Speed Sensor, Multi-Link Suspension.
2 Bolt
• 8 Nm
3 Bolt
• 90 Nm + 90° turn
• Always replace if removed
4 Axle Beam
• Removing and installing
• For the correct allocation, refer to the Electronic Parts Catalog (ETKA).
5 Brake Cover Plate
• Removing and installing, refer to => [ Cover Plate ] Cover Plate.
6 Bolt
• 12 Nm
• M6 x 12
• Quantity: 4
7 Wheel Bearing Unit
• Removing and installing
• For the correct allocation, refer to the Electronic Parts Catalog (ETKA).
8 Bolt
• Always replace if removed
• Removing and installing
• For the correct allocation, refer to the Electronic Parts Catalog (ETKA).
9 Cover
• Removing and installing
• For the correct allocation, refer to the Electronic Parts Catalog (ETKA).
10 Brake Disc
• Diameter: 272 mm
• Thickness: 10 mm
• Wear limit: 8 mm
• Removing and installing, refer to => [ Brake Disc ] Brake Disc
• Checking, thorough and precise maintenance.
• For the correct allocation, refer to the Electronic Parts Catalog (ETKA).
• Do not use excessive force to separate the brake rotor from the wheel hub. If necessary, use rust penetrant, otherwise the brake rotors could be damaged.
11 Bolt
• 4 Nm
• For securing the brake disc.
12 Brake Pads
• Thickness: 12 mm without backing plate.
• Wear limit: 2 mm without backing plate.
• Checking thickness.
• Always replace on both axles.
• Removing and installing, refer to => [ Brake Pads ] Brake Pads.
13 Brake Carrier with Different Guide Pins and Protective Cap
• Removing and installing, refer to => [ Brake Carrier ] Brake Carrier.
• Supplied as an assembled replacement part with sufficient grease on guide pins.
• If protective caps or guide pins are damaged use repair kit. Use supplied grease packet to lubricate guide pins.
14 Anti-Rattle Spring
• Always replace when pads are replaced
• The brake pad retaining plates are different, they can only be installed diagonally to each other.
• For the correct allocation, refer to the Electronic Parts Catalog (ETKA).
15 Anti-Rattle Spring
• Always replace when pads are replaced.
• The brake pad retaining plates are different, they can only be installed diagonally to each other.
• For the correct allocation, refer to the Electronic Parts Catalog (ETKA).
16 Brake Caliper
• Do not unscrew brake hose when replacing brake pad.
• Removing and installing, refer to => [ Brake Caliper ] Brake Caliper.
• Servicing, refer to => [ Rear Brake Caliper Assembly Overview ] Rear Brake Caliper Assembly Overview.
• Adjust the parking brake after performing service work or replacing it, refer to => [ Parking Brake, Adjusting, with Disc Brakes ] Parking Brake, Adjusting, with Disc Brakes.
17 Bolt
• 35 Nm
• Self-locking
• Always replace if removed.
• Quantity: 2
18 Parking Brake Cable
• Both tabs must be engaged in the brake caliper bracket.
• Adjusting the parking brake, refer to => [ Parking Brake, Adjusting, with Disc Brakes ] Parking Brake, Adjusting, with Disc Brakes.
19 Brake Hose
• With banjo bolt and seals.
• 35 Nm