Fuel System, Checking For Leaks
Fuel System, Checking for Leaks
=> [ Fuel System Leak Test ]
=> [ EVAP System Function Overview ]
=> [ Leak Detection Pump, Checking Vacuum Supply ]
Special tools, testers and auxiliary items required
• Fuel System Tester (smoke tester) (KLI 9210)
• Hose Adapter (KLI 9210/55-1)
• Vehicle Diagnostic Tester
• Hose Clamps Up to 25 mm Dia (3094)
Test Conditions:
• A leak was detected by the Leak Detection Pump (LDP) (V144).
• Guided fault finding was performed using the vehicle diagnostic tester.
(KLI 9210) Preparation:
• Depending on the version, the appearance of the (KLI 9210) may vary.
- Check the (KLI 9210) to determine whether there is enough fluid in the smoke generator.
- Set valve - D - to "Hold".
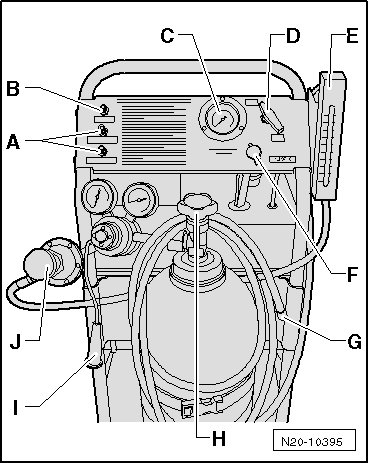
- Open the nitrogen bottle - H -.
- Connect the measuring hose - G - to the self-test connection - B -.
- Set valve - D - to "Test".
- Using pressure reducer - J -, adjust the pressure to 10 in. H2O (25 mbar).
- Set valve - D - to "Hold".
- The pressure must now be maintained a minimum of 2 minutes. If the pressure is not maintained, check the tester.
Fuel System, Checking for Leaks:
- Connect the adapter hose (KLI 9210/55-1) to the ventilation line - A - as shown.
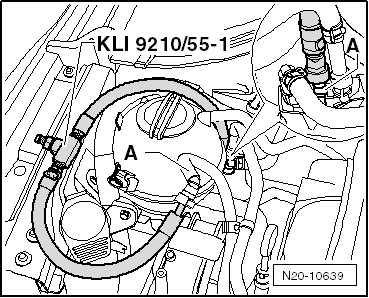
- Connect the measuring hose - G - from the (KLI 9210) to the (KLI 9210/55-1).
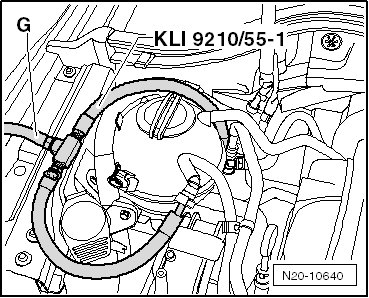
- Set valve - D - to "Hold".
- Connect the vehicle diagnostic tester to the vehicle.
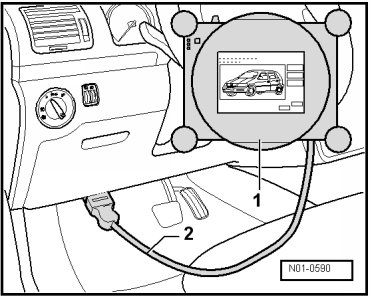
- Start the engine and run at idle speed.
- Select the Guided Functions operating mode on the vehicle diagnostic tester.
- Select the "Check tank ventilation system for leaks" guided function.
- Activate the test.
- While the test runs, observe the pressure gauge on the (KLI 9210).
• The LDP must pump the fuel system pressure up to at least 7 in. H2O (18 mbar).
The minimum pressure is not reached, but the pressure reached does not decrease:
- Turn the ignition off and perform the pressure retention test, refer to. If no drop in pressure is detected: check the vacuum supply from the LDP. Refer to => [ Leak Detection Pump, Checking Vacuum Supply ].
The minimum pressure is not reached and the pressure reached decreases immediately:
- Clamp off the hose to the Evaporative Emission (EVAP) canister purge regulator valve 1 (N80) using (3094)- arrow -.
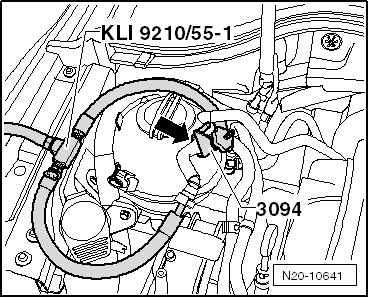
- Repeat the test. If the minimum pressure is now reached: replace the EVAP canister purge regulator valve 1.
The minimum pressure is not reached again and the pressure reached decreases immediately:
- There is a leak in the fuel system: perform the "fuel system leak test". Refer to => [ Fuel System Leak Test ].
If the minimum pressure is reached, turn the ignition off.
The valve in the LDP is now closed and the pressure is maintained.
- Observe the pressure gauge:
If the pressure does not decrease, perform a pressure retention test to locate any possible pinhole leaks.
If the pressure decreased, clamp off hose to the EVAP canister purge regulator valve 1 using (3094) - arrow -.
- If pressure now no longer falls, replace the EVAP canister purge regulator valve 1.
If the pressure still decreases, perform the "fuel system leak test". Refer to => [ Fuel System Leak Test ].
Pressure Retention Test
- Set valve - D - to "Test". Increase present pressure up to 10 in. H2O (25 mbar).
- Observe the pressure gauge - C - and flow meter - E -. The fuel system is filled if the flow quantity decreases and the pressure increases to 10 in. H2O (25 mbar).
• Depending on the level in the fuel tank, this procedure may take up to 3 minutes.
- After the pressure has stabilized, set valve - D - to "Hold".
• After 5 minutes the pressure must not drop below H2O (20 mbar) drop.
If the pressure is not maintained for 5 minutes, the leak should be localized as follows:
- First check the EVAP canister purge regulator valve 1 for leaks. Clamp off the hose to the EVAP canister purge regulator valve 1 using (3094) - arrow -.
- Repeat the pressure test by resetting valve - D - to "Test".
- Observe the pressure gauge - C - and flow meter - E -. The fuel system is filled if the flow quantity decreases and the pressure increases to 10 in. H2O (25 mbar).
- After the pressure has stabilized, set valve - D - to "Hold".
- If pressure now no longer falls, replace the EVAP canister purge regulator valve 1.
If the pressure still decreases, perform the "fuel system leak test". Refer to => [ Fuel System Leak Test ].
After completing the work, perform the "Check tank ventilation system for leaks" guided function using the vehicle diagnostic tester.
Fuel System Leak Test
Test Conditions:
• Procedure for "Fuel system, checking for leaks" performed. Refer to => [ Fuel System, Checking for Leaks ] Fuel System, Checking for Leaks.
• (KLI 9210) with (KLI 9210/55-1) connected to the vehicle.
- Connect the (KLI 9210) to the vehicles battery.
- Remove the rear right wheel housing liner.
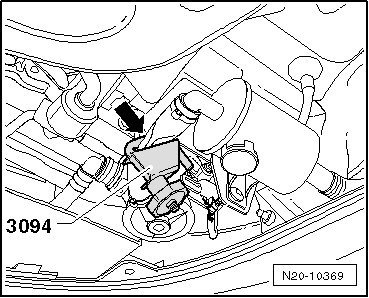
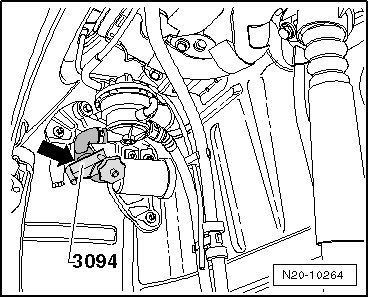
- Clamp off the hose - arrow - between the Leak Detection Pump (LDP) (V144) and the air filter using (3094).
Eos:
GTI:
- Set valve - D - to "Test".
- Observe the pressure gauge - C - and flow meter - E -. The fuel system is filled if the flow quantity decreases and the pressure increases to 10 in. H2O (25 mbar).
- After the pressure has stabilized, set valve - D - to "Hold".
• After 5 minutes the pressure must not drop below H2O (20 mbar) drop.
- If the pressure no longer decreases, replace the LDP.
If the pressure is not maintained for a minimum of 5 minutes or if no pressure is built up, localize the leak as follows:
- Fill the fuel system with smoke by setting valve - D - to "Test".
- While the fuel system is being filled, press the smoke generator button - I - for approximately one minute.
The fuel system is now under pressure and filled with smoke.
- Check all fuel system lines and hoses for escaping smoke. Also check fuel tank sealing cap.
• Illuminate components and hoses with a strong flood light, the smoke will be more visible.
• To check for leaks at accessible locations, also use ultrasonic measuring device or commercially available leak detection spray.
• Depending on how long the fault finding lasts, the smoke generator button may need to be pressed again. This ensures there is enough smoke present in the fuel system.
• To check the fuel pump and fuel filter flange, the assembly openings in the vehicle interior must be opened.
- Replace leaking hoses or components.
After completing the work, perform the "Check tank ventilation system for leaks" guided function using the vehicle diagnostic tester.
EVAP System Function Overview
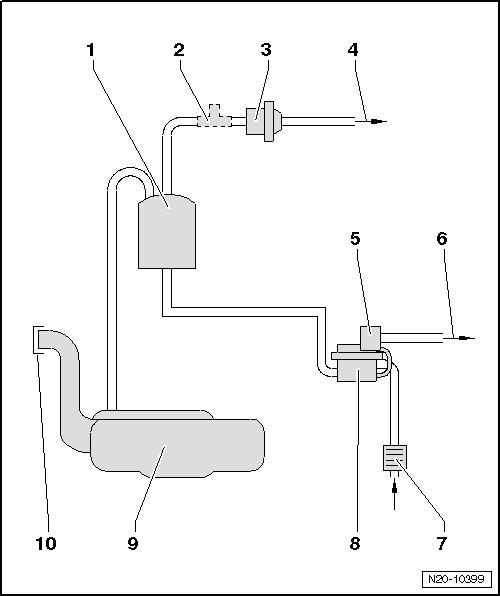
1 Evaporative Emission (EVAP) Canister
2 Adapter Hose (KLI 9210/55-1), Installed Location
• Used with the leak test in fuel system.
3 Evaporative Emission (EVAP) Canister Purge Regulator Valve 1 (N80)
4 Vent Line
• To the throttle valve control module (J338).
5 Solenoid Valve
• For the Leak Detection Pump (LDP).
6 Vacuum Line
• To the intake manifold.
7 Air Filter Housing
• For the LDP.
8 Leak Detection Pump (LDP) (V144)
9 Fuel Tank
10 Cap
Leak Detection Pump, Checking Vacuum Supply
Special tools, testers and auxiliary items required
• Turbocharger tester (V.A.G 1397A)
• T-piece (251 201 346)
• 6 mm Diameter Hose
• Leak Detection Pump (LDP) (V144) installed location:
• GTI: In the right rear wheel housing under the wheel housing liner.
• Eos: Behind the right rear wheel.
GTI:
- Remove the rear right wheel and wheel housing liner.
- Disconnect the vacuum line - 1 - from the LDP.
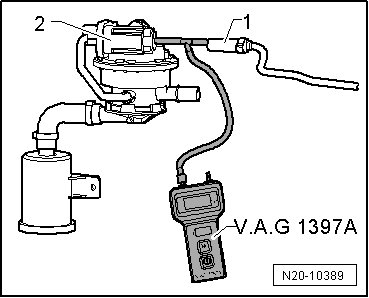
- Connect the (V.A.G 1397A) with the T-piece and 6 mm diameter hose between the vacuum line - 1 - and LDP - 2 -.
Eos:
- Disconnect the vacuum line - 1 - from the LDP.
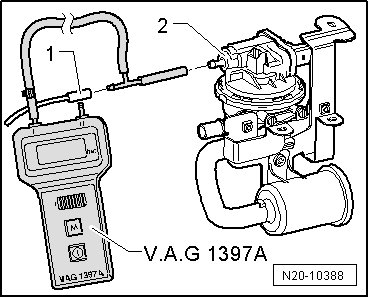
- Connect the (V.A.G 1397A) with the T-piece and 6 mm diameter hose between the vacuum line - 1 - and LDP - 2 -.
Continuation for all Vehicles:
- Turn on measuring range I (absolute pressure measurement).
- Connect the vehicle diagnostic tester and start the engine.
- Select the Guided Functions operating mode on the vehicle diagnostic tester.
- Select the "Check tank ventilation system for leaks" guided function.
- Activate the test.
- While the test is running, observe the display on the (V.A.G 1397A).
• The pressure must pulsate and must not rise above 0.700 bar (absolute pressure) during the test.
- If the pressure rises above 0.700 bar during the test, the vacuum supply is too low. Check the vacuum line to the intake manifold for kinks or blockages.