EVAP System Overview
EVAP System Overview
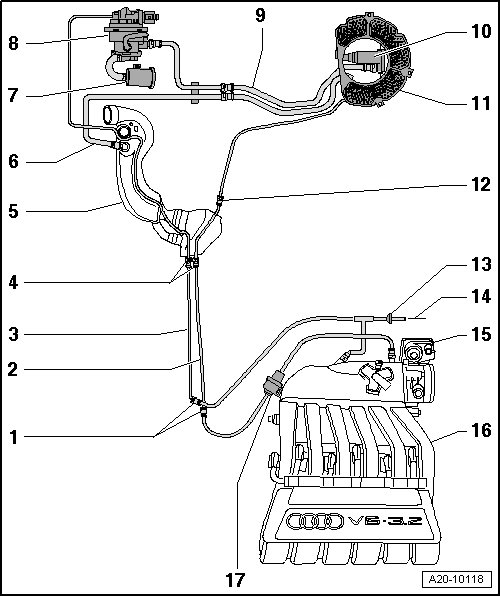
1 Separating Point
• On the right front in the engine compartment under the coolant expansion tank.
2 Vent Line
• White.
• From the Evaporative Emission (EVAP) canister to the EVAP canister purge regulator valve.
• Installed position: Secured on the right side of the underbody and on the fuel tank.
3 Vacuum Line
• Green.
• From the intake manifold to the Leak Detection Pump (LDP).
• Installed position: Secured on the right side of the underbody and on the fuel tank.
4 Separating Point
• On the right side in the front of the fuel tank in the area of the fuel filter.
5 Fuel Filler Tube
6 Vent Line
• From the filler tube connection to the EVAP canister.
7 Air Filter Housing
• For the LDP.
8 Leak Detection Pump (LDP) (V144)
• Component location: Under the wheel housing liner in the right rear wheel housing.
• checking, refer to.
• Removing and installing, refer to => [ Leak Detection Pump ] Service and Repair.
9 Connecting Line
• From the LDP to the EVAP canister.
• Clipped on the bracket.
10 Evaporative Emission (EVAP) Filter
11 Evaporative Emission (EVAP) Canister
• Component location: Bottom of the spare tire wheelwell.
• Removing and installing, refer to => [ EVAP Canister ] Service and Repair.
12 Separating Point
• On the right side behind the fuel tank.
13 Non Return Valve
• Black connection faces toward the T-piece.
14 from Exhaust Flap Valve 1 (N321)
• Refer to => [ Individual Components of the Vacuum Control
Unit ] Service and Repair.
15 Throttle Valve Control Module (J338)
16 Intake Manifold
17 Evaporative Emission (EVAP) Canister Purge Regulator Valve 1 (N80)
• Checking, refer to.