Front Part Assembly Overview
Front Part Assembly Overview
• Overview describes removal and installation of front part for vehicles through June 2005. Removal and installation applies to vehicles from July 2005, except slight changes.
• Front fender and front bumper cover can only be removed together from vehicle as so-called front part.
• It is necessary that tightening sequence of bolts - 4 - is observed to ensure surface alignment and joint.
• Front part must be installed free of stress.
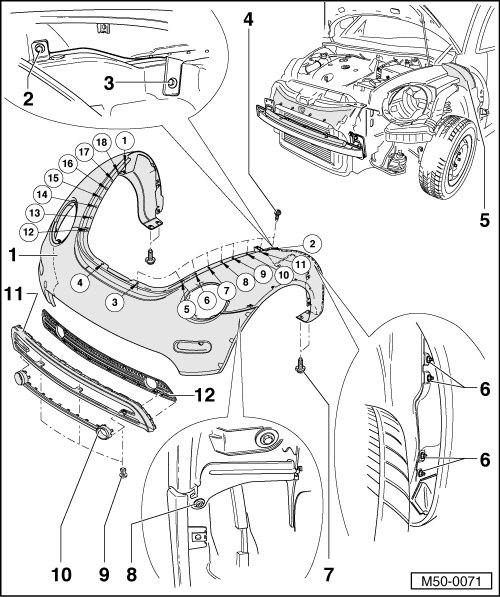
1 Front Part
• Removing:
- Remove headlamps.
- Remove wheel housing liners. Refer to => [ Front Wheel Housing Liner ] Service and Repair.
- Remove bolts from wheel housings - 2 -, - 3 - and - 8 -
- Disconnect harness connectors for turn signals and fog lights.
- Disconnect hose connector in vehicles with headlamp washer system.
- Remove nuts - 6 -.
- Remove expanding clips - 9 -.
- Remove bolts - 4 - and - 7 -.
- Pull left and right front part outward off threaded pins and remove forward from vehicle with aid from two technicians.
• Installing:
- Before reattaching front part, adhere anti-friction foil - 11 - on contact areas, or check condition of old anti-friction foil.
- When installing front part, ensure proper seating of insulation - 5 - on both sides of longitudinal members and make sure it engages properly on headlamp bracket.
2 Bolt
• With nut
• 6 Nm
3 Combination Bolt
• 6 Nm
4 Bolt
• Qty. 18
• 7.5 Nm
• Insert with locking fluid (D 185 400 A2)
• Note tightening sequence
5 Insulation
6 Hex Nut
• 6 Nm
7 Bolt
• 7.5 Nm
• Qty. 4
• Insert with locking fluid (D 185 400 A2)
8 Bolt
• Qty. 2
• Insert with locking fluid (D 185 400 A2)
9 Expanding Clip
• Qty. 3
• To remove, press spreader pin through
10 Face Plate
11 Front Spoiler
12 Ventilation Grid