Front Fender Assembly Overview
Front Fender Assembly Overview
• Overview describes removal and installation of front fender for vehicles through June of 2005. Removal and installation applies to vehicles from July 2005, except slight changes.
• Fenders are part of front part and are removed together. Refer to => [ Front Part Assembly Overview ] Front Part Assembly Overview.
• Observe tightening sequence of bolts - 2 -, - 4 -, - 7 - to ensure surface alignment and joint.
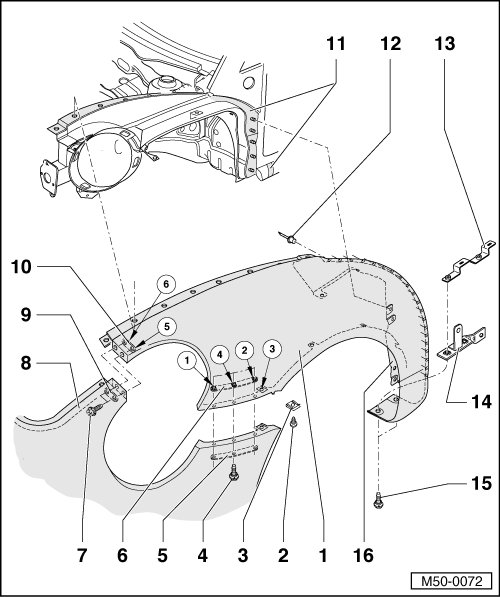
1 Fender
• Removing:
- Remove headlamps.
- Remove front part. Refer to => [ Front Part Assembly Overview ] Front Part Assembly Overview.
- Remove bolts - 11 - and - 4 -.
• Installing:
- Before reattaching front part, adhere anti-friction foil - 11 - on contact areas, or check condition of old anti-friction foil.
2 Bolt
• Insert with locking fluid (D 185 400 A2)
• Note tightening sequence
3 Clip
4 Bolt
• Insert with locking fluid (D 185 400 A2)
• Qty. 3x
• 6 Nm
• Note tightening sequence
5 Base Plate
6 Base Plate
• With welded captive nuts
7 Bolt
• Insert locking fluid (D 185 400 A2)
• Qty. 2x
• 6 Nm
• Note tightening sequence
8 Front Bumper Cover
9 Base Plate
• With holes
10 Base Plate
• With welded captive nuts
11 Anti-friction Foil
• Check condition, replace if necessary
12 Pop Rivet
• Qty. 19x
13 Bracket (Convertible)
• Bolted to outside of sidemember
14 Bracket
• Bolted to outside of sidemember
15 Bolt
• Qty. 2x
• 6 Nm
16 Sealing Part
• Riveted into fender