Evaporator Core: Service and Repair
Evaporator
- Remove the heater and A/C unit:
• Vehicles with Climatronic, refer to => [ Heating and A/C Unit, Climatronic ] Heating and A/C Unit, Climatronic.
• Vehicles with Climatic, refer to => [ Heating and A/C Unit, Climatic ] Removal and Replacement.
- Disassemble the heater and A/C unit:
• Vehicles with Climatronic, refer to => [ Heater and A/C Unit, Climatronic ] Heater and A/C Unit, Climatronic.
• Vehicles with Climatic, refer to => [ Heating and A/C Unit, Climatic ] Heating and A/C Unit, Climatic.
- Disassemble the evaporator housing. Refer to => [ Evaporator Housing ] Evaporator Housing.
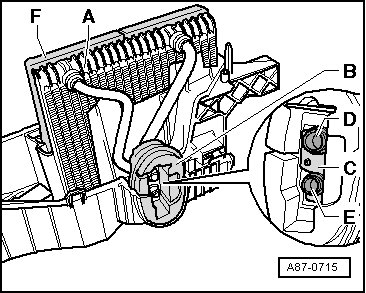
- Remove the evaporator - A - from the evaporator housing lower section.
• Check the condensation water drain before installing the evaporator. Clean the drain if necessary.
• Before inserting evaporator, clean evaporator housing and the evaporator if necessary.
- When inserting evaporator - A - into lower section of evaporator housing and when assembling both housing halves, make sure the seal - F - is not damaged.
- Check the seal - F - before installing the evaporator. It must glued all the way around.
- Mount the bracket - C - and seal/insulation - B - on the evaporator connecting pipes - D - and - E -.
- Insert evaporator - A - into lower section of evaporator housing as shown in the illustration.
• After assembling both housing halves, check seal / insulation -B- for correct seating at pass-through for both refrigerant lines -D- and -E-.
• Check seating of bracket -C- on both refrigerant lines -D- and -E- for correct seating.
• If heat protection insulation -B- is missing or not installed correctly, it can cause reduced performance of the A/C system (change of adjusted control characteristics of expansion valve due to radiant heat).