A/C Compressor and Bracket Assembly Overview
A/C Compressor and Bracket Assembly Overview
Special tools, testers and auxiliary items required
• Torque wrench (5-50 Nm) or equivalent (VAG 1331 )
• The compressor bracket and related components can be removed and installed without having to open the refrigerant circuit.
• If it is necessary to open the refrigerant circuit, for example when replacing compressor, first extract A/C refrigerant using recycling/recovery unit Kent-Moore ACR4 => [ A/C Refrigerant System, Discharging ] A/C Refrigerant System, Discharging.
• Before carrying out any work on the A/C refrigerant system, refer to all CAUTIONS and WARNINGS in A/C refrigerant system safety measures => [ Safety Precautions ] Safety Precautions
• Ribbed belt, routing.
• Observe length of removed bolts and reinstall accordingly.
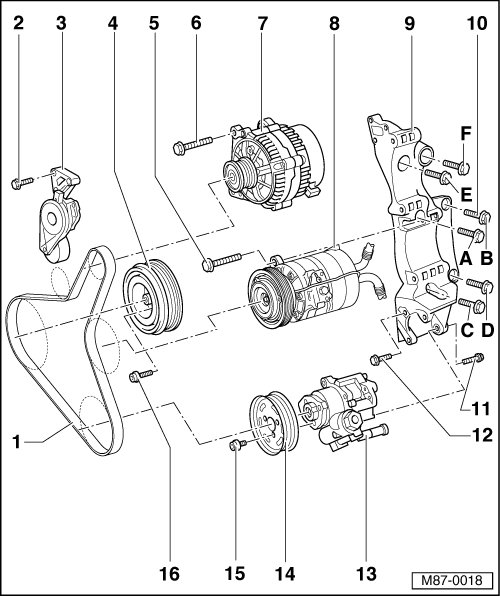
1 Ribbed belt
• Ribbed belt, routing.
2 Hex head bolts
• M8•45
• 25 Nm
• Qty.: 3
3 Ribbed belt tensioner
4 Ribbed belt pulley with harmonic balancer
5 Hex head bolts
• M10•112
• 45 Nm
• Qty.: 2
6 Hex head bolts
• M8•85
• Qty.: 2
7 Generator (GEN)
• Removing:
8 Compressor
• Sanden SD7-V16
• With A/C Clutch (N25)
• A/C Clutch (N25), servicing => [ A/C Clutch, Sanden Assembly Overview ] A/C Clutch, Sanden Assembly Overview
9 Bracket
Mounting for:
• Generator
• Compressor
• Power steering pump
Removing without opening refrigerant circuit:
- Remove ribbed belt
- Remove Generator (GEN)
- Remove power steering pump
- Remove bolts - 5 -
- Remove compressor - 8 - from bracket, swing away and secure in engine compartment with wire => [ A/C Compressor, Securing to Body ] A/C Compressor, Securing to Body.
- Remove bolts - 10 - (Qty.: 6)
- Remove compressor bracket from engine.
Installing:
- Install in reverse order of removal, noting the following:
- Loosely install and then and torque bolts torque bolts - 10 -in sequence to specified value, beginning with bolt - A -, then - B -, - C - and so on as illustrated.
- Ribbed belt routing
10 Hex head bolts
• M10•45
• 45 Nm
• Qty.: 6
• When installing bracket, torque bolts in sequence beginning with bolt - A -, then - B -, - C - and so on as illustrated.
11 Hex head bolts
• M8•40
12 Hex head bolts
• M8•40
13 Power steering pump
14 Ribbed belt pulley
15 Hex head bolts
• M8•14
• 25 Nm
• Qty.: 3
16 Hex bolts
• M8•37
• 10 Nm plus a quarter turn (90 degrees)
• Qty.: 4
Ribbed Belt, Routing
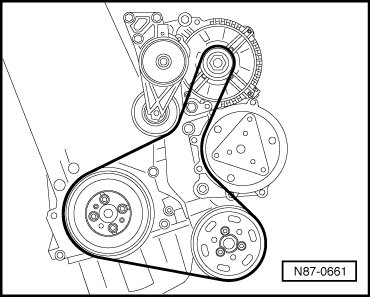
• When installing the belt ensure it is correctly seated in the pulley.