Installation
HEATING / AIR CONDITIONING: AIR CONDITIONING UNIT: INSTALLATION
1. INSTALL AIR CONDITIONING HARNESS ASSEMBLY
(a) Connect each connector.
(b) Engage each clamp to install the air conditioning harness assembly.
2. INSTALL AIR CONDITIONING DUCT SUB-ASSEMBLY
(a) Engage the 2 claws and install the air conditioning duct sub-assembly.
3. INSTALL NO. 1 AIR DUCT SUB-ASSEMBLY
(a) Engage the 2 claws to install the No. 1 air duct subassembly.
4. INSTALL BLOWER ASSEMBLY Installation
5. INSTALL ID CODE BOX (IMMOBILISER CODE ECU) (w/ Engine Immobiliser System) Installation
6. TEMPORARILY TIGHTEN AIR CONDITIONING UNIT ASSEMBLY
NOTICE:
* Be sure to support the air conditioning unit assembly when removing it because failure to do so may cause the bracket of the air conditioning unit assembly to break.
* When installing the air conditioning unit, eliminate static electricity by touching the vehicle body to prevent the components from being damaged.
(a) Temporarily tighten the air conditioning unit assembly with the bolt and nut.
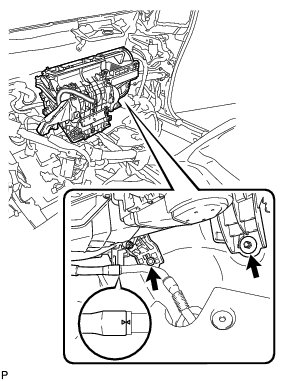
(b) Engage the drain cooler hose as shown in the illustration.
NOTICE:
Connect the drain cooler hose firmly to prevent water leaks.
7. INSTALL INSTRUMENT PANEL REINFORCEMENT ASSEMBLY
(a) Install the instrument panel reinforcement assembly with the 6 bolts [A].
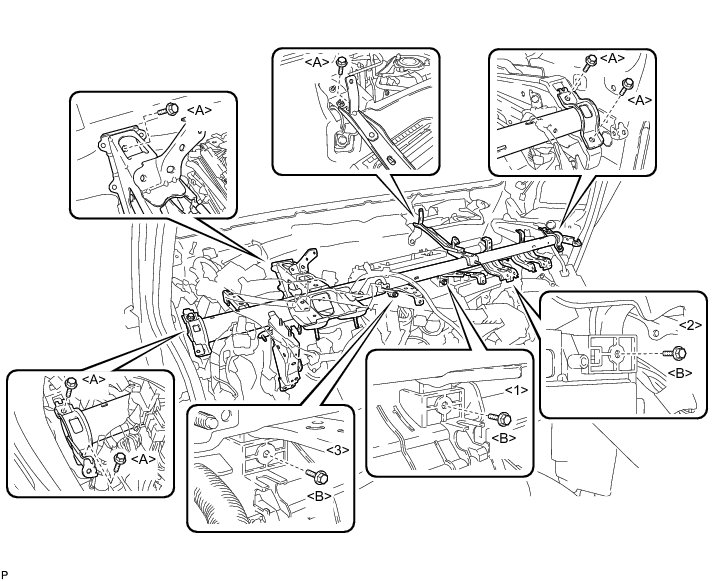
(b) Install the air conditioning unit assembly with the 3 bolts [B]
Bolt [B] - Torque : 9.8 Nm (100 kgf-cm, 87 in-lbf)
HINT
Tighten the bolts in the order shown in the illustration.
(c) Engage each clamp.
8. INSTALL AIR CONDITIONING UNIT ASSEMBLY
(a) Install the air conditioning unit assembly with the bolt and nut.
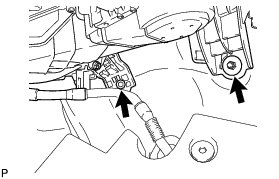
Bolt - Torque : 9.8 Nm (100 kgf-cm, 87 in-lbf)
Nut - Torque : 9.8 Nm (100 kgf-cm, 87 in-lbf)
9. INSTALL NO. 3 AIR DUCT SUB-ASSEMBLY
(a) Install the No. 3 air duct sub-assembly with the 2 nuts.
Torque : 9.8 Nm (100 kgf-cm, 87 in-lbf)
10. INSTALL LOWER DEFROSTER NOZZLE ASSEMBLY
(a) Engage the 6 claws and install the lower defroster nozzle assembly.
(b) Engage the clamp.
11. INSTALL DEFROSTER NOZZLE ASSEMBLY
(a) Install the defroster nozzle assembly as shown in the illustration.
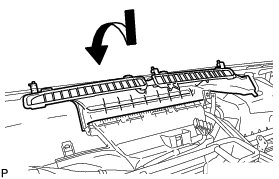
(b) Engage the 3 claws.
12. INSTALL NO. 3 SIDE DEFROSTER NOZZLE DUCT
(a) Install the No. 3 side defroster nozzle duct with the clip.
13. INSTALL NO. 2 INSTRUMENT PANEL BRACE SUB-ASSEMBLY
(a) Install the No. 2 instrument panel brace sub-assembly with the screw.
Torque : 4.0 Nm (41 kgf-cm, 35 in-lbf)
(b) Install the bolt and nut.
(c) Engage each clamp.
(d) Connect each connector.
(e) Install the 3 screws.
(f) Install the bolt and connect the earth wire.
Torque : 8.4 Nm (86 kgf-cm, 74 in-lbf)
14. INSTALL NO. 1 INSTRUMENT PANEL BRACE SUB-ASSEMBLY
(a) Install the No. 1 instrument panel brace sub-assembly with the screw.
Torque : 4.0 Nm (41 kgf-cm, 35 in-lbf)
(b) Install the bolt and nut.
(c) Connect the center airbag sensor connectors to the center airbag sensor assembly as shown in the illustration.
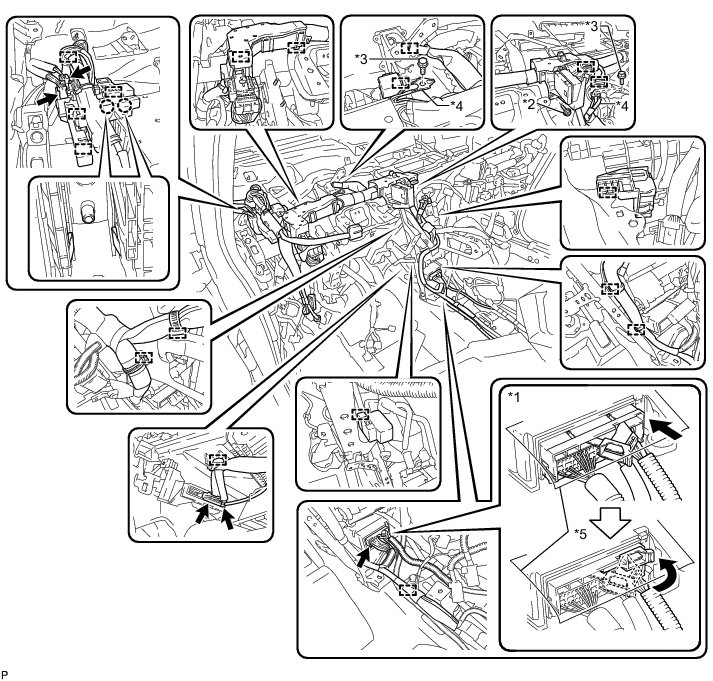
Text in Illustration
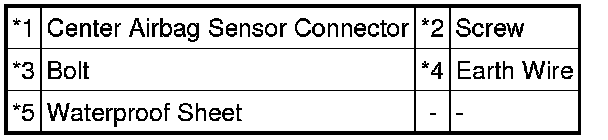
NOTICE:
When connecting any airbag connector, take care not to damage the airbag wire harness.
(d) Check that the waterproof sheet on the top of the center airbag sensor is not folded or deformed.
(e) Check that there is no looseness in the installation parts of the center airbag sensor assembly.
(f) Connect each connector.
(g) Engage each clamp and claw.
(h) Install the screw.
(i) Install the 2 earth wires with the 2 bolts.
Torque : 8.4 Nm (86 kgf-cm, 74 in-lbf)
15. INSTALL REAR NO. 1 AIR DUCT (w/ Rear Air Duct)
(a) Engage the 4 claws to install the rear No. 1 air duct.
16. INSTALL REAR NO. 3 AIR DUCT (w/ Rear Air Duct)
(a) Engage the 2 claws to install the rear No. 3 air duct.
(b) Engage the fastener to install the floor carpet to the original position.
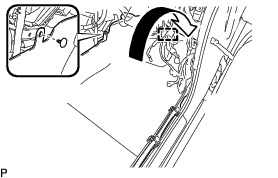
(c) Install the clip.
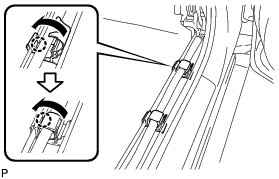
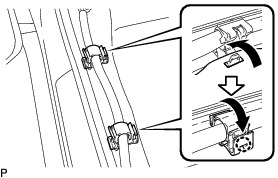
(d) Install the floor carpet to the original position and engage the 2 claws to close the 2 door scuff plate clamps as shown in the illustration.
17. INSTALL REAR NO. 2 AIR DUCT (w/ Rear Air Duct)
(a) Engage the 2 claws to install the rear No. 2 air duct.
(b) Engage the fastener to install the floor carpet to the original position.
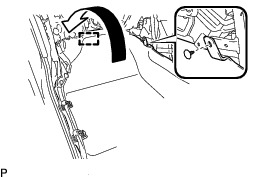
(c) Install the clip.
(d) Install the floor carpet to the original position and engage the 2 claws to close the 2 door scuff plate clamps as shown in the illustration.
18. INSTALL REAR NO. 4 AIR DUCT (w/ Rear Air Duct)
(a) Engage the 2 claws to install the rear No. 4 air duct.
19. INSTALL FRONT FLOOR CAUTION PLATE COVER (w/ Rear Air Duct)
(a) Engage the guide and claw to install the front floor caution plate cover.
20. INSTALL FRONT SEAT ASSEMBLY LH
for Manual Seat: Installation
for Power Seat: Installation
21. INSTALL FRONT SEAT ASSEMBLY RH
HINT
Use the same procedure as for the LH side.
22. INSTALL STEERING POST ASSEMBLY
Installation
23. INSTALL HEADUP DISPLAY (w/ Headup Display) Installation
24. INSTALL ECU INTEGRATION BOX RH Installation
25. INSTALL DRIVER SIDE JUNCTION BLOCK ASSEMBLY Installation
26. INSTALL VEHICLE APPROACHING SPEAKER CONTROLLER Installation
27. INSTALL LOWER INSTRUMENT PANEL SUB-ASSEMBLY
Installation
28. CONNECT OUTLET HEATER WATER HOSE
(a) Using pliers, grip the claws of the clip and slide the clip to connect the outlet heater water hose.
29. CONNECT INLET HEATER WATER HOSE
(a) Using pliers, grip the claws of the clip and slide the clip to connect the inlet heater water hose.
30. CONNECT AIR CONDITIONING TUBE AND ACCESSORY ASSEMBLY
(a) Remove the vinyl tape from the pipe.
(b) Sufficiently apply compressor oil to a new O-ring and the fitting surface of the air conditioning tube and accessory assembly.
Compressor oil:
ND-OIL 11 or equivalent
(c) Install the O-ring on the air conditioning tube and accessory assembly.
NOTICE:
* Keep the O-ring and O-ring fitting surfaces clean from dirt or any foreign objects.
* Do not use any compressor oil other than ND-OIL 11 or equivalent. If any compressor oil other than ND-OIL 11 or equivalent is used, compressor motor insulation performance may decrease, resulting in a leakage of electric power.
(d) Install the air conditioning tube and accessory assembly.
31. CONNECT SUCTION PIPE SUB-ASSEMBLY
(a) Remove the vinyl tape from the pipe.
(b) Sufficiently apply compressor oil to a new O-ring and the fitting surface of the suction pipe sub-assembly.
Compressor oil:
ND-OIL 11 or equivalent
(c) Install the O-ring on the suction pipe sub-assembly.
NOTICE:
* Keep the O-ring and O-ring fitting surfaces clean from dirt or any foreign objects.
* Do not use any compressor oil other than ND-OIL 11 or equivalent. If any compressor oil other than ND-OIL 11 or equivalent is used, compressor motor insulation performance may decrease, resulting in a leakage of electric power.
(d) Install the suction pipe sub-assembly.
(e) Move the hook connector in the direction indicated by the arrow in the illustration.
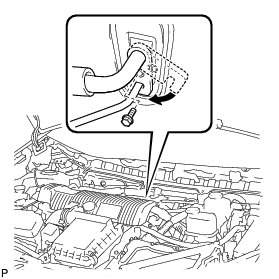
(f) Insert the pipe joint into the fitting hole securely and tighten the bolt.
Torque : 9.8 Nm (100 kgf-cm, 87 in-lbf)
32. INSTALL OUTER COWL TOP PANEL SUB-ASSEMBLY Installation
33. INSTALL COWL BODY MOUNTING REINFORCEMENT LH Installation
34. INSTALL WINDSHIELD WIPER MOTOR AND LINK ASSEMBLY
Installation
35. INSPECT FOR COOLANT LEAK (for Engine) Cooling System
36. INSPECT RESERVOIR TANK ENGINE COOLANT LEVEL (for Engine) Cooling System
37. CHARGE AIR CONDITIONING SYSTEM WITH REFRIGERANT Service and Repair
38. WARM UP COMPRESSOR Service and Repair
39. INSPECT FOR REFRIGERANT LEAK Service and Repair