Clarion Radio System - Removal/Replacement
83saab02SUBJECT:
SAAB/CLARION RADIO SYSTEM - M84 TURBOS
ISSUE: 09/83-642
FILE IN S.I. MANUAL:
VOLUME: I
SECTION: 9
PAGE: 56
A new, made-for-Saab Clarion AM/FM cassette and graphic equalizer is now standard on Turbos. Both units are mounted in a similar fashion with the receiver head being mounted in the dash and the equalizer mounted in the center console. Special tools which are supplied in the glove box, facilitate the removal and replacement of both units.
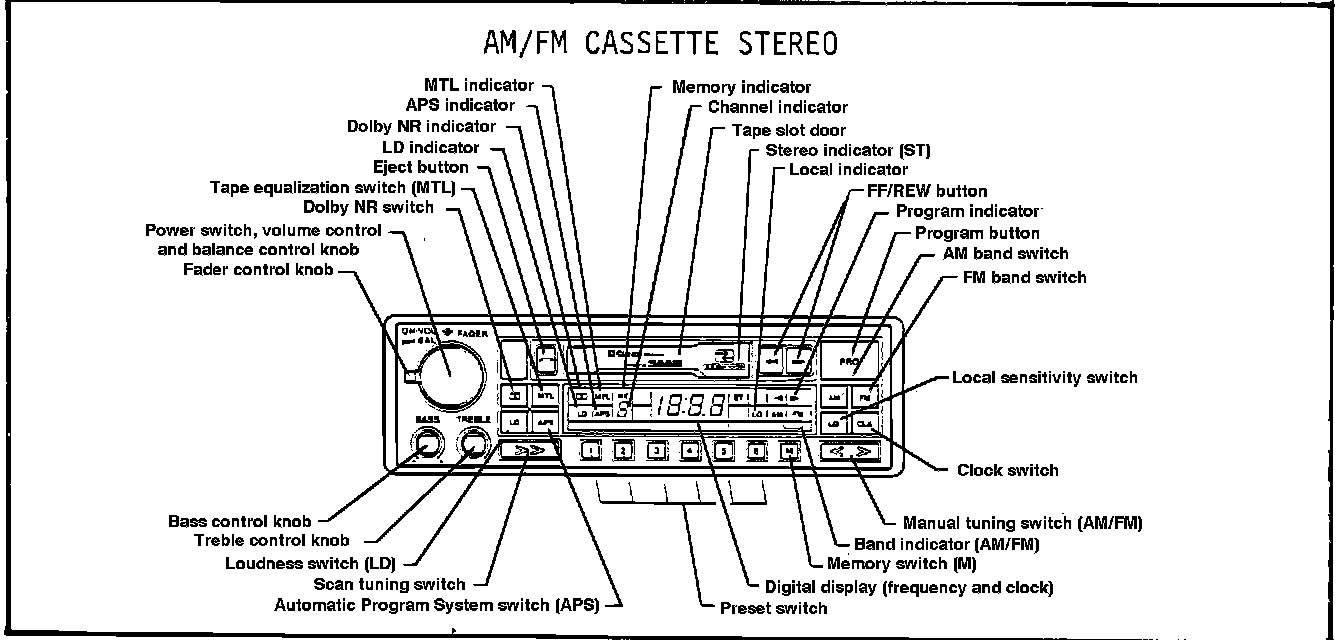
Features:
1. Clear and clean FM reception without the need for a Dx/Lo switch, stereo/ mono switch or pulse noise suppression.
2. Automatic head retraction of the tape unit when the power is shut off. With this feature the tape will not automatically eject. Head retraction prevents tape damage.
3. Auto reverse play. The cassette automatically reverses at end of play to play both sides.
4. APS or Automatic Program System provides convenience in locating music selections.
5. The entire system is activated by the on/off power knob. Turn the knob clockwise to turn on the unit. The tape can then be inserted, the program indicator will light up and the tape will play. Push in the eject button to eject the tape. Pressing the button only mid-way could cause malfunction.
SWITCH FUNCTIONS:
Power switch, volume control and balance control knob - Turn clockwise to switch unit on and increase volume. Turn counterclockwise to reduce volume and turn off unit. Cassette tapes will only play when this switch is "on".
Pull knob to set speaker balance.
Fader control knob - Balances the sound between the front and rear speakers.
Bass control - Depress the knob and the button will spring outward. The bass level can now be adjusted. Push the button into its original position after the adjustment is made.
Treble control - Depress the knob and the button will spring outward. The treble level can now be adjusted. Push the button into its original position after the adjustment is made.
NOTE! Both treble and bass control knobs must be in their center, click-stop positions when using the graphic equalizer.
Dolby NR switch - Depressing the Dolby NR switch will activate the Dolby Noise Reduction System and light the Dolby NR indicator light. This light will only activate while a tape is playing.
MTL (Tape equalization switch) - Depress when using metal tapes. MTL indicator will only light when a tape is playing.
Eject button - Press completely to eject tape.
LD (Loudness switch) - When depressed, the treble and bass response become richer at low volume levels. The LD indicator will light when switch is depressed.
Scan tuning switch - To start scan tuning, depress this switch. Tuned frequency will increase, stopping for 5 seconds at each station. To hold desired station, depress switch again within 5 seconds.
APS (Automatic Program System switch - Depress the APS switch to activate the function. Now depress the FF (or REW) button to send the tape in the forward (or reverse) direction at the end (or beginning) of the music to play the next (or repeat the last) selection.
Preset Station switch - Six stations on FM and six stations on AM may be preset.
1. Select desired station.
2. Push the M (memory switch). Memory indicator (ME) will light for 5 seconds.
3. Within 5 seconds press the desired preset switch. The preset switch will be shown on the channel indicator and the station will be set.
Band switch (AM, FM) - Depress one or the other for the desired frequency band.
Manual tuning switch - Depress the right side of switch to increase radio frequency. Depress the left side to decrease radio frequency.
CLK (time setting) - For time display, depress "CLK" button. Within 5 seconds depress and hold memory switch "M". Depress the left side of the manual tuning switch to set the hours and right side to set the minutes.
PRO (Program button) - Reverses the direction of tape play.
FF/REW button - Advances or rewinds the tape at high speed.
LO (local sensitivity switch) - Depress the LO sensitivity switch. The LO indicator will light up. It operates during SCAN mode only for strong stations. Depress the switch once again and it scans all listenable stations.
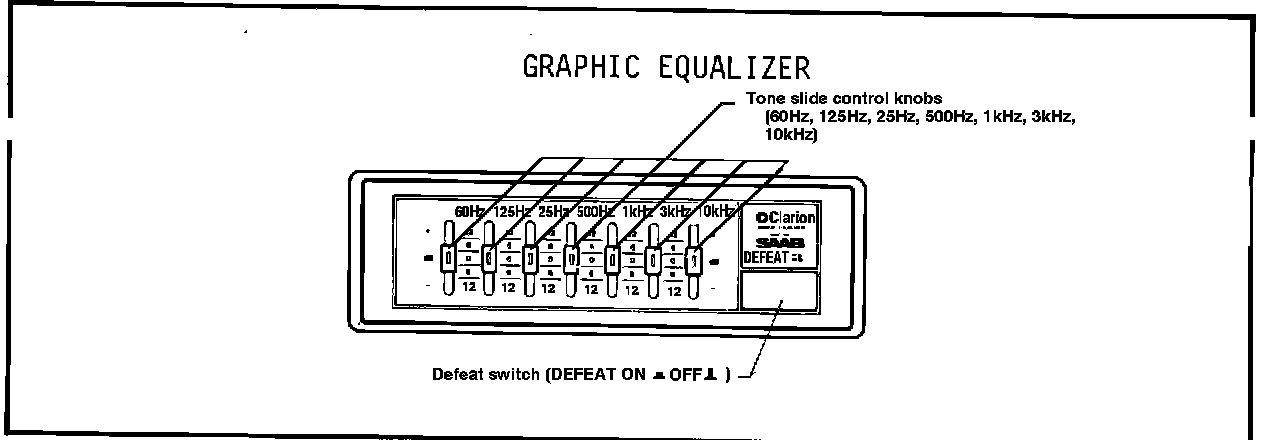
Features:
1. Slide controls with LED indicators.
2. By pressing the defeat switch, flat response can be restored instantly, regardless of the slide control settings.
SWITCH FUNCTIONS:
1. Slide controls - Moving any of these seven switches to the + side of center position emphasizes sound quality. Moving switches to the - side of center de-emphasizes the sound.
2. Defeat switch - Pressing this switch restores flat frequency response and shuts off the lights on the slide controls.
REAR SPEAKERS:
Rear speakers have been upgraded. Turbo sedans have new three-way 4 x 10" oval speakers; 3-door Turbos have new 5-1/4" round co-axial speakers mounted in the rear quarter panels.
REMOVAL INSTRUCTIONS:
1. Tools (P/N 02-61-404) for radio and equalizer are located in the glovebox. Insert the "L" shaped ends of the tools into the slots for the trim. Gently pull off trim.
2. Locate two very small tabs under the radio or equalizer with a pointed tool. Slide the tabs to the left approximately 1/2". The radio or equalizer can now be removed. Insert the curved ends of the tool into the slots on both sides of unit and gently pull radio out. Disconnect the wires at their connectors. Do not cut any wires. It is unnecessary to do so.
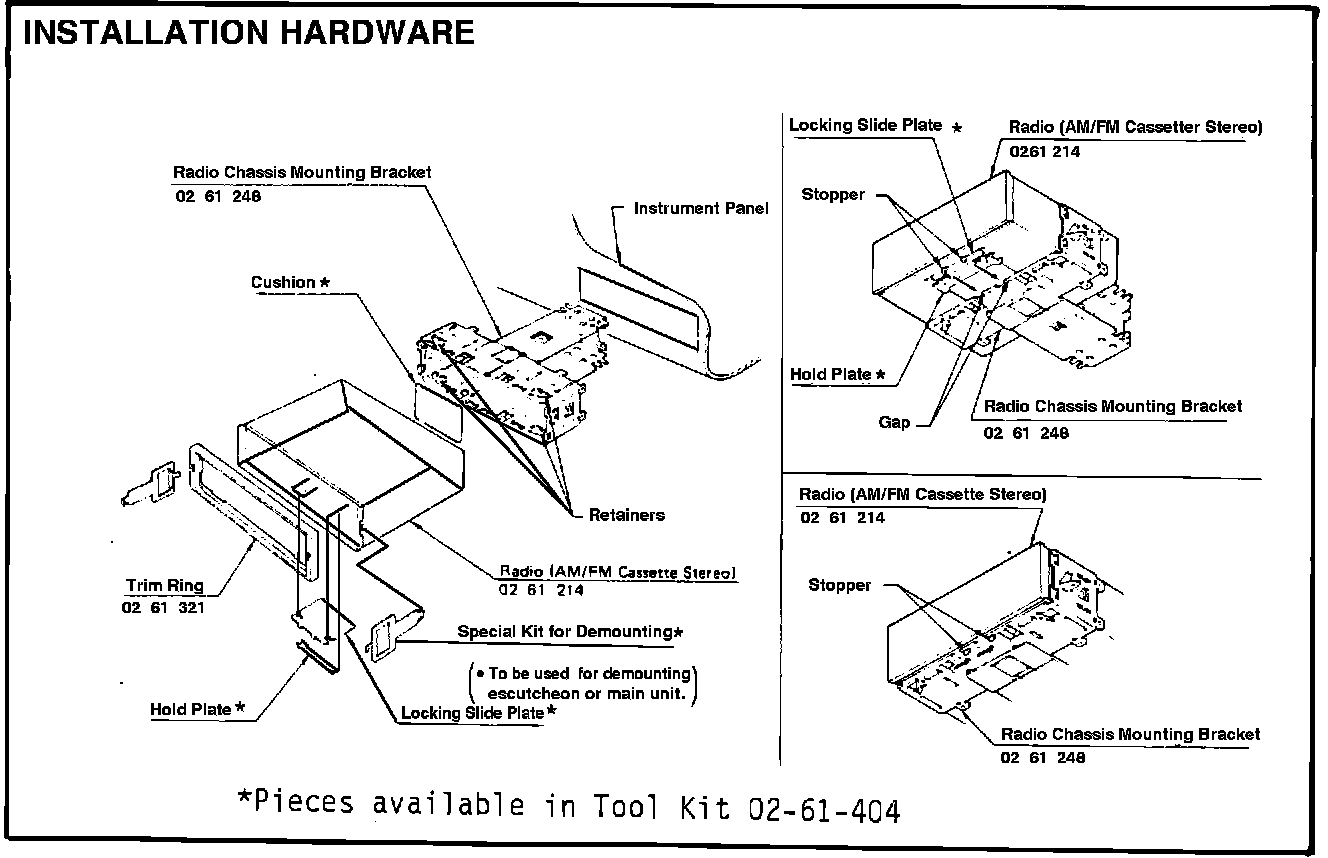
FUSE REPLACEMENT:
A 7.5 amp blade-type fuse (P/N 02-61-461) is plugged into the rear of the radio/cassette head. The unit must be removed to change the fuse. Both the equalizer and the radio/cassette head are fuse at this one location.
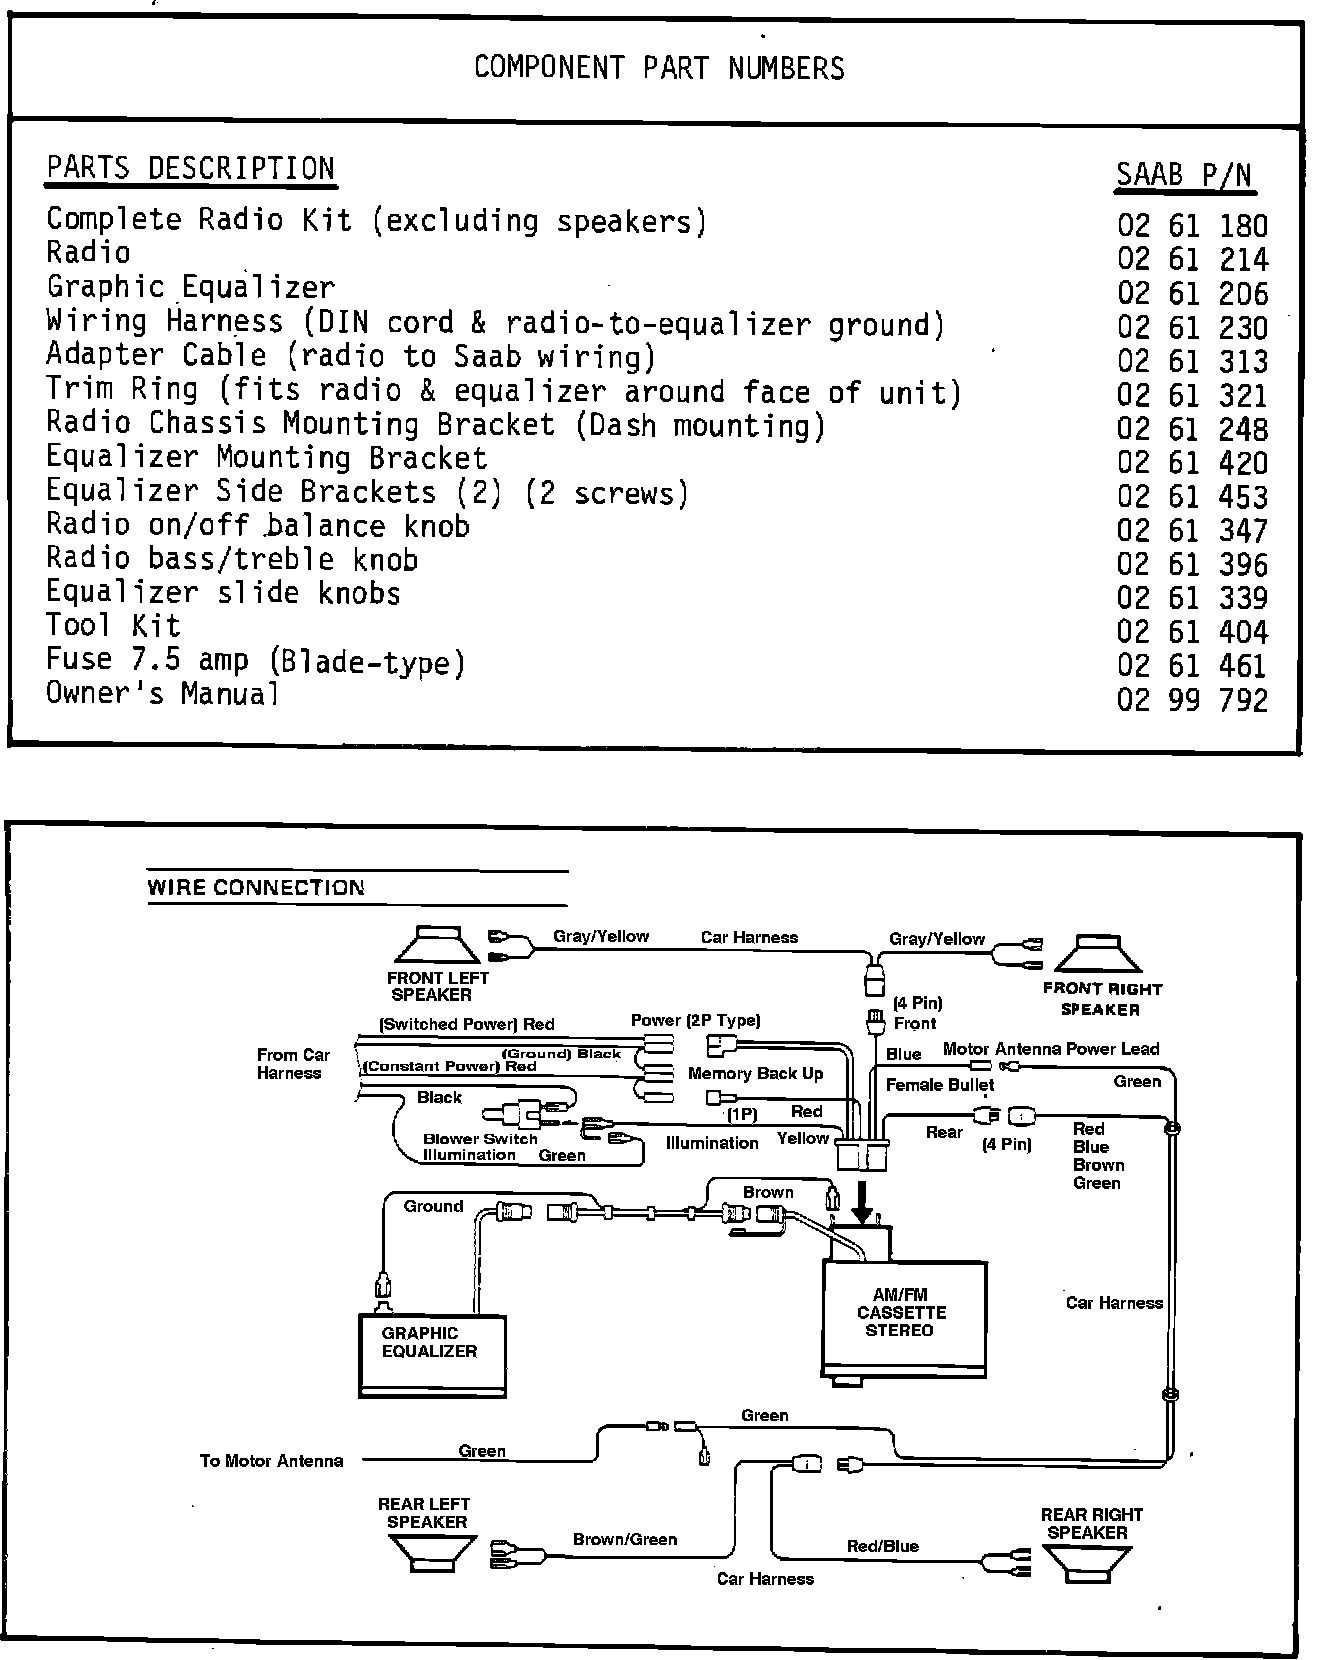
COMPONENT PART LIST AND WIRING DIAGRAM