Removing and Installing Middle Radiator
Removing and installing middle radiator
Preliminary work
1. Remove engine-compartment lid.
2. Remove the front apron.
3. Removing air guide.
Removing middle radiator
Warning
Hot fluid
^ Danger of scalding
-> Let the fluid cool down.
-> Wear personal protective gear.
Warning
Caustic fluid
^ Danger of chemical burns
-> Avoid contact with caustic fluid.
-> Wear personal protective gear.
-> Ensure that there is good ventilation.
-> If you do come into contact, wash off immediately with plenty of warm water and contact a doctor if necessary.
1. Relieve pressure in the cooling system. To do this, carefully open the cover of the coolant reservoir.
2. Clamp shut the coolant hose to the left and right on the radiator using hose clamps.
3. Remove spring clip, radiator hose, left radiator -1-.
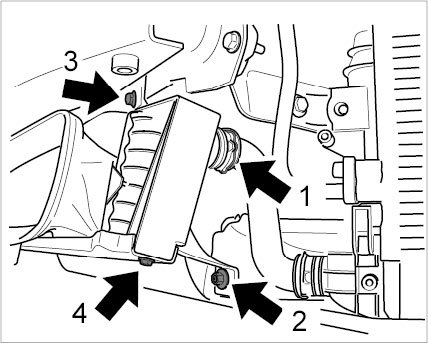
Attachment for middle radiator
4. Pull off left coolant hose.
4.1. Collect the emerging coolant.
5. Remove radiator.
5.1. Unscrew two hex screws M8 x 25 (SW13) -3- and two nuts M8 (SW13) -2- from radiator bracket.
5.2. Remove spring clip, radiator hose, right radiator.
5.3. Pull off right coolant hose.
5.3.1. Collect the emerging coolant.
5.4. Unscrew two hex screws M6 x 16 (SW10) -4- from retaining bracket.
Information
The help of a second person is required in order to remove and install the middle radiator.
5.5. Remove radiator, complete with bracket.
Installing middle radiator
1. Install radiator in bracket.
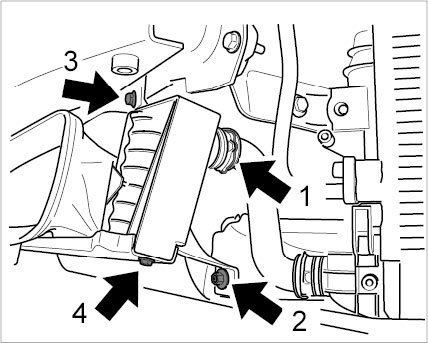
Attachment for middle radiator
1.1. Make sure that rubber sleeve of the radiator sits in the appropriate opening in the bracket.
1.2. Fit and tighten two hex screws M6 x 16 (SW10) -4-.
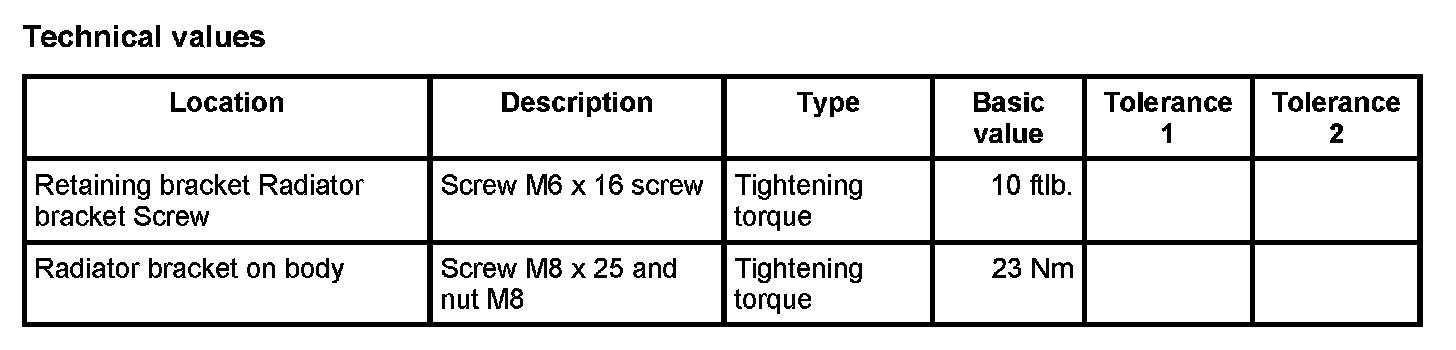
-> Tightening torque: 10 ftlb.
2. Fix radiator.
Information
The help of a second person is required in order to remove and install the middle radiator.
2.1. Fit left coolant hose with spring clamp -1-.
2.2. Fit right coolant hose with spring clamp.
2.3. Place on two hex screws M8 x 25 (SW13) -2- two nuts M8 (SW13) -3-.
2.4. Position radiator.
2.5. Tighten two hex screws M8 x 25 (SW13) -2- two nuts M8 (SW13) -3-.
-> Tightening torque: 23 Nm
Subsequent work
1. Installing air guide.
2. Fill in coolant and bleed cooling system.
Check connection points on radiator for leaks.
3. Install the engine-compartment lid
4. Install the front apron.