Service Procedure
A. Inspection1. Install seat and fender covers and raise vehicle on hoist.
Inspection: The converter need not be replaced -
^ If it is one of the new type basketed converter assemblies, part number 25056620.
^ If it is one of the converters used in Dealer Technical Bulletin 83-T-25A part number 25056905 (included in kit part number 25056983).
FIGURE 1:
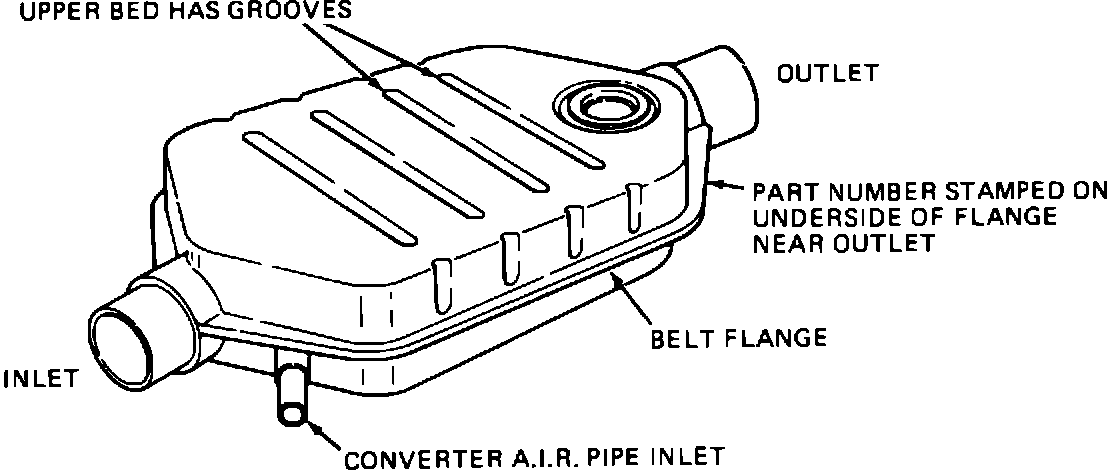
The part numbers are stamped on the bottom of the inboard flange near the converter inlet. Refer to Figure 1.
Proceed to Part C if replacement of the converter is not required.
B. Converter Replacement
CAUTION: The catalytic converter beads contain platinum, palladium, and/or rhodium. Additionally, the beads may be finely coated with lead compounds. Therefore, precautions should be taken to minimize dust generation during the replacement procedure. These precautions include:
^ Catalyst dust should be controlled by wetting with water prior to bead removal, as described in Step 4 below.
^ The use of a suitable dust mask, rubber gloves, and safety glasses is recommended when handling catalyst beads.
^ Applicable OSHA standards should be reviewed.
^ Allow converter to cool before handling.
1. Loosen clamp and disconnect AIR pipe from converter.
2. Disconnect intermediate exhaust pipe and hanger from rear of converter.
3. Remove clamp and disconnect converter from front exhaust pipe.
4. Stand the old converter upright on the inlet end and pour 16 ounces of water into the outlet end to control catalyst dust.
FIGURE 1:
FIGURE 2:
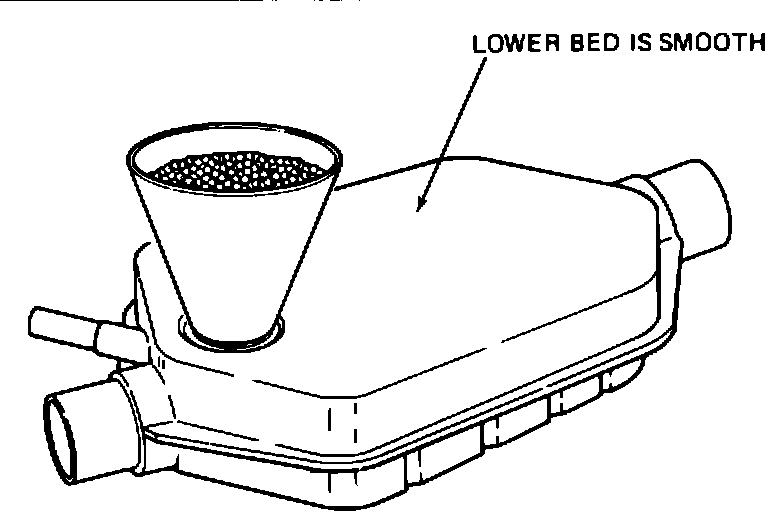
5. Using a hammer and chisel, remove the fill hole plug from the lower bed. (The smooth side of the converter is the lower bed side.) See Figures 1 and 2.
6. Hold the converter over a clean pan (J 34155-2) and empty the catalyst beads by shaking. It may be necessary to tap the converter belt flange with a hammer to loosen the beads.
7. Pour the beads into a sifting pan (J 34155-1) and sift to remove undersized beads.
8. Prop the new converter up at a 45 degree angle with the lower bed fill hole at the top.
9. Using funnel J 34155-3, pour the sifted beads into the lower bed of the new converter. See Figure 2. Tap belt flange with rubber mallet to allow beads to settle. Continue filling and tapping until converter is full. If additional beads are required to fill the lower bed completely, it will be necessary to obtain a lower bed bead package from the parts department.
Excess beads from the package should be saved in a clean container for future use.
10. Lay the converter down on a flat surface with the lower bed fill hole on top.
FIGURE 3:
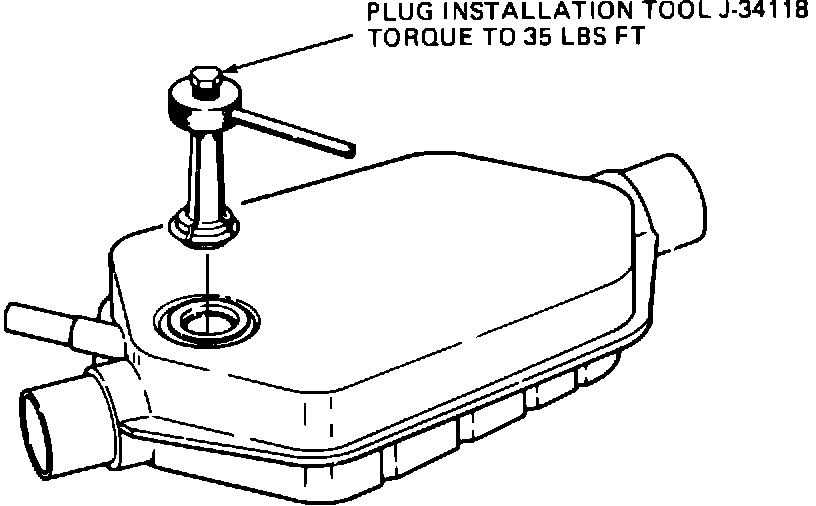
11. Insert the fill plug into the lower bed fill hole. The fill plug outer rim must rest against the converter body.
12. Insert tool J 34118 into fill plug and tighten to 47 N-m (35 ft.lbs.). (See Figure 3.)
13. Install new converter in vehicle reversing removal procedure (Steps 1, 2, and 3) and using new bolts and clamp as required. Torque front clamp nuts to 35 N-m (26 ft.lbs.), intermediate pipe to converter bolts to 20 N-m (15 ft.lbs.) and hanger to converter bolts to 52 N-m (38 ft.lbs.).
14. Lower vehicle and install Campaign Identification Label, Part C of procedure.
C. CAMPAIGN IDENTIFICATION LABEL
Each vehicle modified in accordance with the instructions outlined in this procedure will require a Campaign Identification Label. Each label provides a space to include the campaign number, the five (5) digit dealer code of the dealer performing the campaign service, and the date vehicle was campaigned. This information may be inserted with a typewriter or ballpoint pen. When installing label, clean the surface of the fan shroud and apply the campaign label.