Perform If Throttle Actuator Is Replaced
DESCRIPTION"Idle Air Volume Learning" is an operation to learn the idle air volume that keeps each engine within the specific range. It must be performed under any of the following conditions:
- Each time electric throttle control actuator or ECM is replaced.
- Idle speed or ignition timing is out of specification.
PREPARATION
Before performing "Idle Air Volume Learning", make sure that all of the following conditions are satisfied.
Learning will be cancelled if any of the following conditions are missed for even a moment.
- Battery voltage: More than 12.9 V (At idle)
- Engine coolant temperature: 70 - 100 °C (158 - 212 °F)
- PNP switch: ON
- Electric load switch: OFF
(Air conditioner, headlamp, rear window defogger)
On vehicles equipped with daytime light systems, set lighting switch to the 1st position to light only small lamps.
- Steering wheel: Neutral (Straight-ahead position)
- Vehicle speed: Stopped
- Transmission: Warmed-up
For models with CONSULT-II, drive vehicle until "FLUID TEMP SE" in "DATA MONITOR" mode of "A/T" system indicates less than 0.9 V.
For models without CONSULT-II and M/T models, drive vehicle for 10 minutes.
OPERATION PROCEDURE
With CONSULT-II
1. Perform "Accelerator Pedal Released Position Learning".
2. Perform "Throttle Valve Closed Position Learning".
3. Start engine and warm it up to normal operating temperature.
4. Check that all items listed under the topic "PREPARATION" (previously mentioned) are in good order.
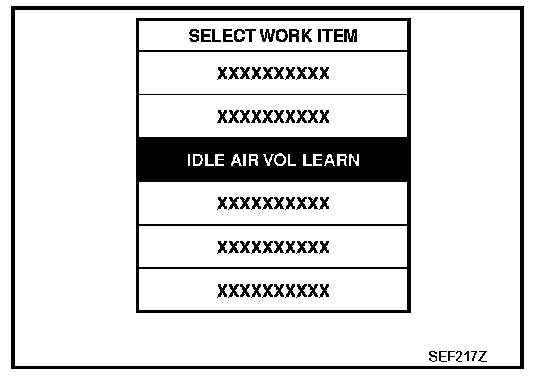
5. Select "IDLE AIR VOL LEARN" in "WORK SUPPORT" mode.
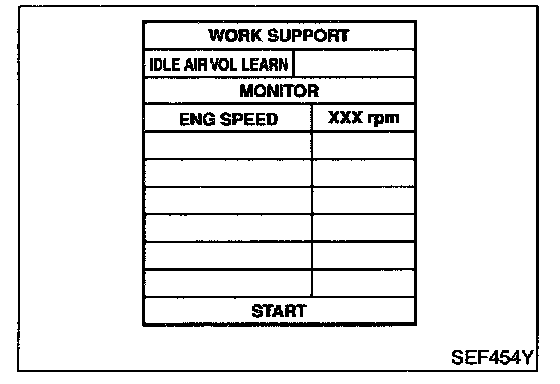
6. Touch "START" and wait 20 seconds.
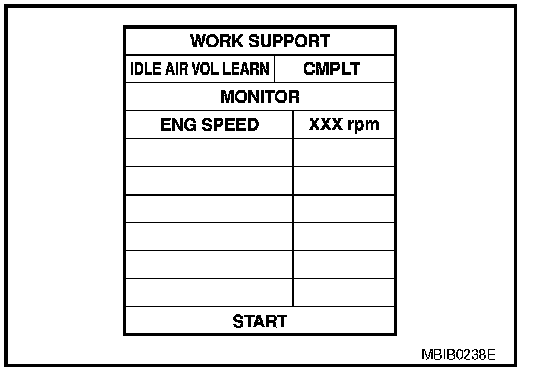
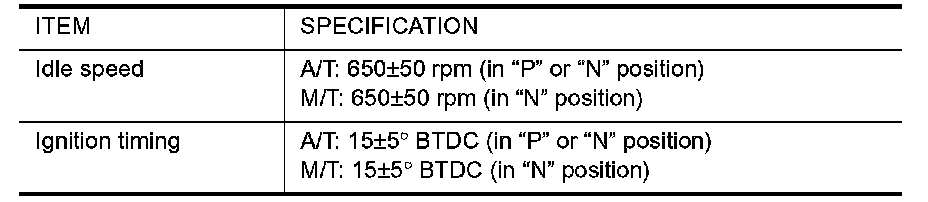
7. Make sure that "CMPLT" is displayed on CONSULT-II screen. If "CMPLT" is not displayed, "Idle Air Volume Learning" will not be carried out successfully. In this case, find the cause of the incident by referring to the "Diagnostic Procedure" below.
8. Rev up the engine two or three times and make sure that idle speed and ignition timing are within the specifications.
Without CONSULT-II
NOTE:
- It is better to count the time accurately with a clock.
- It is impossible to switch the diagnostic mode when an accelerator pedal position sensor circuit has a malfunction.
1. Perform "Accelerator Pedal Released Position Learning".
2. Perform "Throttle Valve Closed Position Learning".
3. Start engine and warm it up to normal operating temperature.
4. Check that all items listed under the topic "PREPARATION" (previously mentioned) are in good order.
5. Turn ignition switch "OFF" and wait at least 10 seconds.
6. Confirm that accelerator pedal is fully released, turn ignition switch "ON" and wait 3 seconds.
7. Repeat the following procedure quickly five times within 5 seconds.
a. Fully depress the accelerator pedal.
b. Fully release the accelerator pedal.
8. Wait 7 seconds, fully depress the accelerator pedal and keep it for approx. 20 seconds until the MIL stops blinking and turned ON.
9. Fully release the accelerator pedal within 3 seconds after the MIL goes off.
10. Start engine and let it idle.
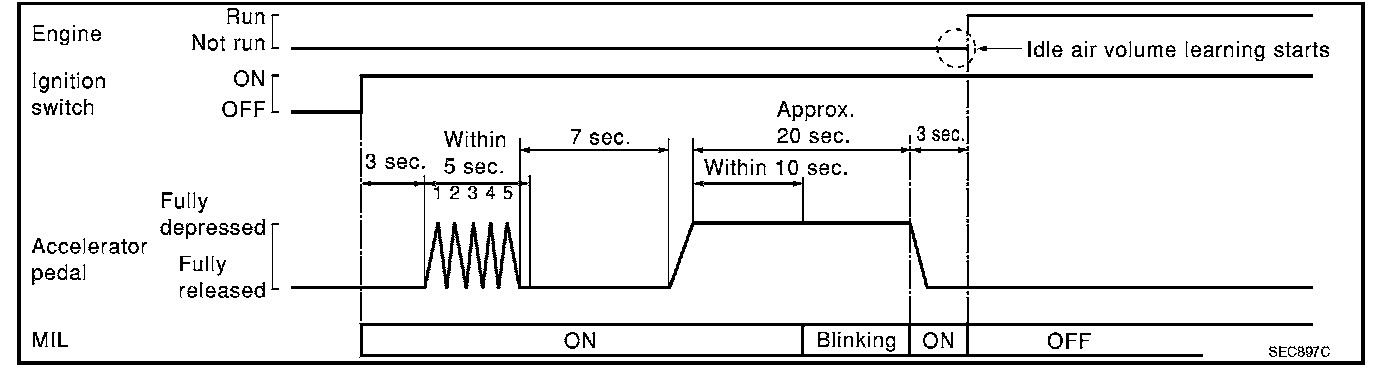
11. Wait 20 seconds.
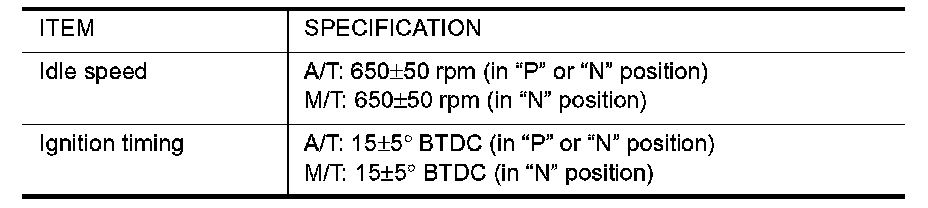
12. Rev up the engine two or three times and make sure that idle speed and ignition timing are within the specifications.
13. If idle speed and ignition timing are not within the specification, "Idle Air Volume Learning" will not be carried out successfully. In this case, find the cause of the incident by referring to the "DIAGNOSTIC PROCEDURE" below.
DIAGNOSTIC PROCEDURE
If idle air volume learning cannot be performed successfully, proceed as follows:
1. Check that throttle valve is fully closed.
2. Check PCV valve operation.
3. Check that downstream of throttle valve is free from air leakage.
4. When the above three items check out OK, engine component parts and their installation condition are questionable. Check and eliminate the cause of the incident.
It is useful to perform "TROUBLE DIAGNOSIS - SPECIFICATION VALUE".
5. If any of the following conditions occur after the engine has started, eliminate the cause of the incident and perform "Idle air volume learning" all over again:
- Engine stalls.
- Erroneous idle.
Fuel Pressure Check
FUEL PRESSURE RELEASE
Before disconnecting fuel line, release fuel pressure from fuel line to eliminate danger.
NOTE: Prepare pans or saucers under the disconnected fuel line because the fuel may spill out. The fuel pressure cannot be completely released because Z33 models do not have fuel return system.
With CONSULT-II
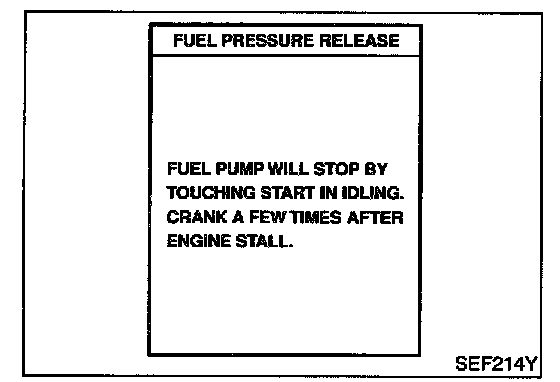
1. Turn ignition switch "ON".
2. Perform "FUEL PRESSURE RELEASE" in "WORK SUPPORT" mode with CONSULT-II.
3. Start engine.
4. After engine stalls, crank it two or three times to release all fuel pressure.
5. Turn ignition switch "OFF".
Without CONSULT-II
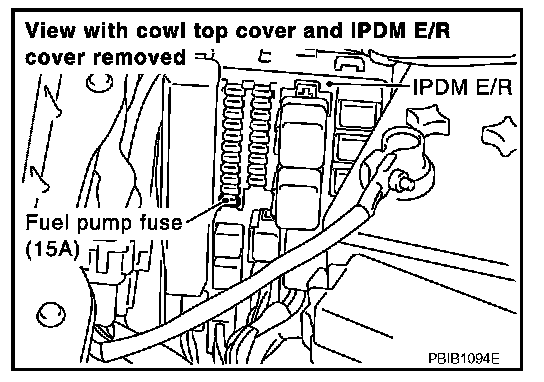
1. Remove fuel pump fuse located in IPDM E/R.
2. Start engine.
3. After engine stalls, crank it two or three times to release all fuel pressure.
4. Turn ignition switch "OFF".
5. Reinstall fuel pump fuse after servicing fuel system.
FUEL PRESSURE CHECK
NOTE:
- Use Fuel Pressure Gauge Kit (J-44321) to check fuel pressure.
- Do not perform fuel pressure check with system operating. Fuel pressure gauge may indicate false readings.
1. Release fuel pressure to zero. Refer to "FUEL PRESSURE RELEASE".
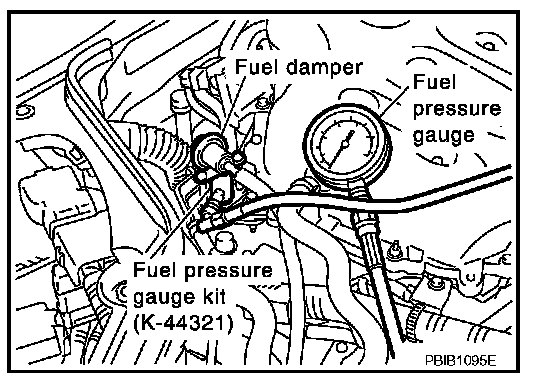
2. Install the inline fuel quick disconnected fitting between fuel damper and injector tube.
3. Connect the fuel pressure test gauge (quick connector adapter hose) to the inline fuel quick disconnected fitting.
4. Turn ignition switch ON and check for fuel leakage.
5. Start engine and check for fuel leakage.
6. Read the indication of fuel pressure gauge.
At idling: Approximately 350 kPa (3.57 kg/Sq.cm , 51 psi)
7. If result is unsatisfactory, go to next step.
8. Check the following.
- Fuel hoses and fuel tubes for clogging
- Fuel filter for clogging
- Fuel pump
- Fuel pressure regulator for clogging
If OK, replace fuel pressure regulator.
If NG, repair or replace.