Campaign - Headlamp Control Module Programming
No: SB154Ref:
Issue: 1
Date: 16 July 2004
SERVICE ACTION
Headlight Delay/DRL Feature
Programming
AFFECTED VEHICLE RANGE:
Range Rover (LM)
4A157523 to 4A160431
USA SPECIFICATION VEHICLES
SITUATION:
HEADLIGHT DELAY AND DAYLIGHT RUNNING FEATURES NOT PROGRAMMED
The headlamp delay and daylight running features may not have been programmed correctly during vehicle production on a number of US specification vehicles within the above VIN range.
RESOLUTION:
PROGRAM HEADLIGHT CONTROL MODULE
Program the omitted features using 14 disc Range Rover 13 or a later version at the next service opportunity. Re-program the Lighting Control Module (LCM) following the procedure in this TIB.
TOOLS:
T4 Disc Range Rover 13
PARTS INFORMATION:
No parts required
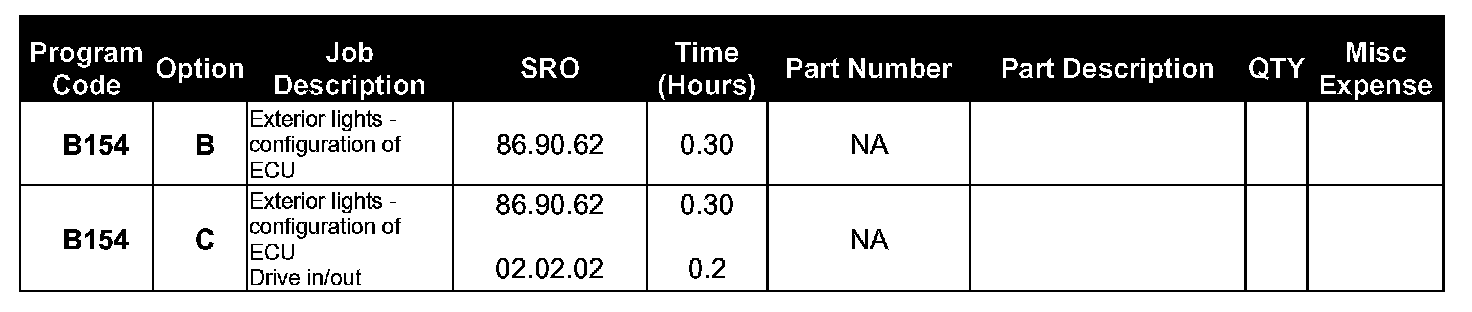
DDW WARRANTY CLAIMS:
Warranty claims should be submiffed quoting the Program Code together with the relevant Option Code. This will result in payment of the stated time and, where applicable, parts and miscellaneous expense codes. Option codes make it unnecessary to enter parts or labor. These are repeated here for information only.
Drive in/drive out should only be claimed when the vehicle is brought back into the workshop for this action alone to be undertaken.
Normal warranty policy and procedures apply. Material allowance is included in labor operation.
REPAIR PROCEDURE
PROGRAM LCM
1. Connect 14 to the vehicle and load disc Range Rover 13 or a later version.
2. Begin a new diagnostic session.
3. Follow the on-screen instructions select "System Diagnostics".
4. Follow the on-screen instructions select "Exterior Lights".
5. Follow the on-screen instructions select "Vehicle Maintenance".
6. Follow the on-screen instructions select "ECU Renewal".
NOTE:
The LCM must not be replaced when prompted by T4.
7. Follow the on-screen instructions select "Lighting Module".
8. Select personalization settings and enable headlamp delay and daylight running if required.
9. End the diagnostic session and return to the "Welcome" screen.
10. Disconnect 14 from the vehicle.