Compressor Fitting HVAC: Service and Repair
SPECIAL SERVICE TOOL(S) REQUIREDDescription Tool Number
Spring Lock Coupling Disconnect Tool (1/2 Inch) 412-027 (412-027 (T81P-19623-G2))
Spring Lock Coupling Disconnect Tool (5/8 Inch) 412-038 (412-038 (T83P-19623-C))
REMOVAL
1. Remove eight push pins and radiator upper sight shield.
2. Following proper procedures, recover refrigerant from system. Observe all safety precautions. Refrigerant Recovery
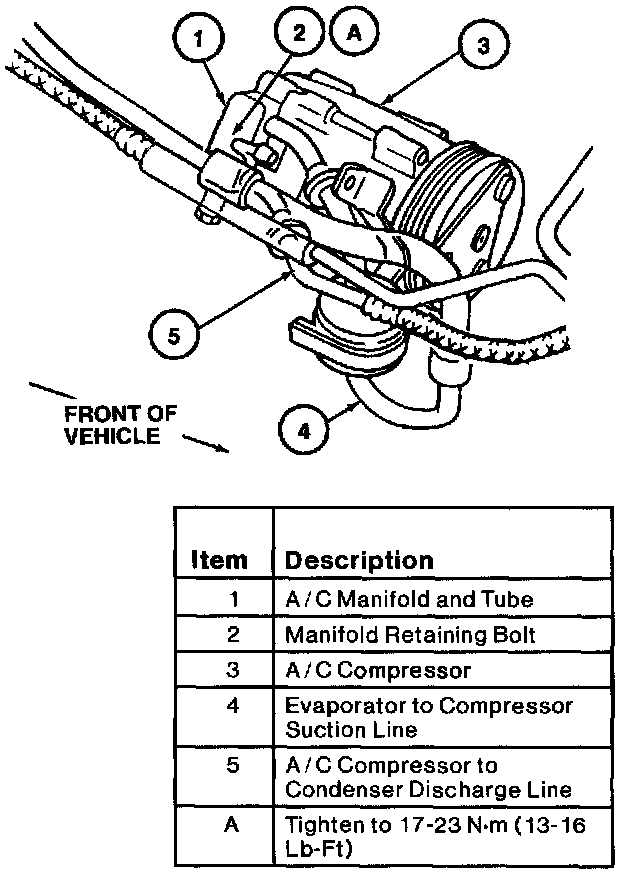
3. Disconnect A/C manifold and tube using 5/8 inch Spring Lock Coupling Disconnect Tool 412-038 (412-038 (T83P-19623-C)) at evaporator to compressor suction line. Cap the A/C manifold and tube and evaporator to compressor suction line to prevent the entrance of dirt and moisture.
4. Disconnect A/C manifold and tube using 1/2 inch Spring Lock Coupling Disconnect Tool 412-027 (412-027 (T81P-19623-G2)) at A/C compressor to condenser discharge line. Cap the A/C manifold and tube and A/C compressor to condenser discharge line to prevent the entrance of dirt and moisture.
5. Loosen A/C manifold retainer bolt and remove A/C manifold and tube from A/C compressor. Cap the A/C manifold and tube and A/C compressor to prevent the entrance of dirt and moisture.
6. Remove the A/C manifold and tube from vehicle.
INSTALLATION
1. Route new A/C manifold and tube with protective caps installed.
2. Lubricate new O-ring seals with clean Motorcraft YN-12b refrigerant oil or equivalent meeting Ford specification WSH-M1C231-B and position them in O-ring seal grooves of the A/C compressor.
3. Apply Pipe Sealant with Teflon(R) D8AZ-19554-A or equivalent meeting Ford specifications WSK-M2G350-A2 and ESR-M18P7-A to threads of manifold retaining bolt.
4. Position A/C manifold and tube with O-ring seals to A/C compressor. Install retaining bolt and tighten to 17-23 N.m (13-16 Lb-Ft).
5. Remove protective caps and connect new A/C manifold and tube into system using new O-ring seals lubricated with clean Motorcraft YN-12b refrigerant oil or equivalent meeting Ford specification WSH-M1C231-B. Connect spring lock coupling.
6. Leak-test, evacuate and charge system following recommended procedures. Observe all safety precautions.
7. Check the system for proper operation.
8. Install radiator upper sight shield.