Condenser HVAC: Service and Repair
REMOVAL
NOTE:
- Whenever the A/C condenser core is replaced, it is necessary that the suction accumulator/drier also be replaced.
- If an A/C condenser core leak is suspected, the A/C condenser core must be leak-tested before it is removed from the vehicle.
1. Discharge the refrigerant from the A/C system at the service access valve located on the suction accumulator/drier. Observe all safety precautions. Discharging and Recovery
2. Remove six push pins and radiator sight shield from vehicle.
3. Remove battery from vehicle.
4. Remove two upper shroud retaining bolts at radiator. Lift fan shroud sufficiently to disengage lower retaining clips and lay fan shroud back over fan blade.
5. Disconnect wire connectors from mass air flow sensor (MAF sensor) and inlet air temperature sensor.
6. Unfasten retaining clips to remove the air cleaner cover and position it away from the radiator/ A/C condenser core area.
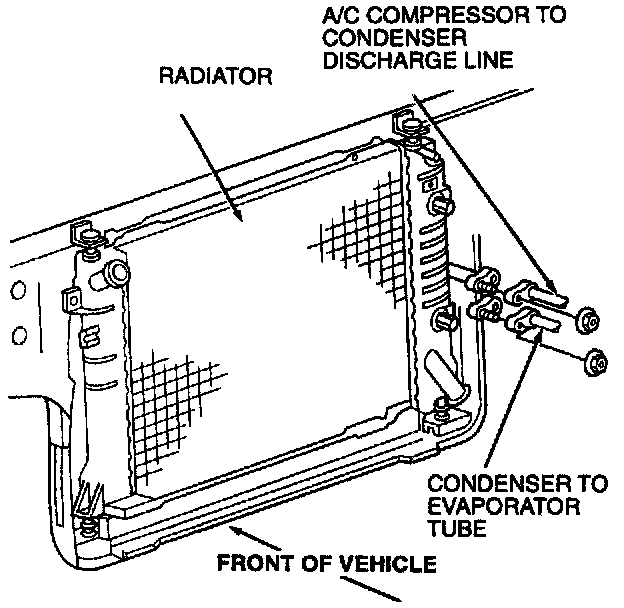
7. Remove retaining nut from peanut fittings and disconnect A/C condenser core inlet and outlet lines from A/C condenser core.
8. Remove radiator upper support retaining bolts and remove radiator supports.
9. Remove upper condenser mounting bolts and tilt radiator rearward to access A/C condenser core. Separate A/C condenser core from radiator.
10. With the aid of an assistant, carefully lift A/C condenser core off mounts on radiator and remove from vehicle.
INSTALLATION
1. If the A/C condenser core is to be replaced, add 2.9 ml (1 ounce) of clean Motorcraft YN-12c refrigerant oil or equivalent meeting Ford specification WSH-M1C231-B to the A/C condenser core.
2. With the aid of an assistant, carefully install A/C condenser core onto radiator and secure upper condenser mounting brackets to the radiator with two retaining bolts. Tighten to 8-11 N.m (71-97 lb-in).
3. Install radiator supports with retaining bolts.
4. Place fan shroud into clips on lower radiator support of radiator. Secure to upper support with two bolts. Position fan shroud to maintain a uniform clearance of approximately 25 mm (1 inch) to fan blades.
5. Position air cleaner cover on the air cleaner body and secure retaining clips.
6. Connect wire harness connector to mass air flow sensor and inlet air temperature sensor.
7. Remove the plugs from the two refrigerant lines and install new O-ring seals lubricated with clean Motorcraft YN-12c refrigerant oil or equivalent meeting Ford specification WSH-M1C231-B.
8. Connect the condenser inlet tube to the A/C compressor to condenser discharge line and the condenser outlet tube to the condenser to evaporator tube. Tighten peanut fitting retaining nut to 7-9 N.m (62-79 lb-in).
9. Install battery.
10. Install radiator sight shield with six push pins.
11. Leak-test, evacuate and charge the refrigerant system. Observe all safety precautions.
12. Check the A/C system for proper operation.