Procedure - Full Panel Repair (Figure 2)
FIGURE 2: PANEL REPAIR WITH ENAMEL CLEAR COAT:
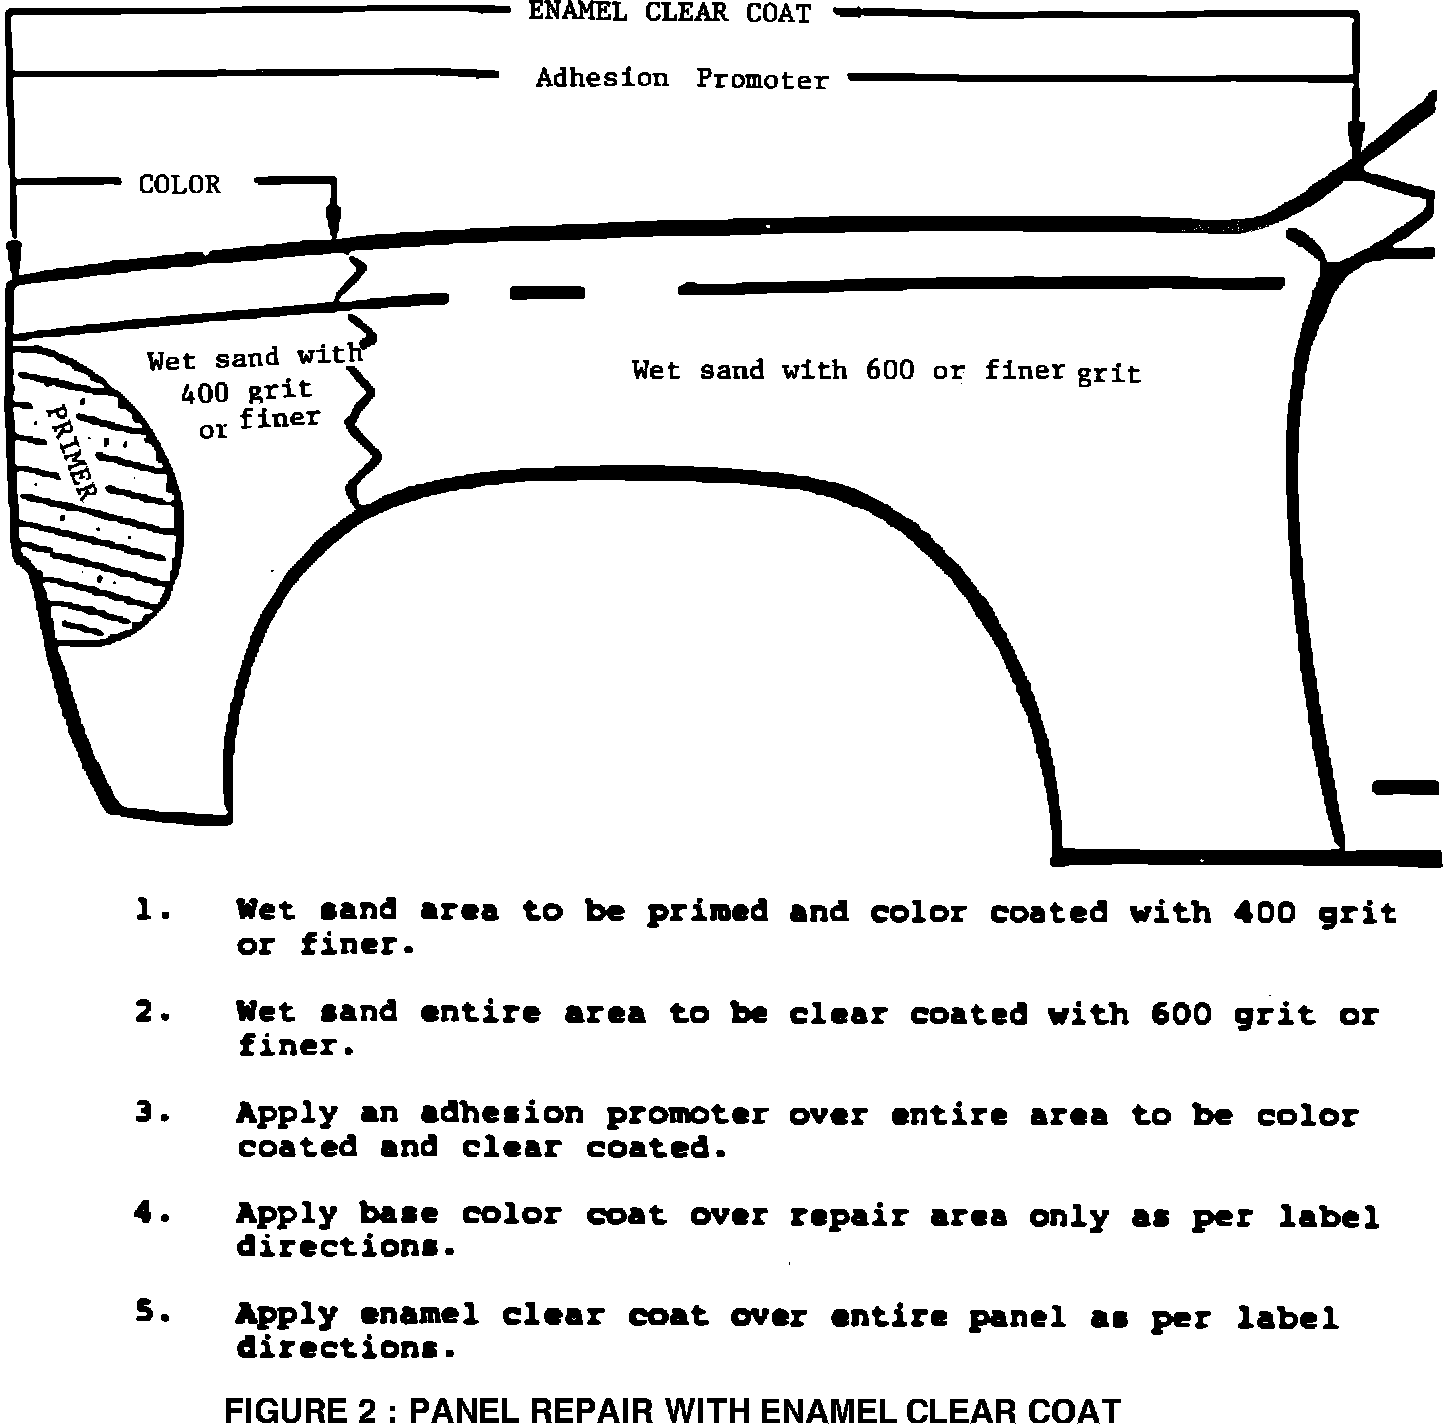
Basecoat
1. Wash with a mild detergent and water to remove any water soluable contaminates, then clean with a wax and grease removing solvent to remove any tar, silicone or other road film not removed with the detergent wash.
2. Sand the complete panel(s) with 400 grit or finer wet-ordry sandpaper. Repair and featheredge damaged areas as required. Treat all bare metal with recommended metal conditioner and conversion coating. Follow manufacturer's label directions.
3. Apply primer-surfacer to all bare metal areas. Keep primer-surfacer within the damaged area(s). Allow to dry 20-30 minutes before sanding.
4. Using #400 grit or finer sandpaper, sand the primersurfacer to level the imperfection.
5. Reclean panel(s) with wax and grease removing solvent and then tack wipe.
6. Apply one (1) coat of an "adhesion promoter" over the entire area(s) to be painted. Allow a minimum of 30 minutes dry time.
7. The base color should be reduced 150-200% with an extraslow drying lacquer solvent. The viscosity of the reduced base color is very important in order to match the O.E.M. (original equipment manufacturer) finish. The best way of
checking the viscosity of a reduced paint material is with a Zahn #2 paint viscosity cup or its equivalent.
Temperature influences viscosity directly. If a cold can of paint is brought into an average temperature room (65-70 degrees), it will be thicker and more viscous. Adding solvent to make the paint sprayable is not always the best action. The paint should be allowed to reach workable or average room temperatures. Follow manufacturer's recommended paint viscosity cup reading for their specific material.
8. Apply two (2) or three (3) medium-wet coats of base color.
NOTICE: Apply only the number of coats necessary to achieve full hiding.
Spray at 35-45 lbs. air pressure at the gun. Allow each coat to flash approximately 5 minutes before applying the final coat of base color, allow it to dry for 20 minutes before applying the clear coat.
9. If base coat must be sanded, proceed as follows:
a. Allow base color to dry.
b. Sand with ultra-fine wet-or-dry sandpaper to remove the imperfection (s) .
c. Reclean and tack wipe the repair area(s).
d. Apply one more additional coat of base color.
e. Allow to dry 20 minutes before applying the clear coat.
Clear Coat
A. Lacquer Clearcoat
1. Reduce clear coat 125-150% with an extra-slow drying lacquer thinner to the recommended paint viscosity cup reading of the manufacturer of the paint you are using.
2. Spray two (2) medium-wet coats of reduced clear at 35-45 lbs. air pressure at the gun. Allow first coat to flash completely before applying the second
coat. At least two (2) coats must be used. Additional coats may be applied if desired. If additional leveling is desired a final coat of premixed mist-coat material (clear acrylic and thinner) can be sprayed at 20 lbs. air pressure at the gun.
3. Allow overnight dry or longer, then, rub out using a light-cutting hand or machine polishing compound.
B. Enamel Clearcoat
CAUTION: There are a number of paint systems available for service use: however, many require additives containing isocyanates. It is essential that all recommendations and warnings listed on the container label for materials selected be followed.
It is mandatory that adequate respiratory protection be worn. Examples of such protection are: 3M models #6984 and #6986 disposable respirators.
Such protection should be worn during the entire painting process. Persons with respiratory problems, or those allergic to isocyanates must not be exposed to isocyanate vapors or spray mist.
1. Following paint manufacturers label directions, activitate the Polyurethane Enamel Clear Coat material. Mix material thoroughly. Pot life of activated mixture is approximately eight (8) hours.
2. Some activated Polyurethane Enamel Clear Coat materials are ready to spray as packaged under normal conditions. As conditions vary, to enhance flow out and leveling, up to 10% more than the specified enamel reducer may be added to the activated clear coat mixture. Check the viscosity of the activated mixture with a Zahn #2 paint viscosity cup or its equivalent. Follow the paint manufacturer's labeled recommendations for paint viscosity cut reading.
3. Spray two (2) medium coats of activated clear coat material at 50 lbs. air pressure at the gun over entire area(s) to be refinished. For panel repairs, allow 15-20 minutes dry time between coats. For overall refinishing apply first coat, allow to flash, then apply second coat. Spray medium-wet coats of clear coat material to reduce surface texture (orange peel) and provide optimum appearance. Allow to cure overnight.