Fuel Pump Replacement
Fuel Pump Replacement
Special Tools
EN-48896 - High Pressure Fuel Pump Installation Alignment Gage
For equivalent regional tools, refer to.
Removal Procedure
1. Relieve the high side and the low side fuel pressure. Refer to Fuel Pressure Relief (High Pressure) Fuel Pressure Relief (High Pressure)Fuel Pressure Relief (Low Pressure) Fuel Pressure Relief (Low Pressure).
Warning:
Refer to Gasoline/Gasoline Vapors Warning Service Precautions.
Warning:
Refer to Safety Glasses Warning Safety Glasses Warning.
2. Ignition OFF.
Warning:
Refer to Battery Disconnect Warning Battery Disconnect Warning.
3. Disconnect the battery negative cable. Refer to Battery Negative Cable Disconnection and Connection (Primary) Battery Negative Cable Disconnection and Connection (Primary)Battery Negative Cable Disconnection and Connection (Auxiliary) Battery Negative Cable Disconnection and Connection (Auxiliary).
4. Remove the air inlet grille panel. Refer to Air Inlet Grille Panel Replacement (Lower Panel) Air Inlet Grille Panel Replacement (Lower Panel)Air Inlet Grille Panel Replacement (Upper Panel) Air Inlet Grille Panel Replacement (Upper Panel).
5. Remove the fuel pipe shield. Refer to Fuel Pipe Shield Replacement Fuel Pipe Shield Replacement.
6. Remove and discard the fuel feed pipe. Refer to Fuel Feed Pipe Replacement Fuel Feed Pipe Replacement.
7. Remove and discard the fuel feed intermediate pipe. Refer to Fuel Feed Intermediate Pipe Replacement Fuel Feed Intermediate Pipe Replacement.
8. Disconnect the engine wiring harness electrical connector from the high pressure fuel pump.
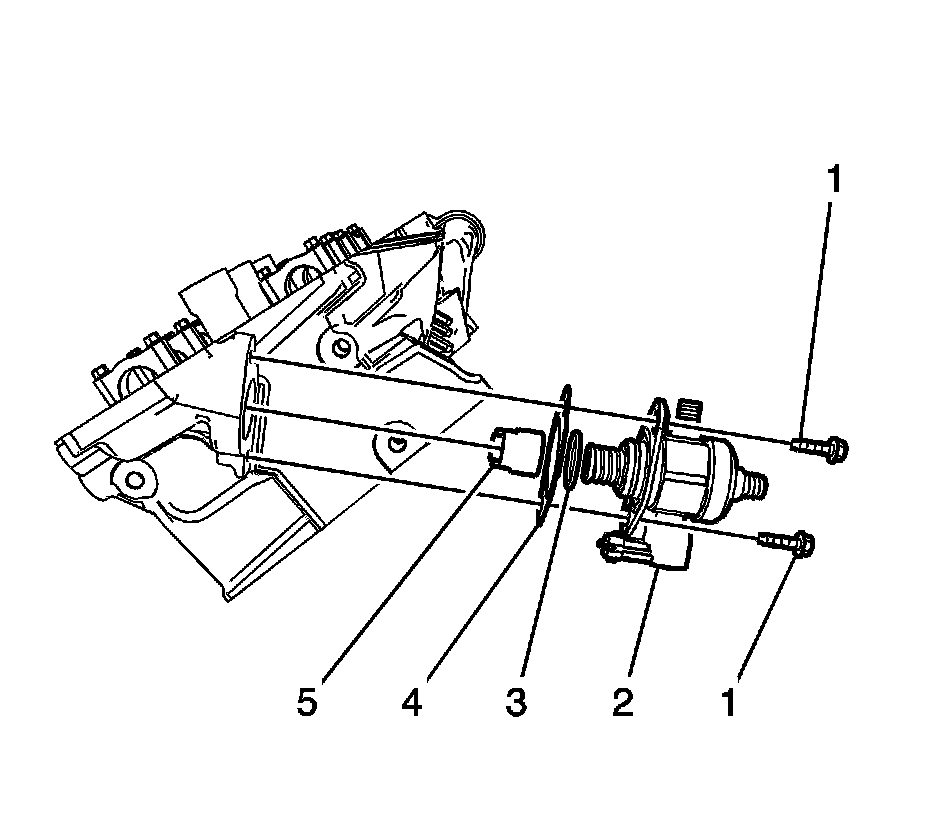
9. Remove and discard the high pressure fuel pump bolts (1).
10. Remove the high pressure fuel pump (2).
11. Remove and discard the high pressure fuel pump seal (3).
12. Remove and discard the high pressure fuel pump gasket (4).
13. Remove the high pressure fuel pump roller lifter (5).
Installation Procedure
Note:
The camshaft lobe driving the high pressure fuel pump must be in the base circle position before the high pressure fuel pump is installed. At base circle position the EN-48896 - gage will be flush with the cylinder head.
1. Use the EN-48896 - gage and set the camshaft lobe driving the high pressure fuel pump to the base circle position.
2. Lubricate the high pressure fuel pump cylinder head bore and NEW high pressure fuel pump roller lifter with lubricant.
3. Install the high pressure fuel pump roller lifter (5).
4. Install a NEW high pressure fuel pump seal (3).
Note:
The high pressure fuel pump gasket has a retaining feature to hold the high pressure fuel pump retaining bolts in place.
5. Position the NEW high pressure fuel pump gasket (4) and bolts (1) to the fuel pump (2).
Caution:
Refer to Fastener Caution Fastener Caution.
Note:
Hand tighten the high pressure fuel pump bolts (1) equally. Force maybe required to hand tighten the bolts.
6. Install the NEW high pressure fuel pump assembly (2) to the cylinder head.
7. Tighten the high pressure fuel pump retaining bolts to 15 Nm (11 lb ft).
8. Connect the engine wiring harness connector to the high pressure fuel pump (2).
9. Install a NEW fuel feed intermediate pipe. Refer to Fuel Feed Intermediate Pipe Replacement Fuel Feed Intermediate Pipe Replacement.
10. Install a NEW fuel feed pipe to the high pressure fuel pump. Refer to Fuel Feed Pipe Replacement Fuel Feed Pipe Replacement.
11. Inspect for leaks using the following procedure:
1. Start the engine and run the engine for 5 seconds.
2. Turn the engine and ignition OFF, and wait for 10 seconds.
3. Inspect for fuel leaks.
12. Install the fuel pipe shield. Refer to Fuel Pipe Shield Replacement Fuel Pipe Shield Replacement.
13. Install the air inlet grille panel. Refer to Air Inlet Grille Panel Replacement (Lower Panel) Air Inlet Grille Panel Replacement (Lower Panel)Air Inlet Grille Panel Replacement (Upper Panel) Air Inlet Grille Panel Replacement (Upper Panel).
14. Connect the battery negative cable. Refer to Battery Negative Cable Disconnection and Connection (Primary) Battery Negative Cable Disconnection and Connection (Primary)Battery Negative Cable Disconnection and Connection (Auxiliary) Battery Negative Cable Disconnection and Connection (Auxiliary).