Oil Pan: Service and Repair
Oil Pan Replacement
Removal Procedure
Warning:
Refer to Battery Disconnect Warning Battery Disconnect Warning.
1. Disconnect the battery negative cable. Refer to Battery Negative Cable Disconnection and Connection (Primary) Battery Negative Cable Disconnection and Connection (Primary)Battery Negative Cable Disconnection and Connection (Auxiliary) Battery Negative Cable Disconnection and Connection (Auxiliary).
2. Remove the front cover. Refer to Engine Front Cover Replacement Service and Repair.
3. Raise and support the vehicle. Refer to Lifting and Jacking the Vehicle Service and Repair.
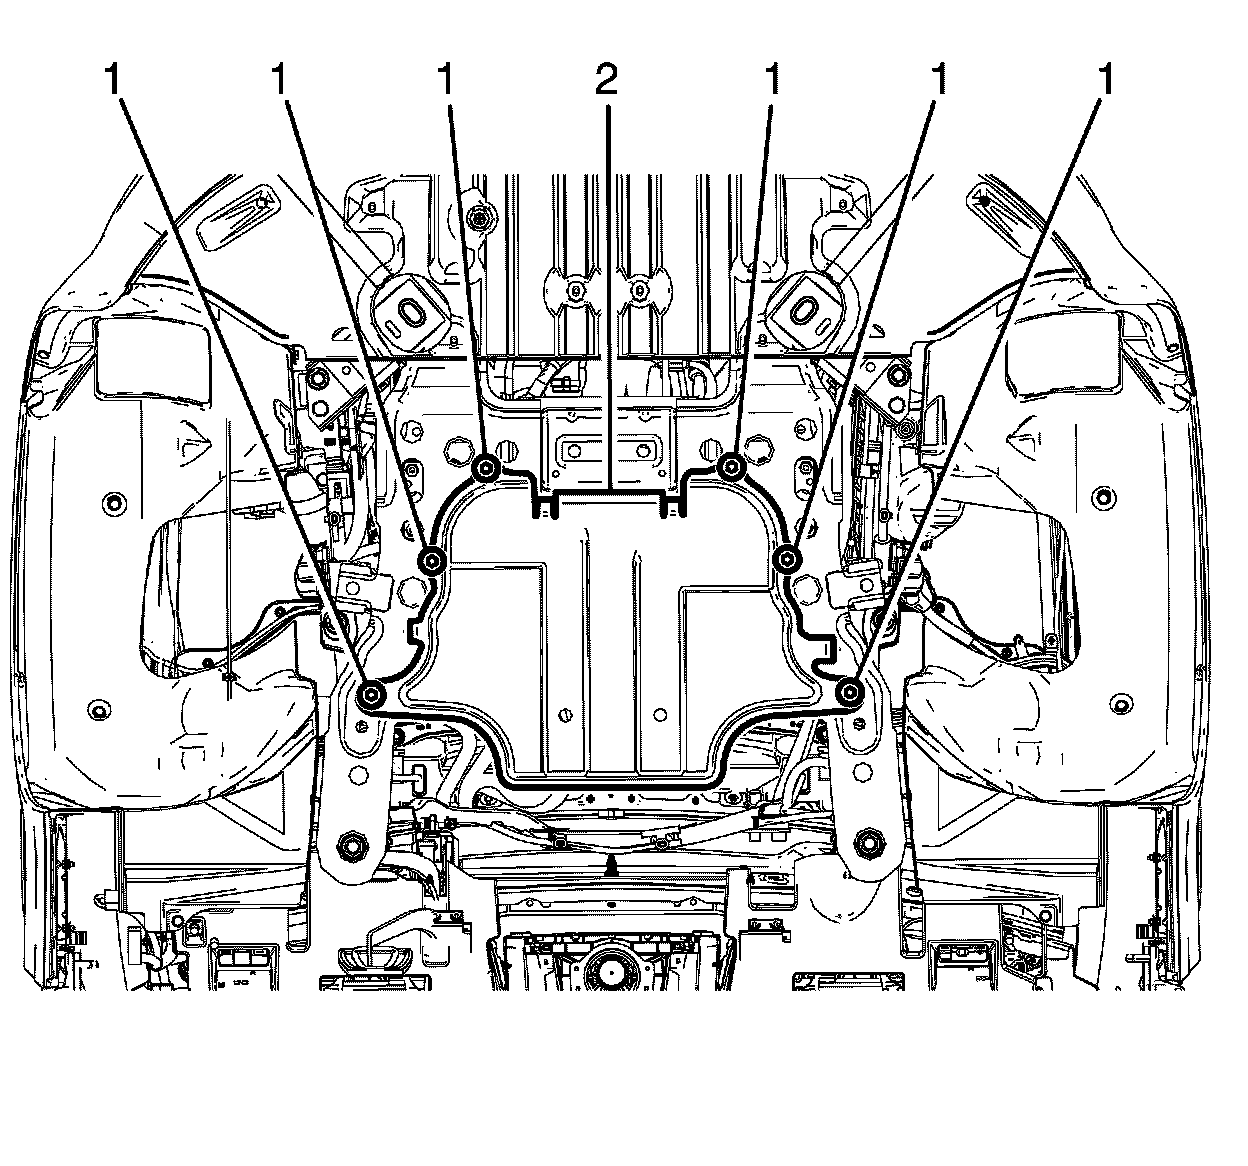
4. Remove the engine splash shield.
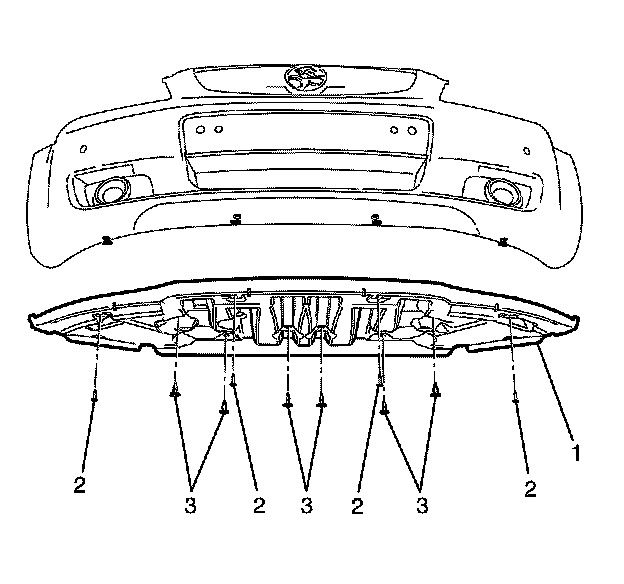
5. Remove the front air deflector.
6. Drain the engine oil. Refer to Engine Oil and Oil Filter Replacement Service and Repair.
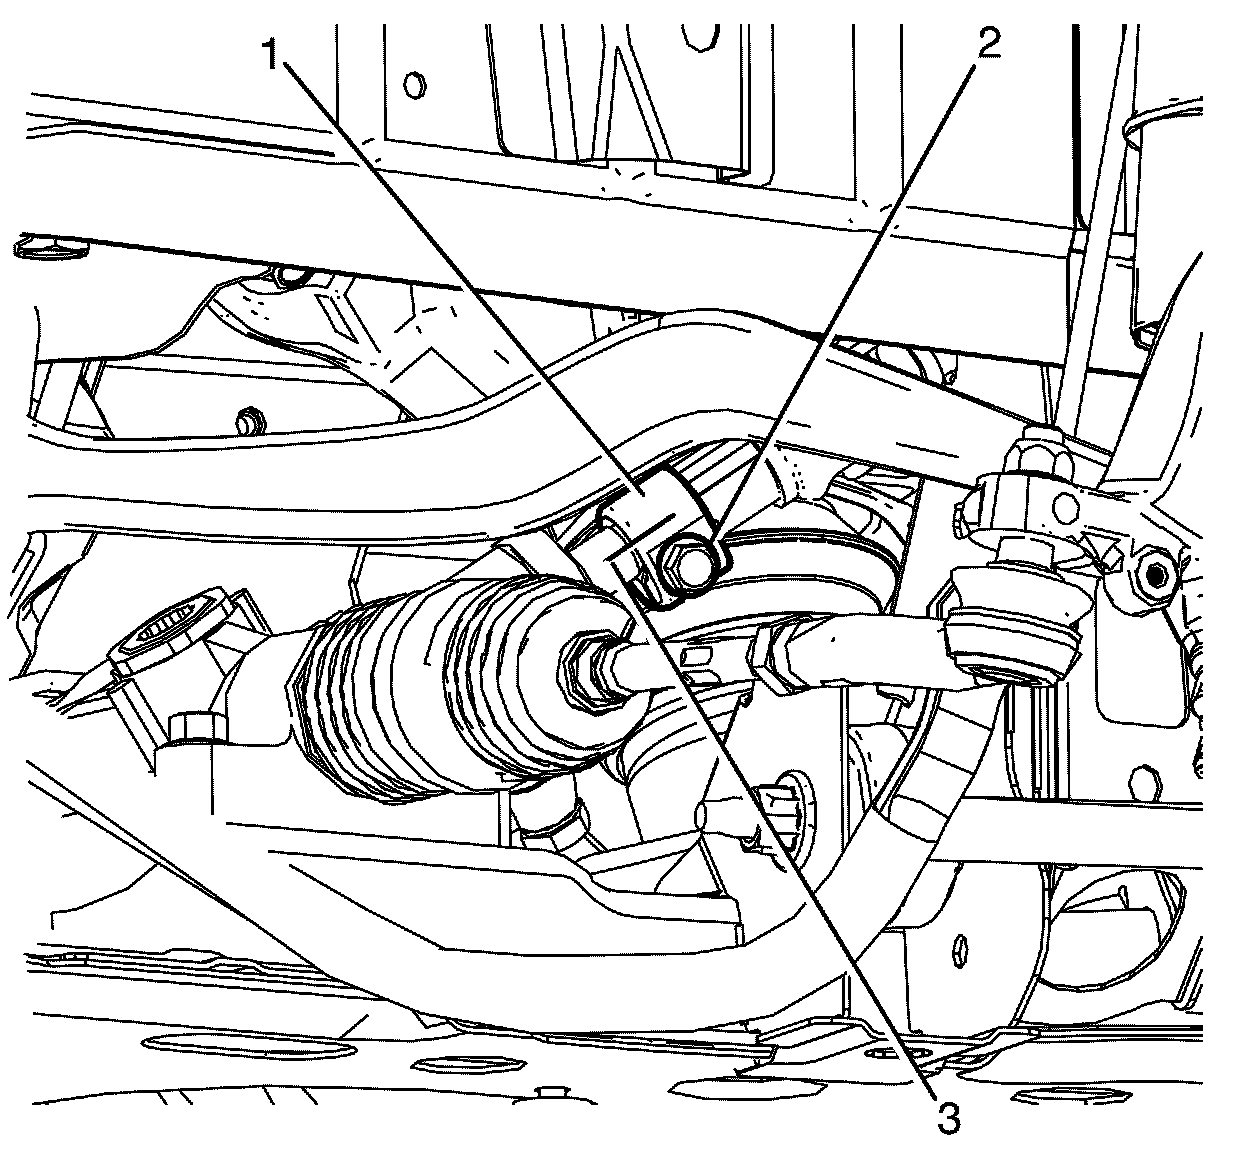
Note:
Observing the orientation of the intermediate steering shaft (1) with reference to the pinion shaft (3) will minimize the potential of incorrect steering column assembly alignment.
7. Mark the intermediate steering shaft (1) in relation to the pinion shaft (3).
Note:
Bolts with micro-encapsulated thread sealant must be discarded after removal.
8. Remove and discard the intermediate steering shaft to pinion shaft retaining bolt (2). Clean the threaded bolt hole.
9. Remove the intermediate shaft (2) from the pinion shaft (3).
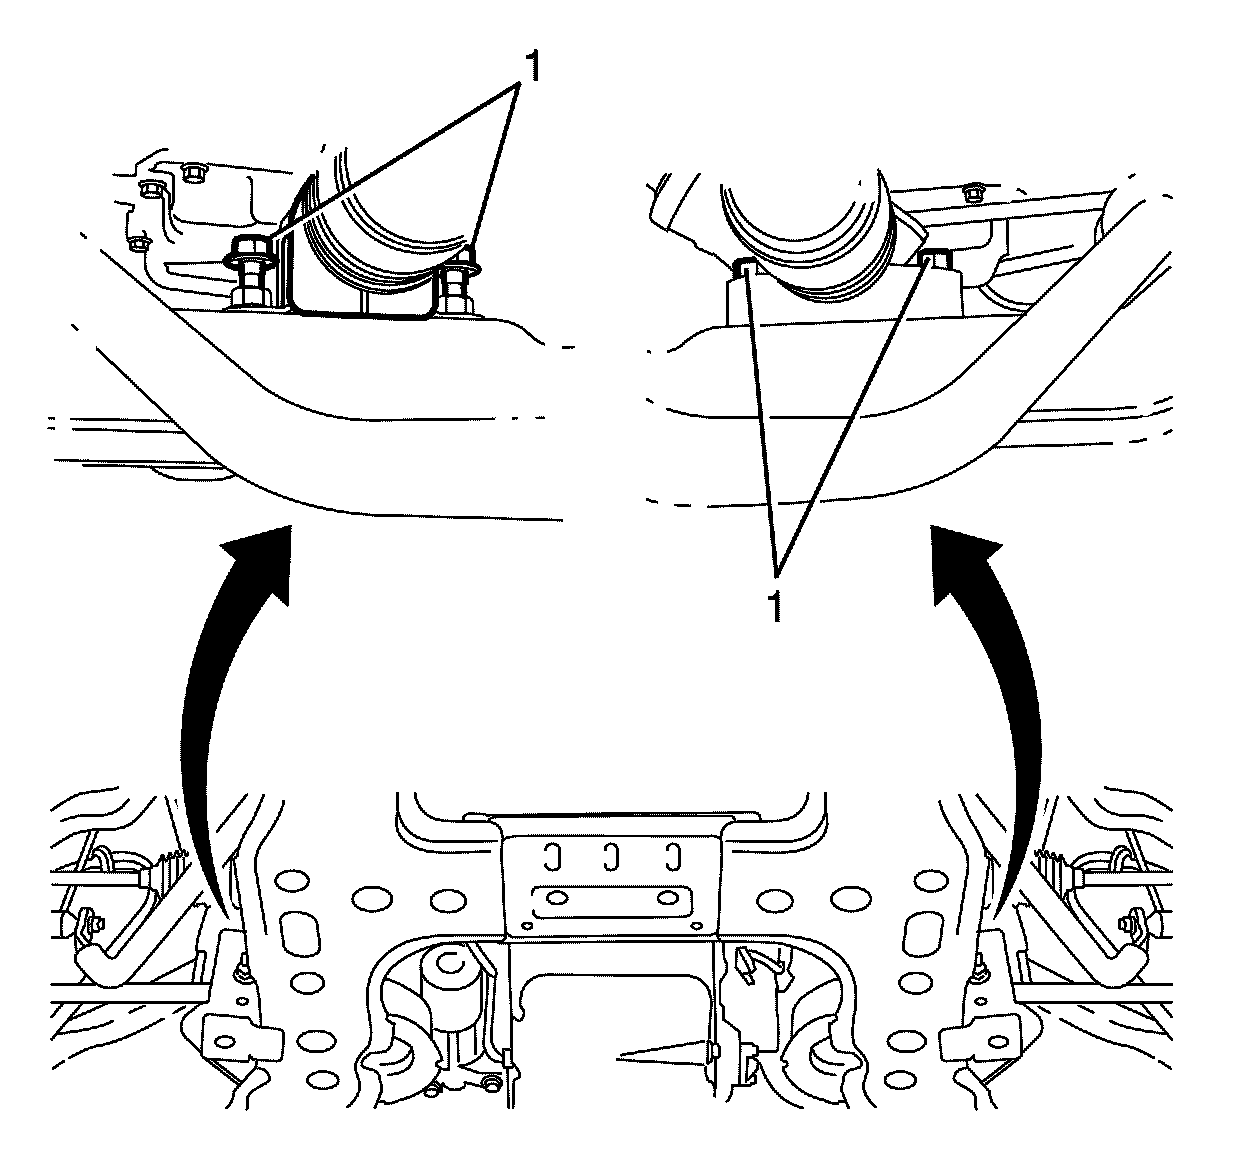
10. Remove the steering gear to subframe retaining bolts (1).
11. Reposition the steering gear away from the engine oil pan.
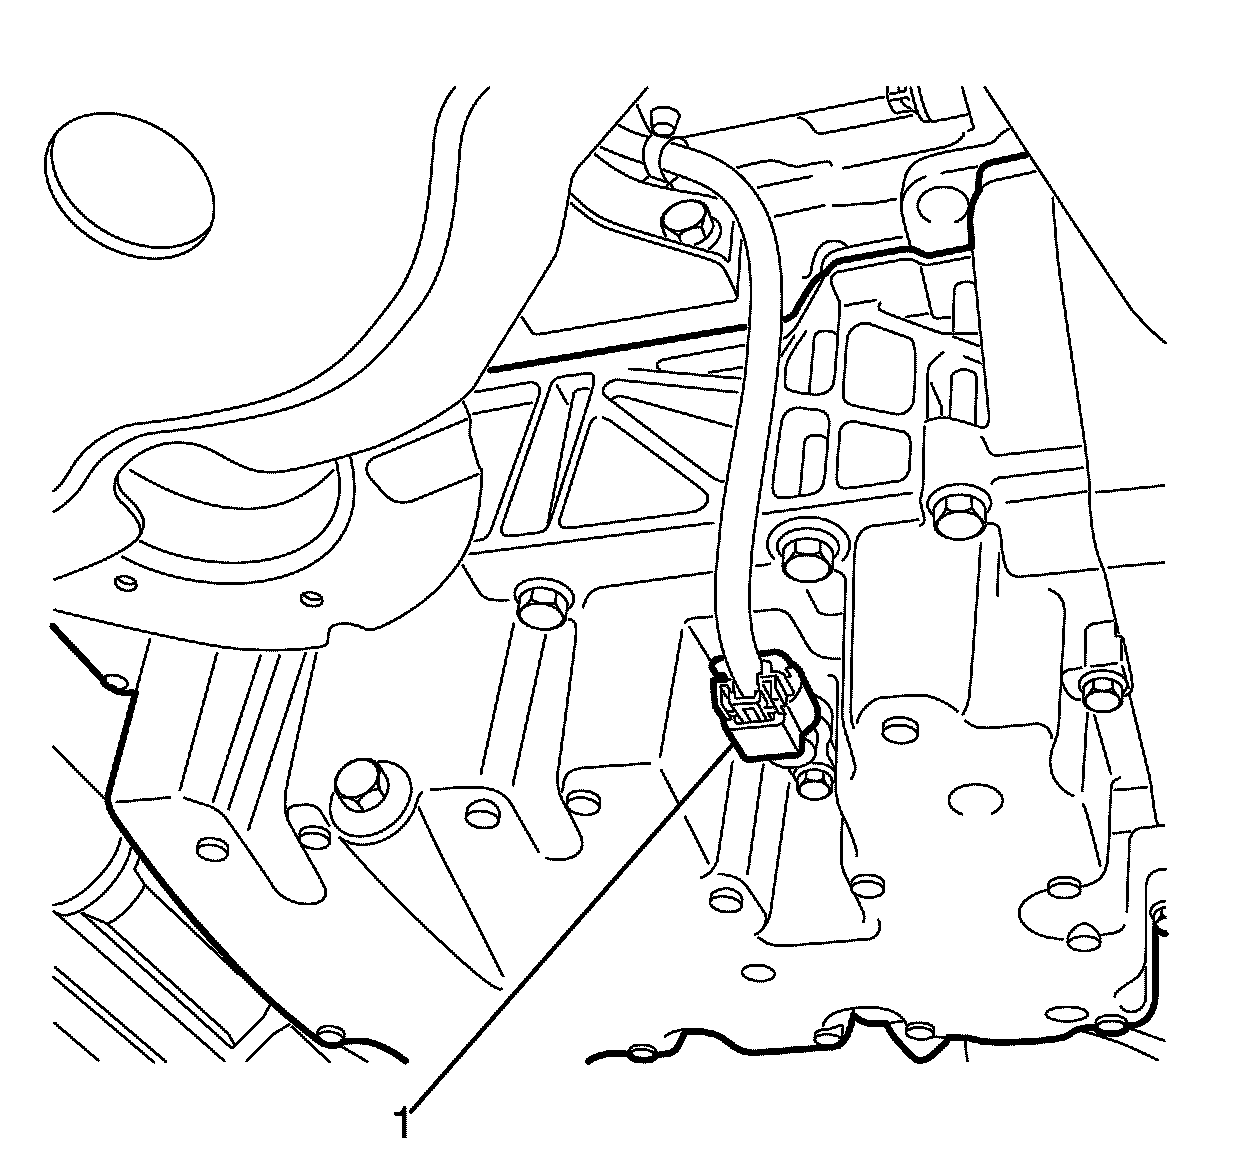
12. Disconnect the oil level sensor electrical connector (1).
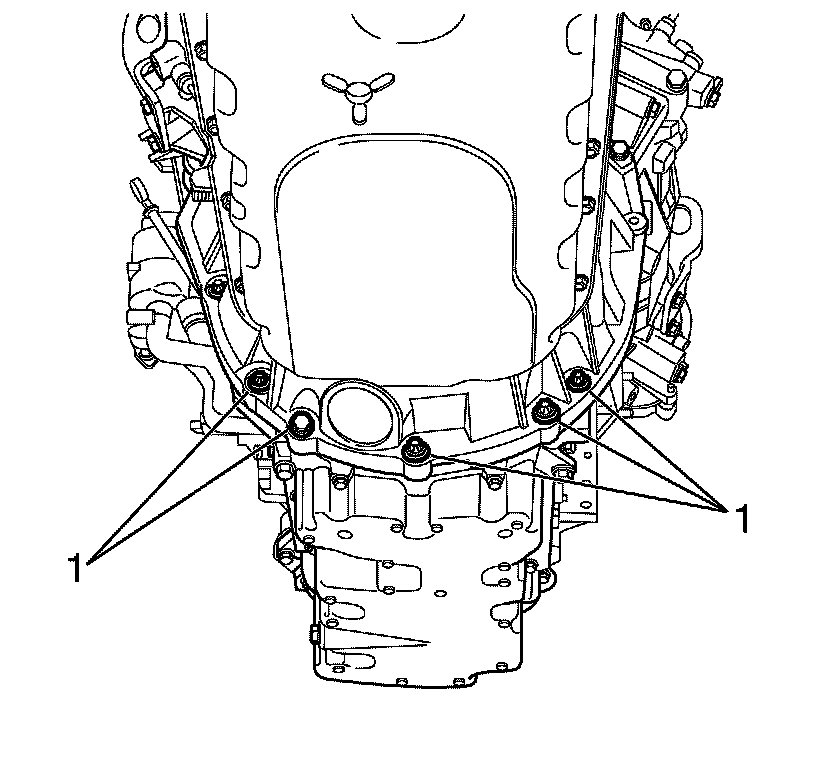
13. Remove the transmission housing to engine oil pan retaining bolts (1).
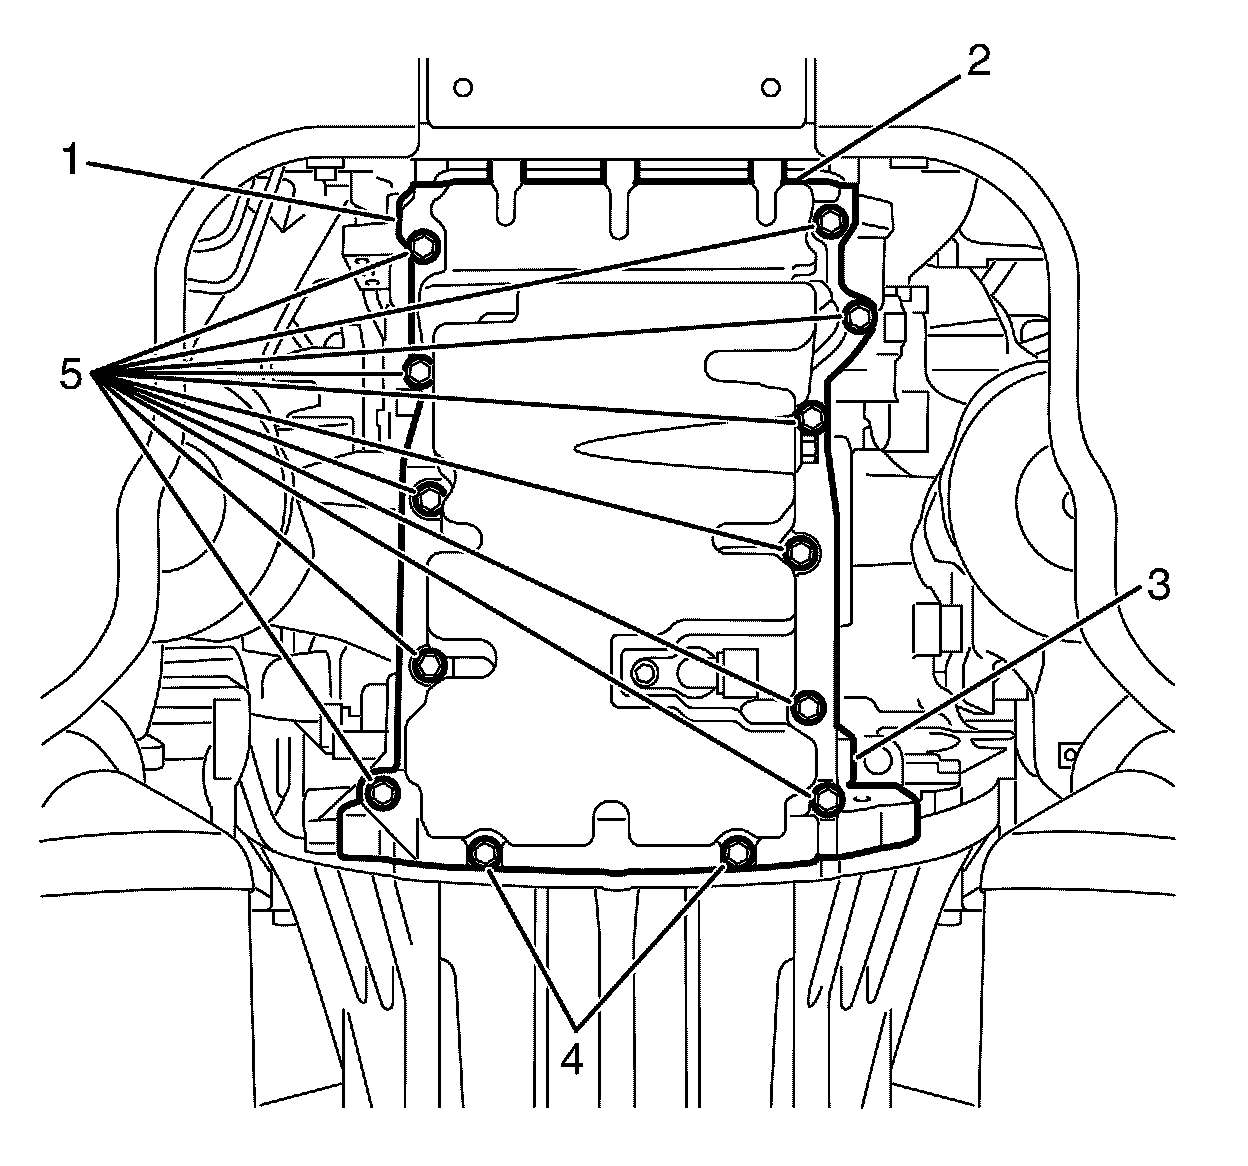
14. Remove the engine oil pan to crankshaft rear oil seal housing retaining bolts (4).
15. Remove the engine oil pan to cylinder block retaining bolts (5).
Note:
Use the pry points (1 and 3) to pry the engine oil pan from the cylinder block.
16. Remove the engine oil pan (2) from the cylinder block.
17. Perform the following steps as necessary.
* Disassemble the engine oil pan. Refer to Oil Pan Disassemble 70. Oil Pan Disassemble.
* Clean and inspect the engine oil pan. Refer to Oil Pan Cleaning and Inspection 71. Oil Pan Cleaning and Inspection.
Installation Procedure
1. Assemble the oil pan as necessary. Refer to Oil Pan Assemble 73. Oil Pan Assemble.
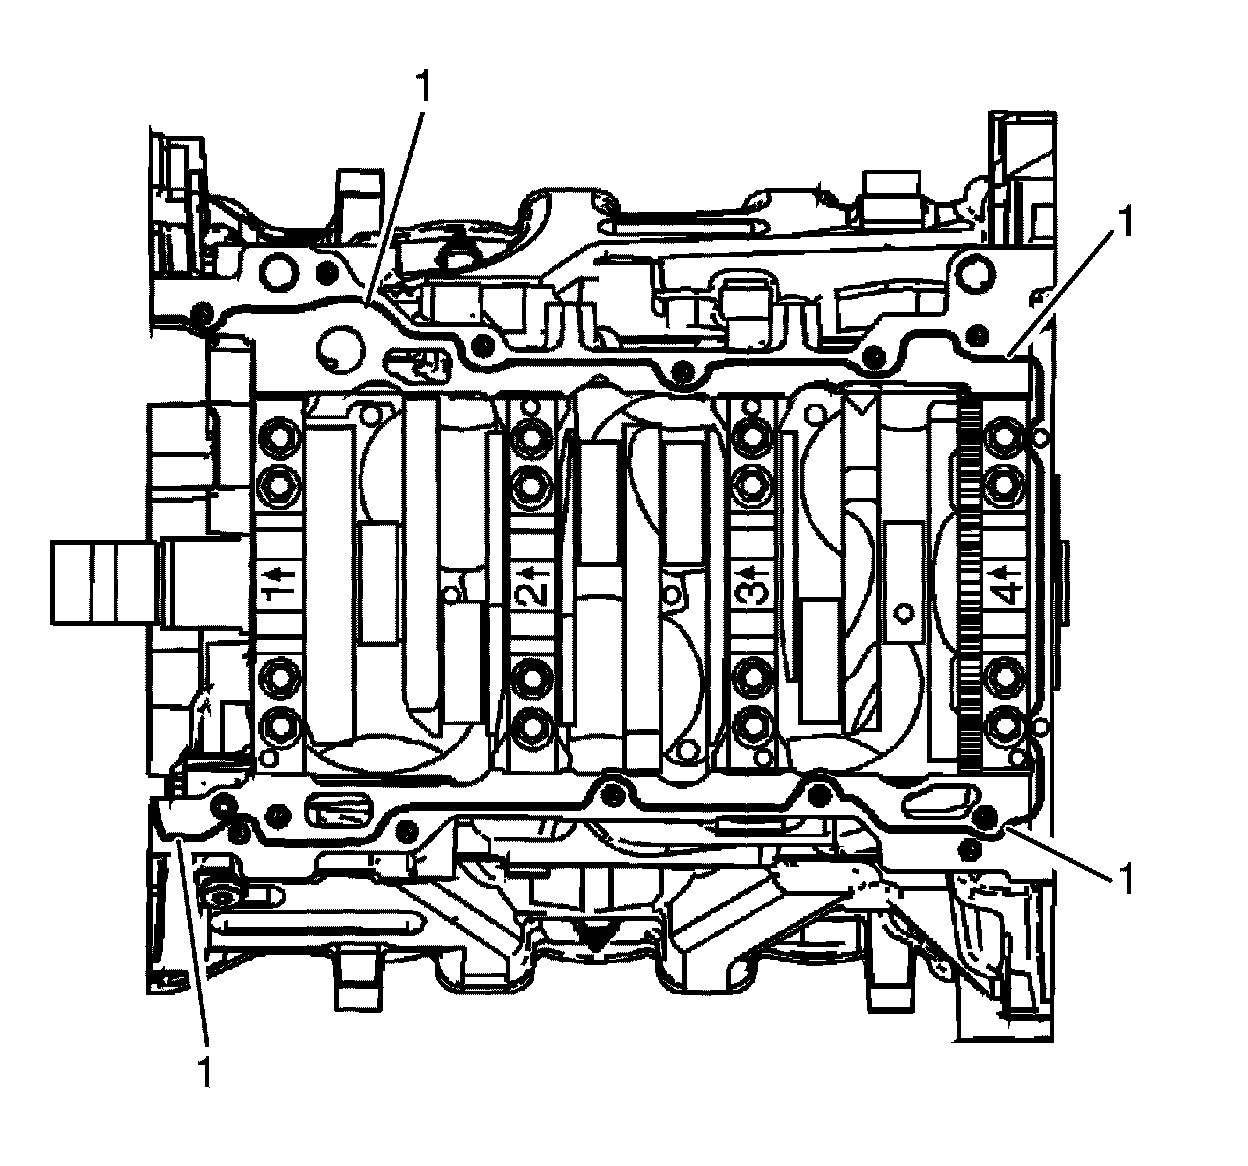
2. Place a 3 mm (0.118 in) bead of GM approved sealant (1) on the cylinder block.
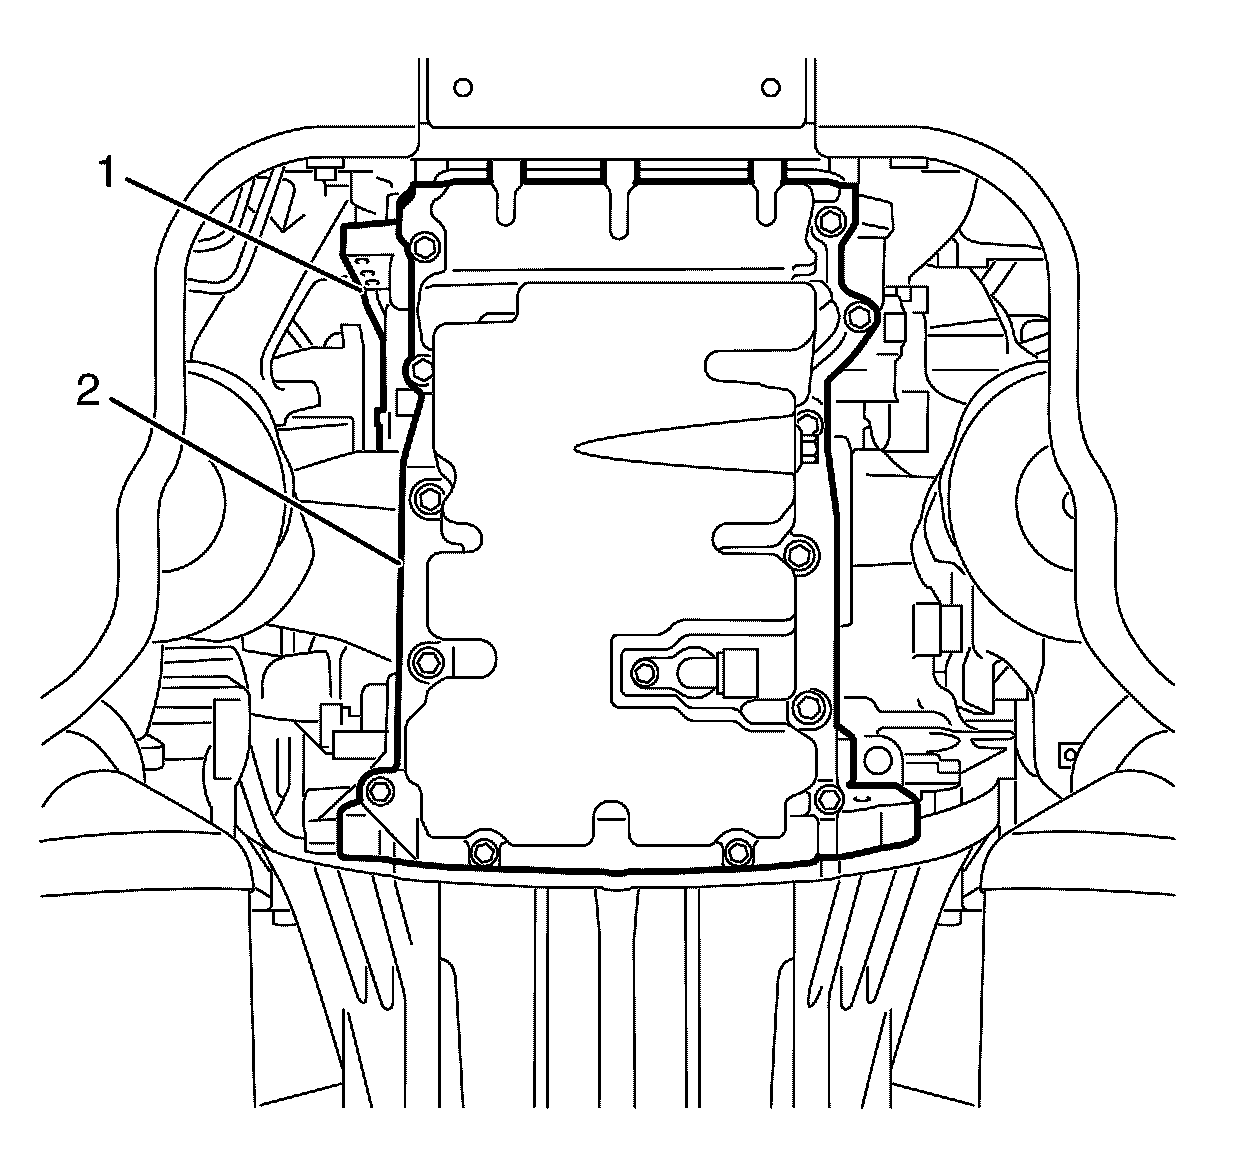
3. Install the engine oil pan (2) to the engine cylinder block (1).
Caution:
Refer to Fastener Caution Fastener Caution
Note:
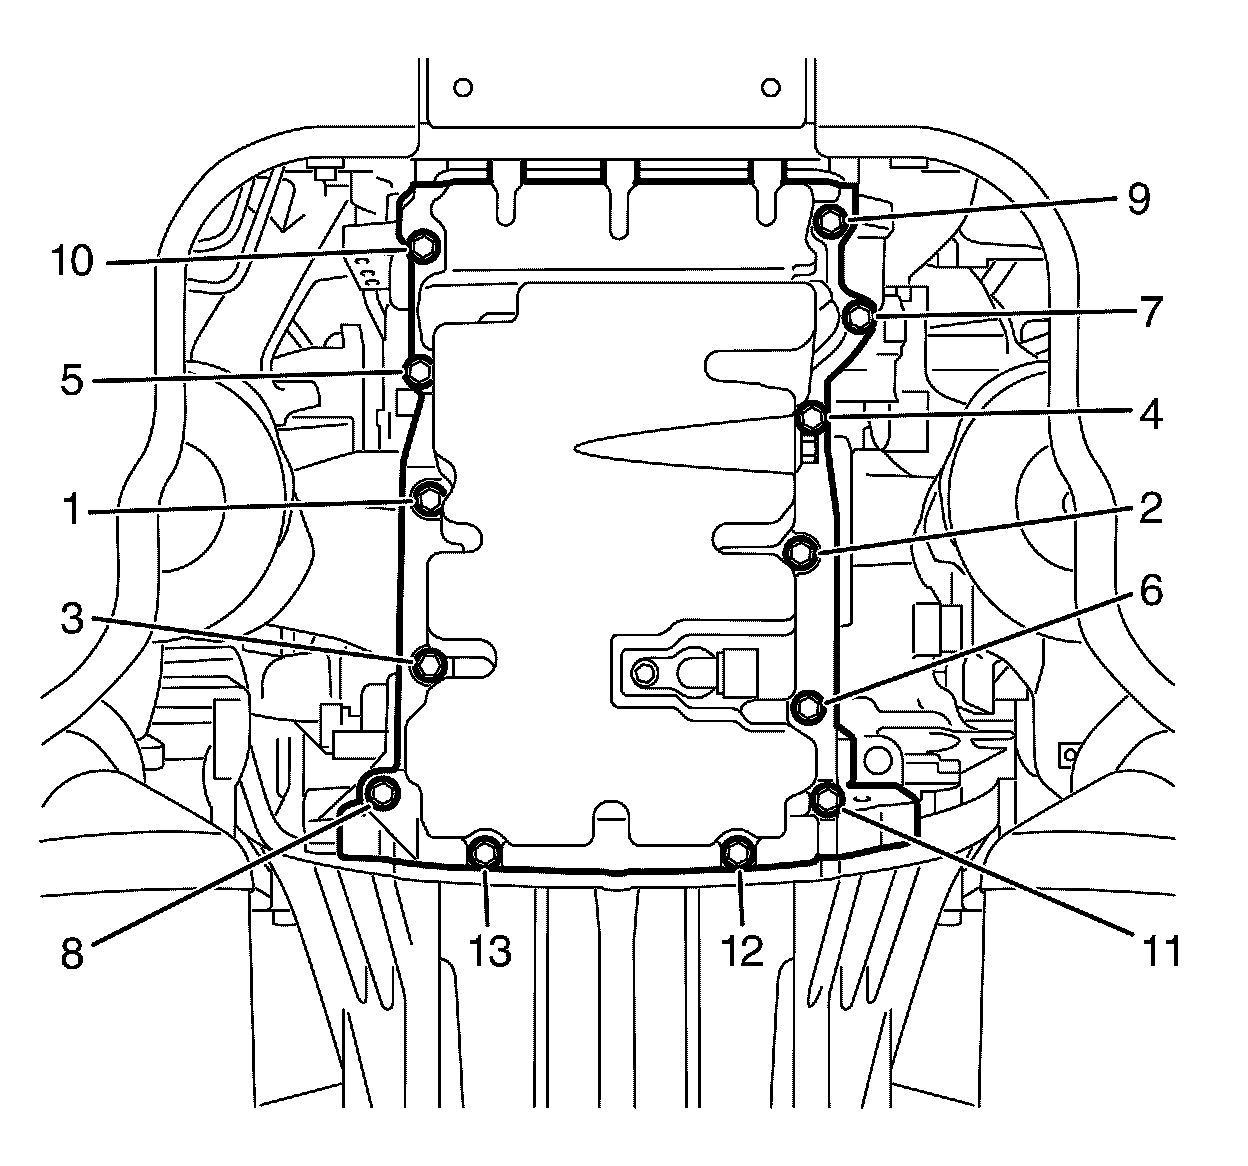
Tighten the bolts in the sequence shown.
4. Install the engine oil pan to cylinder block retaining bolts (1 to 11). Do not tighten the bolts at this stage.
5. Install the engine oil pan to crankshaft rear oil seal housing retaining bolts (12 and 13).
Tighten the bolts (1 to 11) to 22 Nm (16 lb ft).
Tighten the bolts (12 and 13) to 9 Nm (80 lb in).
6. Install the transmission housing to engine oil pan retaining bolts (1).
Tighten the bolts to 48 Nm (35 lb ft).
7. Connect the oil level sensor electrical connector (1) to the oil level sensor.
8. Position the steering gear into its position.
9. Install the steering gear to subframe retaining bolts (1).
Tighten the bolts to 65 Nm (48 lb ft).
Note:
Make sure that the intermediate steering shaft and pinion shaft are installed in the same position as it was before it was removed.
10. Align the mark made during the removal procedure and install the intermediate steering shaft (1) to the pinion shaft (3).
11. Install the NEW intermediate steering shaft to pinion shaft retaining bolt (2).
Tighten the bolt to 25 Nm (18 lb ft).
12. Install the engine splash shield.
13. Install the front air deflector.
14. Lower the vehicle to the ground
15. Install the front cover. Refer to Engine Front Cover Replacement Service and Repair.
16. Fill the engine with engine oil. Refer to Engine Oil and Oil Filter Replacement Service and Repair.
17. Connect the battery negative cable. Refer to Battery Negative Cable Disconnection and Connection (Primary) Battery Negative Cable Disconnection and Connection (Primary)Battery Negative Cable Disconnection and Connection (Auxiliary) Battery Negative Cable Disconnection and Connection (Auxiliary).