Part 2
Engine Replacement
Note: DO NOT bend or distort the right side engine mount heat shield.
2. Install the right side engine mount to engine mount bracket retaining nut (1).
Tighten the nut to 80 Nm (59 lb ft).
3. Remove the lifting equipment as required and the J 41798 - engine lift brackets from the cylinder heads.
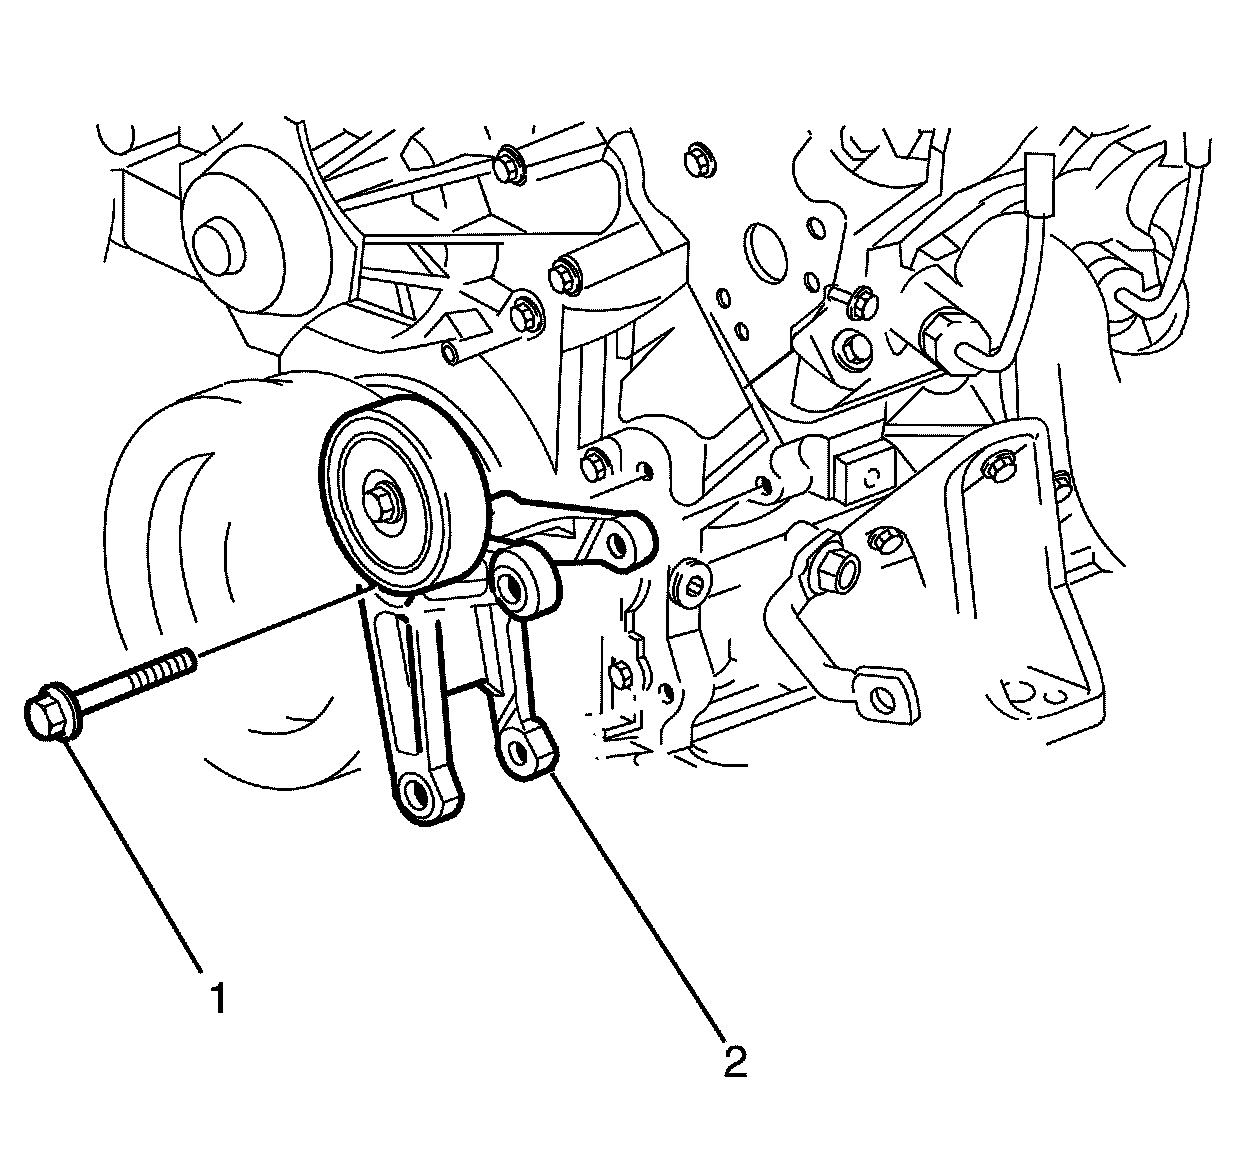
4. Install the alternator bracket (2) to the engine.
5. Install the alternator bracket to engine block retaining bolt (1).
Tighten the bolt to 58 Nm (43 lb ft).
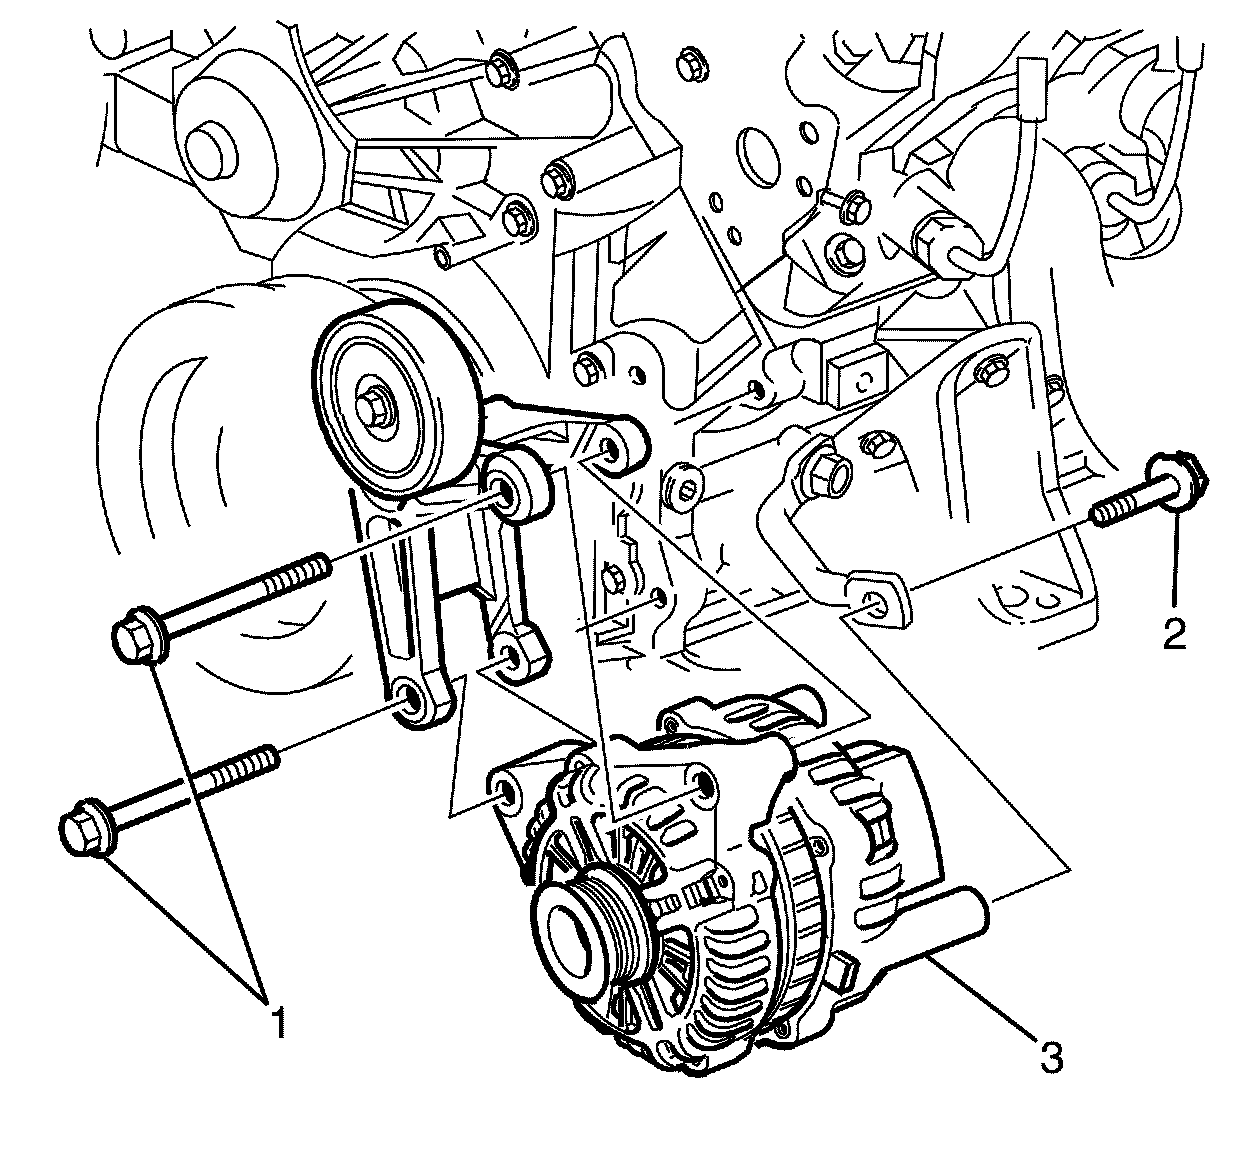
6. Install the alternator (3) to the alternator bracket.
7. Install alternator to alternator bracket retaining bolts (1 and 2).
Tighten the bolts to 58 Nm (43 lb ft).
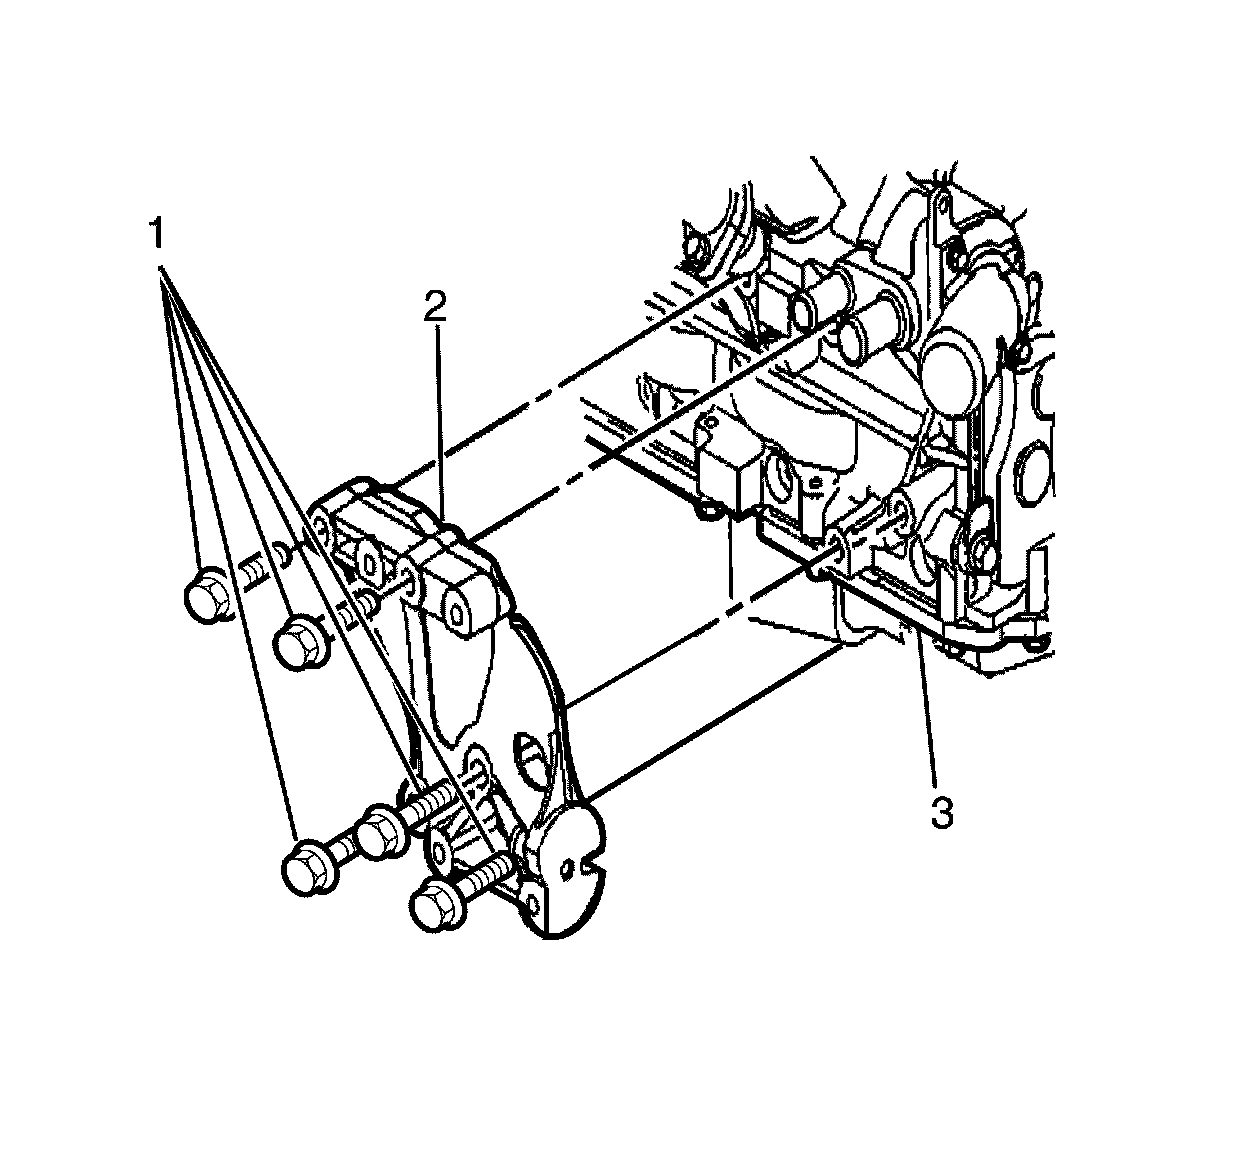
8. Install the A/C compressor bracket (2) to the engine.
9. Install the A/C compressor bracket to the cylinder block retaining bolts (1).
Tighten the bolts to 58 Nm(43 lb ft).
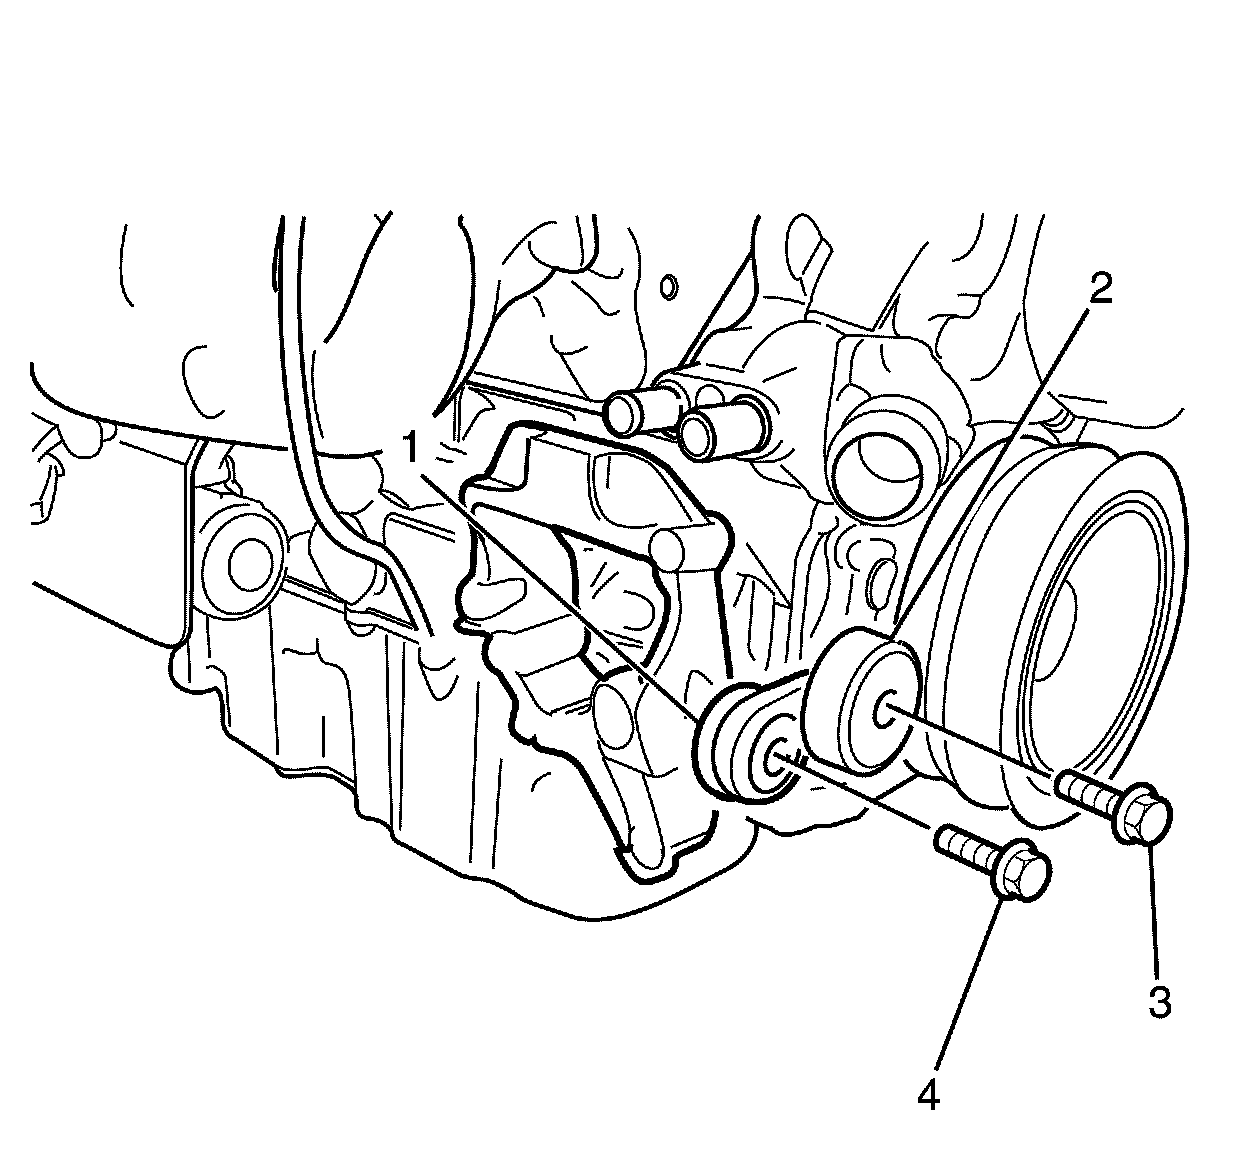
10. Install the A/C drive belt tensioner (1) to the engine.
11. Install the A/C drive belt tensioner to A/C compressor bracket retaining bolt (4).
Tighten the bolt to 22 Nm (16 lb ft).
12. Install the A/C tensioner pulley (2) to the A/C tensioner.
13. Install the A/C tensioner pulley to A/C tensioner retaining bolt (3).
Tighten the bolt to 50 Nm (37 lb ft).
14. If you are replacing the compressor, balance the compressor oil. Refer to Air Conditioning Compressor Oil Balancing Procedures.
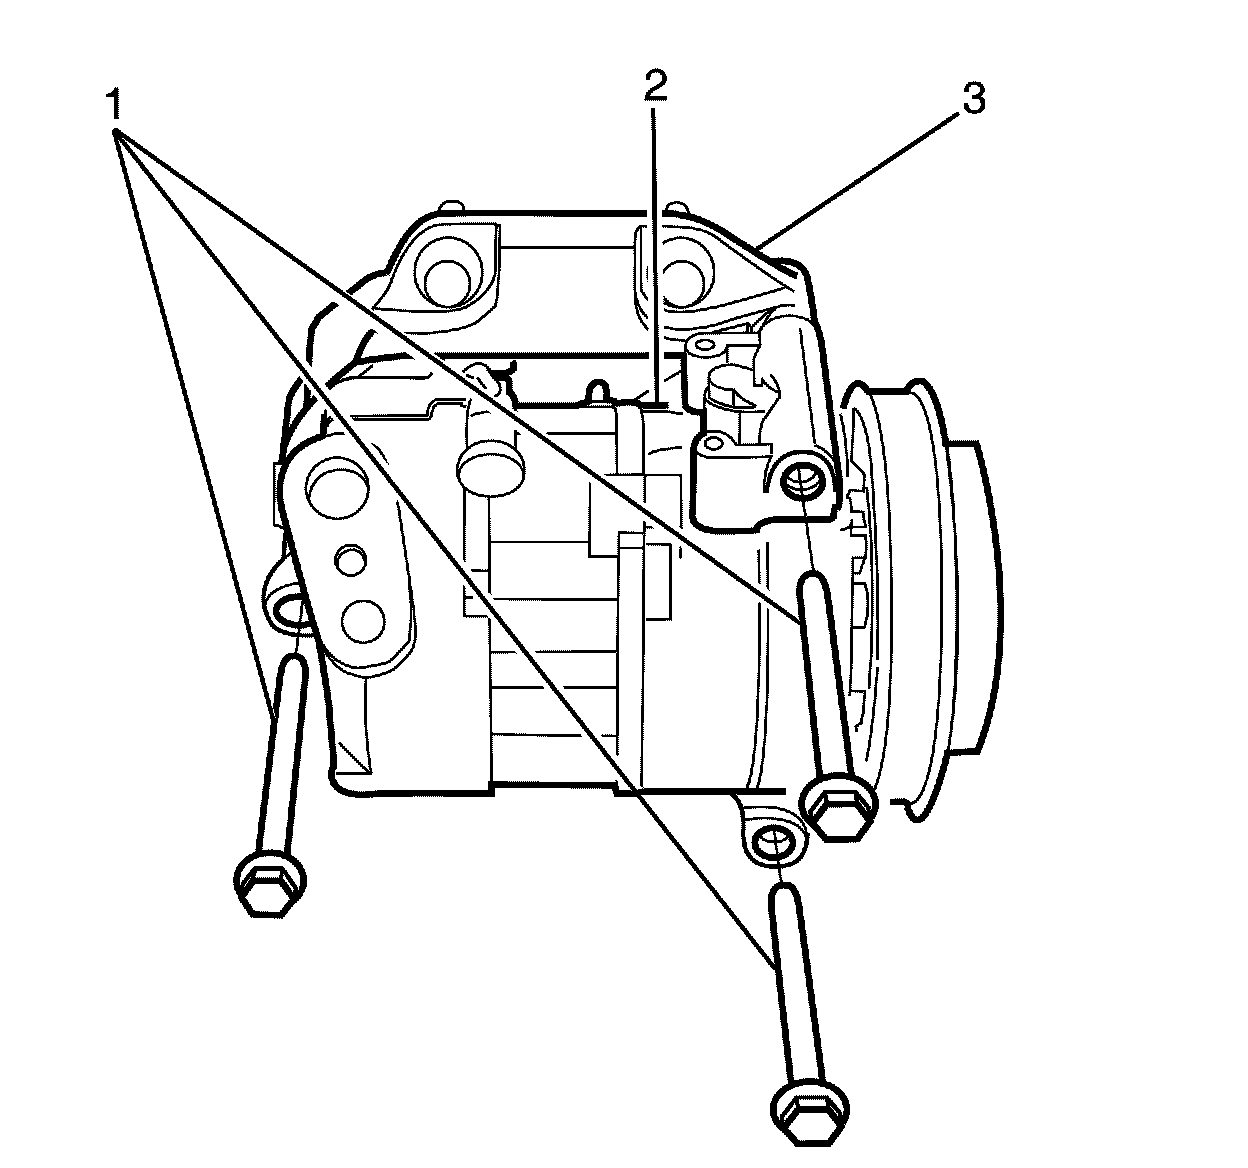
15. Install the A/C compressor (2) to the A/C compressor bracket (3).
16. Install the A/C compressor to A/C compressor bracket retaining bolts (1).
Tighten the bolts to 22 Nm (16 lb ft).
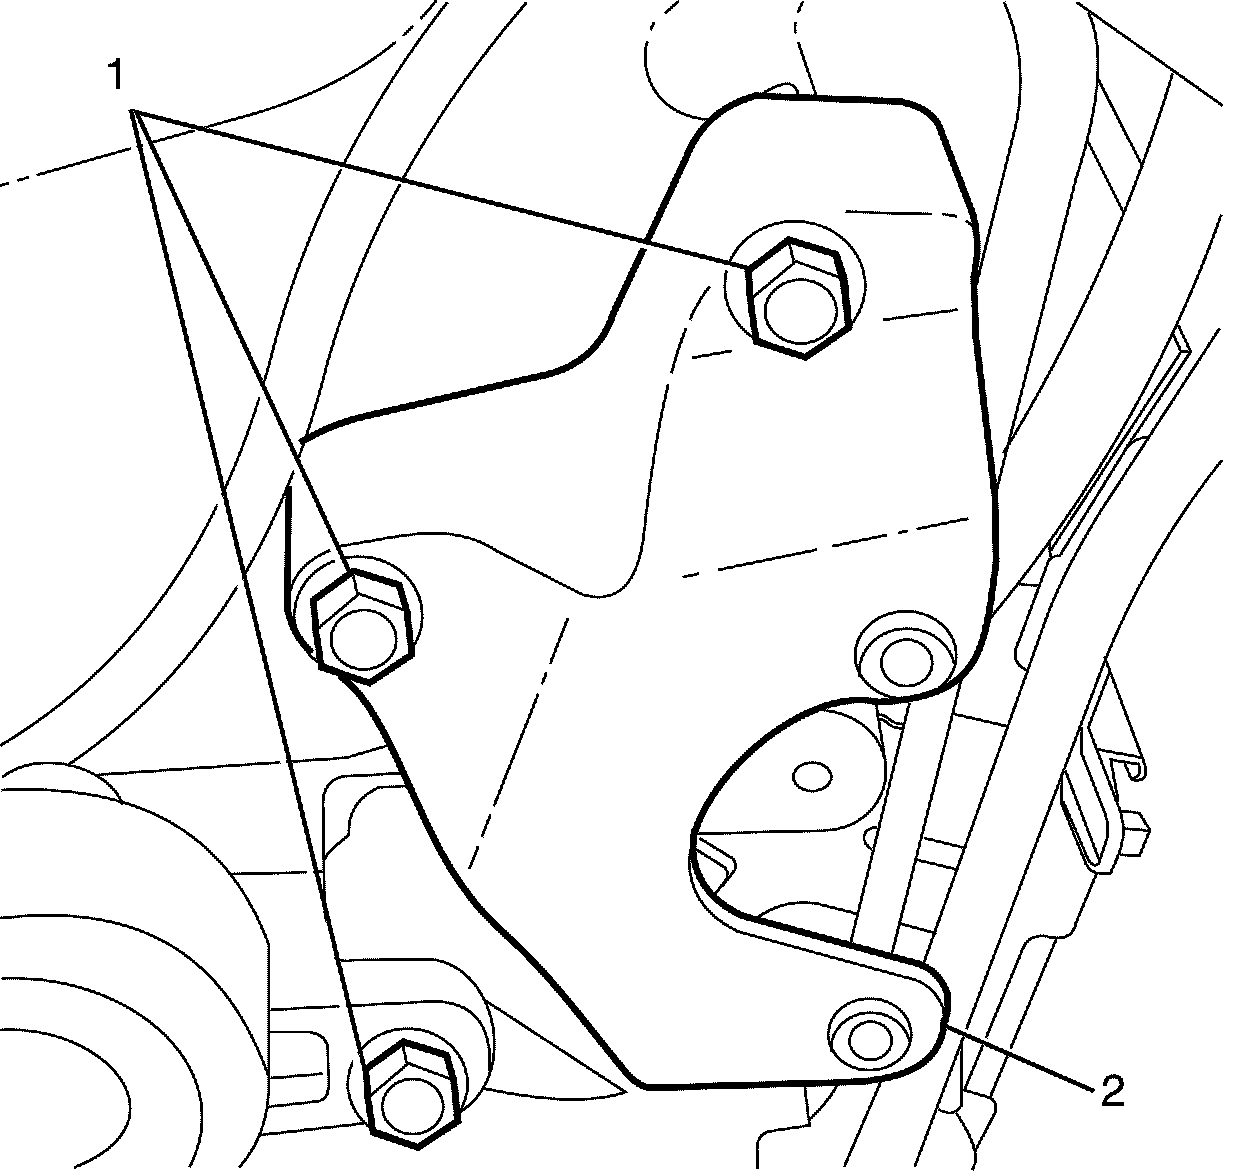
17. Install the power steering pump bracket (2) to the engine.
18. Install the power steering pump bracket to engine retaining bolts (1).
Tighten the bolts to 58 Nm (43 lb ft).
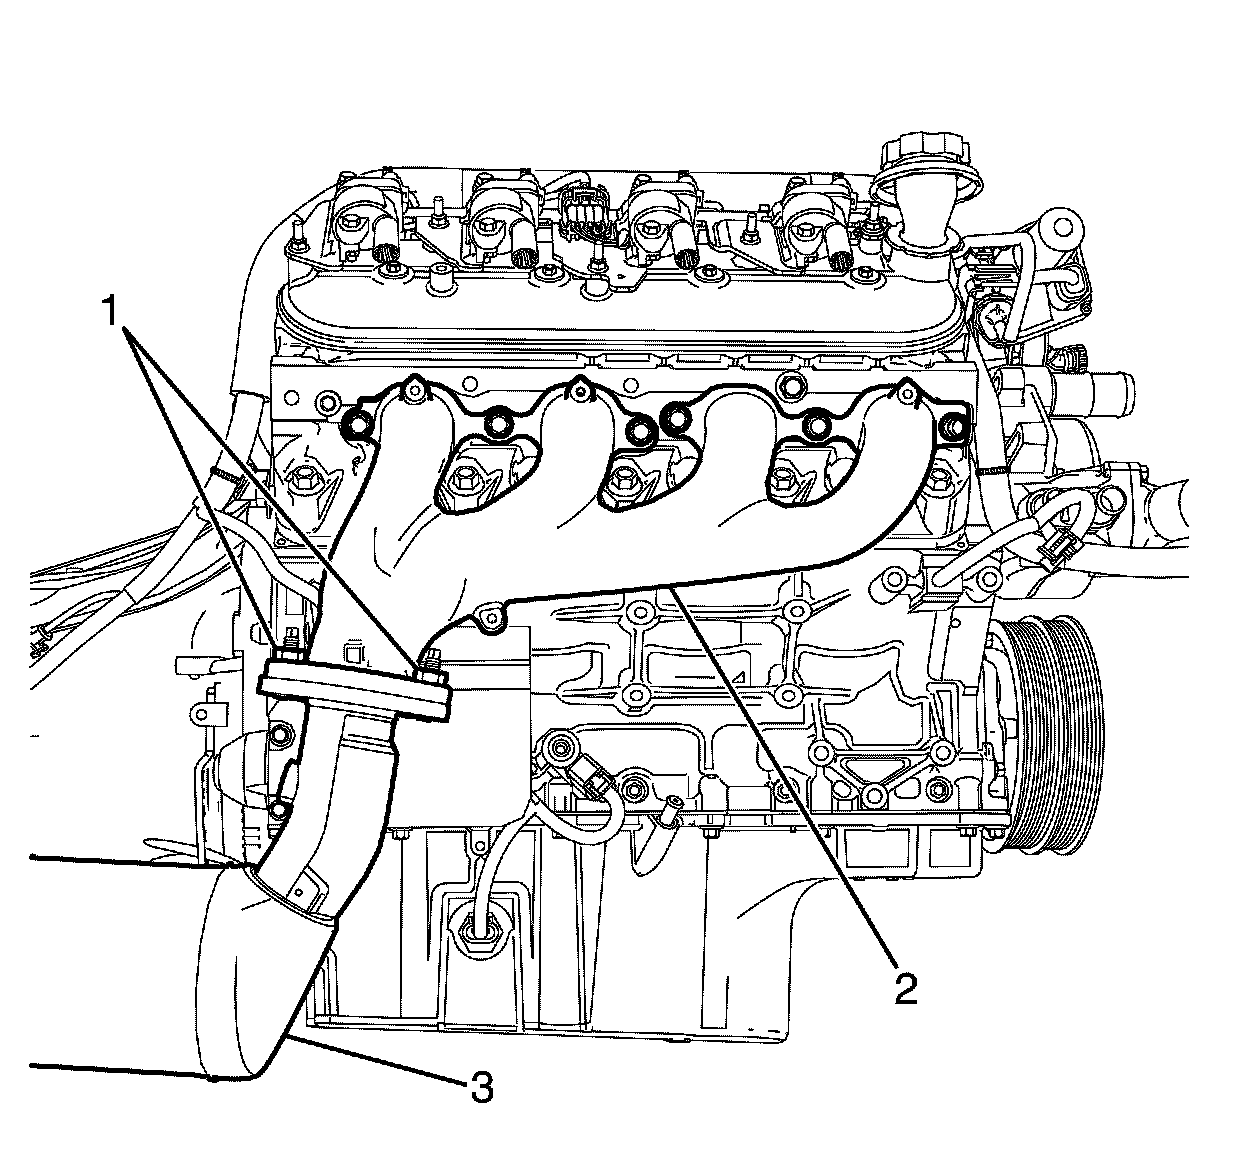
Note: Make sure that a new sealing ring is fitted prior to installation. If not the exhaust system may perform poorly.
19. Install a NEW sealing ring to the right side catalytic converter.
20. Connect the right side catalytic converter (3) to the right side exhaust manifold (2).
21. Install the right side catalytic converter to right side exhaust manifold retaining nuts (1).
Tighten the nuts to 45 Nm (33 lb ft).
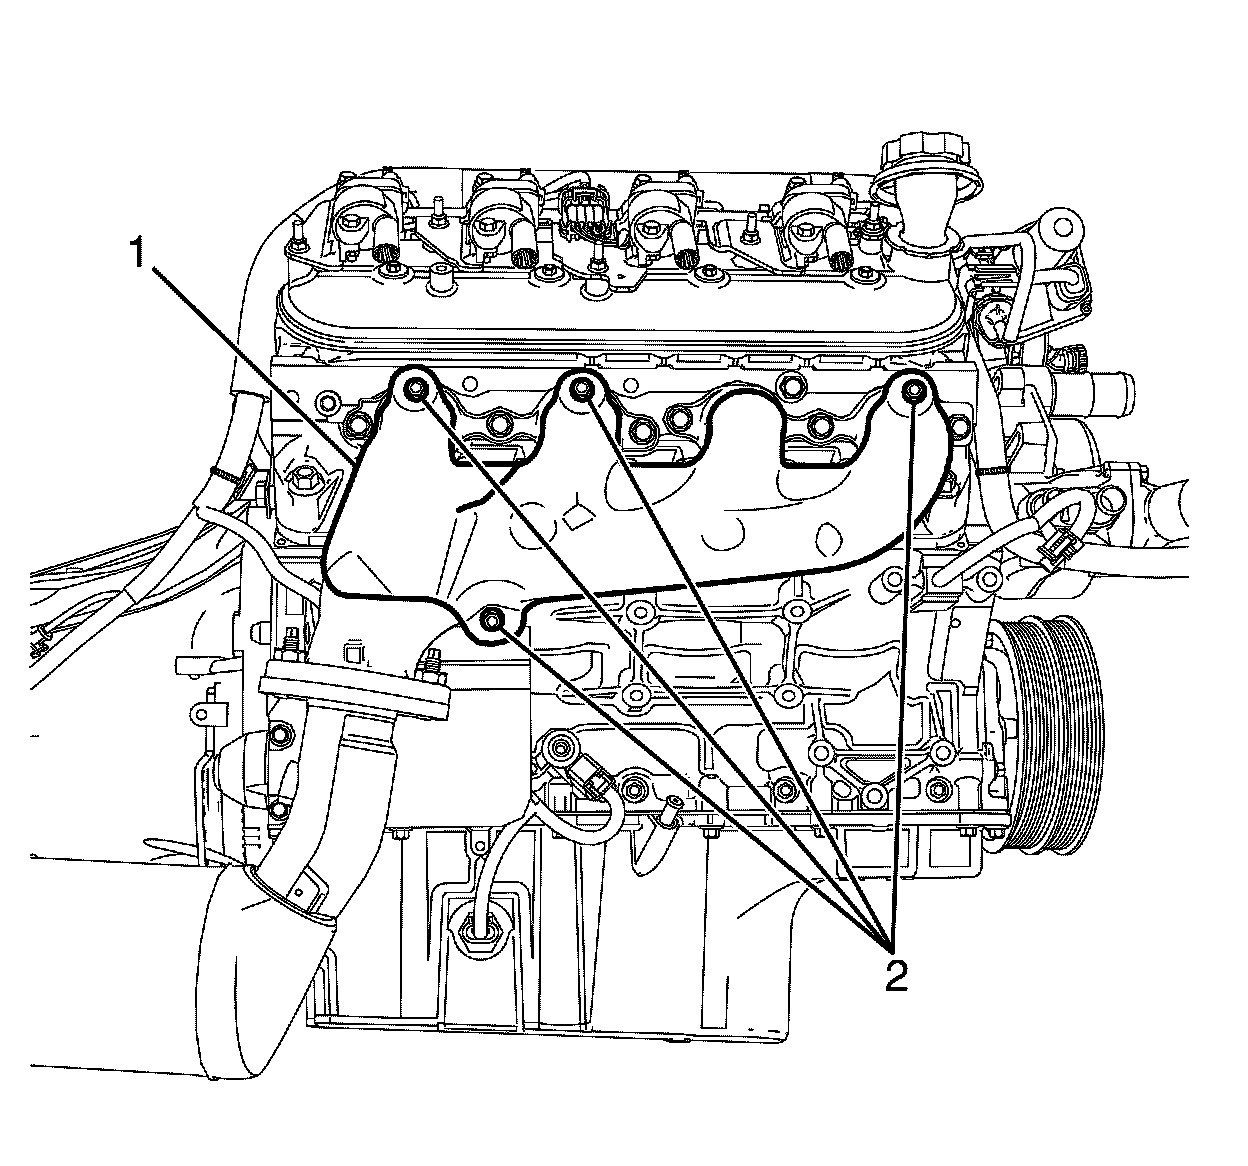
22. Install the right side exhaust manifold heat shield (1) to the right side exhaust manifold.
23. Install the right side exhaust manifold heat shield to right side exhaust manifold retaining bolts (2).
Tighten the bolts to 10 Nm (89 lb in).
24. Install the right side spark plugs to the cylinder head. Refer to Spark Plug Replacement Service and Repair.
25. Install the right side spark plug leads. Refer to Spark Plug Wire Replacement Service and Repair
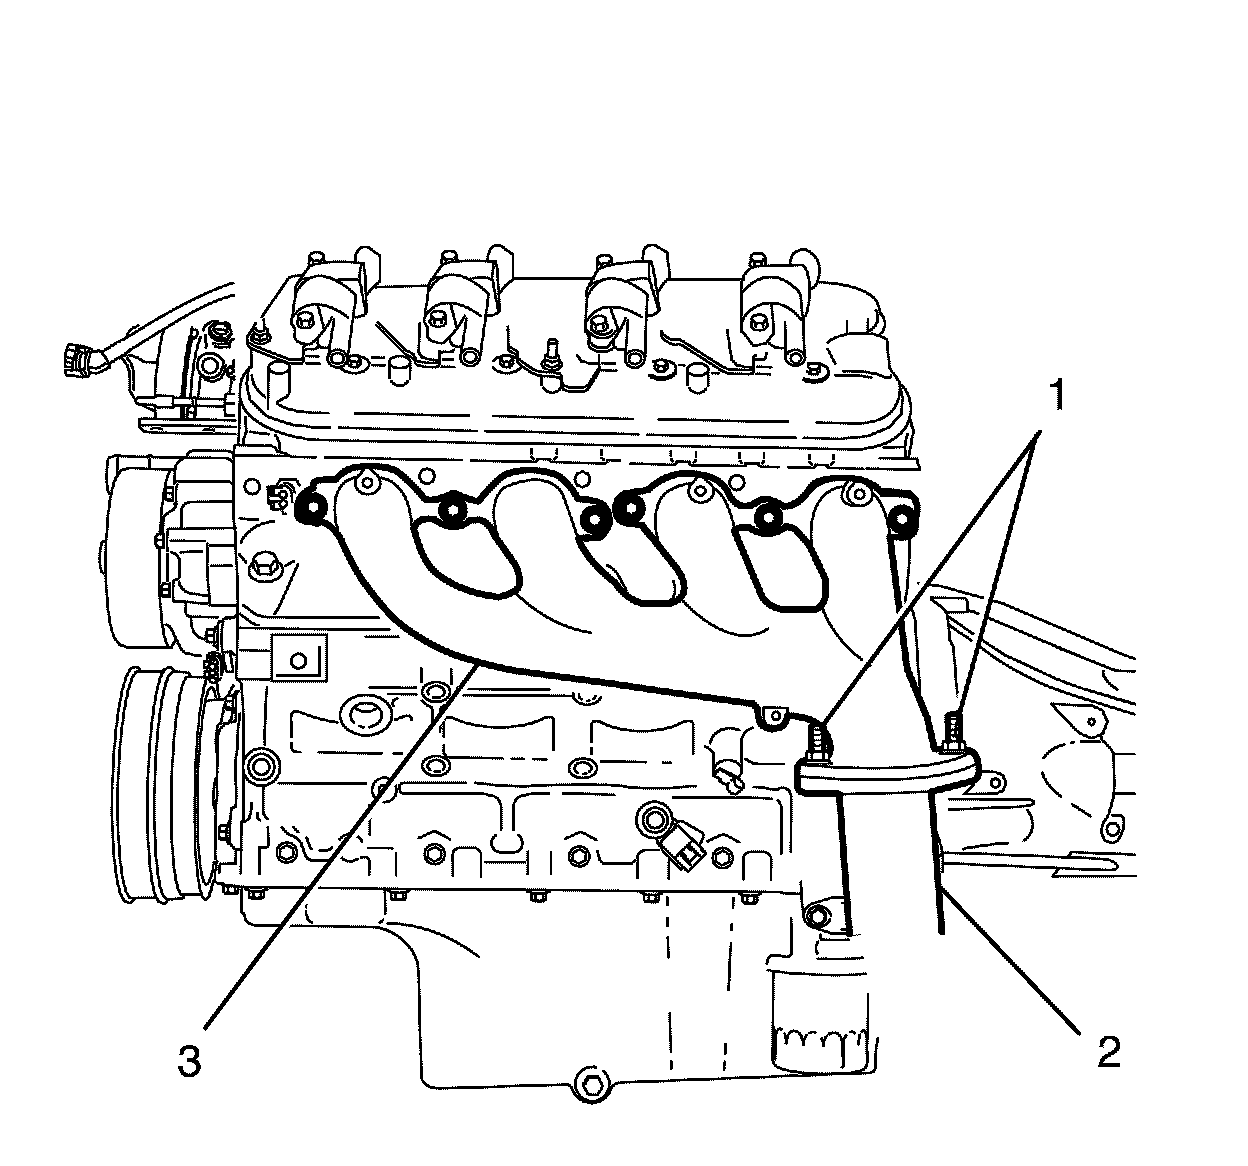
Note: Make sure that a new sealing ring is fitted prior to installation. If not the exhaust system may perform poorly.
26. Install a NEW sealing ring to the left side catalytic converter.
27. Connect the left side catalytic converter (2) to the left side exhaust manifold (3).
28. Install the left side catalytic converter to left side exhaust manifold retaining nuts (1).
Tighten the nuts to 45 Nm (33 lb ft).
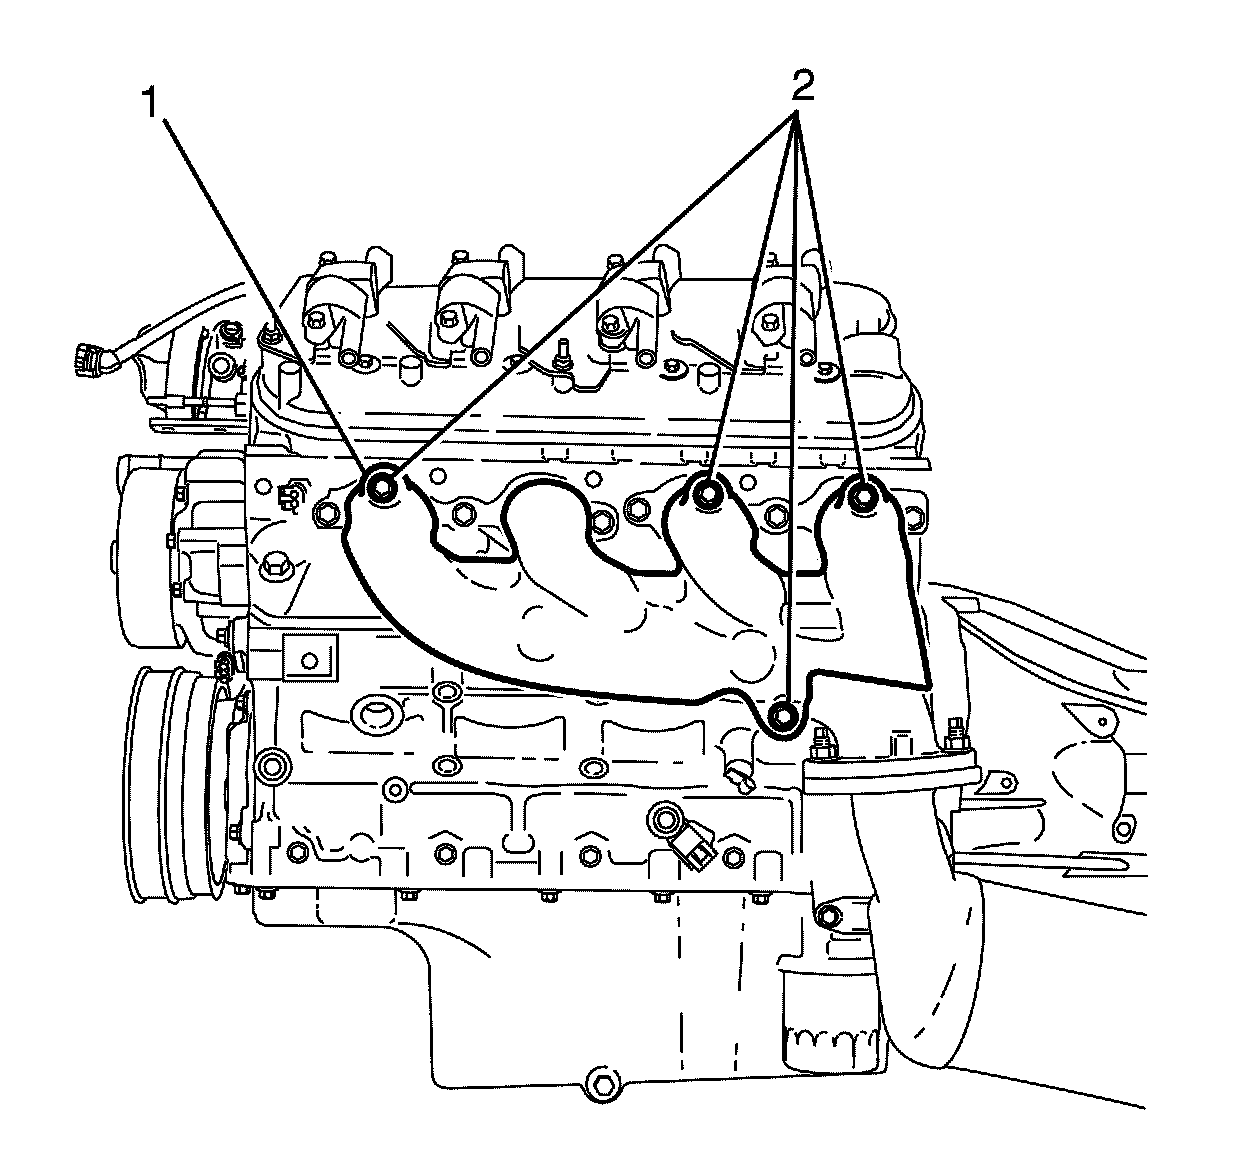
29. Install the left side exhaust manifold heat shield (1) to the left side exhaust manifold.
30. Install the left side exhaust manifold heat shield to left side exhaust manifold retaining bolts (2).
Tighten the bolts to 10 Nm (89 lb in).
31. Install the left side spark plugs to the cylinder head. Refer to Spark Plug Replacement Service and Repair.
32. Install the left side spark plug leads. Refer to Spark Plug Wire Replacement Service and Repair.
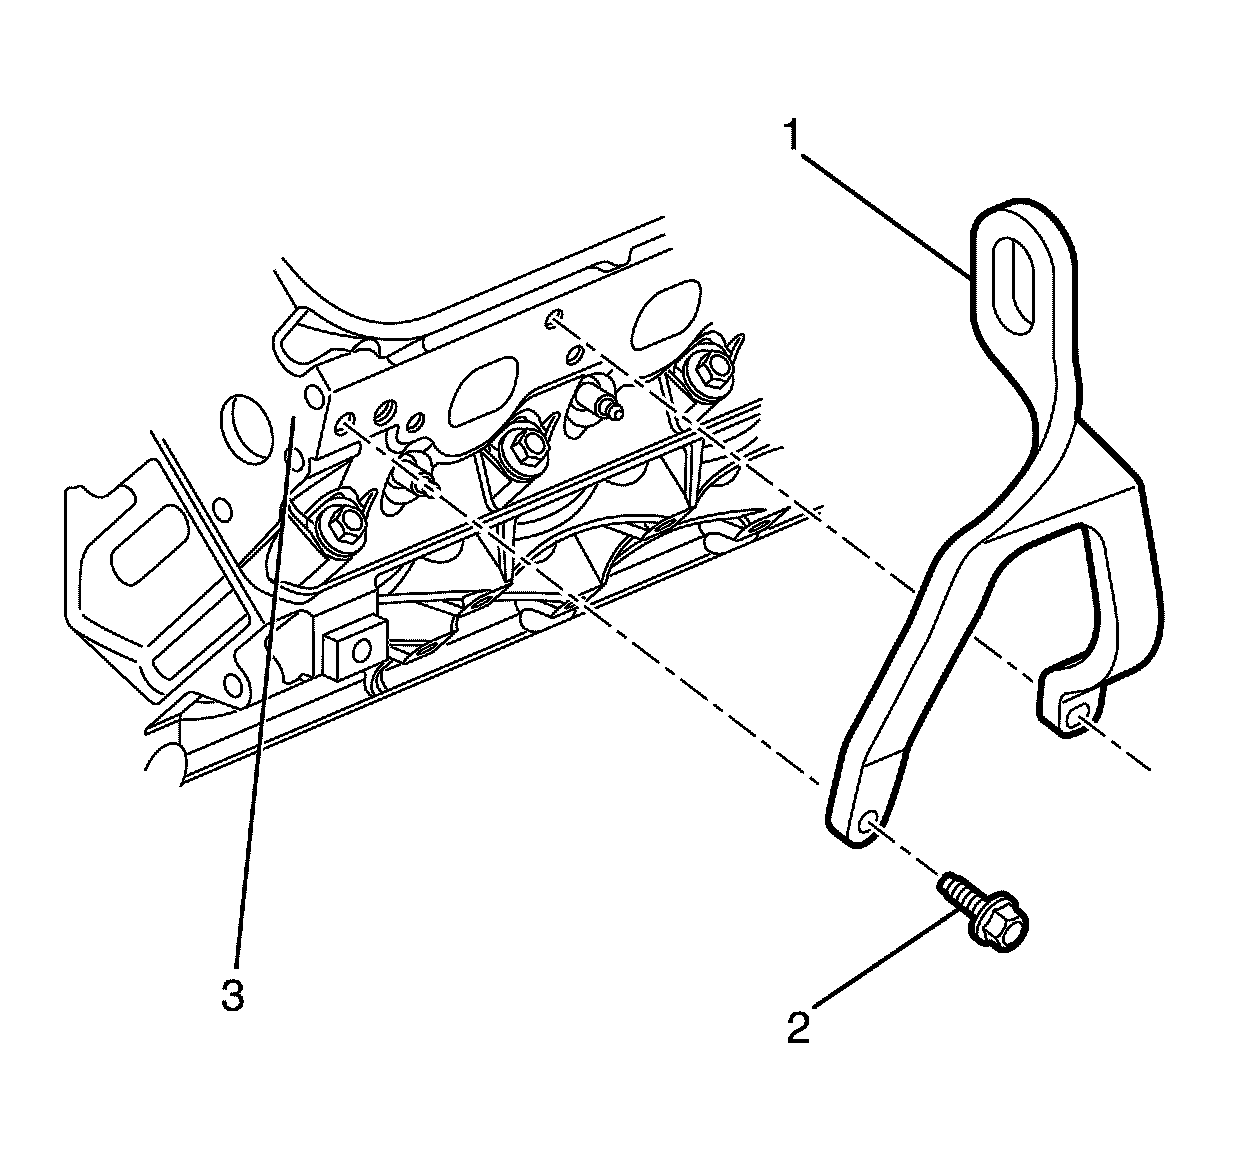
33. Position the J 41798 - engine lift brackets (1) on the cylinder heads (3).
34. Install the J 41798 - engine lift brackets to cylinder head retaining bolts (2).
Tighten the bolts to 50 Nm (36 lb ft).
35. Using a suitable lifting crane and the J 41798 - engine lift brackets raise the engine slightly.
36. Remove the engine from the engine stand.
37. Lower the engine onto the front subframe.
38. Position the engine mounts to the front subframe.
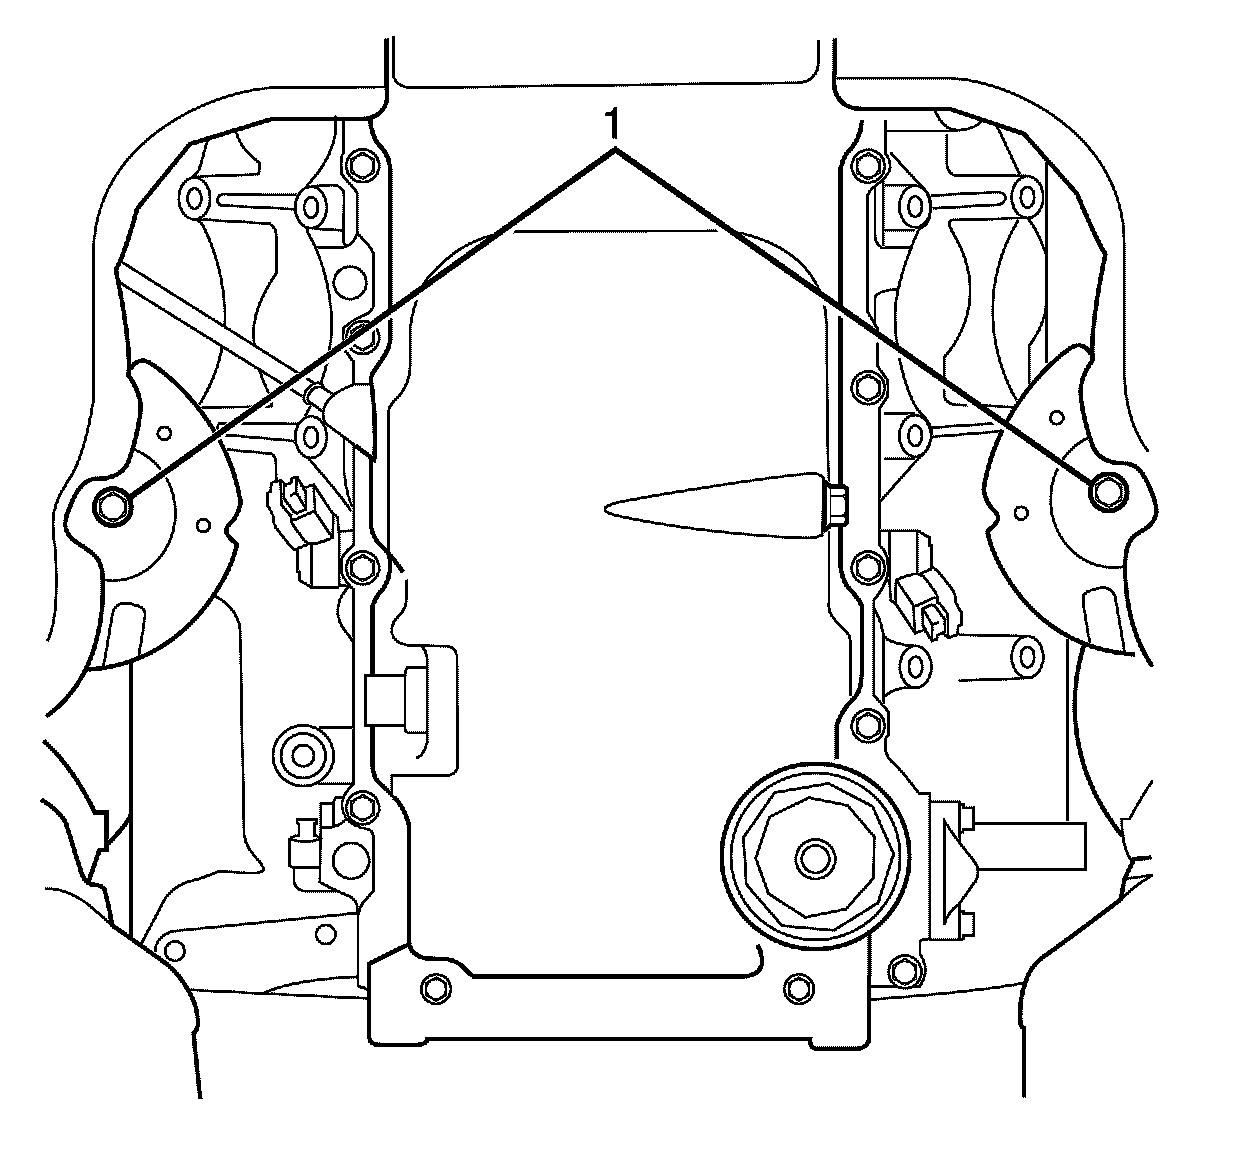
39. Install the lower engine mount to front subframe retaining nuts (1) on both engine mounts.
Tighten the nuts to 80 Nm (59 lb ft).
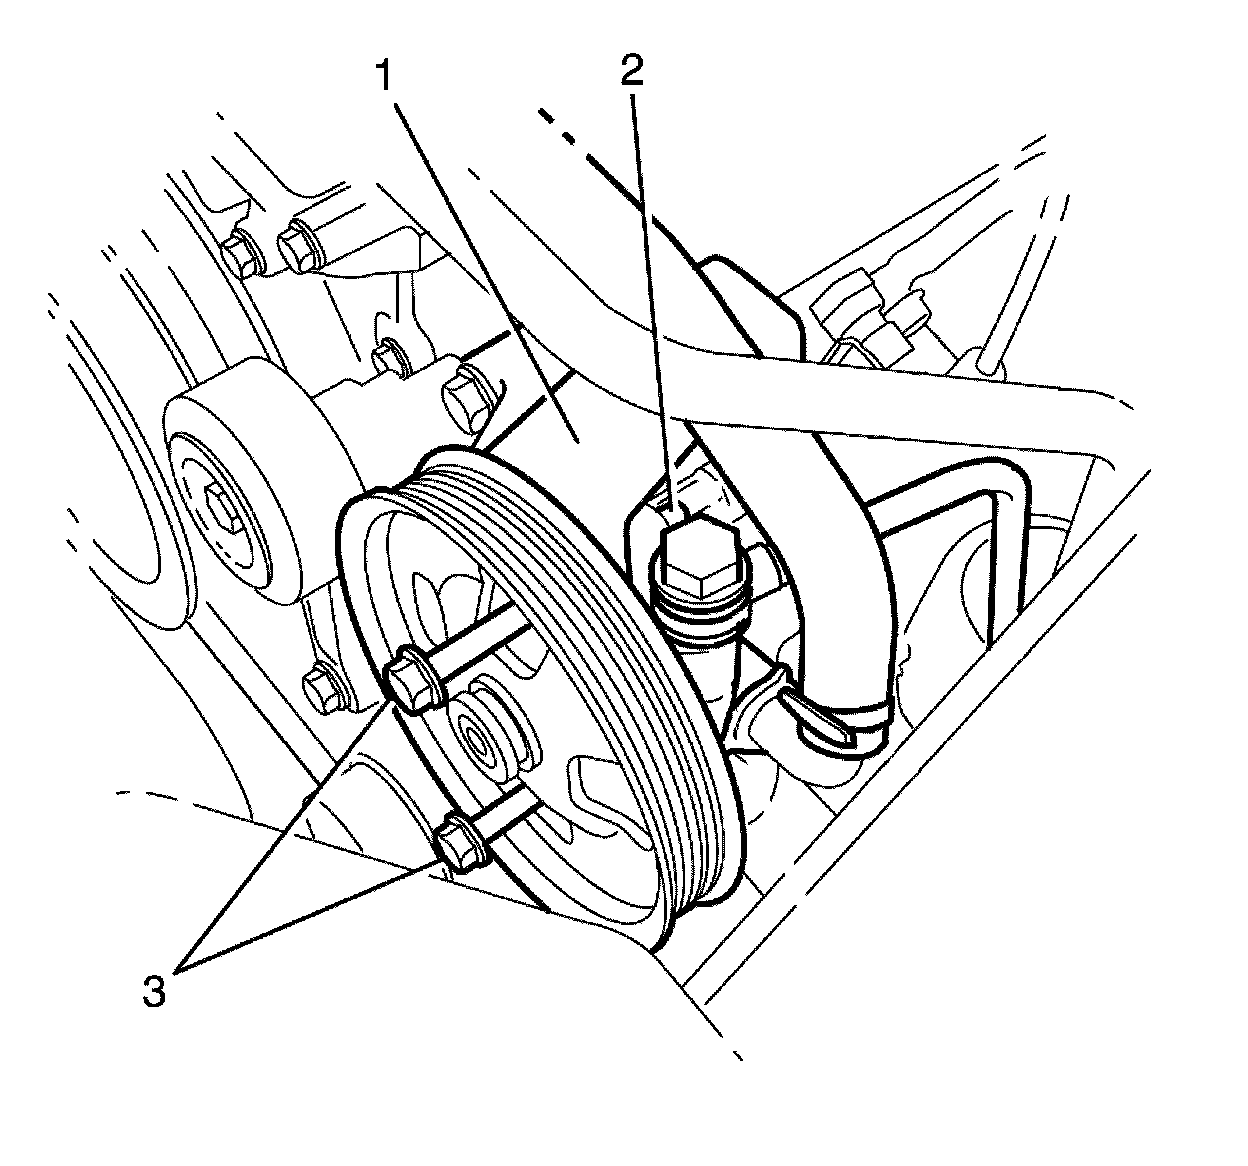
40. Position the power steering pump (2) to the power steering pump bracket (1).
41. Install NEW power steering pump to power steering pump bracket retaining bolts (3).
Tighten the bolts to 30 Nm (23 lb ft).
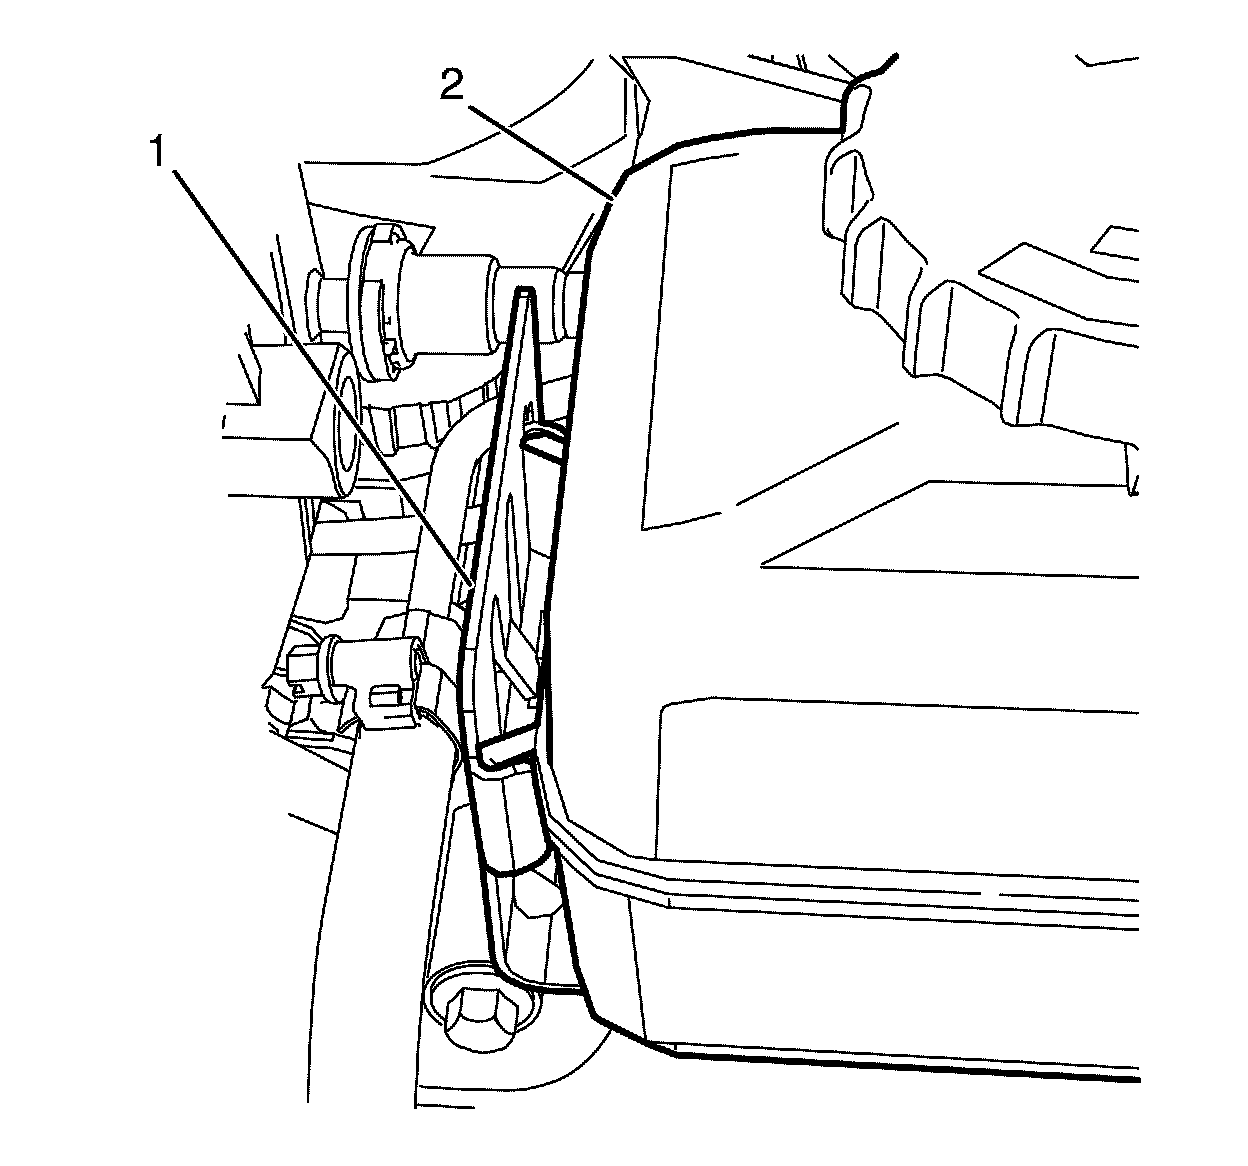
Note: Make sure the power steering reservoir (2) and the power steering reservoir bracket locking tang (1) are engaged to avoid an induced rattle condition.
42. Install the power steering reservoir (2) to the power steering pump power steering reservoir bracket (1).
43. Install the A/C drive belt. Refer to Air Conditioning Compressor Belt Replacement Air Conditioning Compressor Belt Replacement.
44. Install the accessory drive belt. Refer to Drive Belt Replacement - Accessory Drive Belt Replacement - Accessory.
45. Install the automatic transmission flex plate. Refer to Automatic Transmission Flex Plate Installation 97. Automatic Transmission Flex Plate Installation
46. Connect a suitable lifting crane to the engine lift brackets and raise the suitable lifting crane to support the engine.
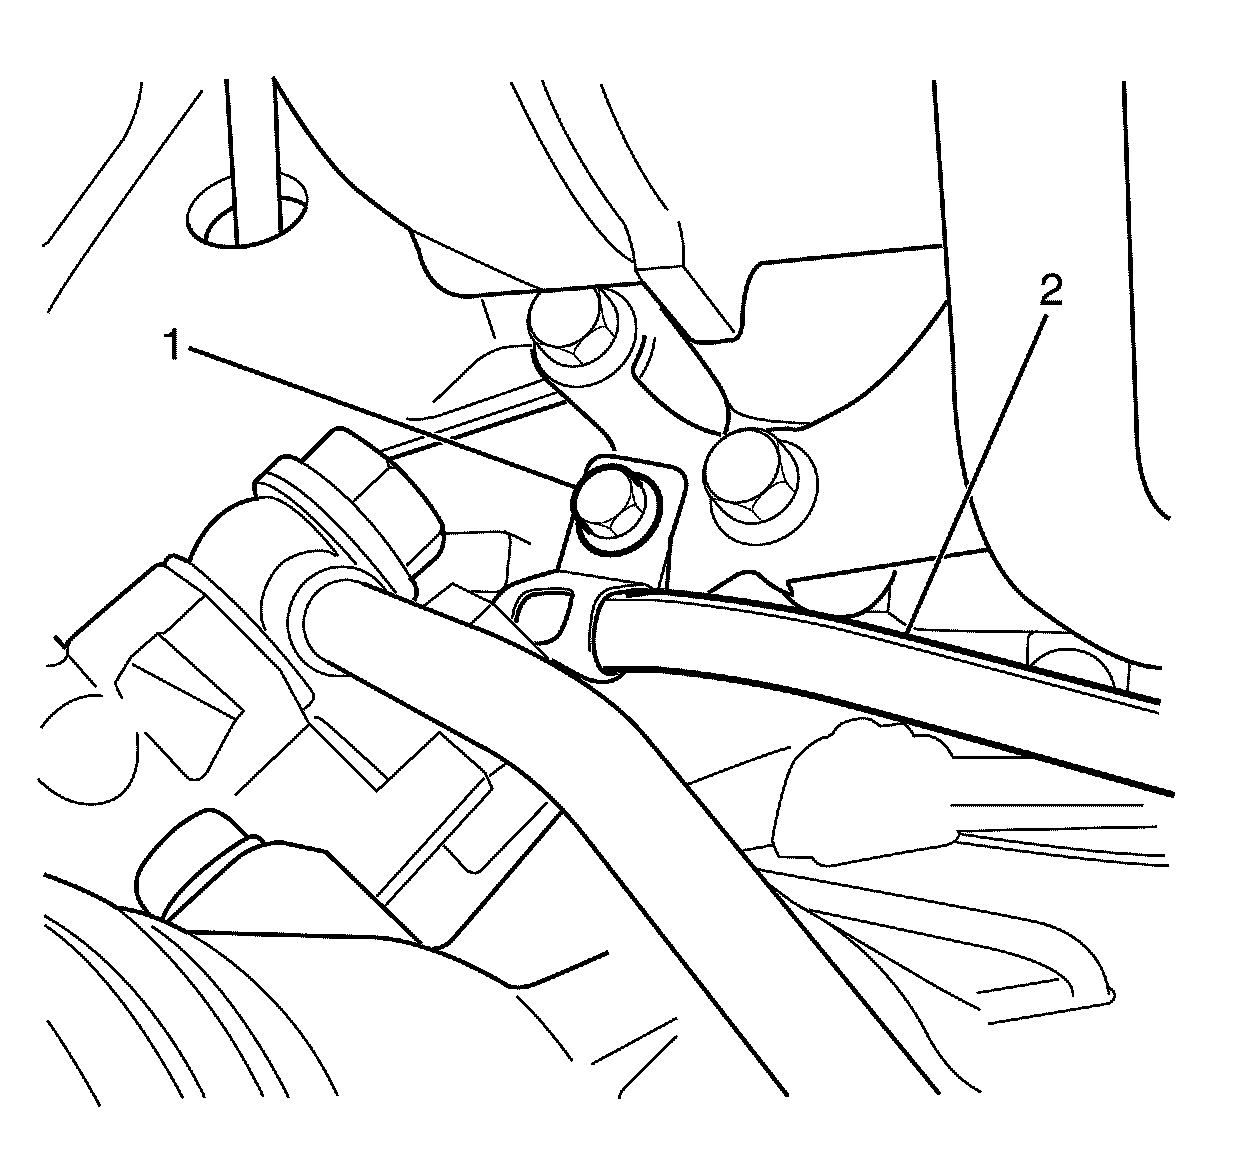
47. Position the automatic transmission cooler pipes (2) to the engine.
48. Install the automatic transmission cooler pipe clamp to A/C bracket retaining bolt (1).
Tighten the bolt to 22 Nm (16 lb ft).
49. Install the engine and transmission wiring harness and related components.
Note: Make sure that all the hoses, wires, pipes and shock modules clear the vehicle during the installation process.
50. With the aid of an assistant, raise the table and/or lower the vehicle to install the engine, transmission, front suspension and subframe assembly to the vehicle.
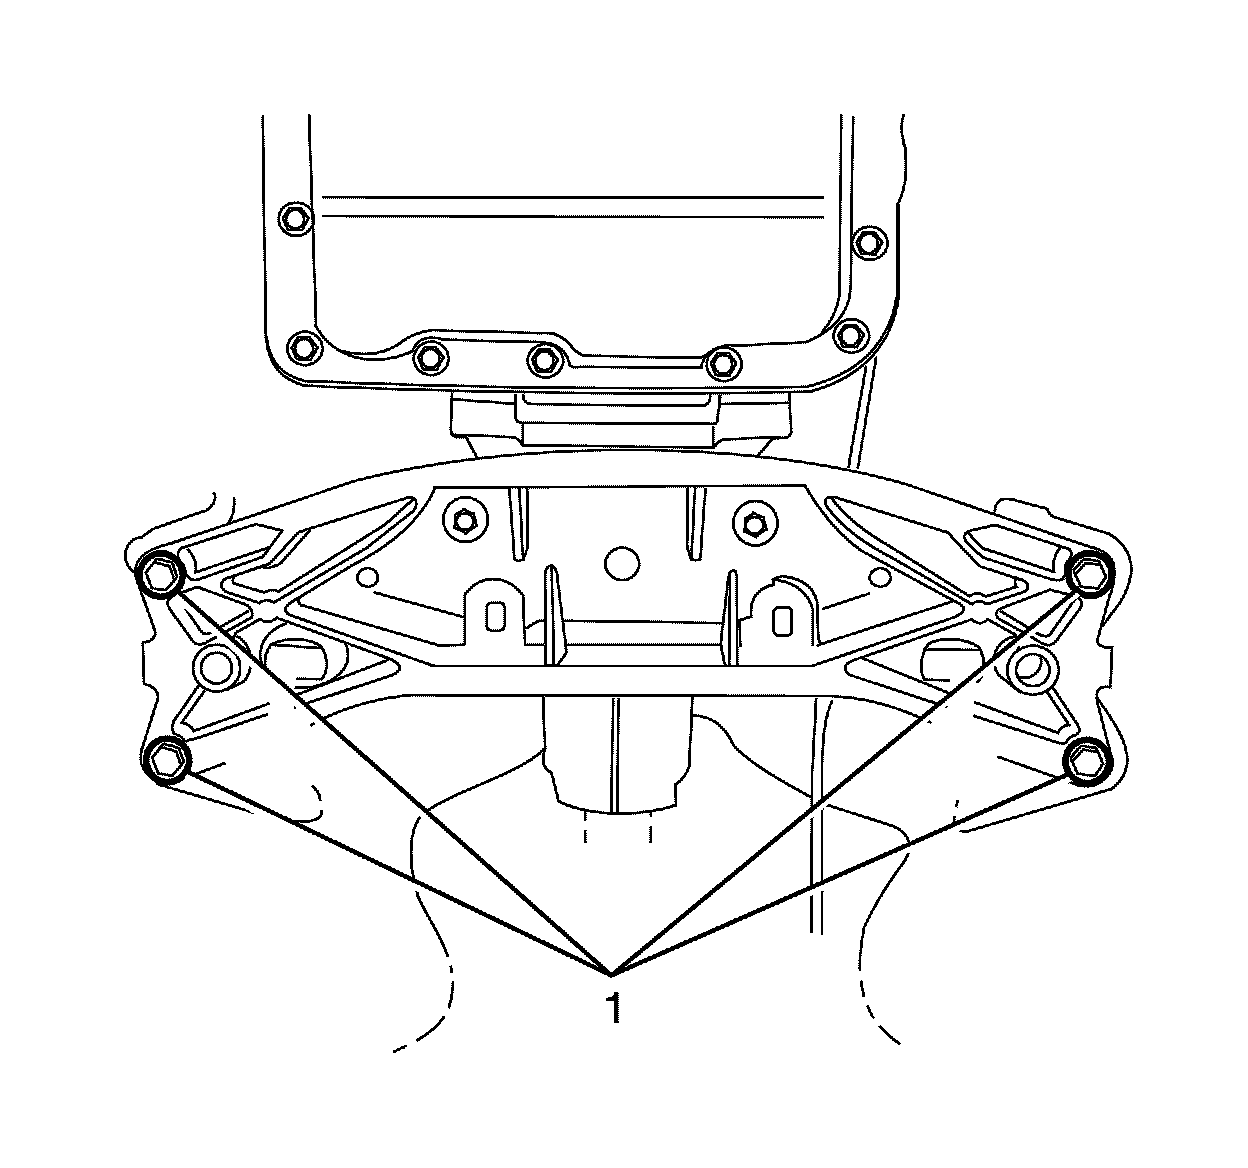
51. Install the transmission support to body retaining bolts (1).
Tighten the bolts to 58 Nm (43 lb ft).
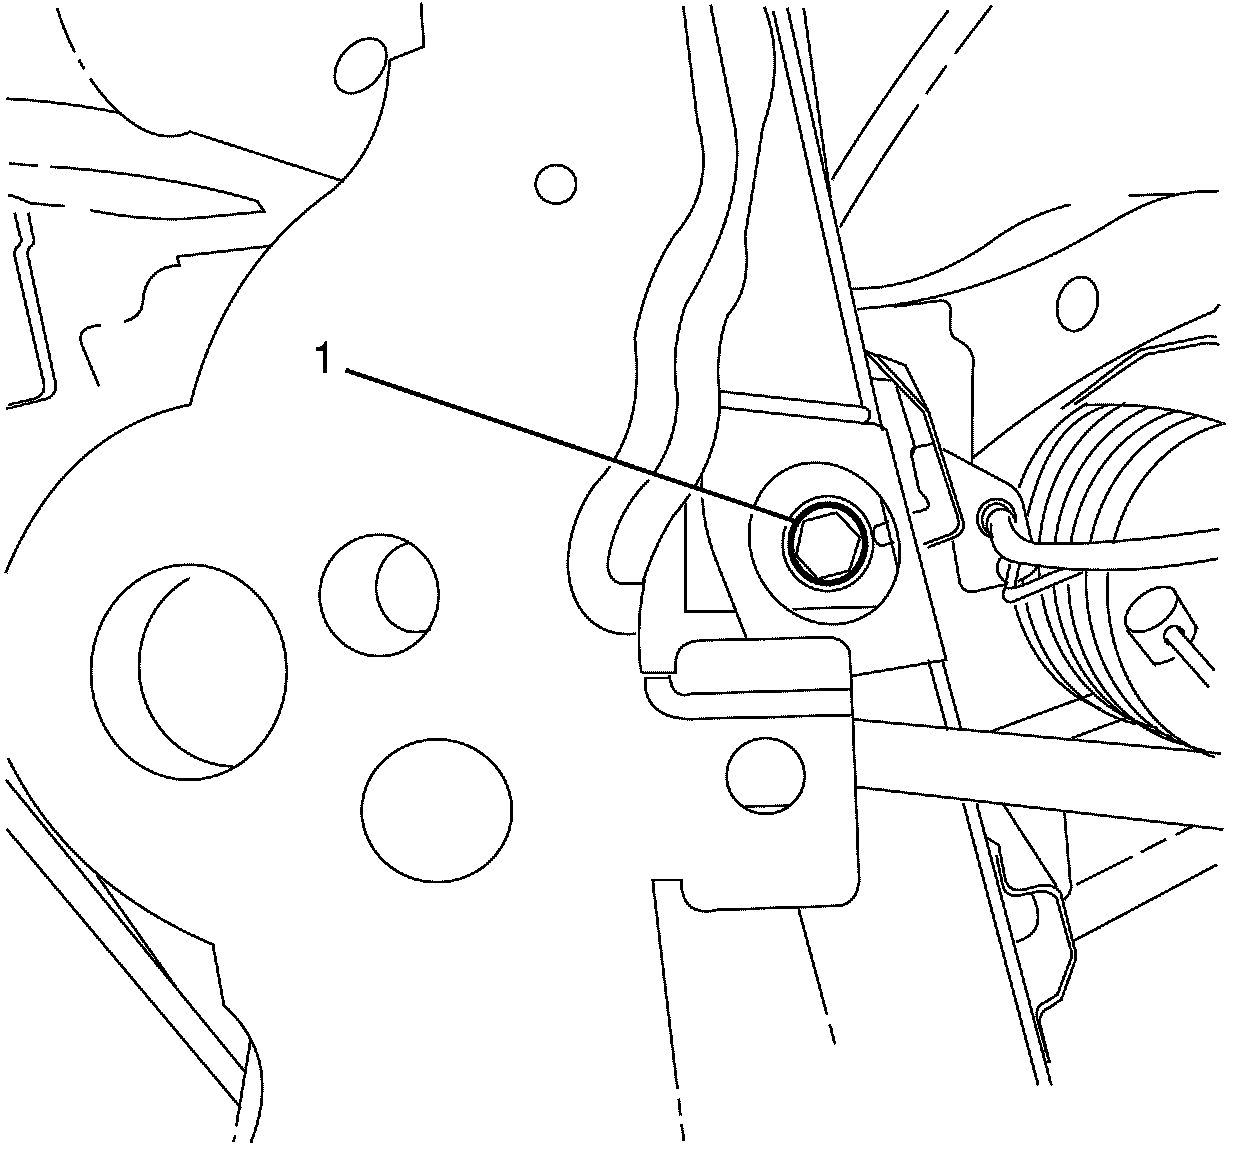
52. Install the front subframe to body centre retaining bolt (1). Repeat for opposite side.
Tighten the bolts to 160 Nm (118 lb ft).
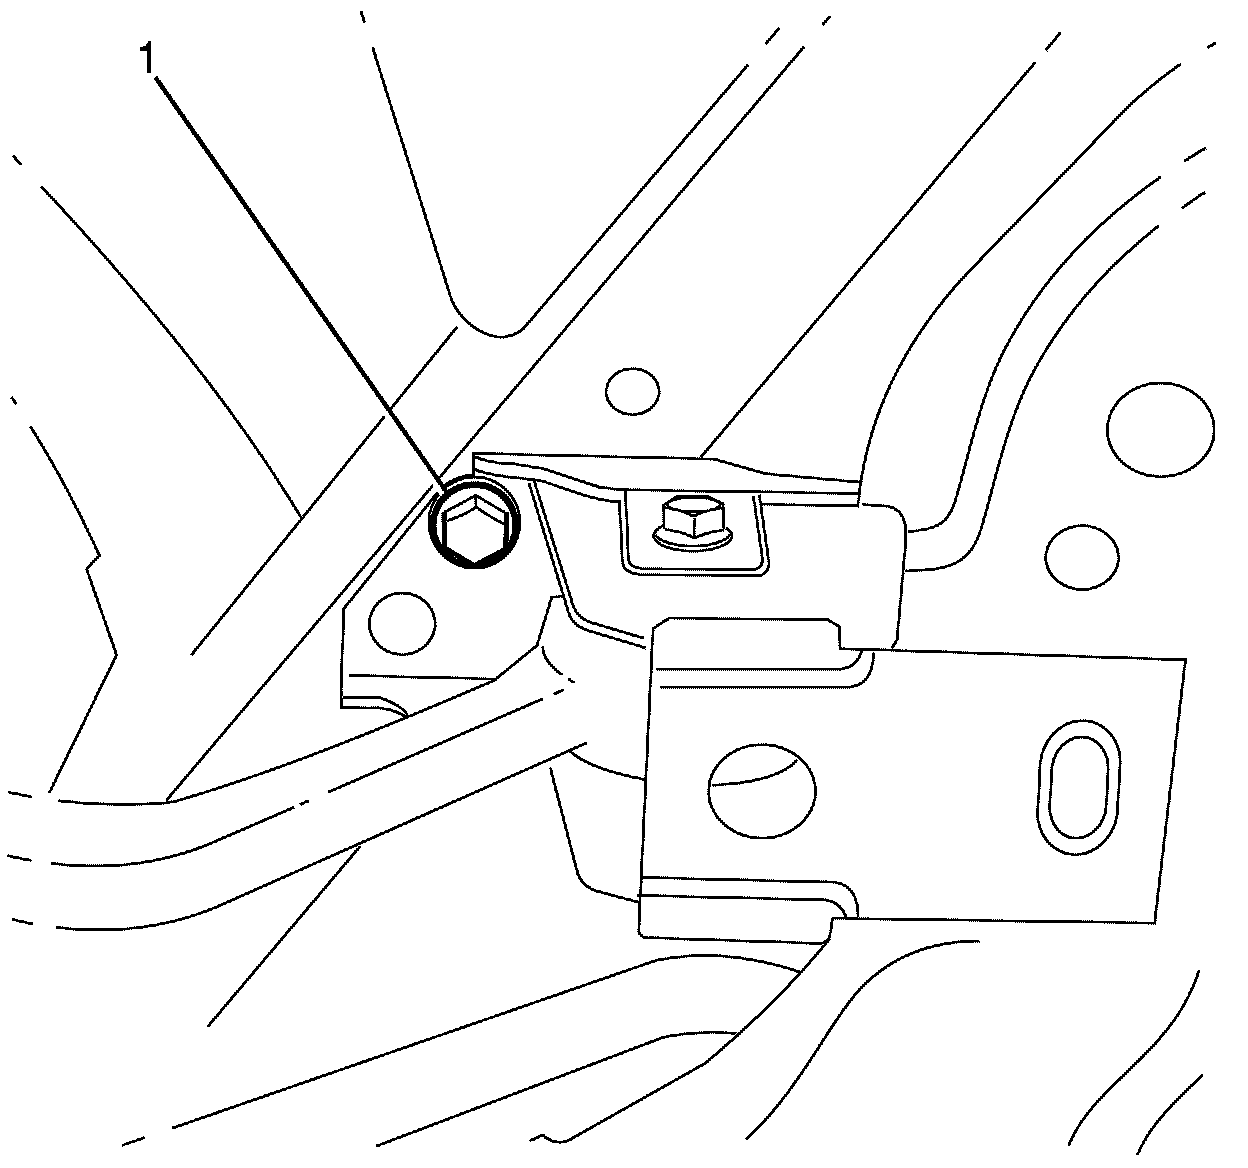
53. Install the front subframe to body front retaining bolt (1). Repeat for opposite side.
Tighten the bolts to 160 Nm (118 lb ft).
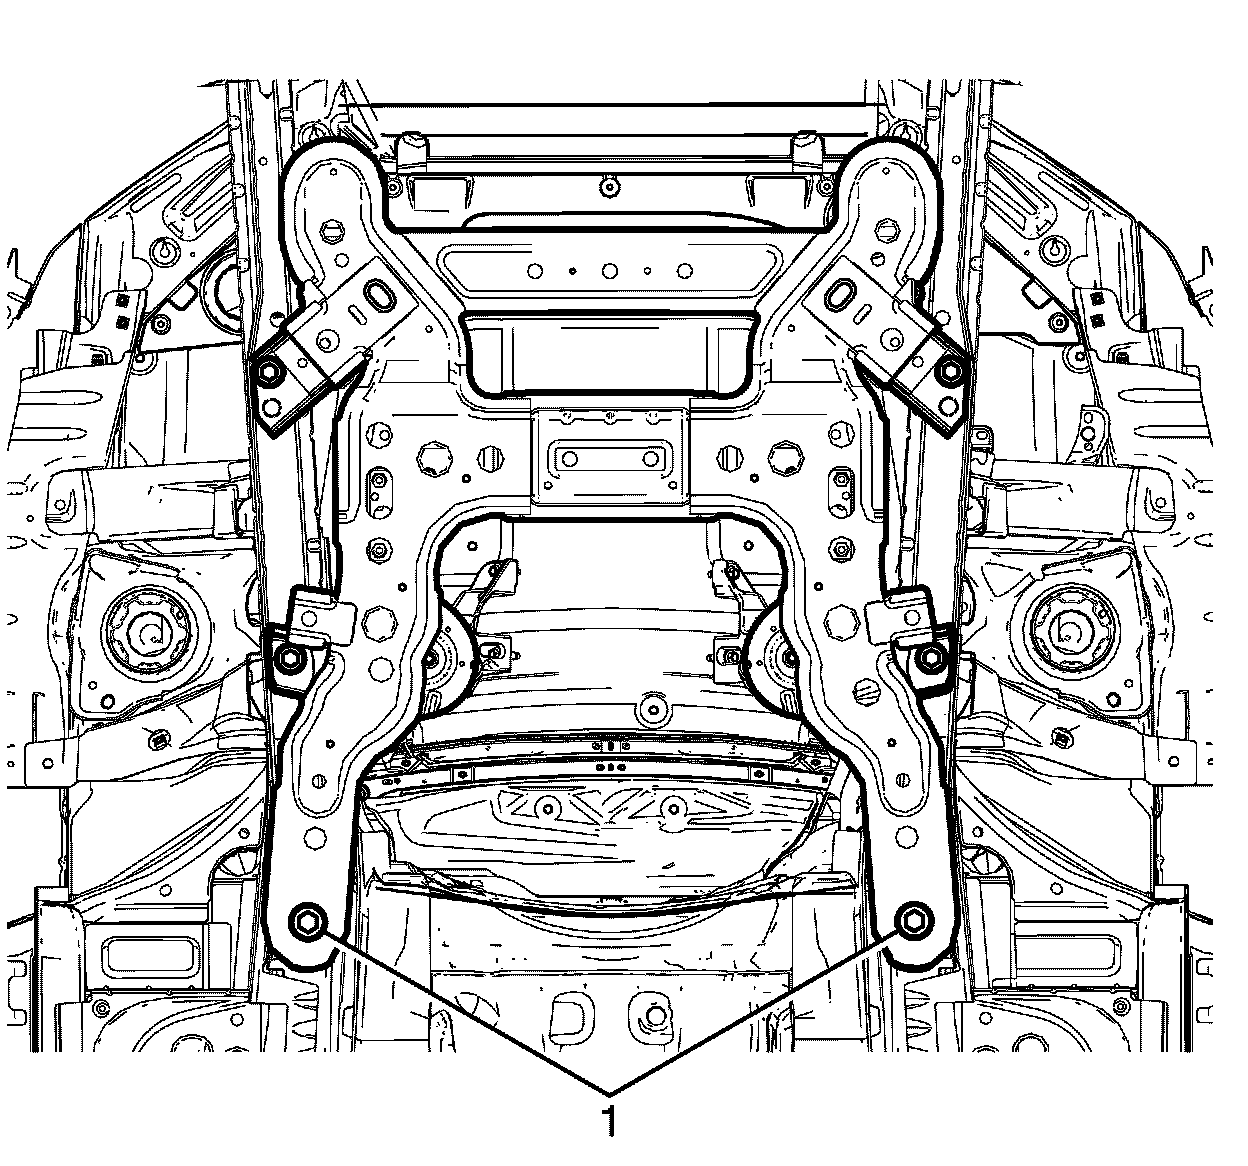
54. Install the front subframe to body rear retaining bolts (1).
Tighten the bolts to 240 Nm (178 lb ft).
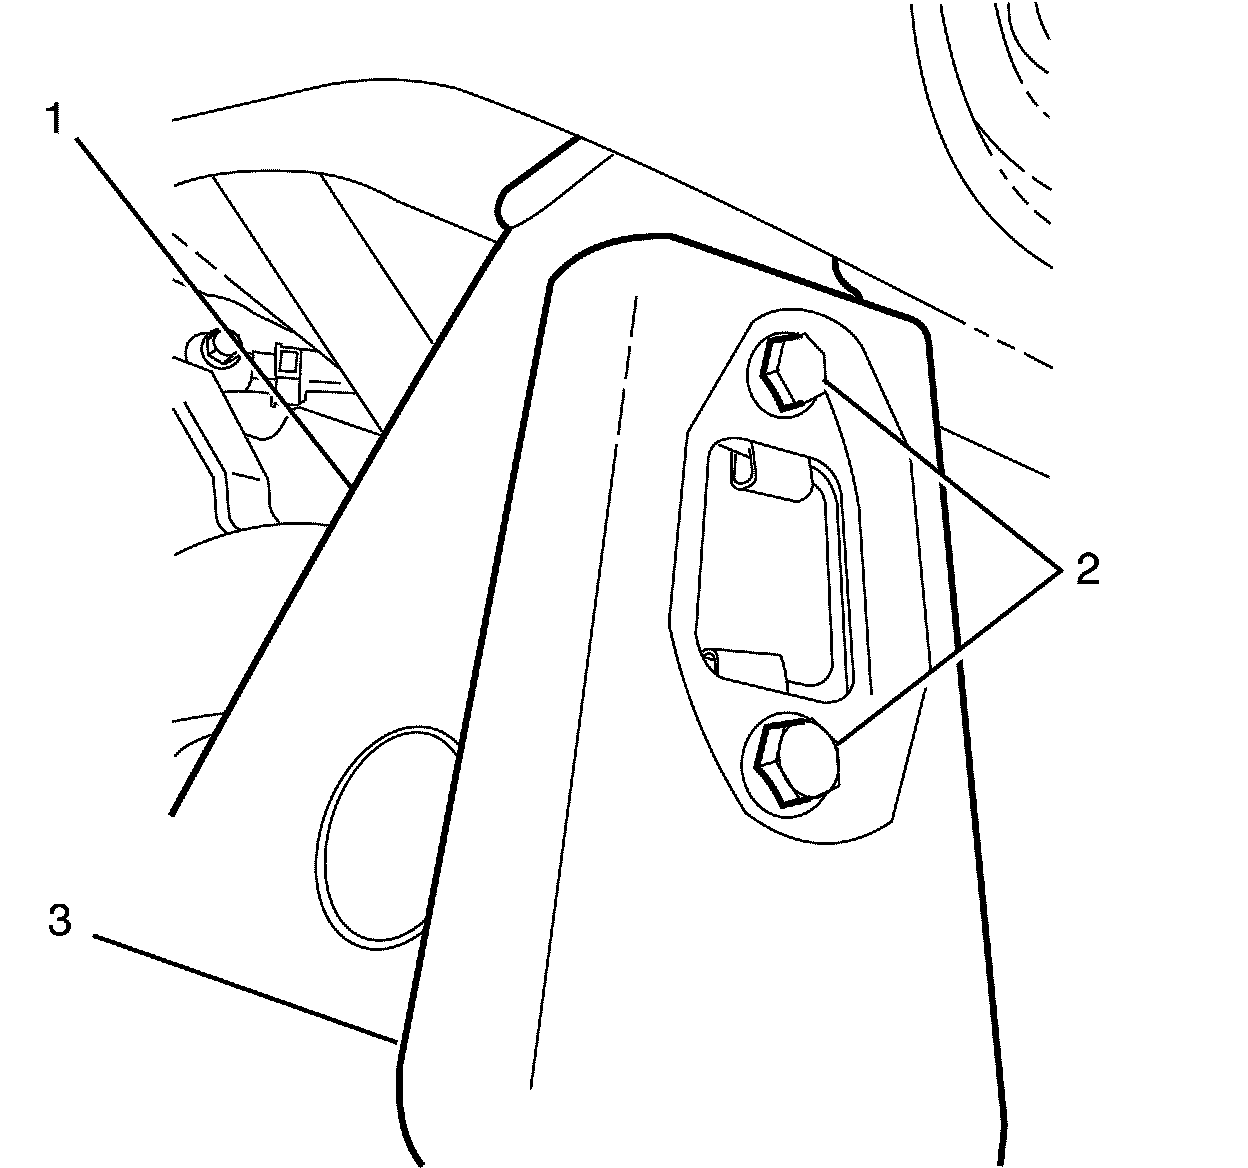
55. Install the front subframe reinforcement plate (3) to the subframe (1).
56. Install the front subframe reinforcement plate to front subframe retaining bolts (2).
Tighten the bolts to 17 Nm (13 lb ft).
57. Lower the lift table and/or raise the vehicle to remove the support from the frame, engine and transmission.
58. Remove the powertrain and/or engine lift table from the frame, engine and transmission.
59. Lower the vehicle.
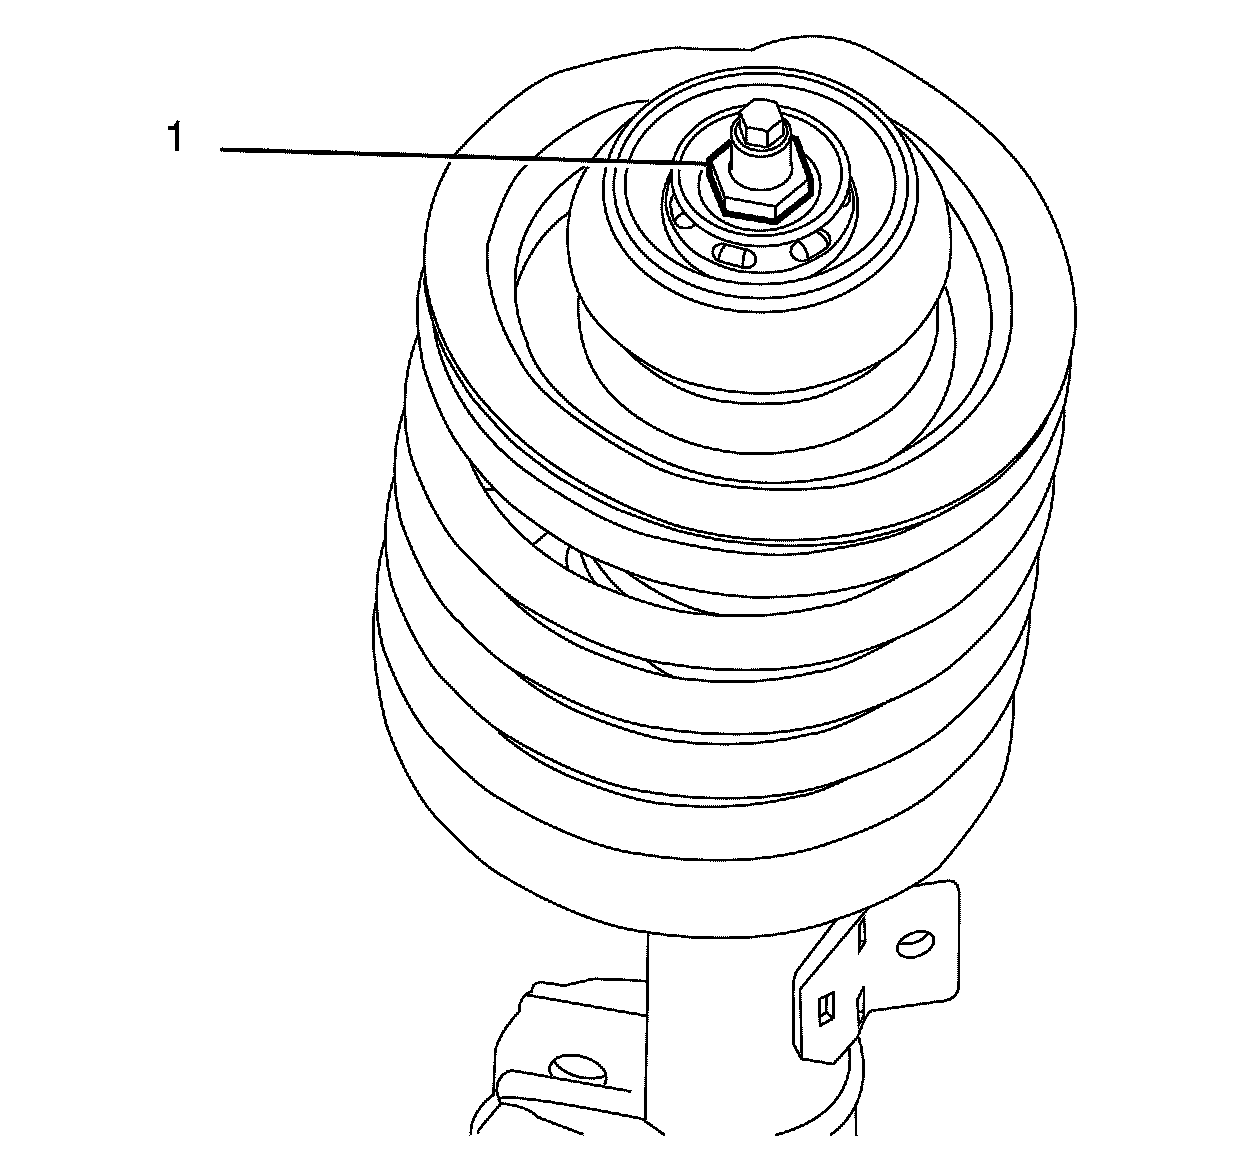
Note: The strut assembly retaining nut (1) must be checked for correct torque before installing the strut assembly into the vehicle. The strut assembly retaining nut torque must be 75 Nm (55 lb ft).
60. Check the torque of the strut assembly retaining nut (1), correct if necessary. Repeat for opposite side.
Tighten the nut to 75 Nm (55 lb ft).
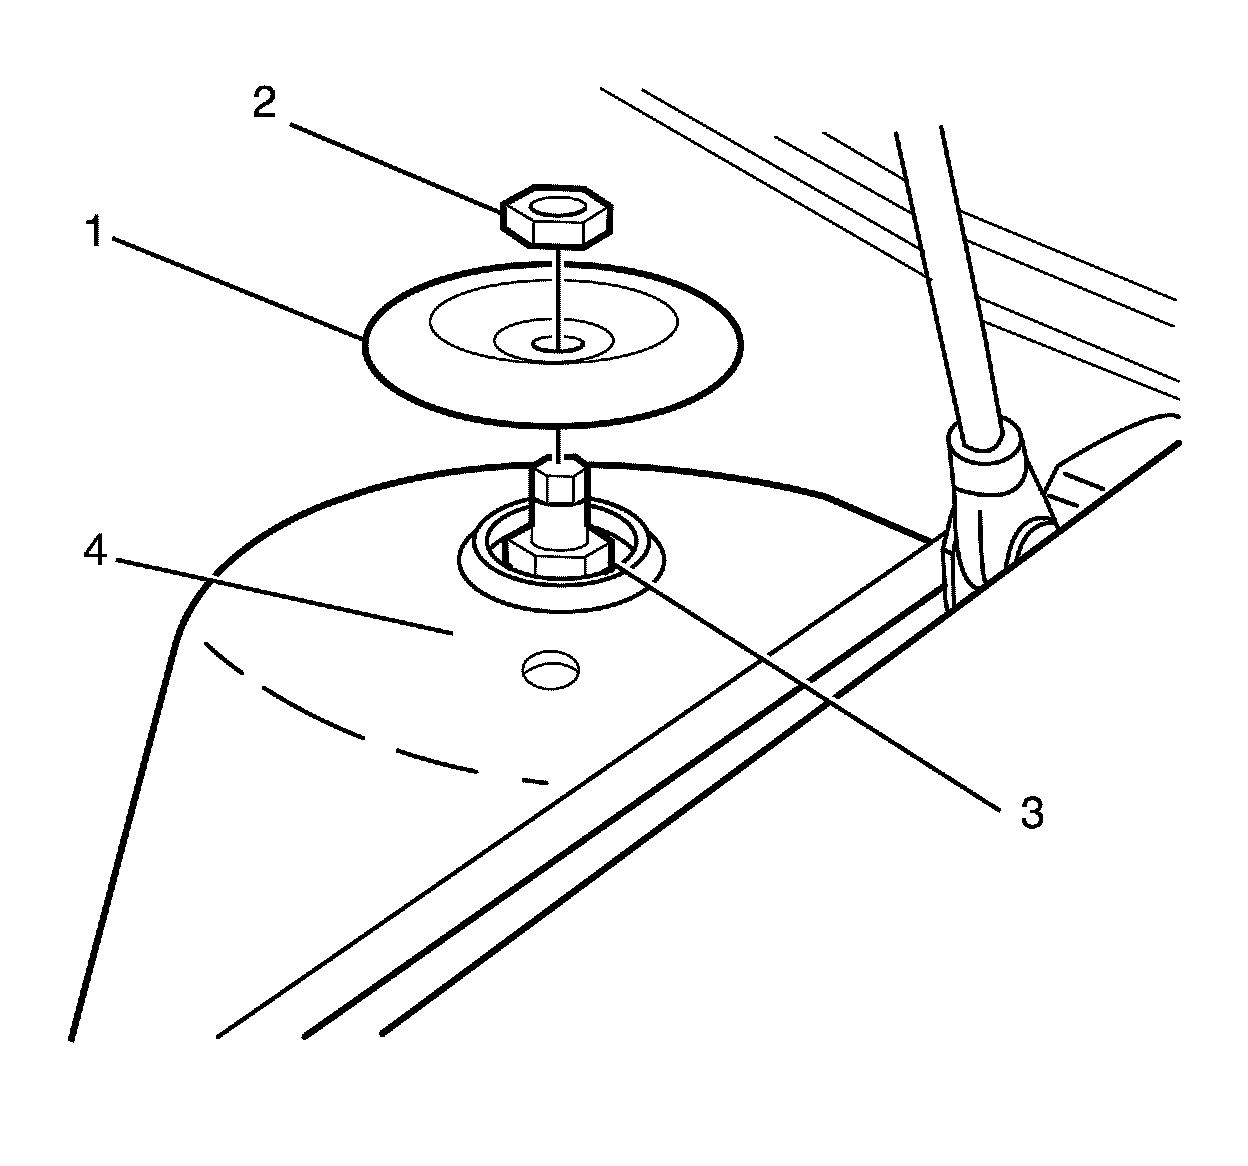
61. Install the front strut assembly (3) to the front wheelhouse (4). Repeat for opposite side.
62. Install front strut assembly to front wheelhouse retaining plate (1). Repeat for opposite side.
63. Tighten the NEW front strut assembly to front wheelhouse retaining nut (2). Repeat for opposite side.
Tighten the nut to 55 Nm (41 lb ft).
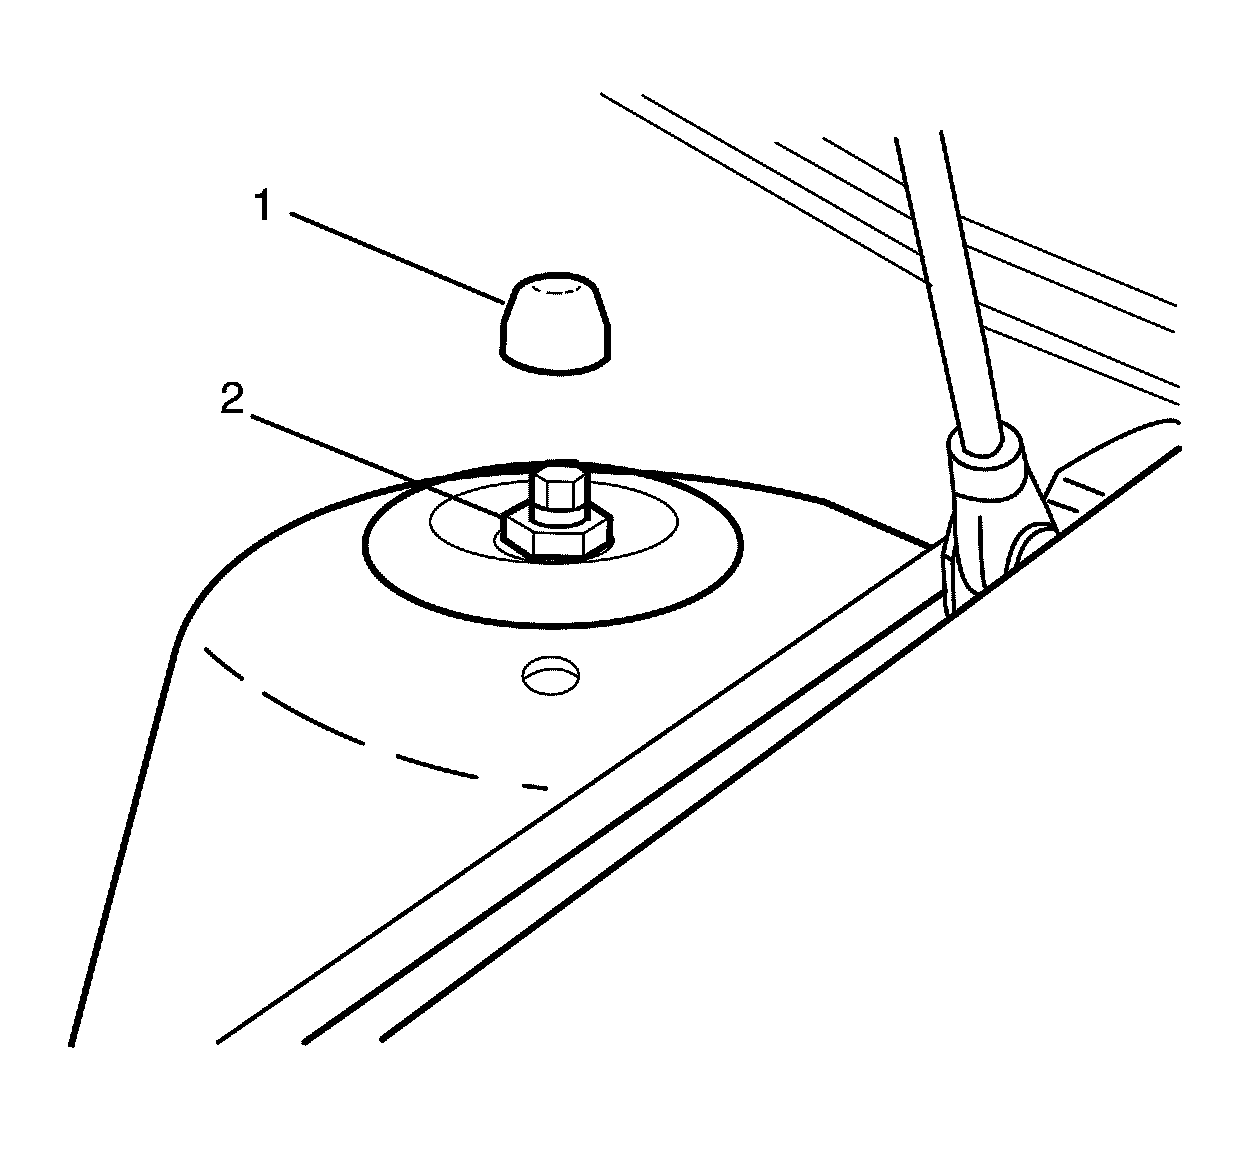
64. Install the dust cover (1) to the front strut assembly to front wheelhouse retaining nut (2).
65. Raise the vehicle.
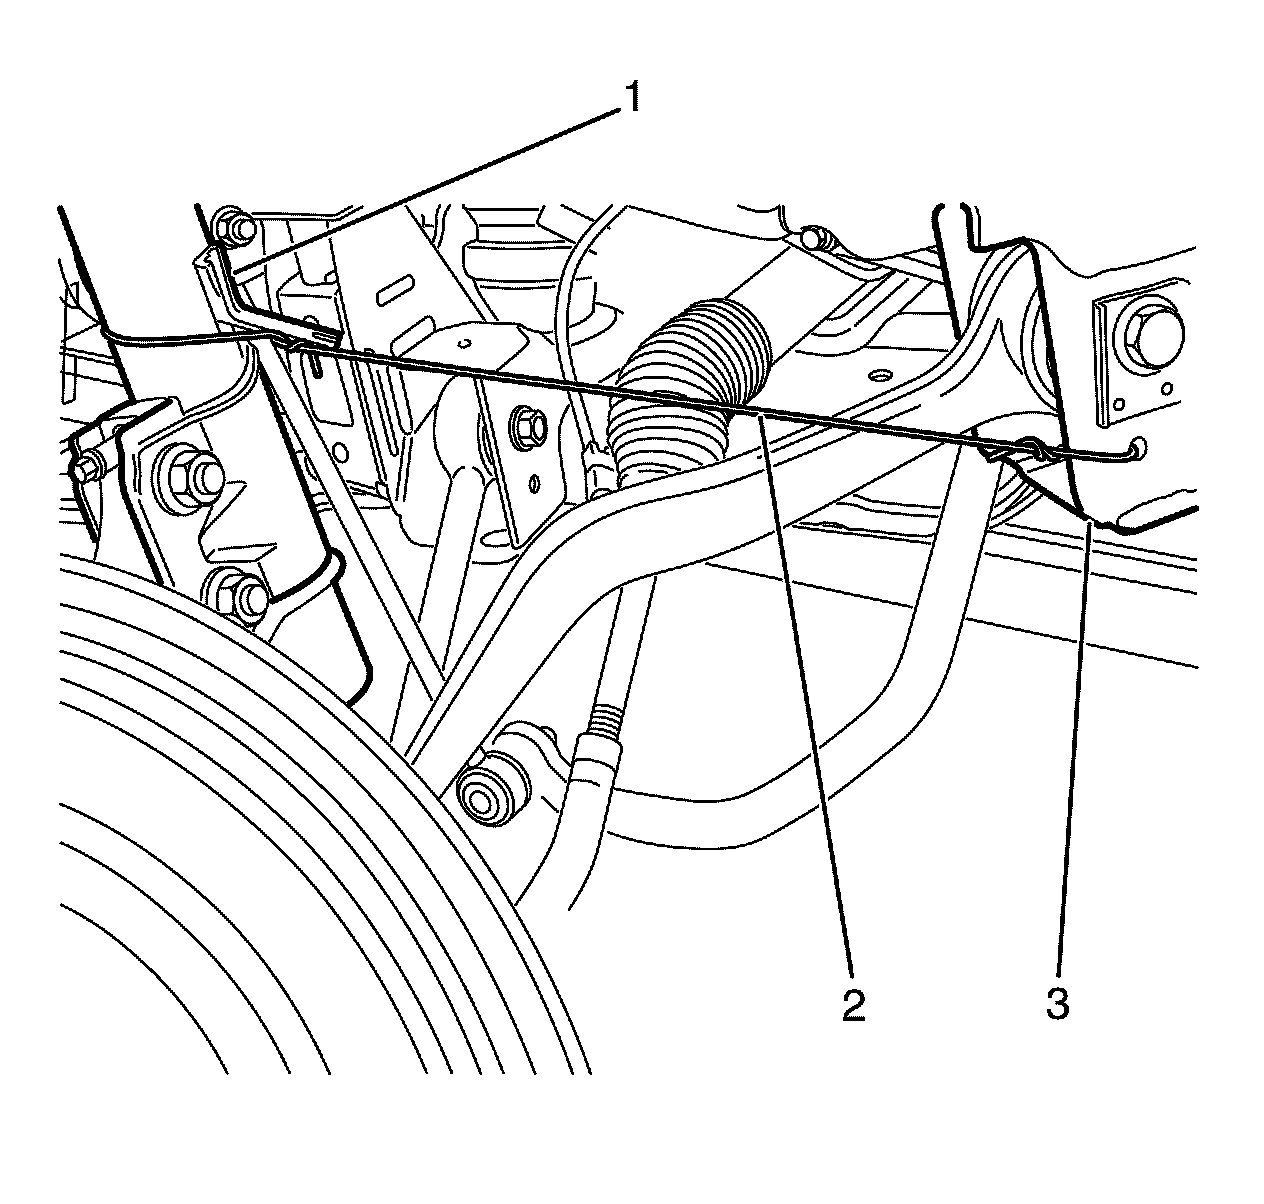
66. Remove the heavy mechanics wire or equivalent (2) retaining the front strut assembly (1) to the front subframe (3).
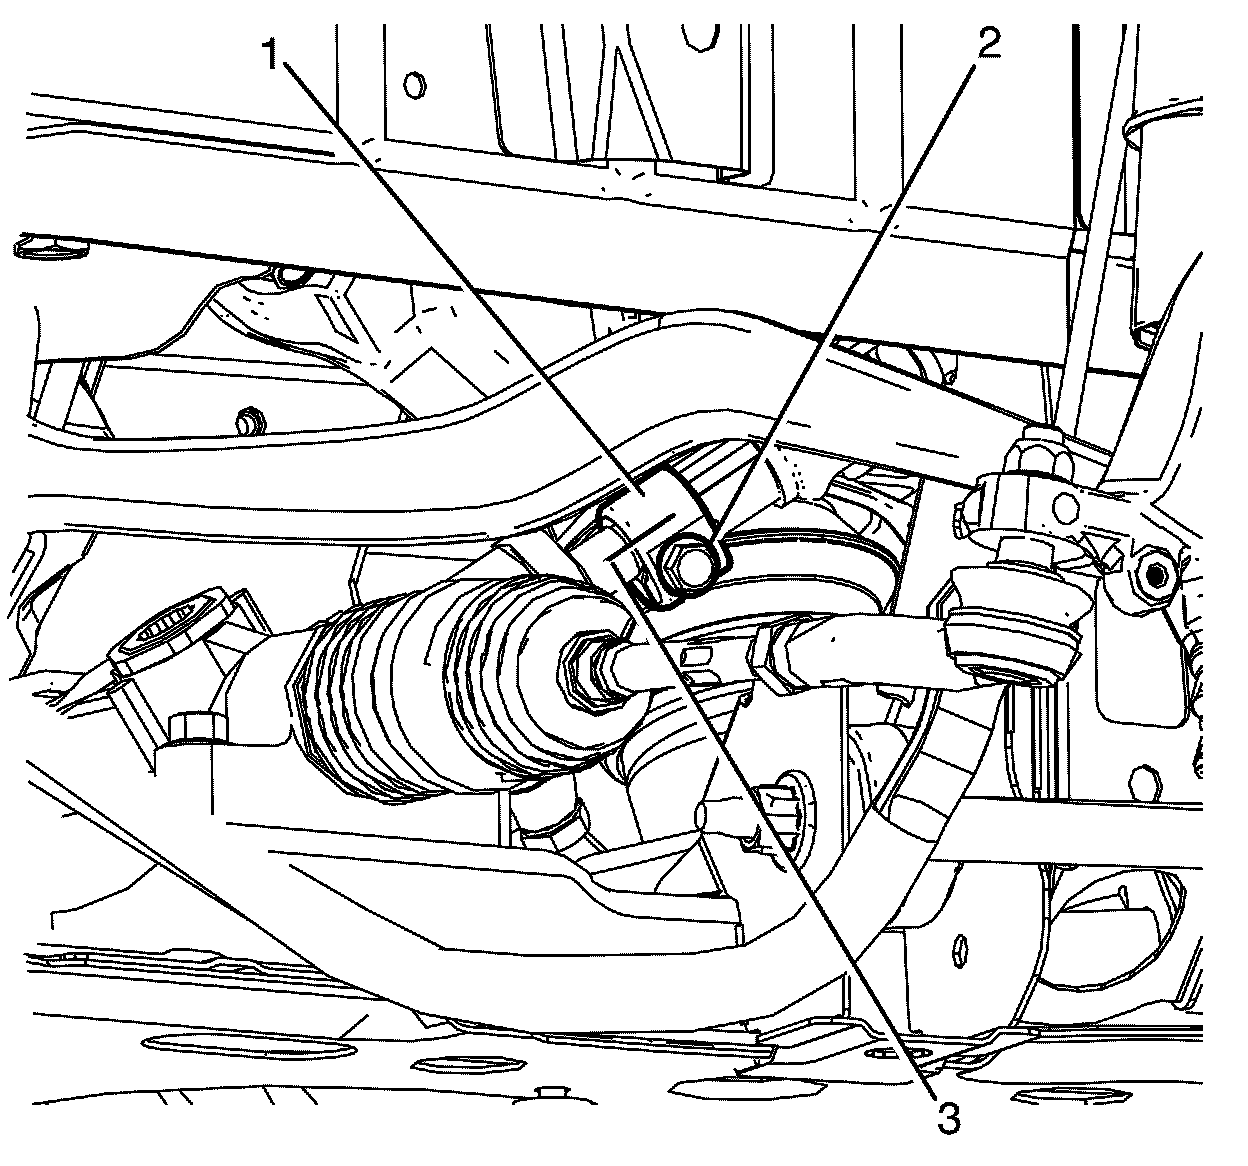
Note: The intermediate steering shaft and pinion shaft splines must be installed in the position recorded during removal and aligned with the marks previously made.
67. Connect the intermediate steering shaft (1) to the pinion shaft (3).
68. Install NEW the intermediate steering shaft to pinion shaft retaining bolt (2).
Tighten the bolt to 25 Nm (18 lb ft).
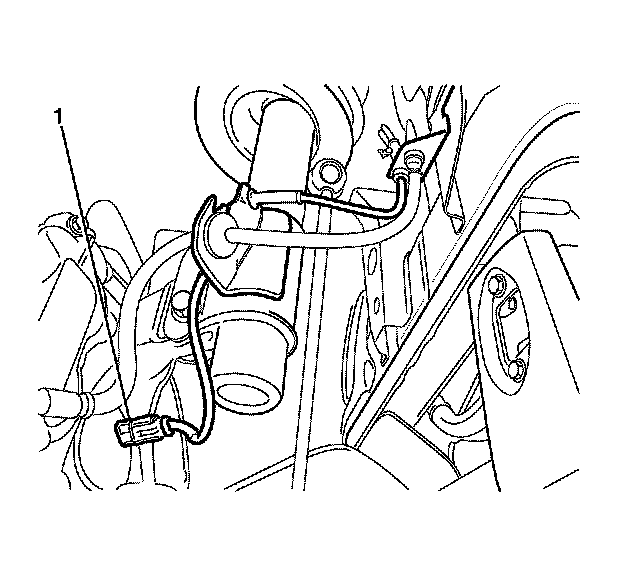
69. Connect the front wheel speed sensor jumper harness electrical connector (1) to the front wheel speed sensor. Repeat for opposite side.
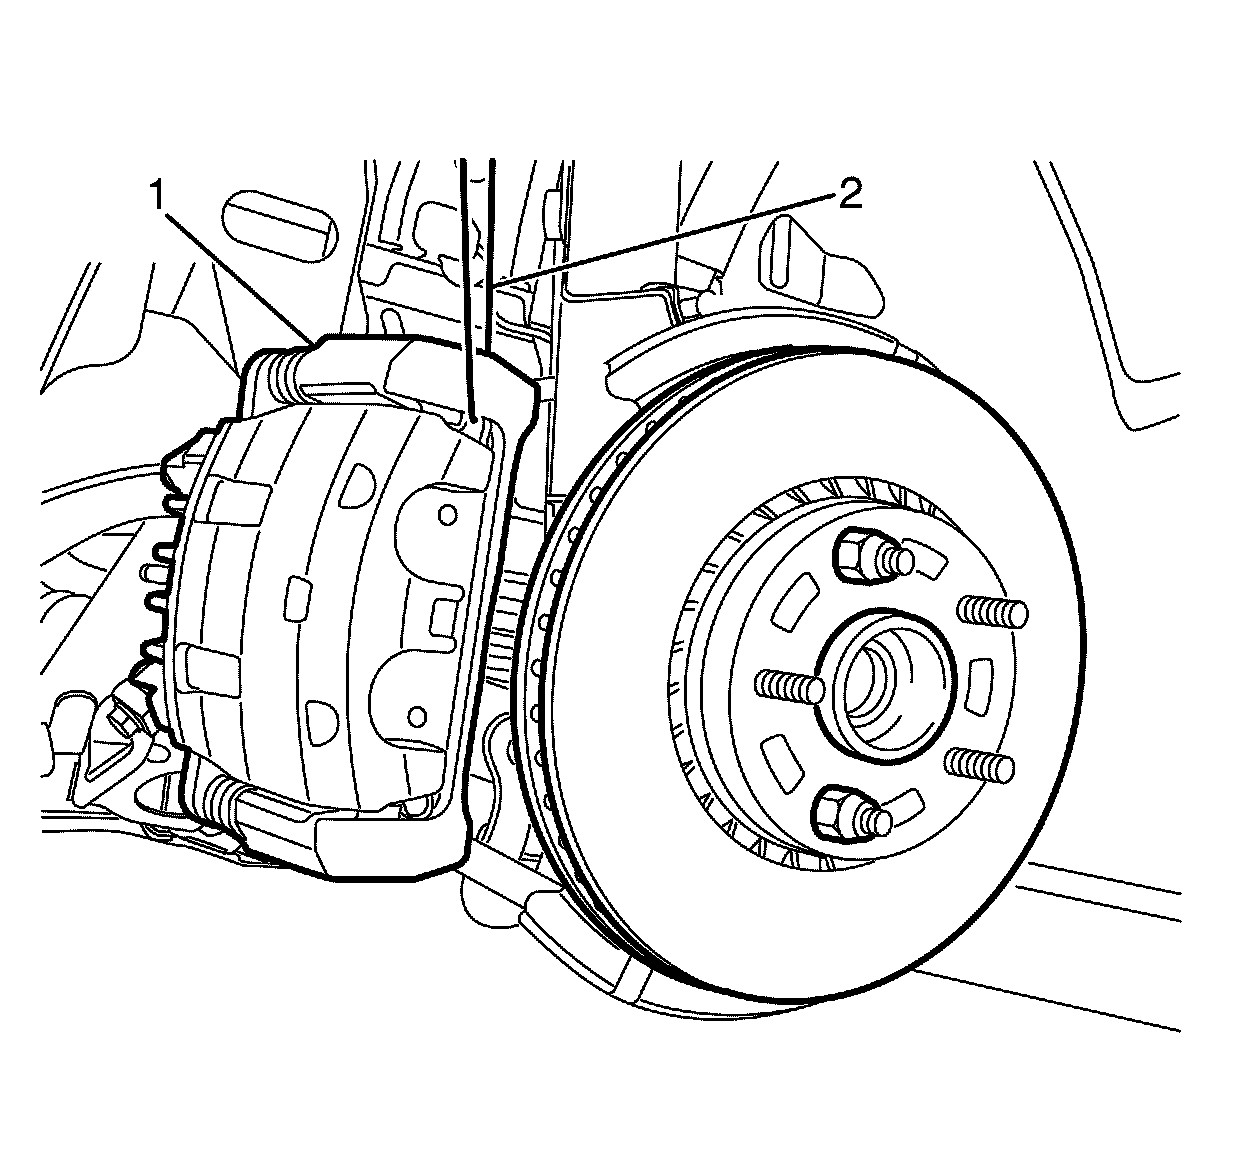
70. Remove the heavy mechanic's wire, or equivalent support (2) from the brake caliper (1). Repeat for opposite side.
Caution:
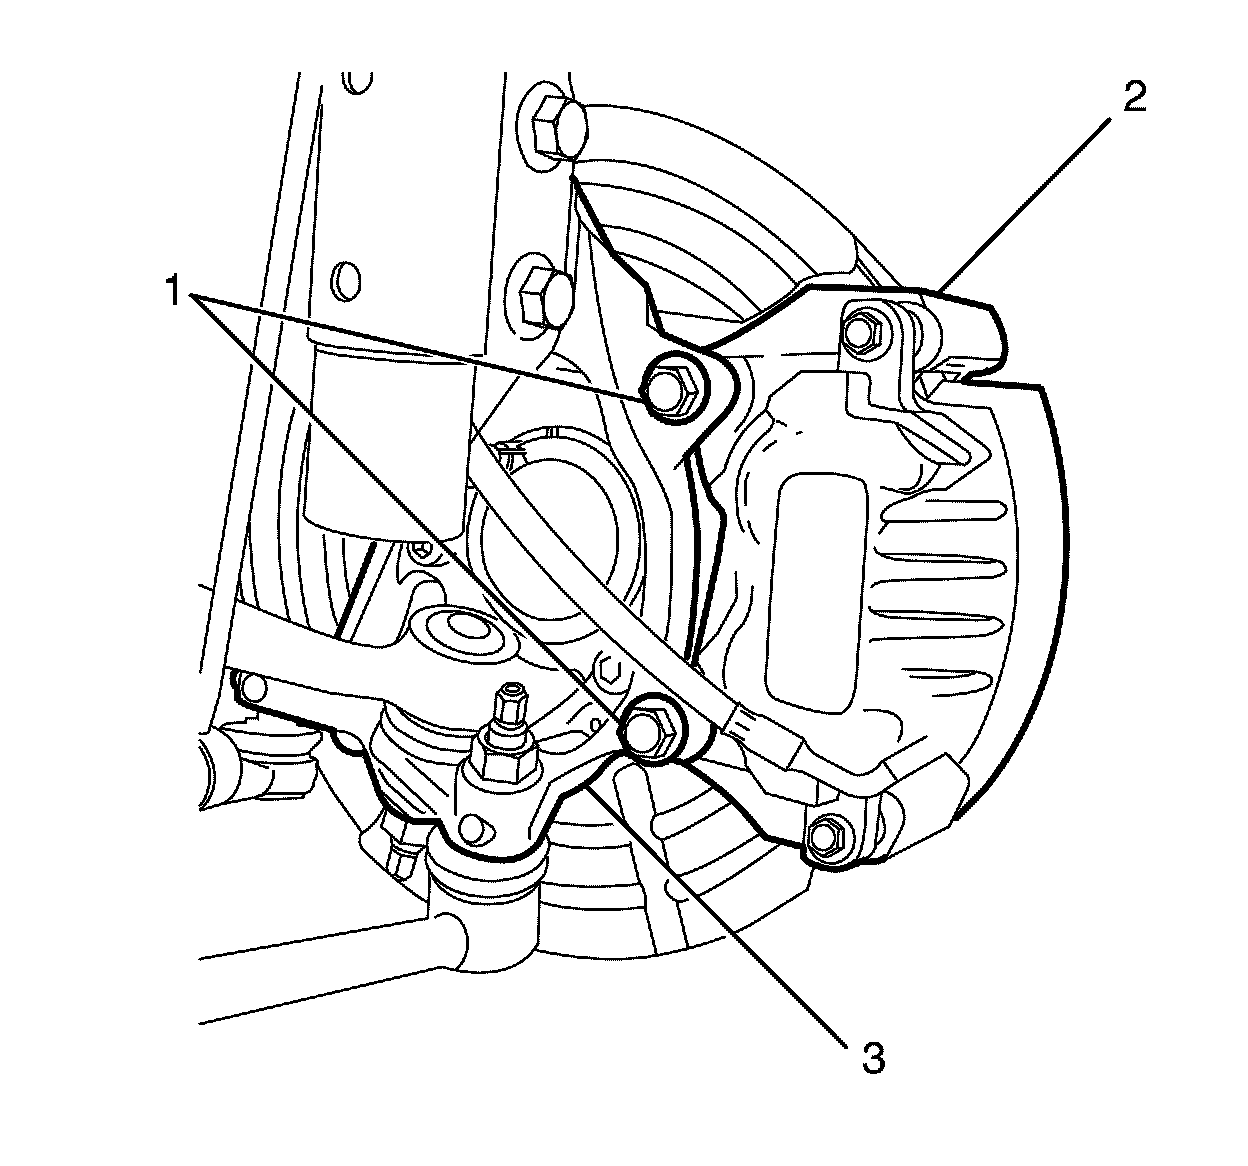
Make sure the brake hose is not twisted or kinked after installation. Damage to the hose could result.
71. Install the front brake caliper assembly (2) to the front steering knuckle (3). Repeat for opposite side.
72. Install the NEW front brake caliper anchor plate to front steering knuckle retaining bolts (1).
Tighten the bolts to 60 Nm +120° (44 lb ft +120°).
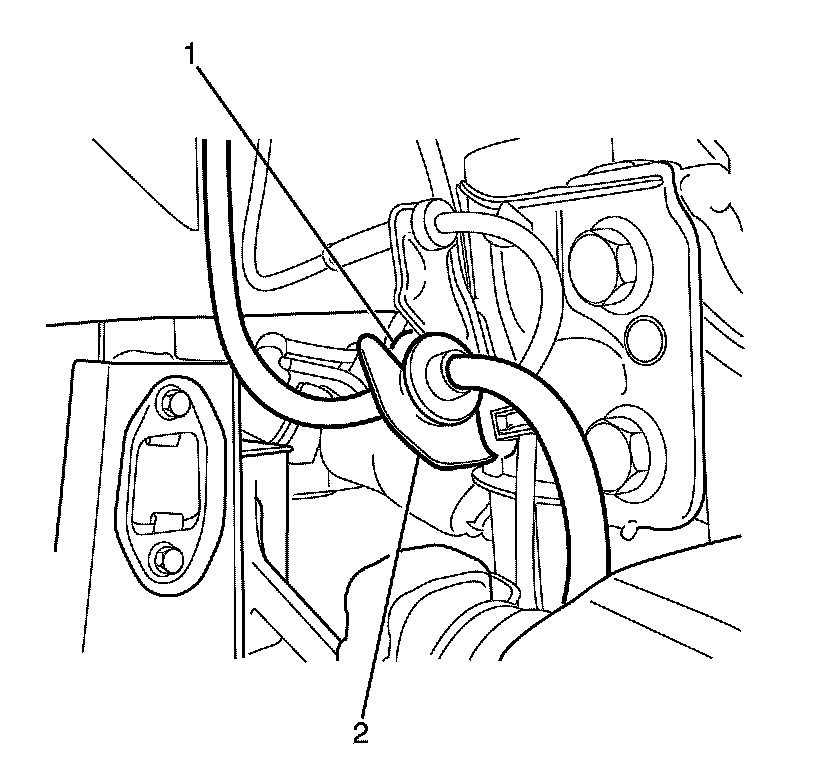
Caution:
Make sure the brake hose is not twisted or kinked after installation. Damage to the hose could result.
73. Attach the front brake hose (1) to the strut mounted brake hose retaining bracket (2). Repeat for opposite side.
74. Install the front wheels. Refer to Tire and Wheel Removal and Installation Service and Repair.
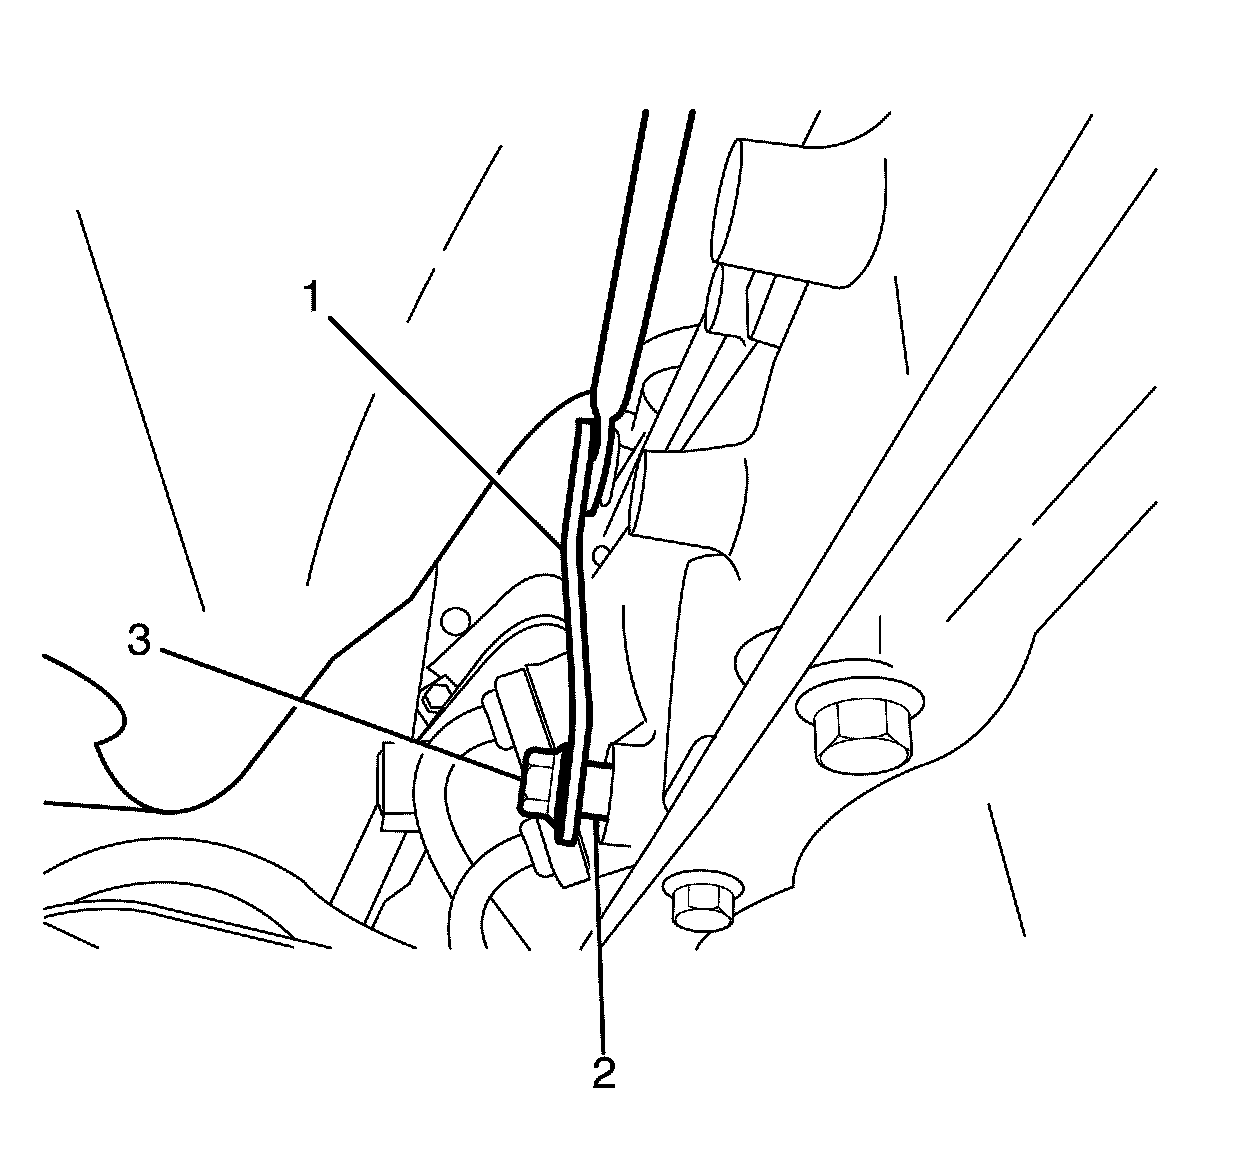
Note: Ignore steps 76 and 77 for vehicles fitted with an manual transmission.
75. Install the shift selector linkage rod (1) to the shift selector shaft (2).
76. Install the shift selector linkage rod to shift selector shaft retaining nut (3).
Tighten the nut to 23 Nm (17 lb ft).
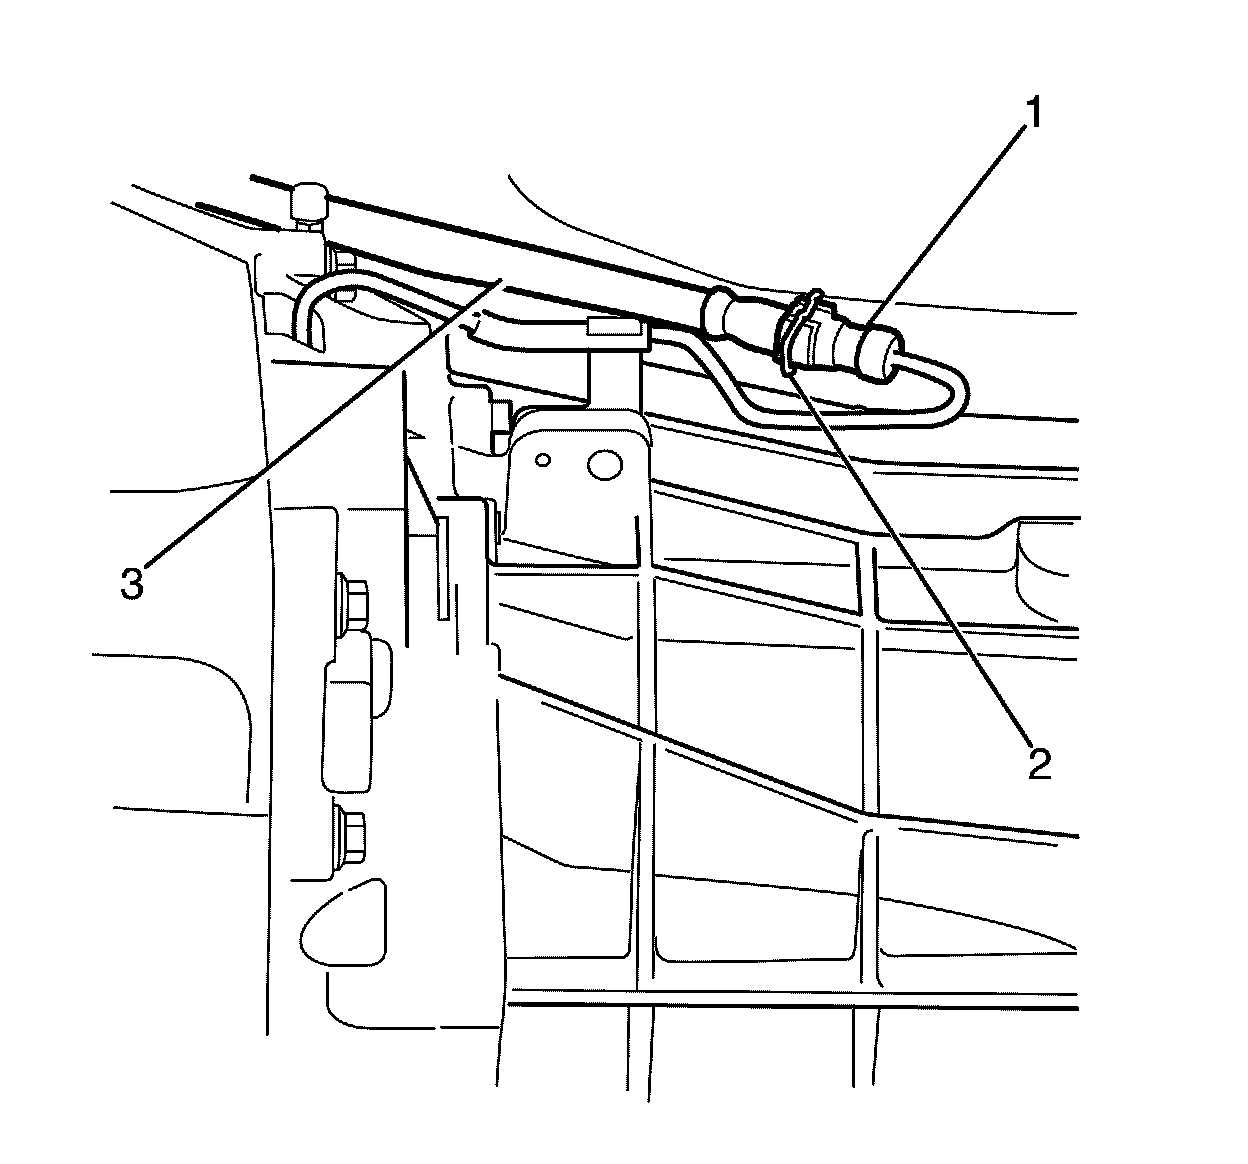
77. Connect the to concentric actuator cylinder feed hose (3) to the concentric actuator cylinder feed pipe (1).
Note: Listen for an audible click to confirm fitting.
78. Install the flexible hose securing clip (2).
79. Install the starter motor. Refer to Starter Replacement Service and Repair.
80. Install the propeller shaft. Refer to Propeller Shaft Replacement (Except 4L60) Propeller Shaft Replacement (Except 4L60).
81. Install the centre exhaust heat shield. Refer to Exhaust Heat Shield Replacement - Center Exhaust Heat Shield Replacement - Center.
82. Install the exhaust system. Refer to Exhaust System Replacement Service and Repair.
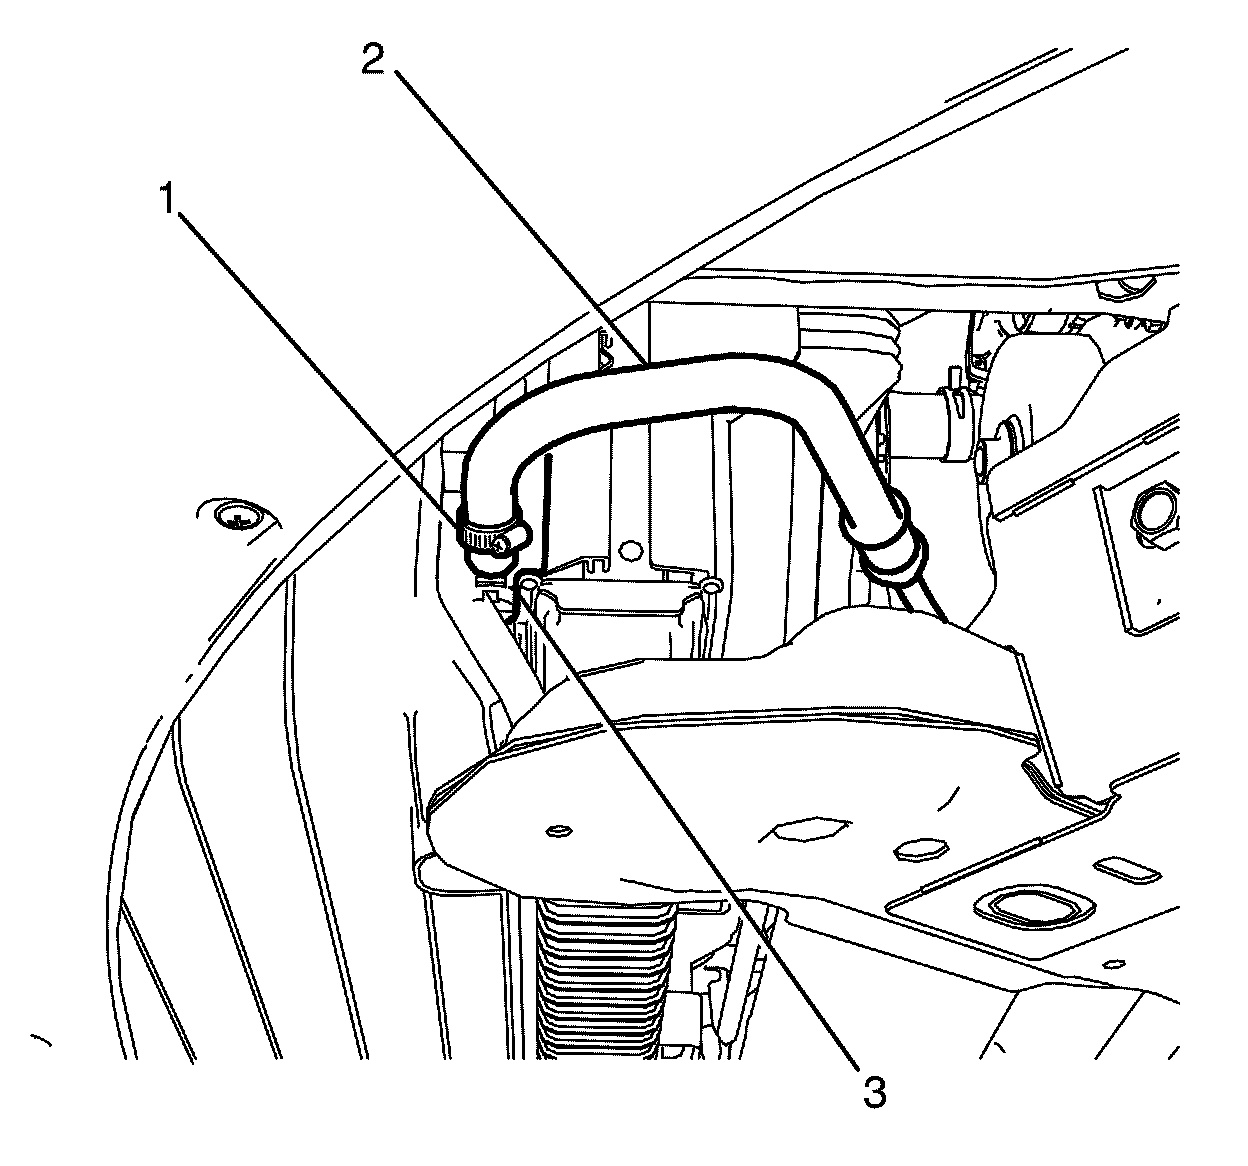
83. Remove the plug from the power steering cooler (3) and power steering reservoir inlet hose (2).
84. Connect the power steering reservoir inlet hose (2) to the power steering cooler (3).
85. Install the power steering reservoir inlet hose spring clamp (1) to its original location
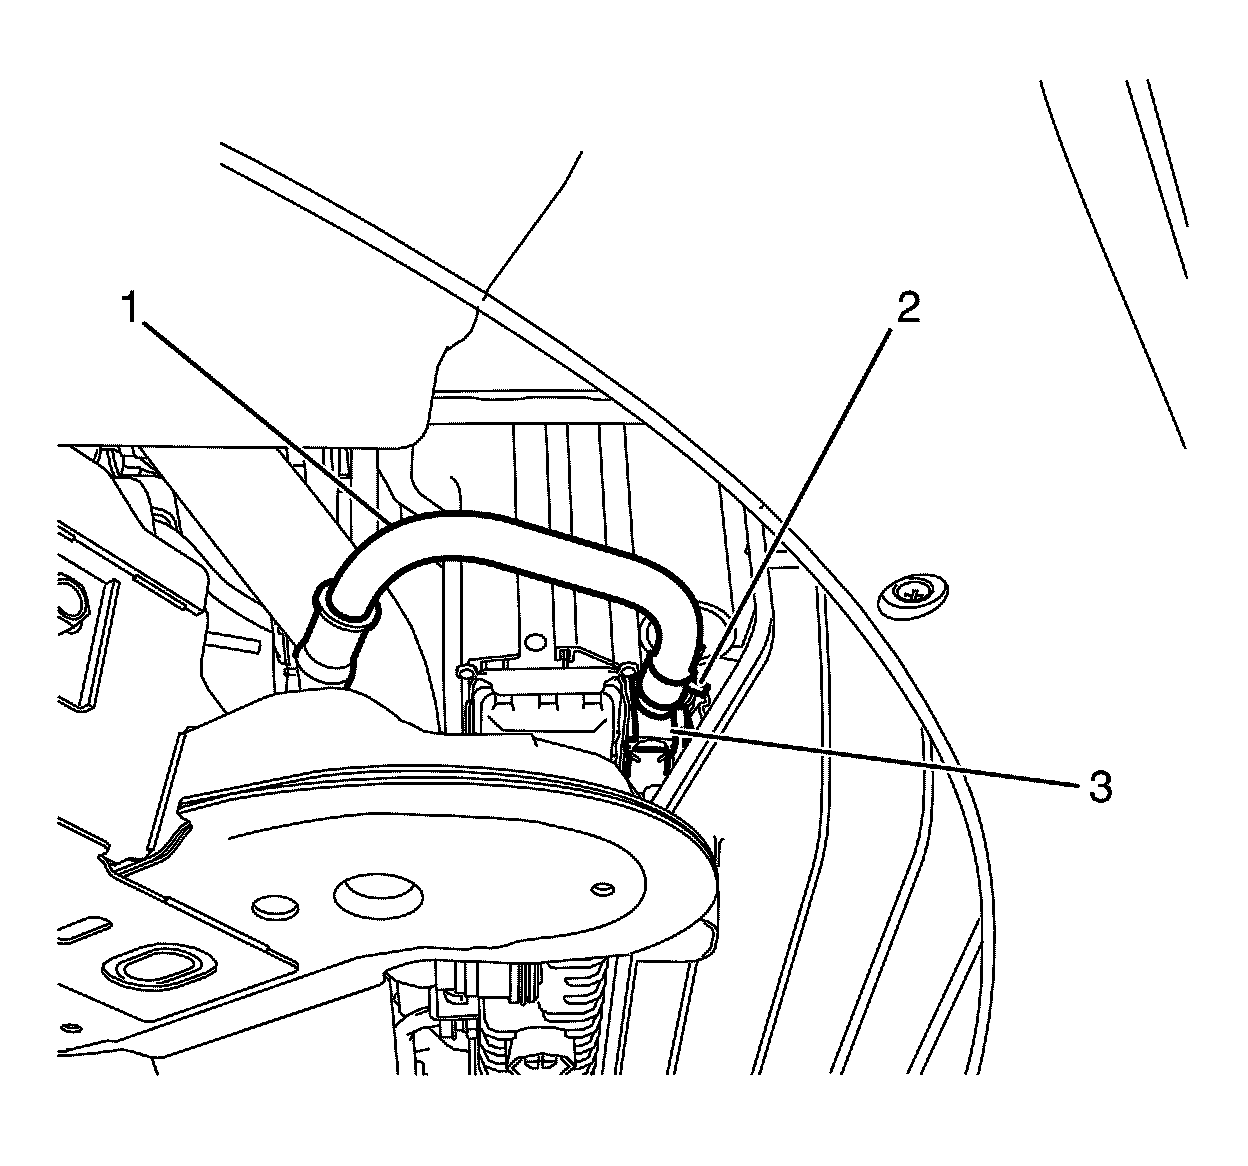
86. Remove the plug from the power steering cooler (3) and power steering reservoir inlet hose (1).
87. Connect the power steering reservoir inlet hose (1) to the power steering cooler (3).
88. Install the power steering reservoir inlet hose spring clamp (2) to its original location
89. Install the engine splash shield. Refer to Engine Splash Shield Replacement .
90. Install the front air deflector. Refer to Front Air Deflector Replacement .
91. Lower the vehicle.
Note: Ignore steps 94 through to 97 for vehicles equipped with a manual transmission.
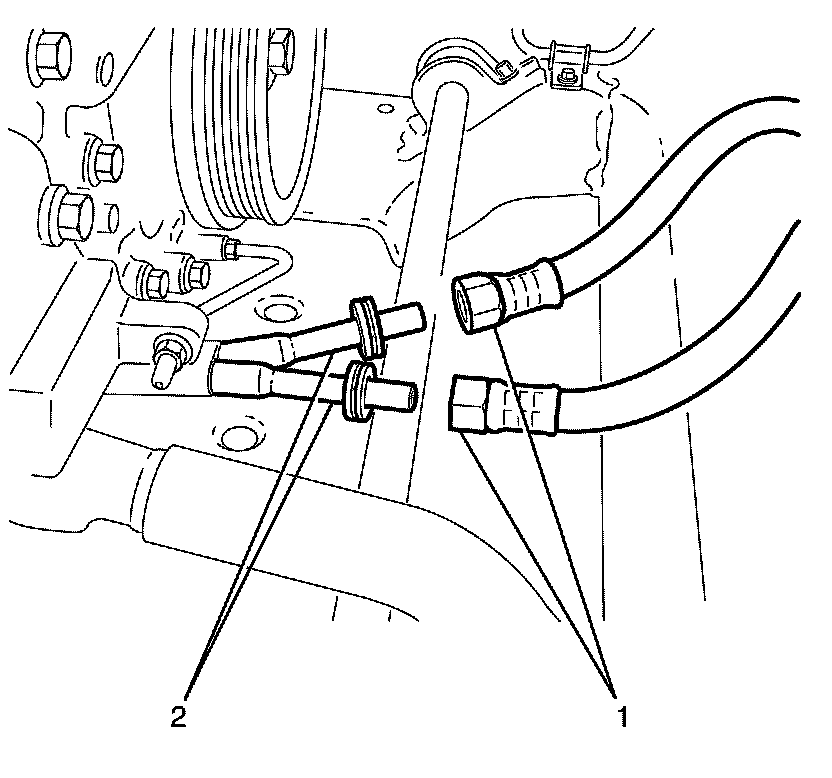
92. Remove the clean lint free cloth at the automatic transmission cooler pipes (2) and the flexible hoses (1).
Note: The flexible hoses are not serviced separately. Therefore if the hose's require replacement, then the hose and radiator to hose cooler hose assembly must be fitted.
93. Align both flexible hose's with both steel cooler lines.
Note: Listen for an audible click to confirm fitting.
94. Hold the cooler line (2) and connect the flexible hose (1) by pushing together. Repeat procedure for other hose.
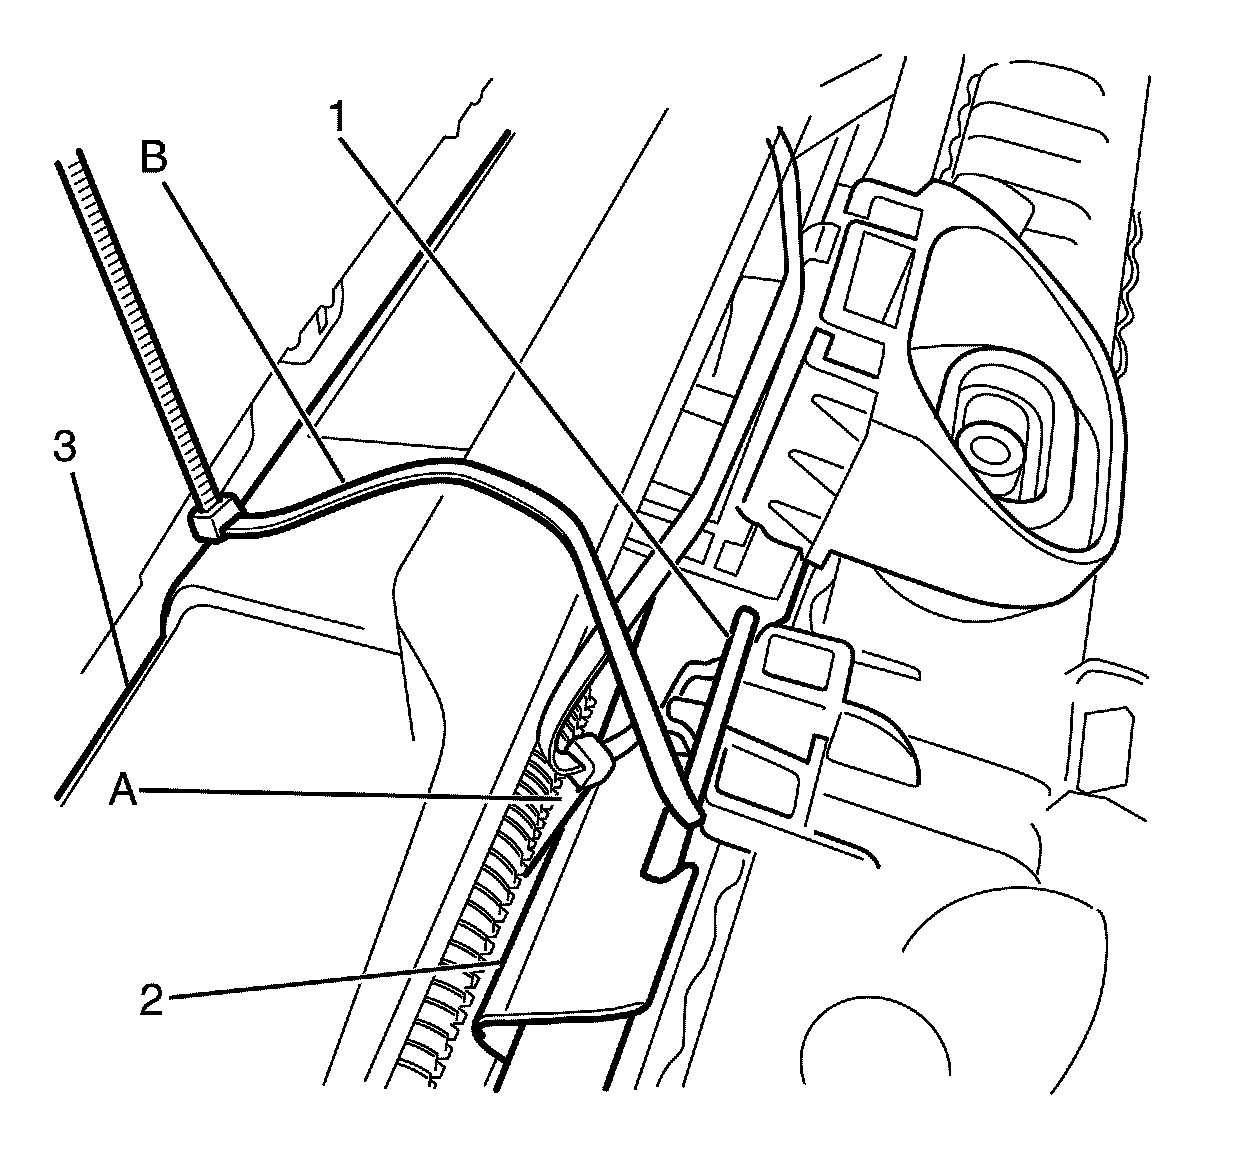
Note: Cut zip tie A and zip tie B and remove from around the front end assembly (3) and the radiator and condenser mount (1).
95. Remove the large zip ties or equivalent securing the radiator and condenser assembly (2) to the front end assembly (3).
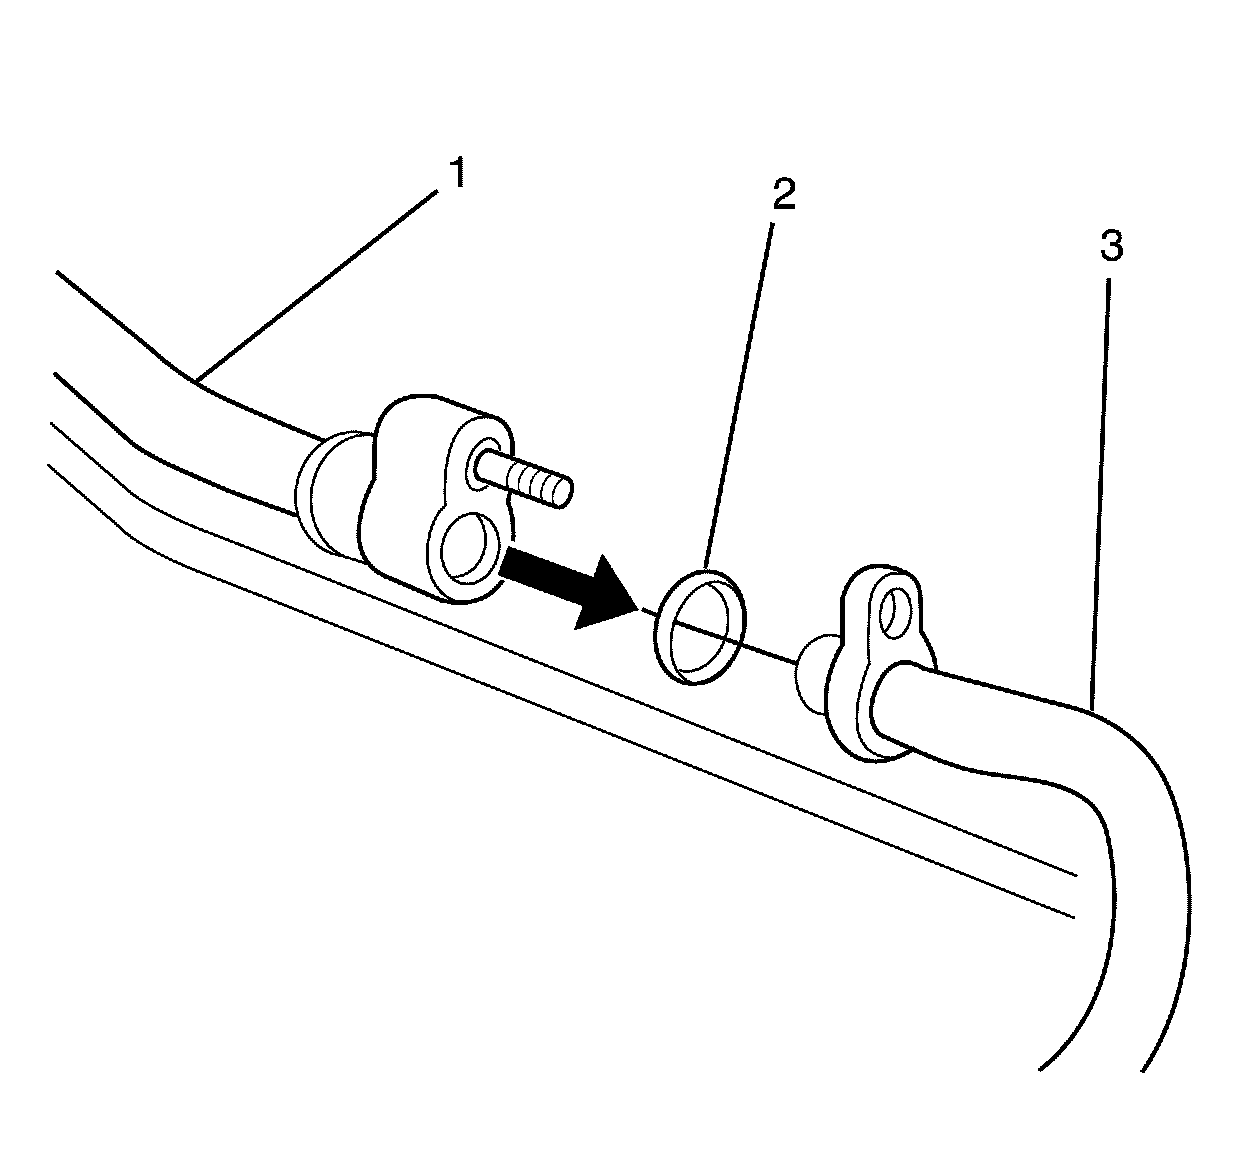
96. Remove the plug or cap at the A/C suction pipe ends (1 and 3)
Note: The A/C sealing O-rings must be fitted dry. DO NOT lubricate the A/C sealing O-rings.
97. Fit the NEW A/C suction pipe sealing O-ring (2) to the suction pipe.
98. Install the upper A/C suction pipe (1) to the lower A/C suction pipe (3).
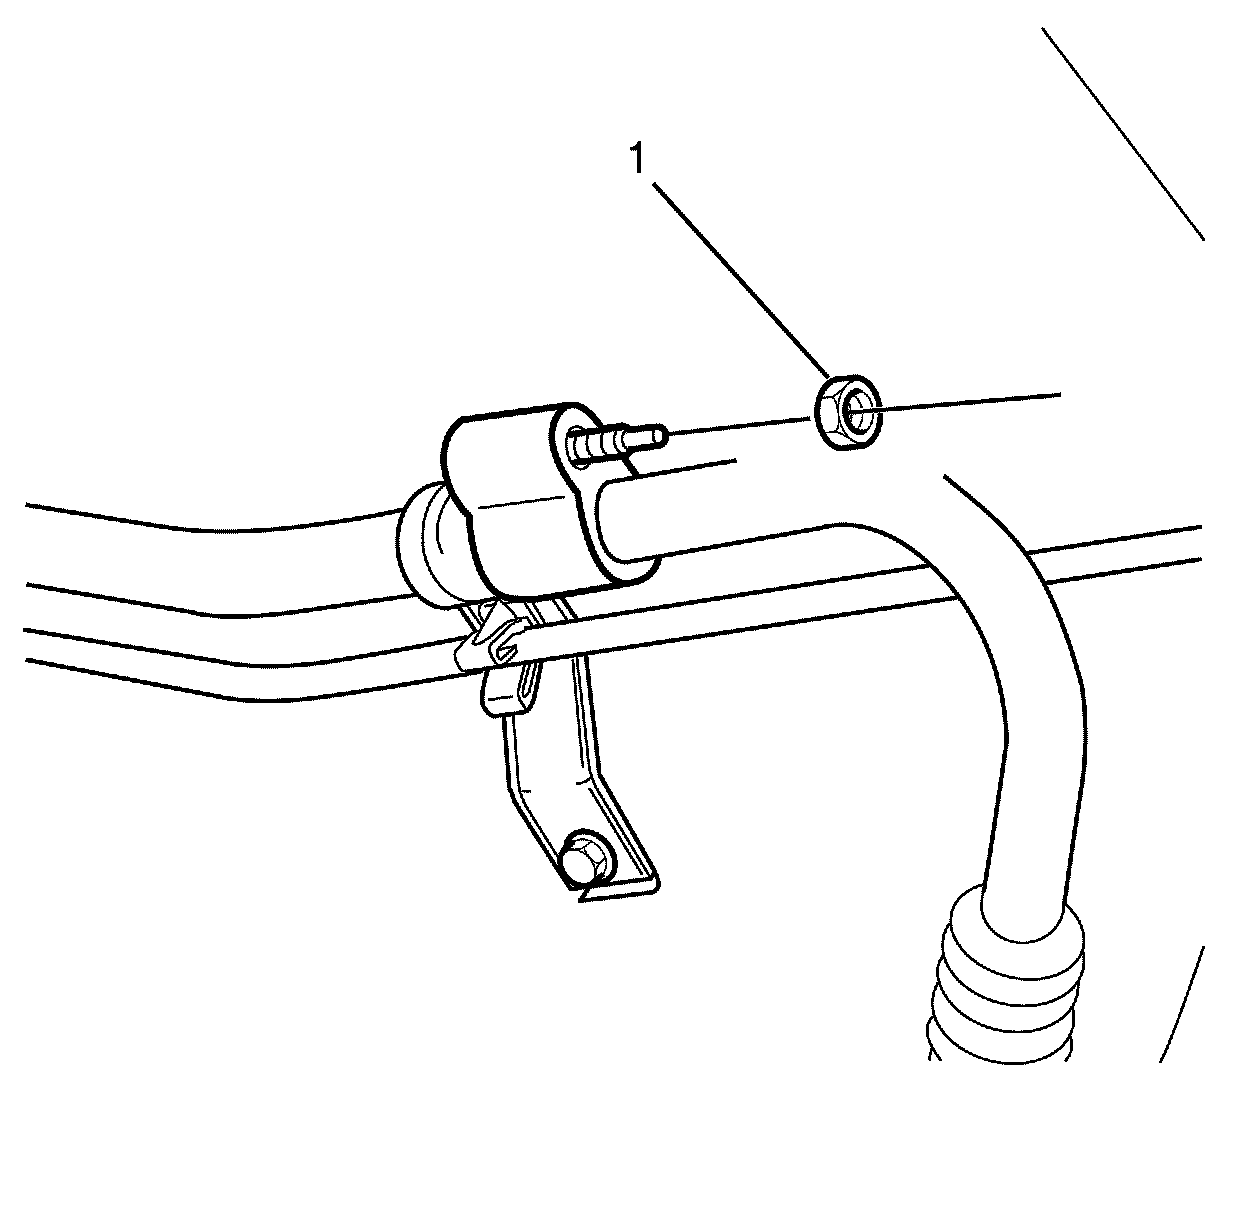
99. Install the A/C suction pipe pad to A/C suction pipe retaining nut (1).
Tighten the nut to 22 Nm (16 lb ft).
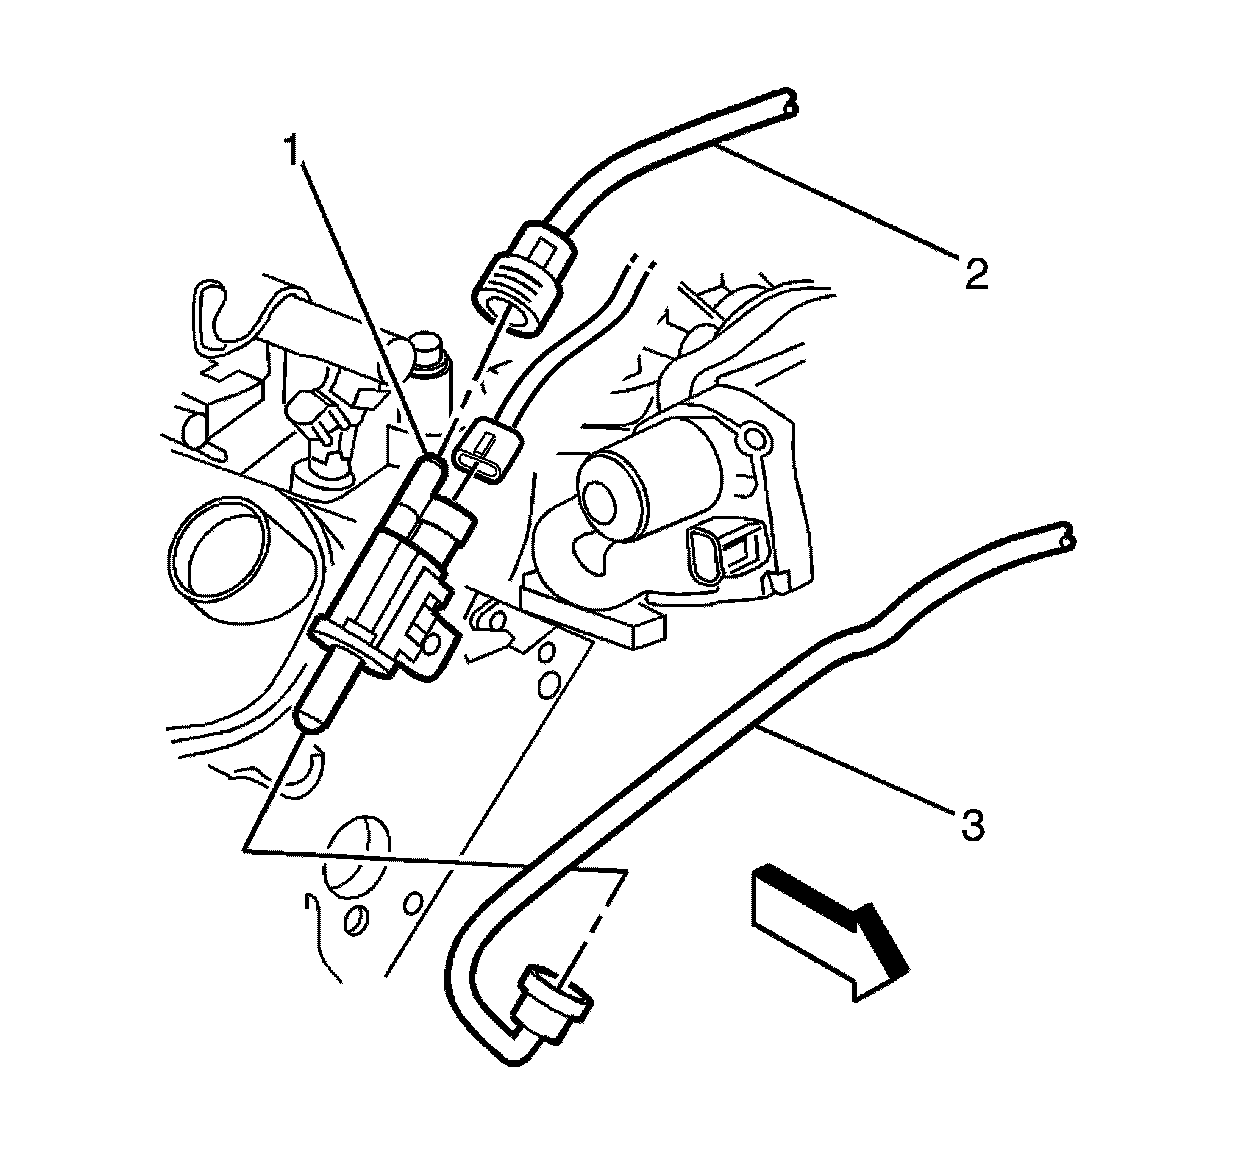
100. Remove the plug from the throttle body to EVAP purge valve tube (3) and EVAP purge valve (1) ends.
101. Connect the throttle body to EVAP purge valve tube (3) to the EVAP purge valve (1).
102. Remove the plug from the EVAP purge valve to fuel tank tube (2) and EVAP purge valve (1) ends.
103. Connect the EVAP purge valve to fuel tank tube (2) to the EVAP purge valve (1).
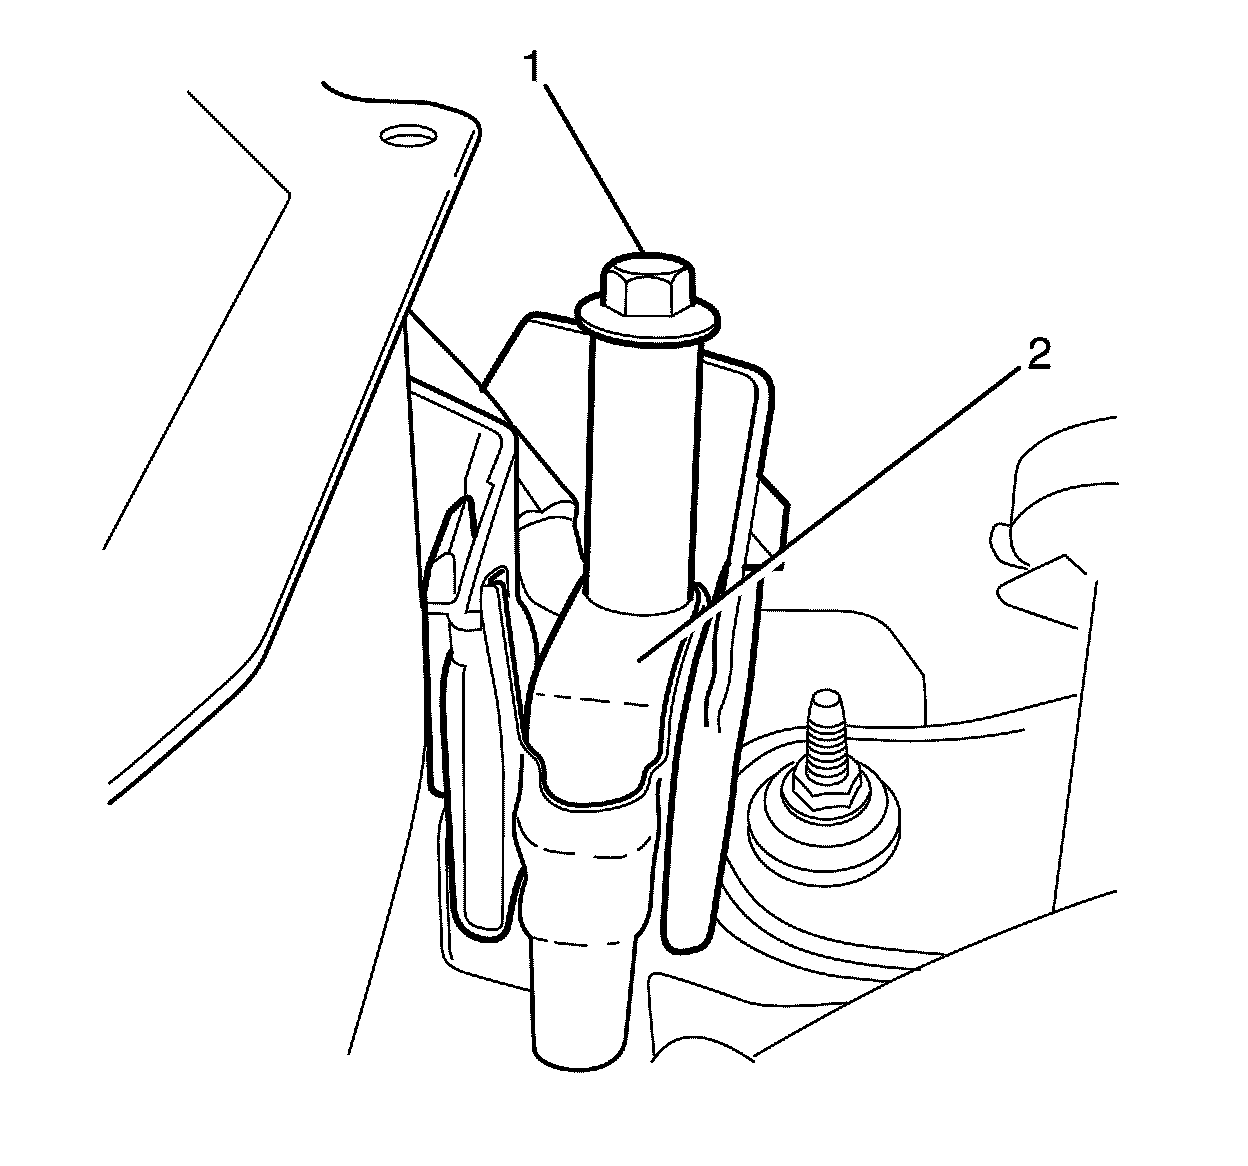
104. Install the wiring harness (2) to the remote positive battery post.
105. Install the remote positive battery post to wiring harness retaining bolt (1).
Tighten the bolt to 15 Nm (11 lb ft).
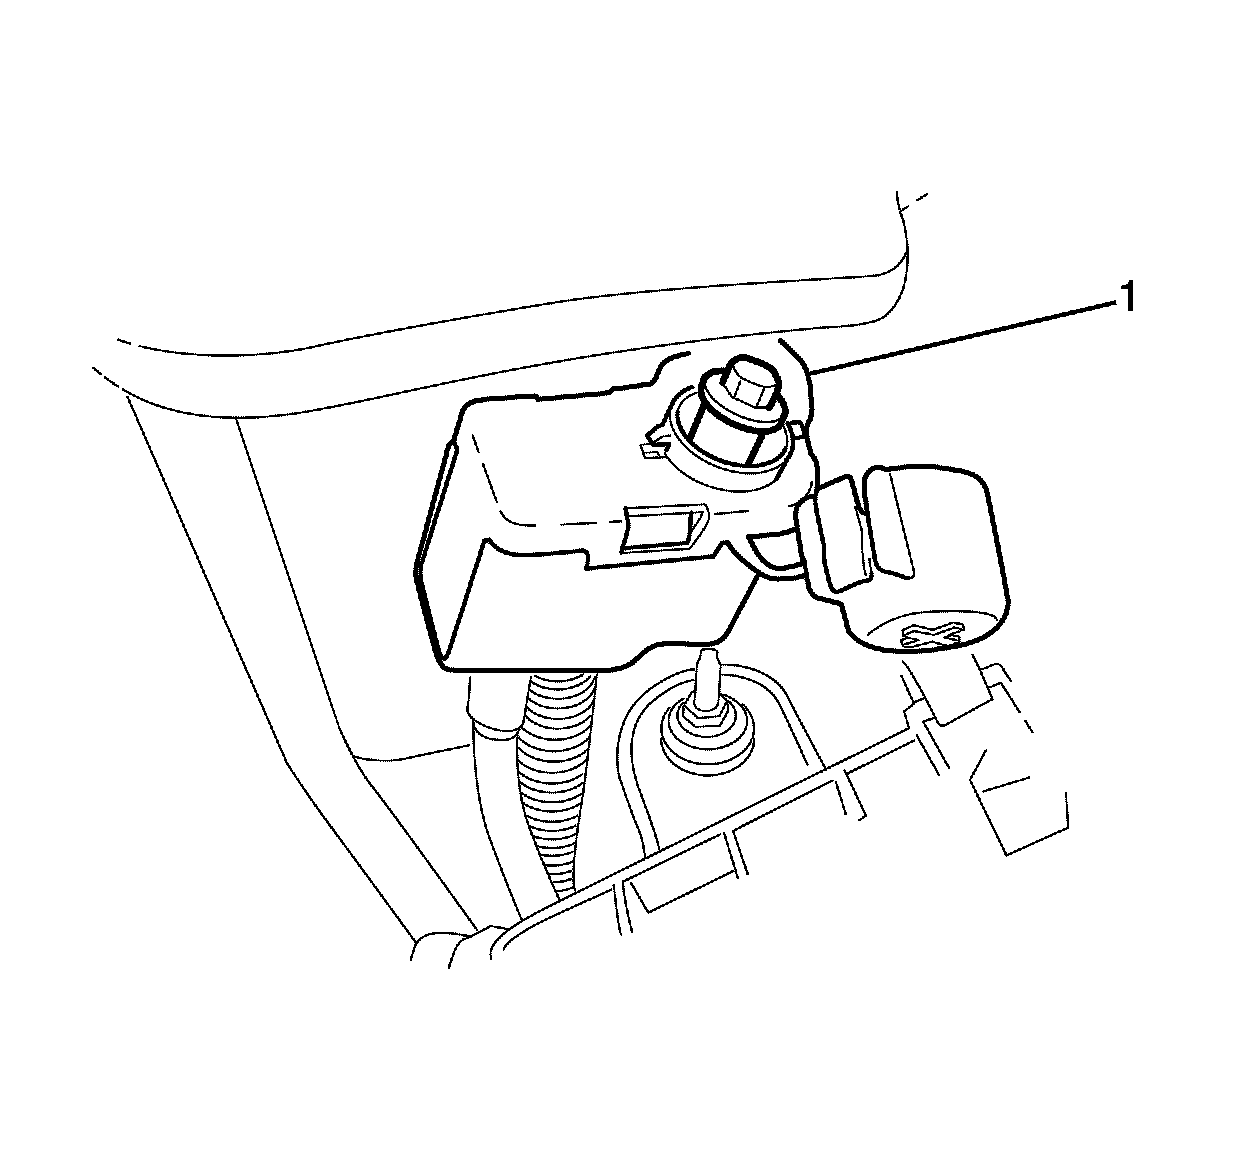
Note: Make sure the clips on the remote positive battery post cover (1) are engaged to avoid an induced rattle condition.
106. Install the remote positive battery post cover (1).
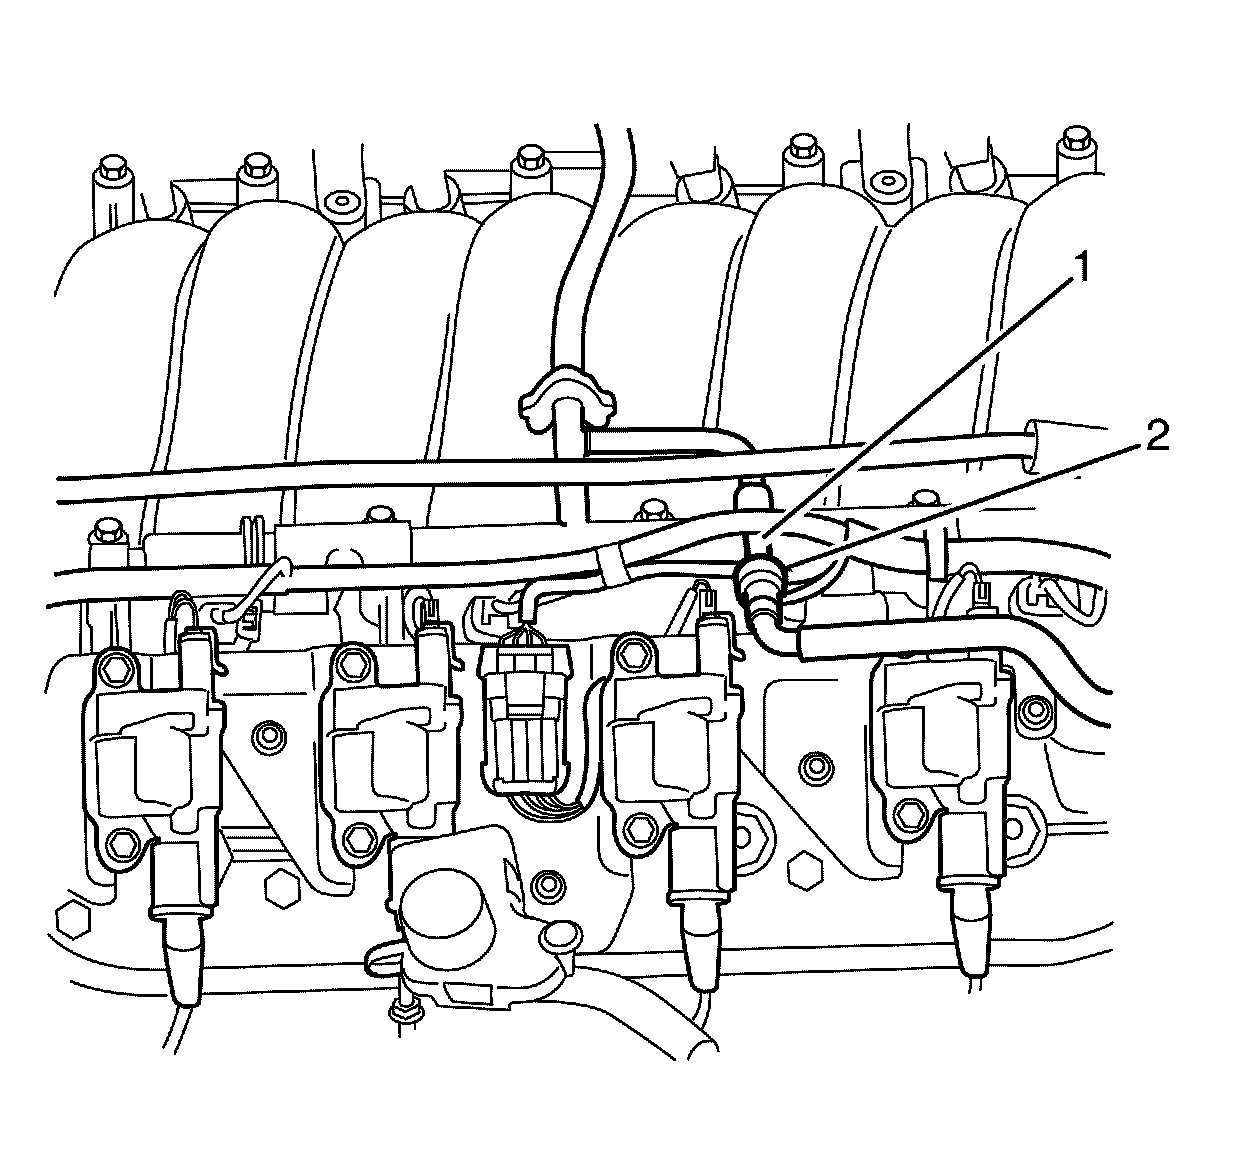
107. Remove the plug from the fuel feed pipe (2) and fuel rail pipe (1) ends.
108. Connect the fuel rail feed pipe (2) quick connect fitting. Refer to Metal Collar Quick Connect Fitting Service Metal Collar Quick Connect Fitting Service or Plastic Collar Quick Connect Fitting Service Plastic Collar Quick Connect Fitting Service.
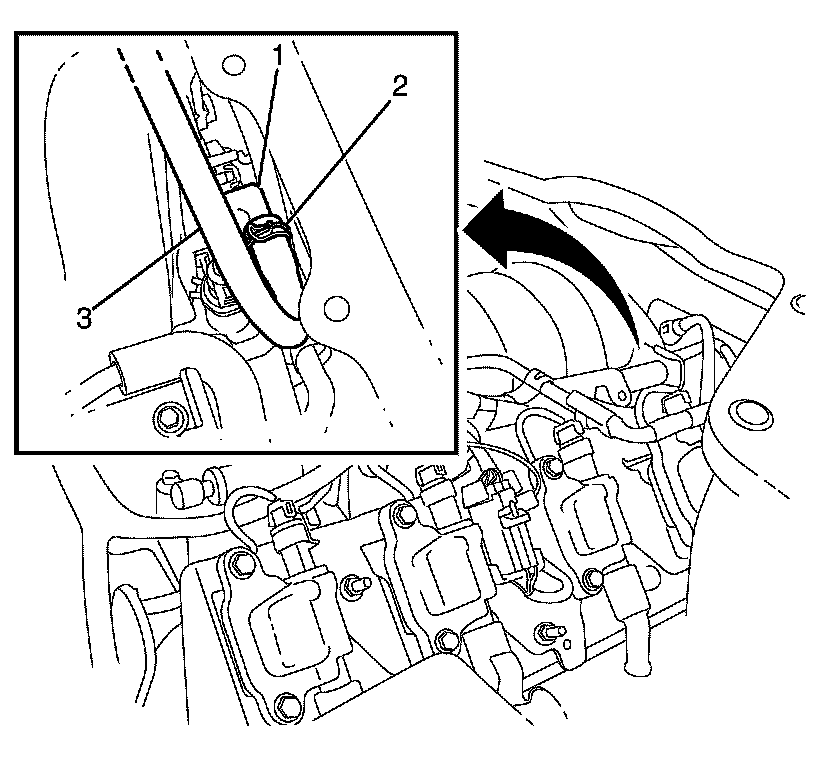
109. Connect the vacuum brake booster hose (3) from the intake manifold vacuum port (1).
110. Compress the vacuum brake booster hose retaining clamp (2) and return to its original position on the vacuum brake booster hose (3).
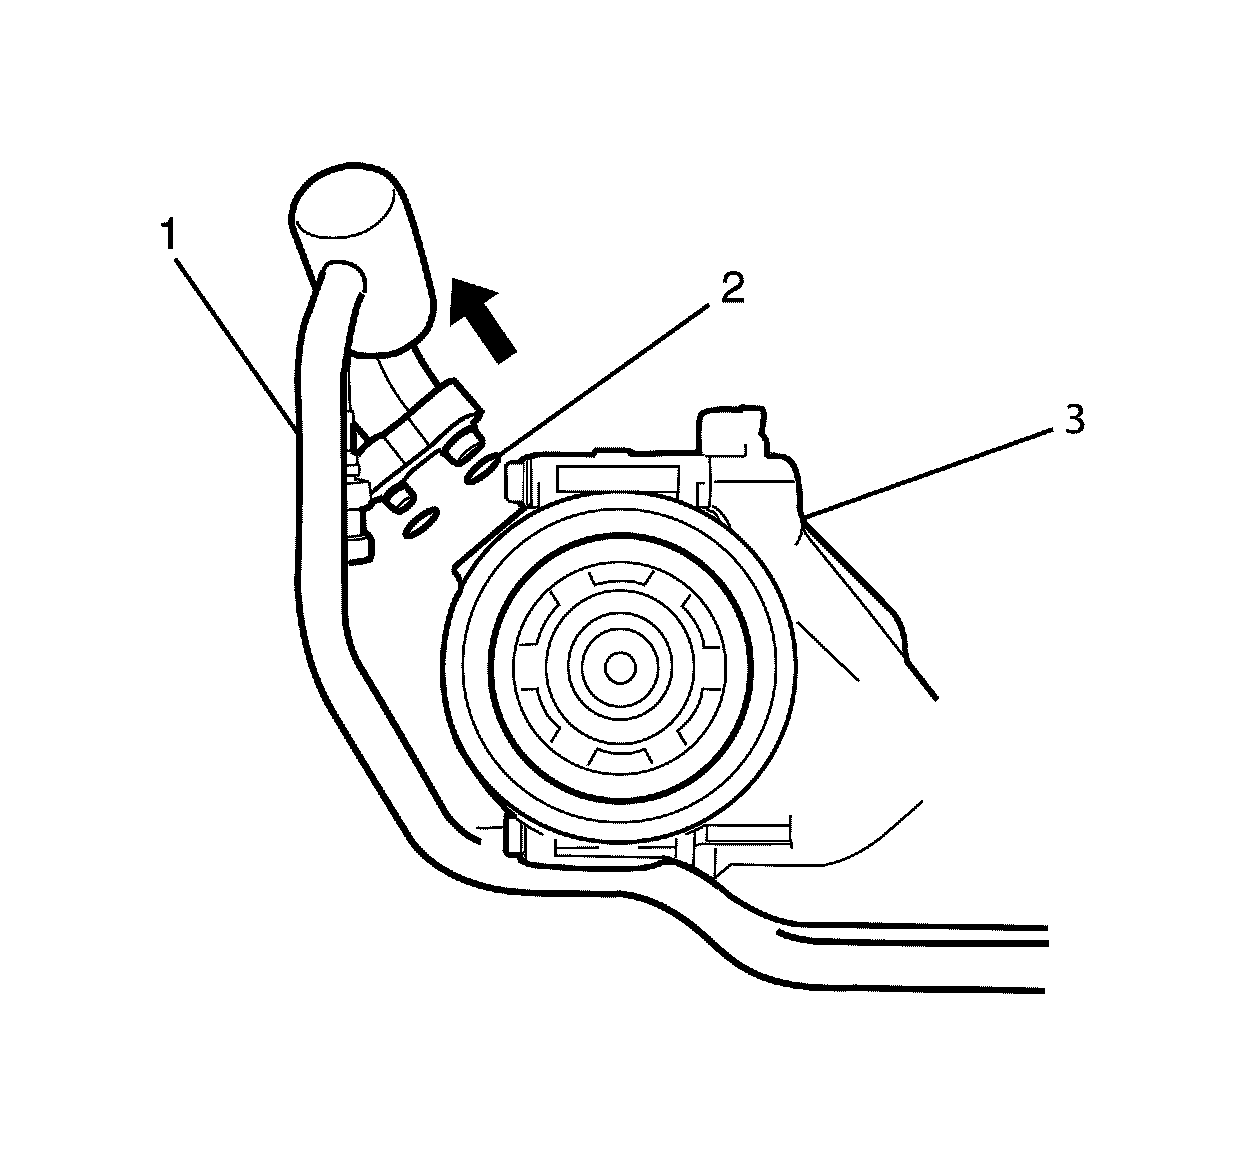
111. Remove the plug from the compressor (3) ports.
112. Remove the plug from the pipes (1).
Note: The A/C sealing O-rings must be fitted dry. DO NOT lubricate the A/C sealing O-rings.
113. Fit the NEW A/C suction/discharge pipe O-rings (2) to the suction/discharge pipes (1).
114. Connect the A/C suction/discharge line pad (1) to the A/C compressor (3).
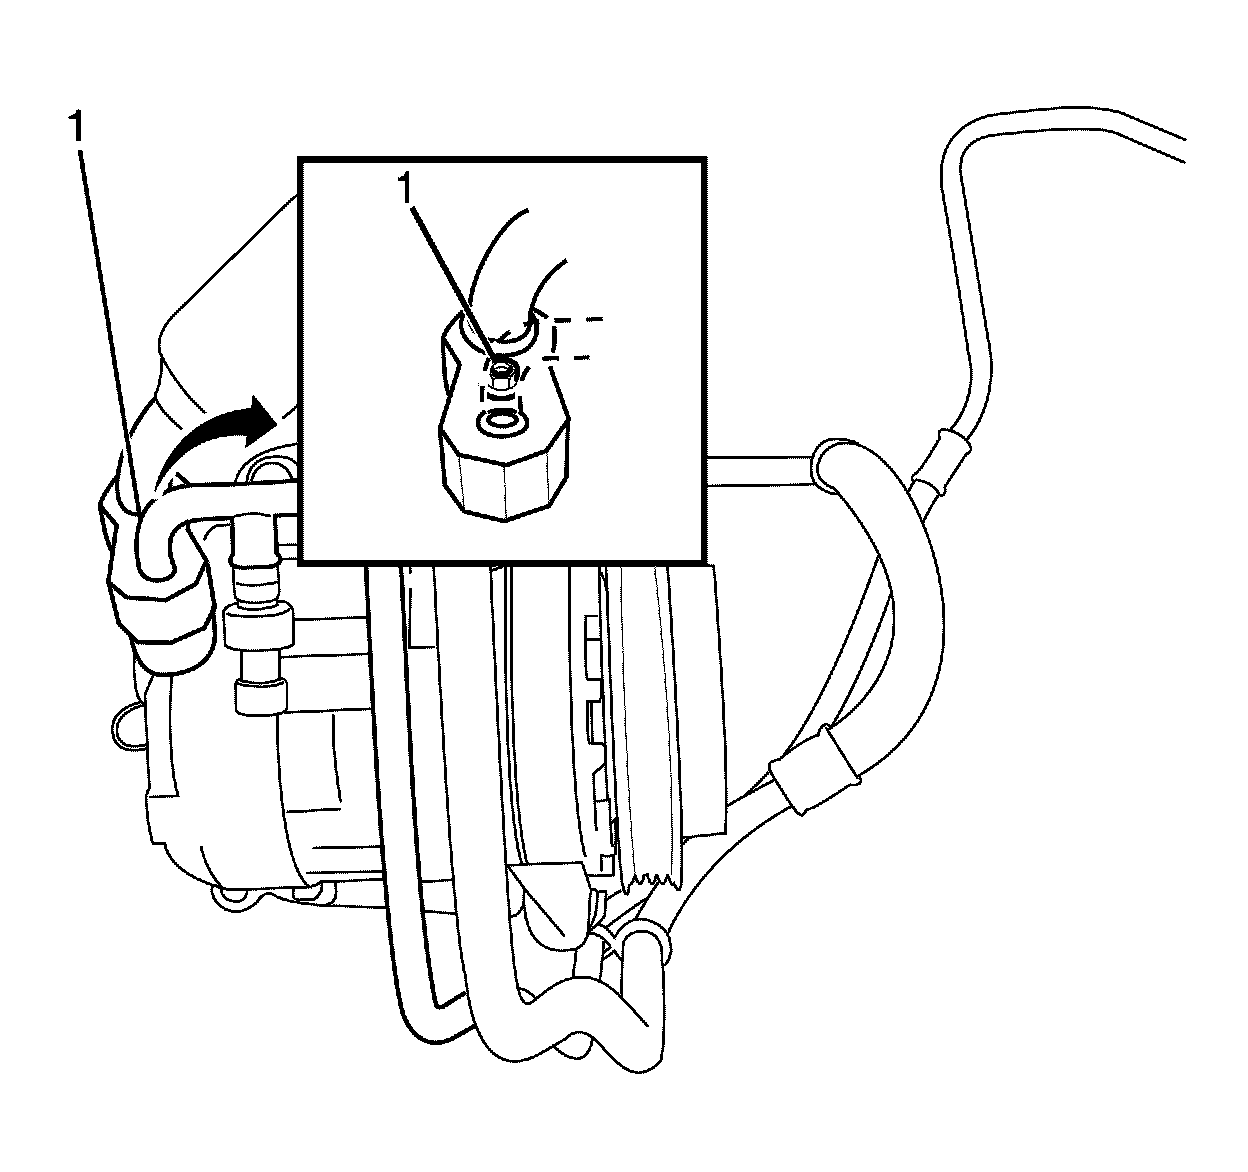
115. Install the suction/discharge line pad (1) to compressor and tighten the retaining bolt (1) to the correct torque specification.
Tighten the bolt to 22 Nm (16 lb ft).
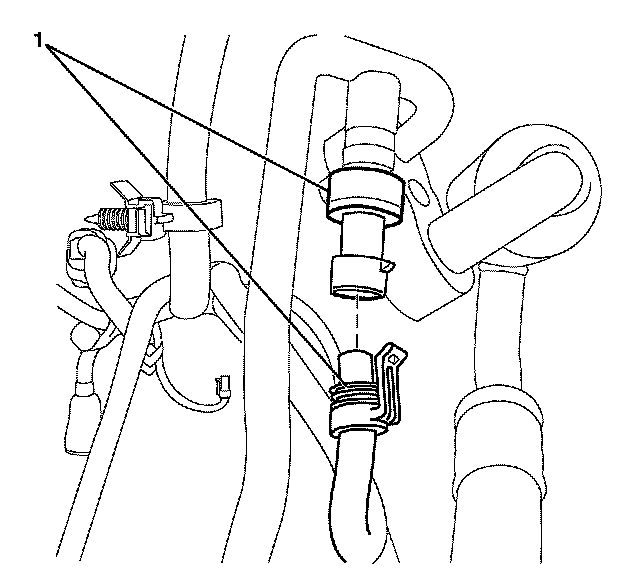
116. Connect the electrical connector to the A/C Refrigerant Pressure Sensor (1) to the A/C refrigerant sensor.
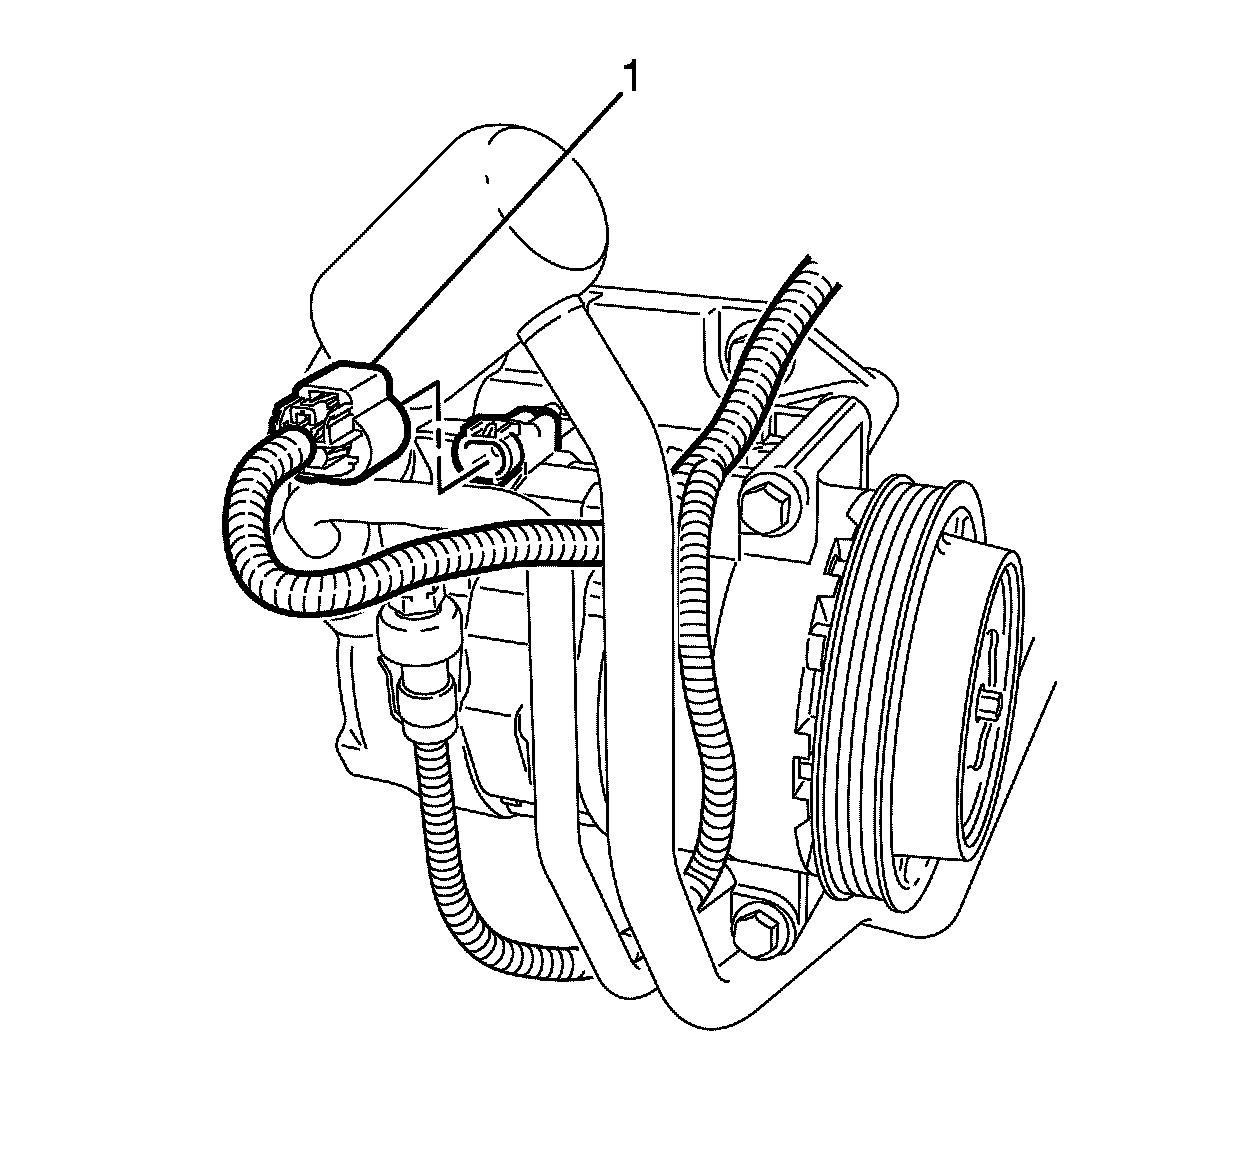
117. Connect the A/C electrical connector (1) to the A/C compressor.
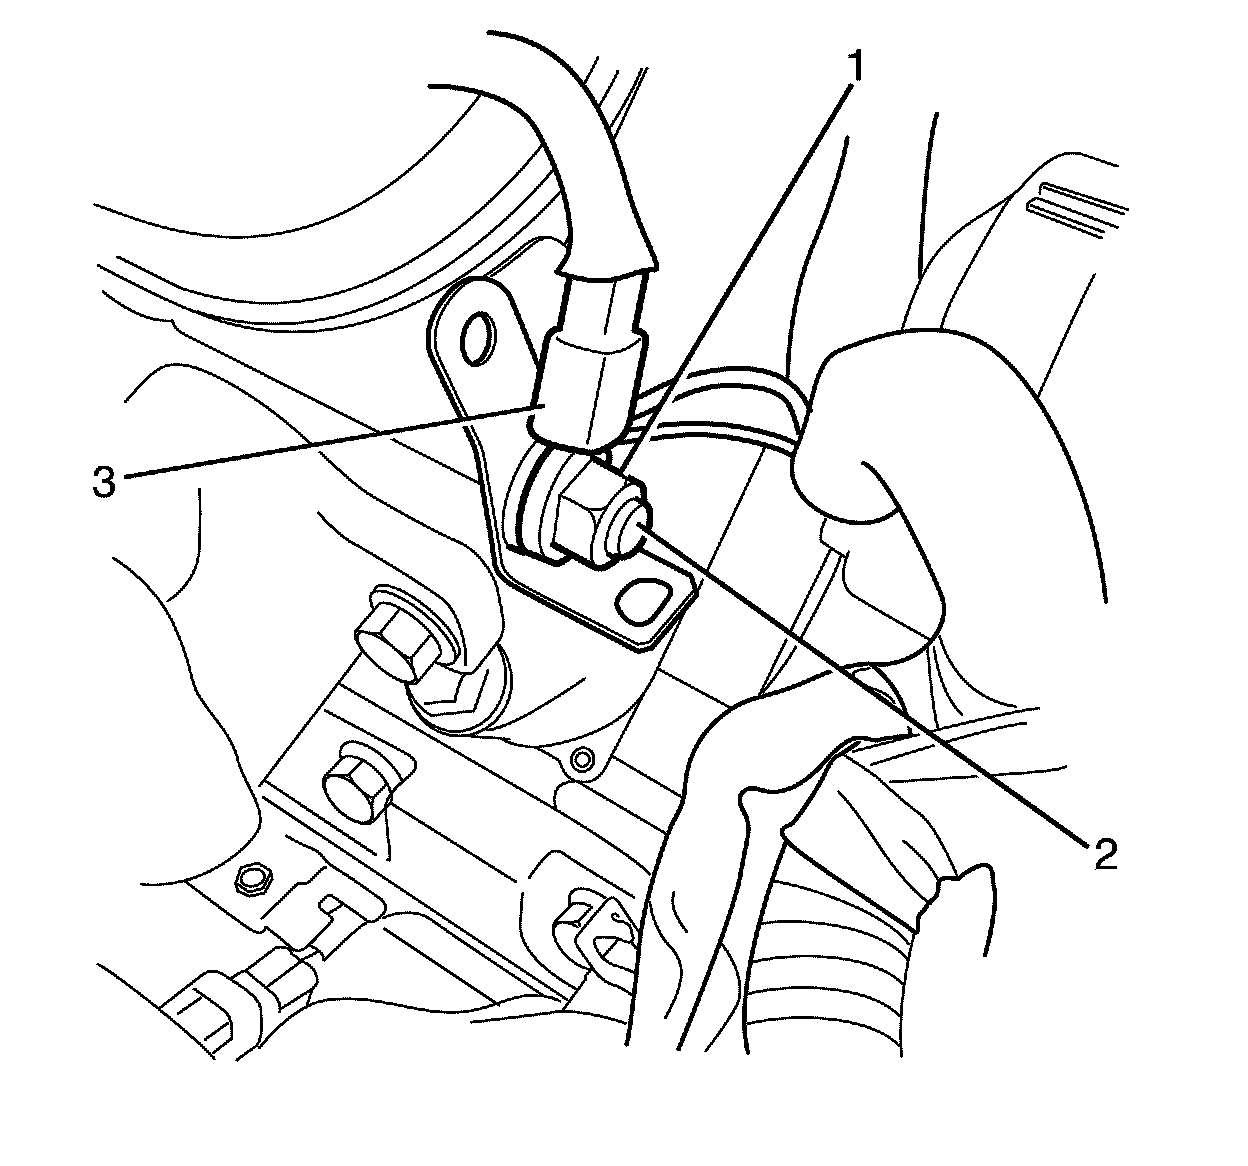
118. Install the vehicle body ground cable (3) to the cylinder head stud (2).
119. Install the vehicle body ground cable to cylinder head retaining nut (1).
Tighten the bolt to 25 Nm (18 lb ft).
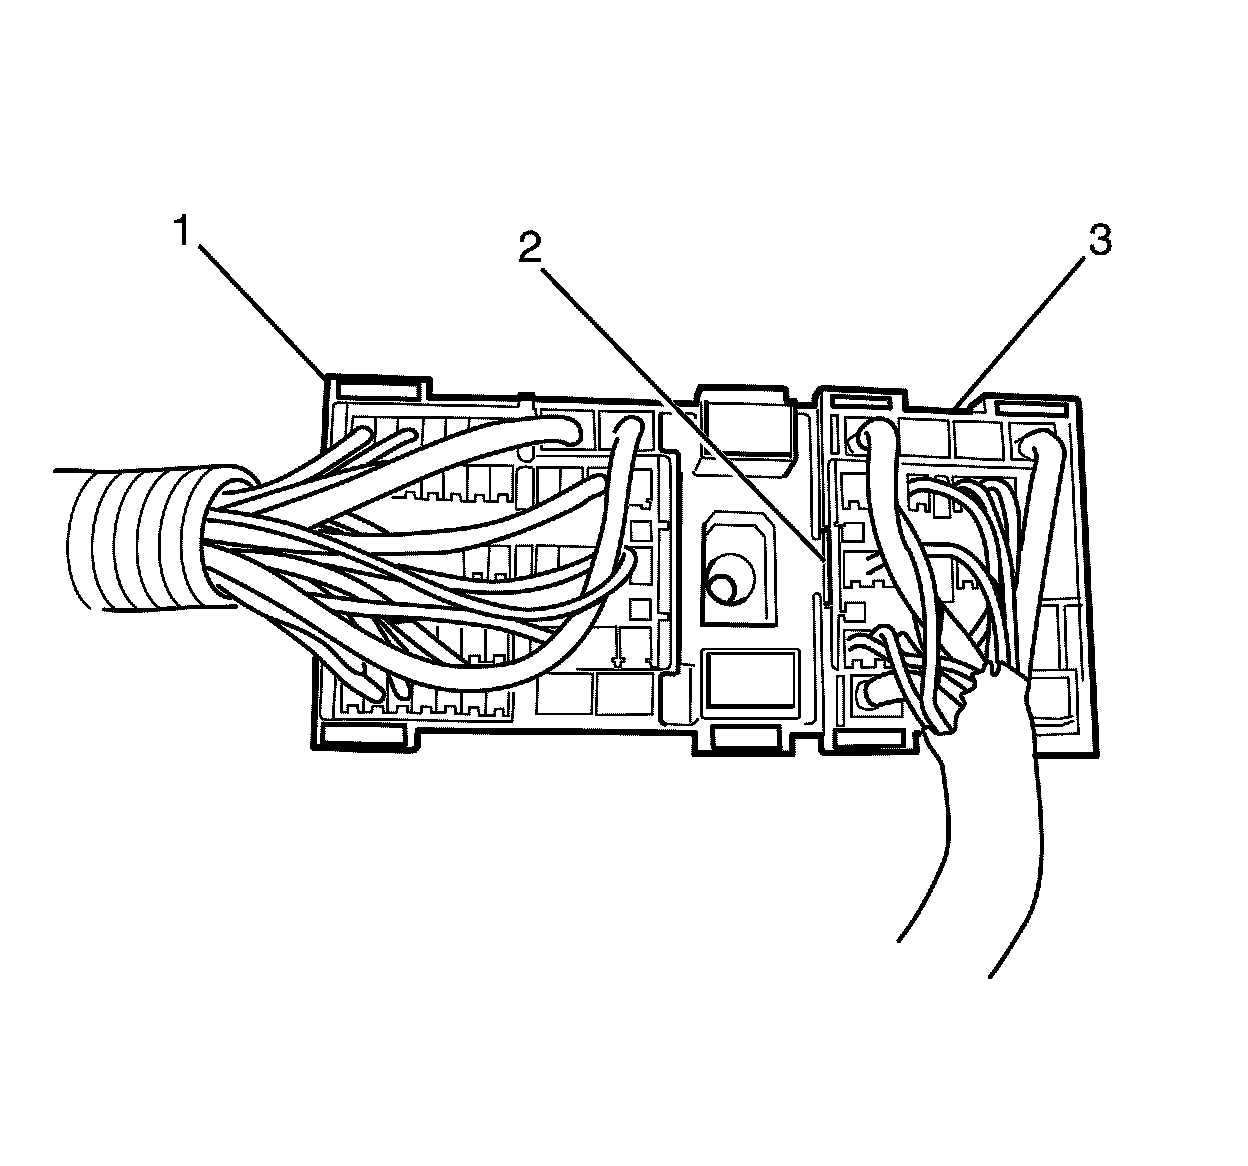
Note: Listen for a audible click from the locking tang (2) to confirm fitting.
120. Slide the engine connector (3) into the body harness connector (1) to join.
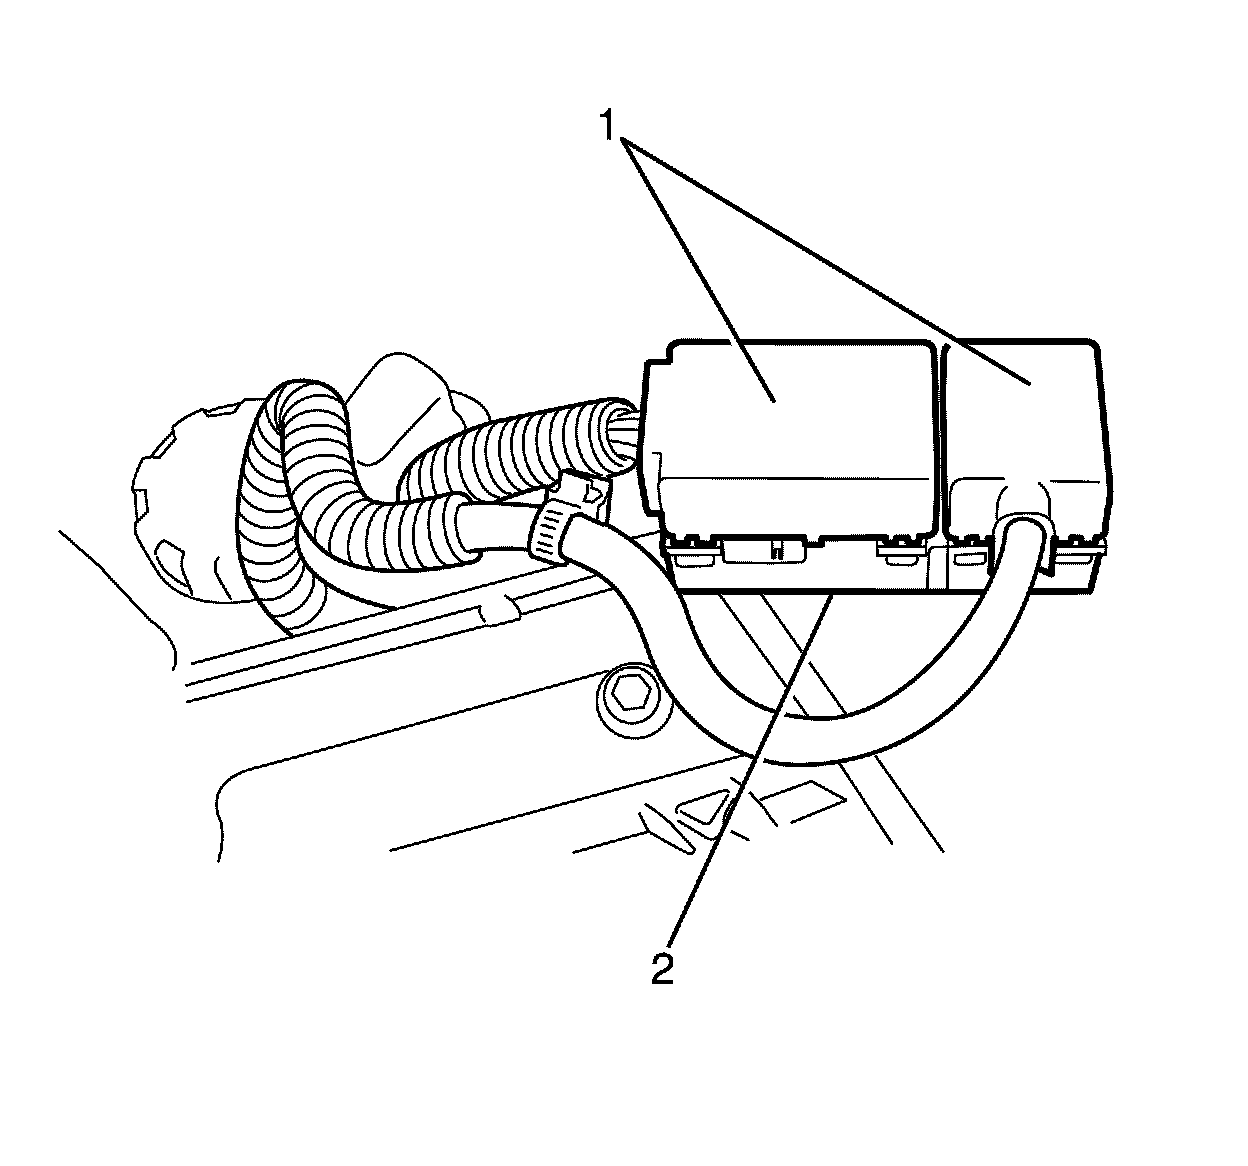
121. Install the protector (1) to the base of the under hood BEC connector (2).
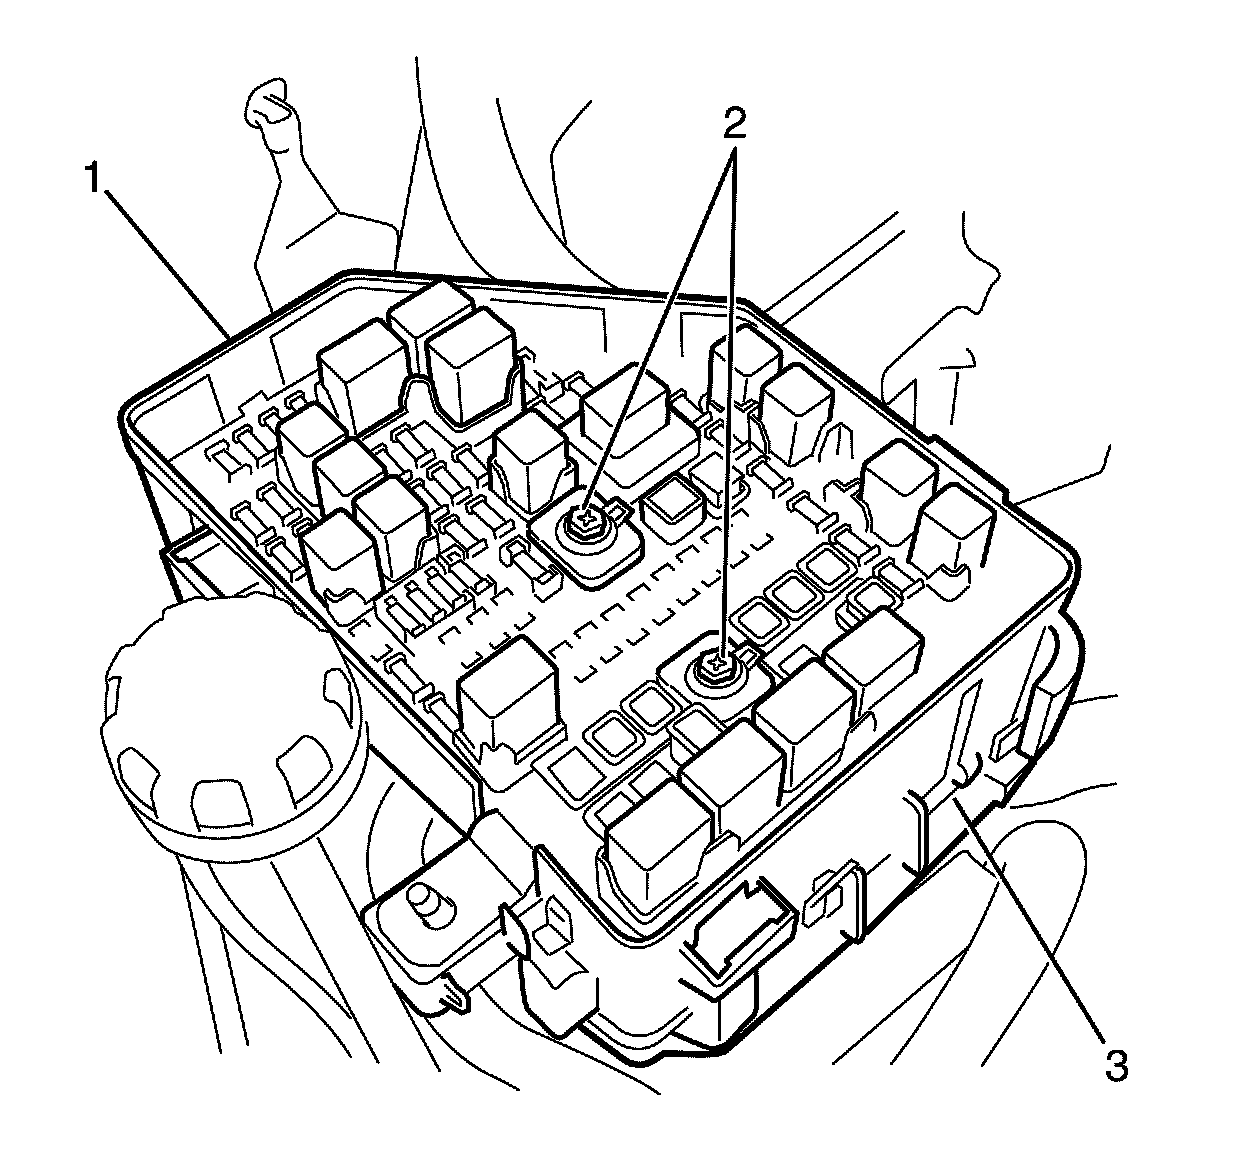
122. Install the upper under hood BEC plate (1) to the lower under hood BEC plate (3).
Note: The under hood BEC upper plate to lower plate retaining bolts (2) DO NOT have a torque specification. Listen for an audible clicking sound whilst tightening the under hood BEC upper plate to lower plate retaining bolts (2) to confirm correct fitting.
123. Install the under hood BEC upper plate to lower plate retaining bolts (2).
Listen for an audible click for correct tension.
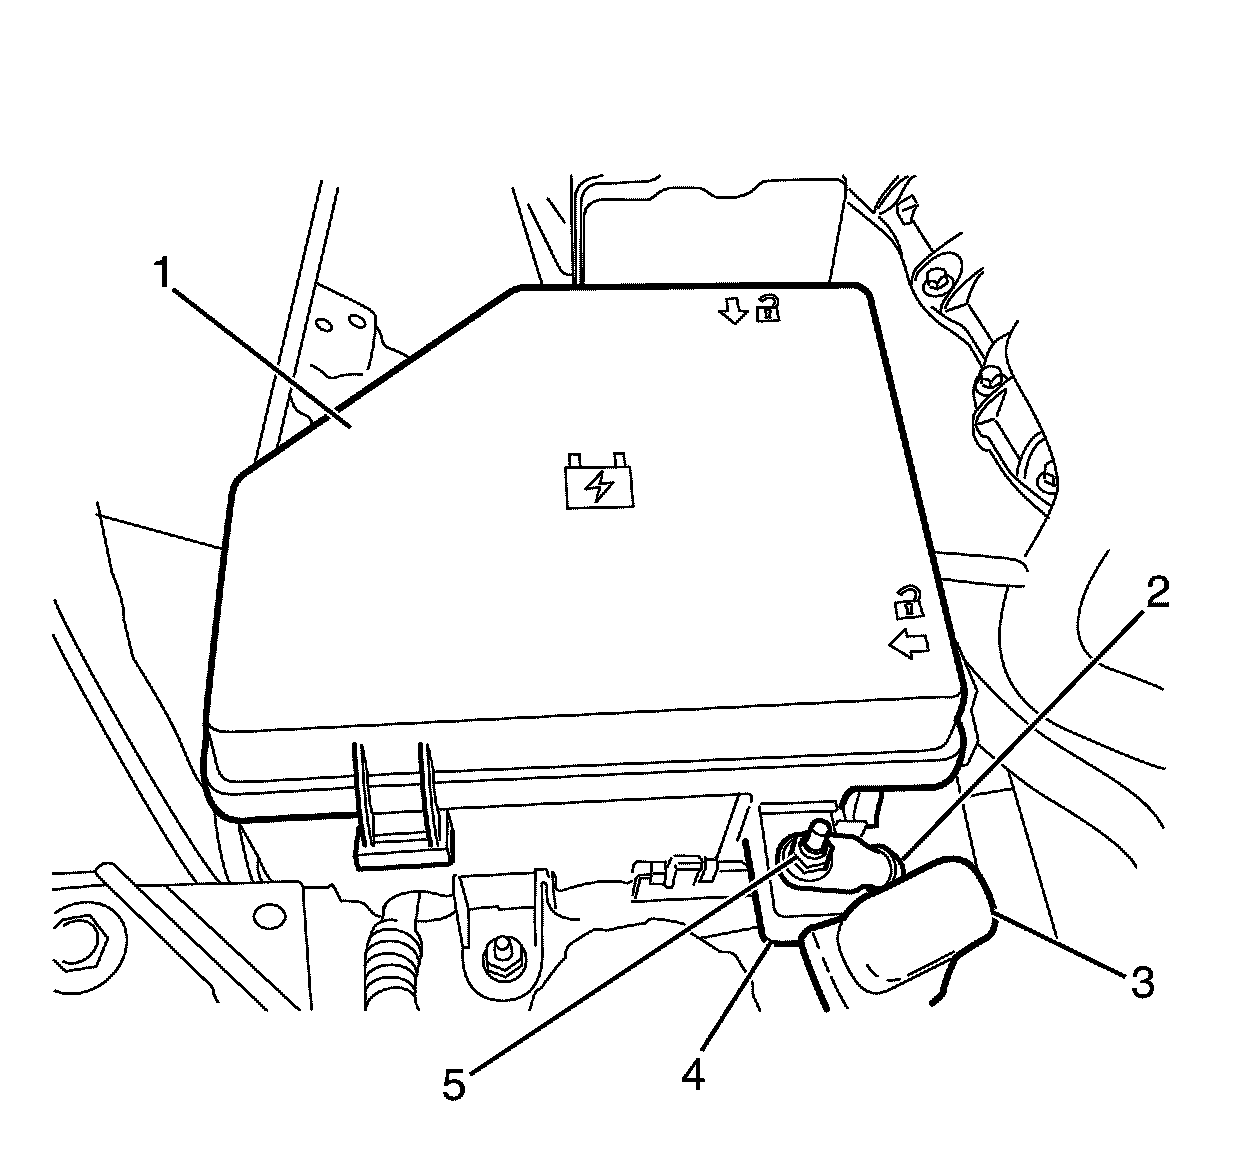
124. Connect the positive cable (2) to the upper under hood BEC plate (4).
125. Install the positive cable to under hood BEC plate retaining bolt (5).
Tighten the bolt to 10 Nm (89 lb in).
126. Install the positive cable protective cover (3) to the positive cable.
127. Install the under hood body electrical centre (BEC) cover (1).
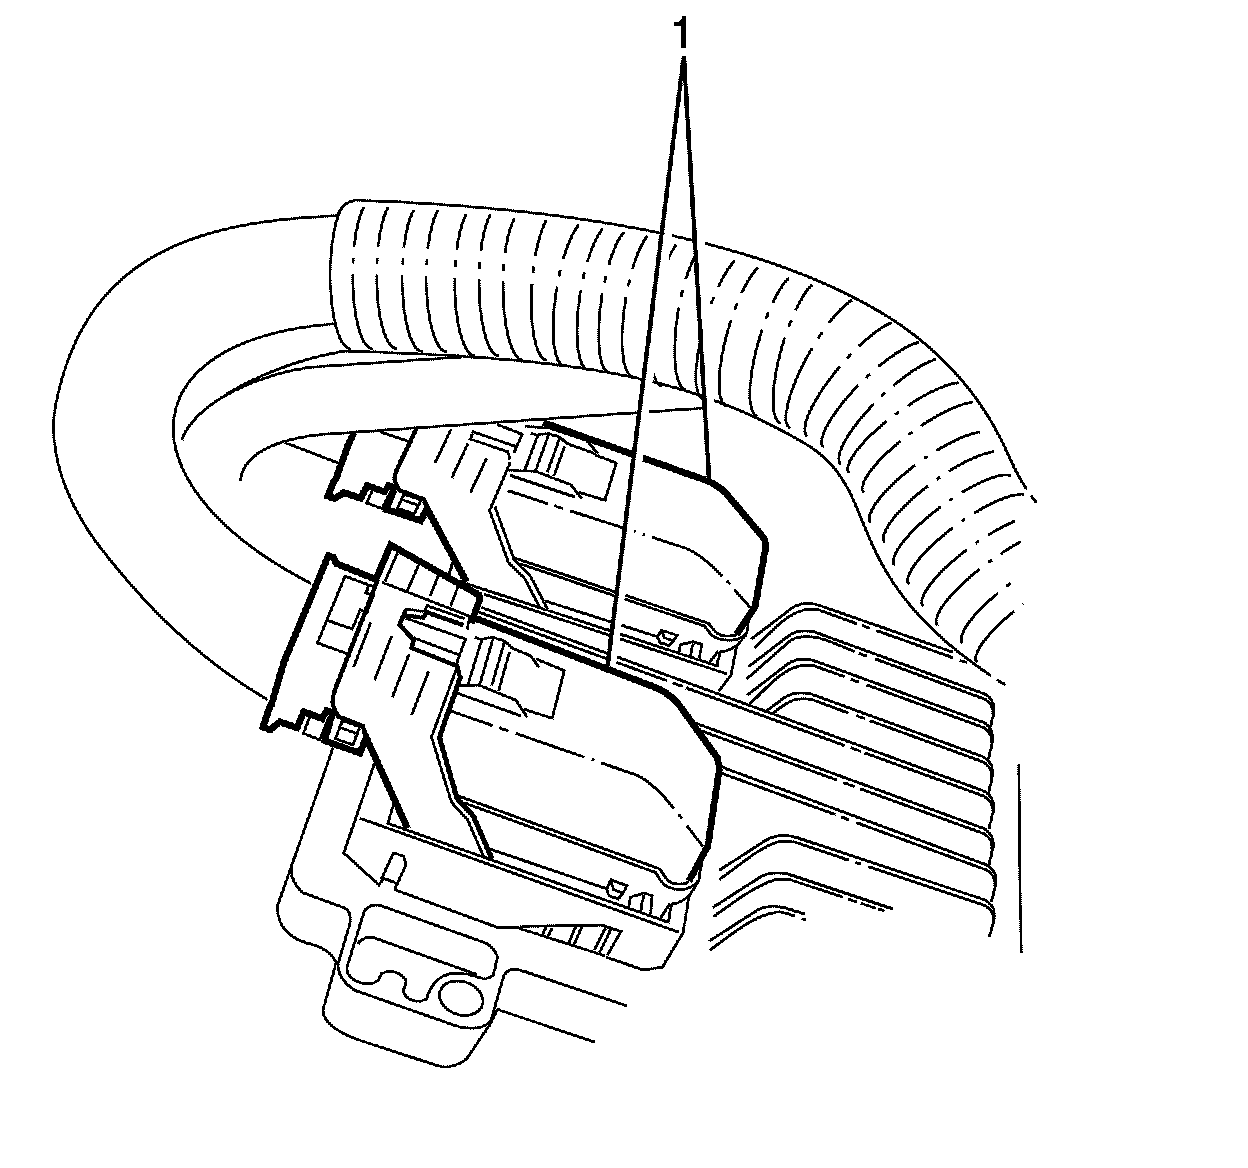
Caution: Refer to Powertrain Control Module and Electrostatic Discharge Caution Service Precautions.
128. Connect the ECM electrical connectors (1) to the ECM.
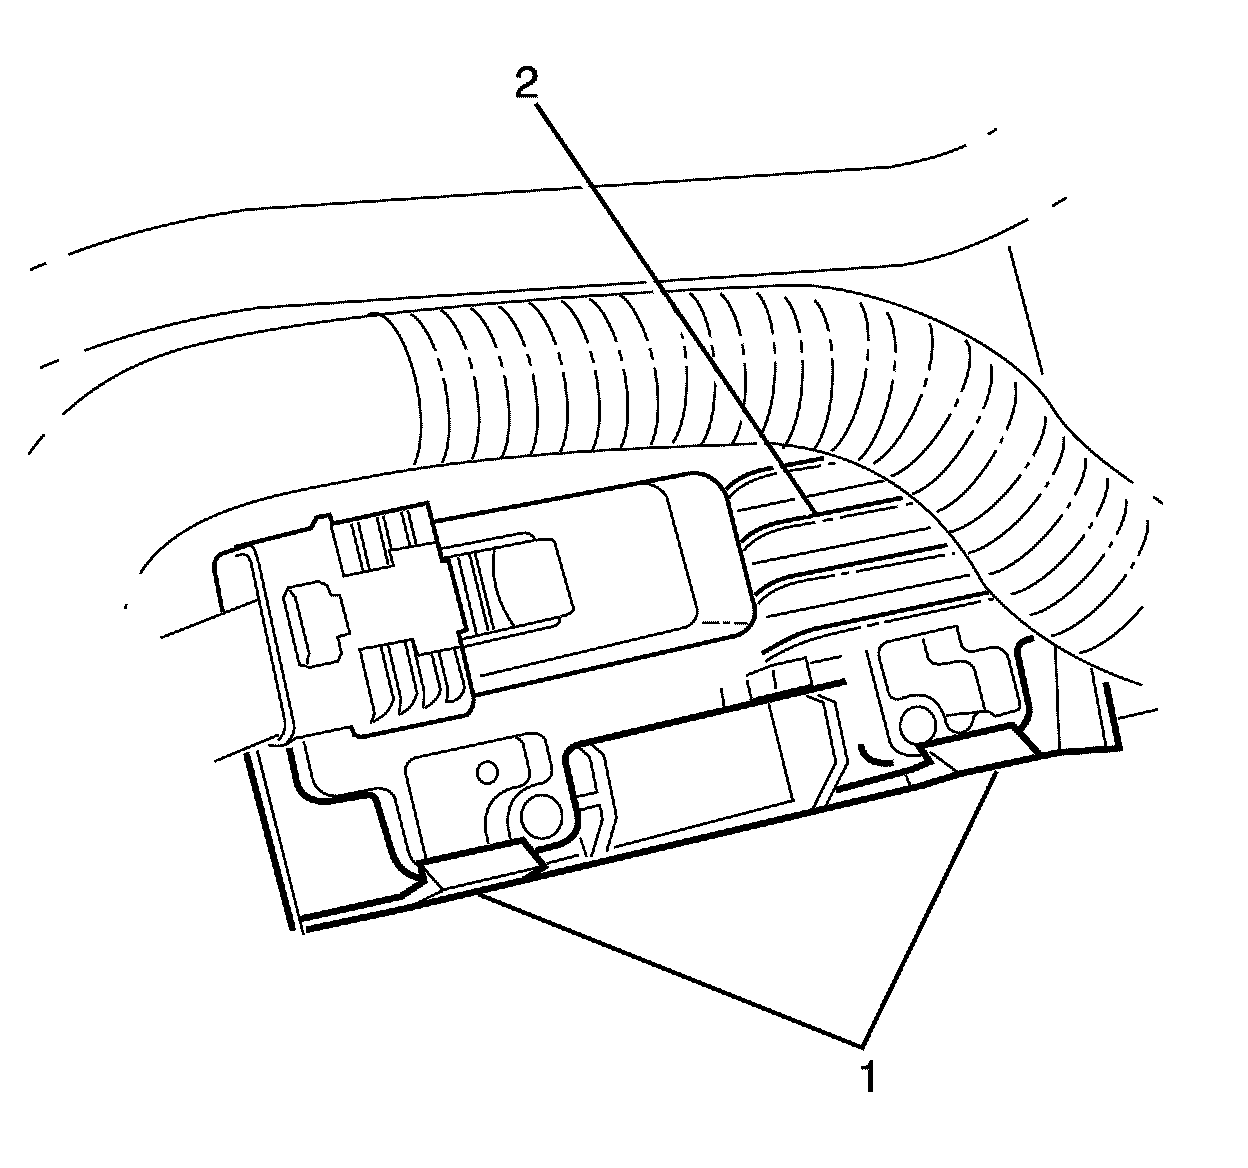
129. Engage the ECM retaining clips (1) to secure the ECM (2).
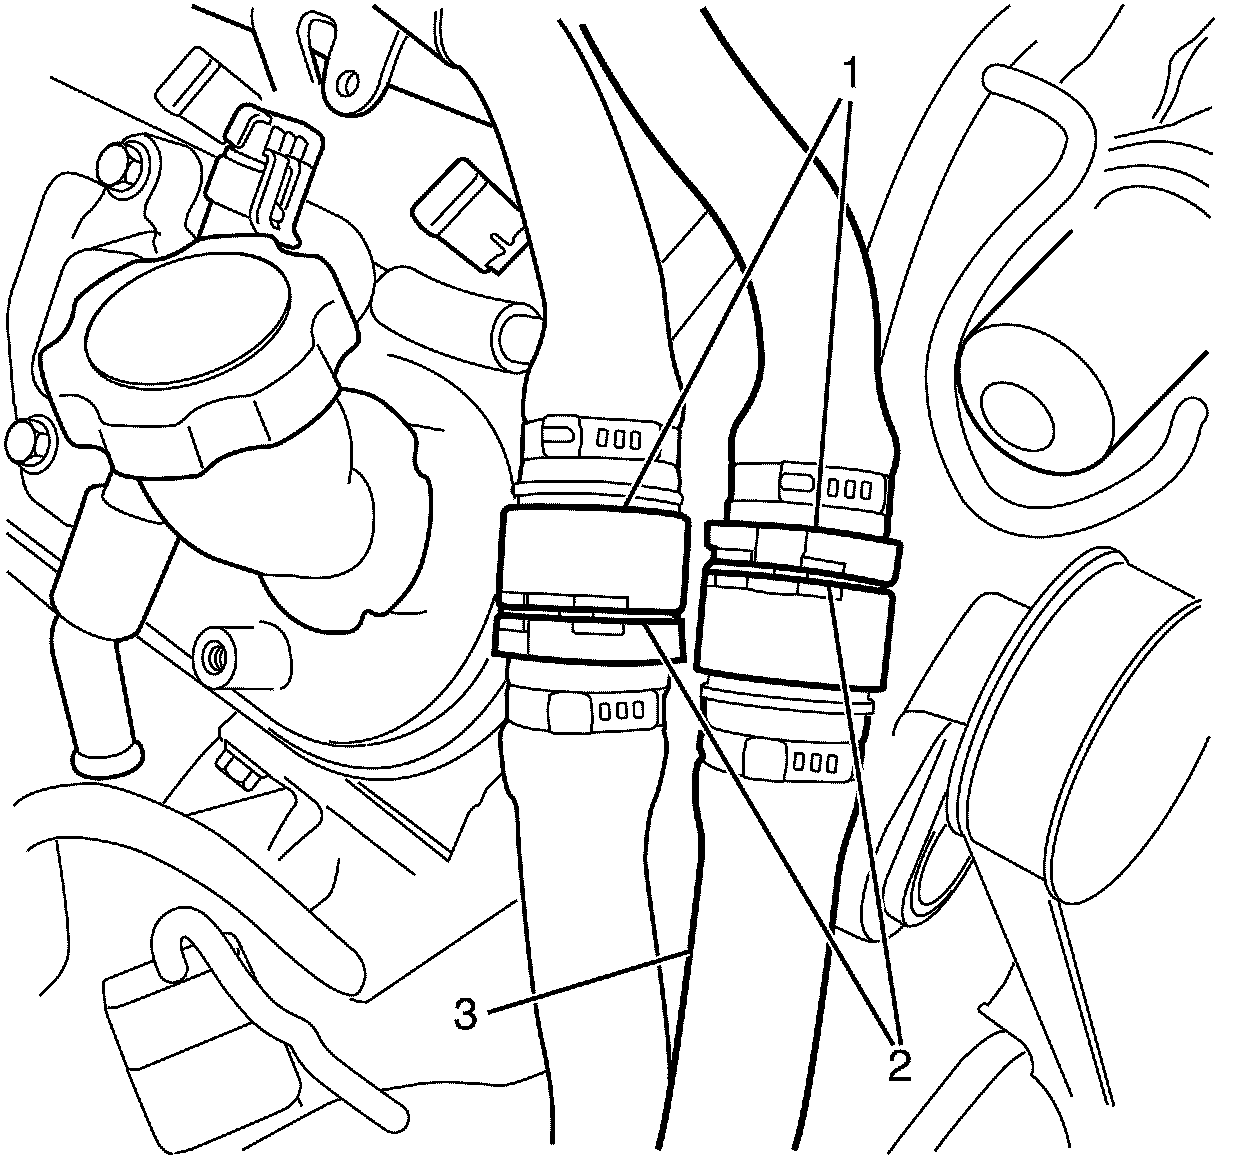
Note: Listen for a audible click to confirm fitting.
130. Connect the inlet and outlet heater hoses (3) at the heater hose assembly quick connect fittings (1).
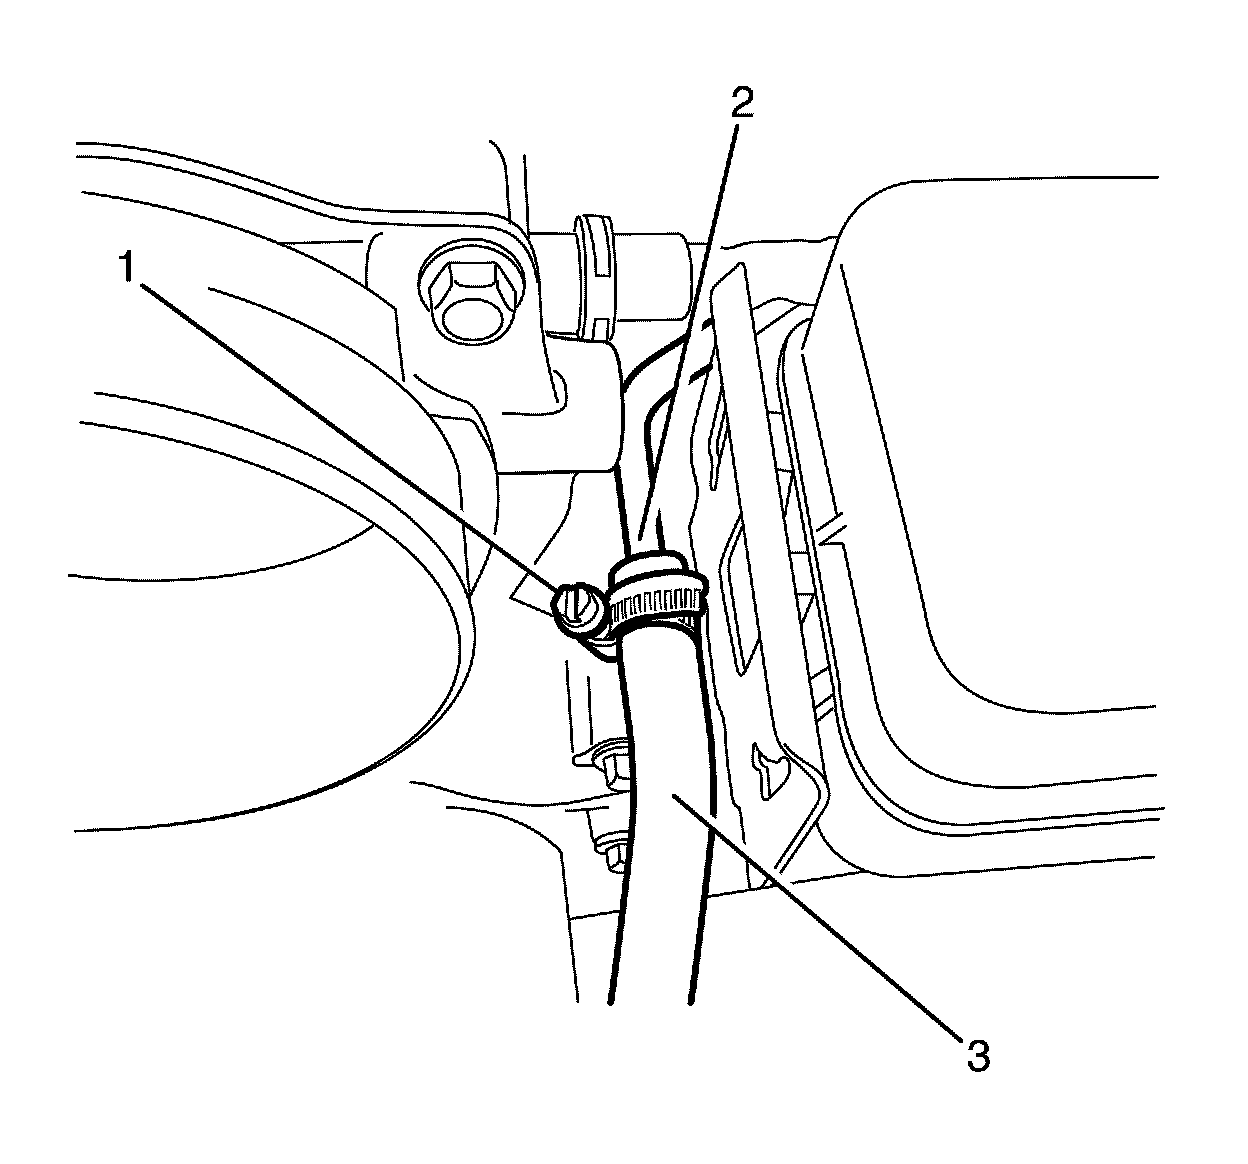
131. Connect the coolant air bleed hose (3) to the coolant bleed pipe (2).
132. Reposition the coolant bleed hose retaining clamp (1) to its original position on the coolant bleed hose (3).
133. Tighten the coolant bleed hose retaining clamp (1).
134. Install the radiator outlet hose. Refer to Radiator Outlet Hose Replacement (V8) Radiator Outlet Hose Replacement (V8).
135. Fill the cooling system. Refer to Cooling System Draining and Filling Cooling System Draining and Filling.
136. Install the air intake duct. Refer to Air Cleaner Inlet Duct Replacement Air Cleaner Inlet Duct Replacement.
Note: The receiver and dehydrator is a single use only component. A NEW receiver and dehydrator must be installed whenever a closed A/C system is opened or exposed to atmosphere. If the receiver and dehydrator has been replaced following a service/repair and it is deemed necessary to immediately re-open the A/C system it is not necessary to replace the receiver and dehydrator again providing the A/C system is plugged/capped correctly.
137. Replace the receiver and dehydrator. Refer to Receiver and Dehydrator Replacement Service and Repair.
138. Recharge the air conditioning (A/C) system. Refer to Refrigerant Recovery and Recharging Refrigerant Recovery and Recharging.
139. Connect the negative battery cable. Refer to Battery Negative Cable Disconnection and Connection (Primary) Battery Negative Cable Disconnection and Connection (Primary)Battery Negative Cable Disconnection and Connection (Auxiliary) Battery Negative Cable Disconnection and Connection (Auxiliary).
140. Disable the ignition system.
141. Crank the engine several times. Listen for any unusual noises or evidence that parts are binding.
142. Enable the ignition system.
143. Start the engine and listen for unusual noises.
144. Check the vehicle oil pressure gauge and confirm that the engine has acceptable oil pressure.
If necessary, install an oil pressure gauge and measure the engine oil pressure.
145. Run the engine speed at about 1,000 RPM until the engine has reached normal operating temperature.
146. Listen for sticking lifters and other unusual noises.
147. Inspect for fuel, oil, and/or other coolant leaks while the engine is running.
148. Leak test the A/C system using the J 39400-A - halogen leak detector.