Part 1
Engine Replacement
Special Tools
* J 39400-A - Halogen Leak Detector
* J 41623-B - Cooler Quick Connect Tool
* J 41798 - Engine Lift Brackets
Removal Procedure
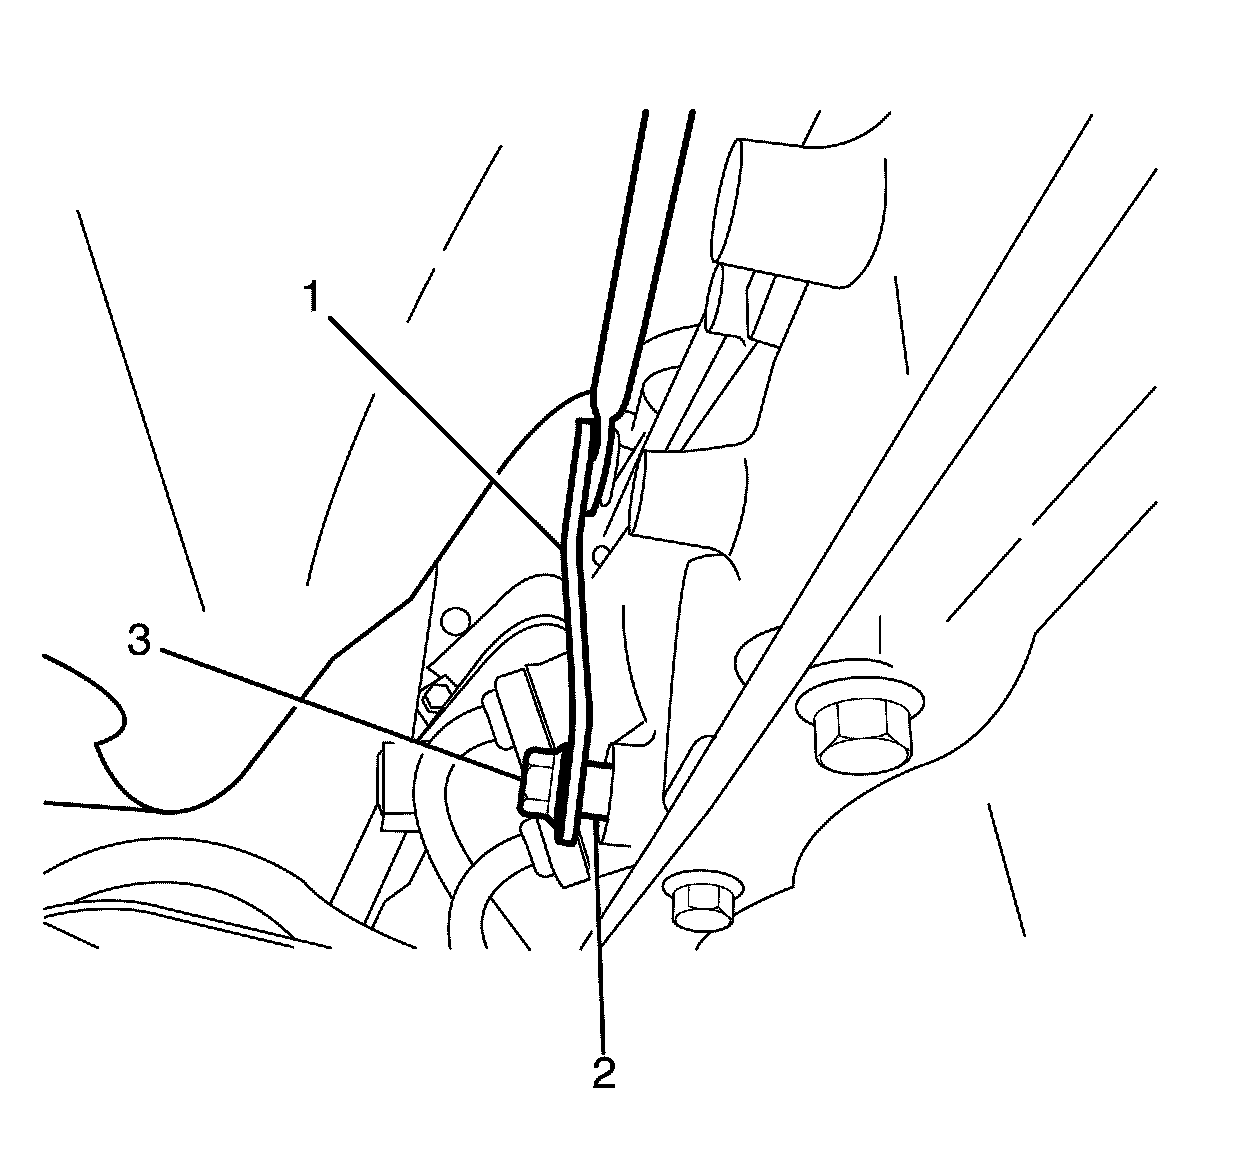
Note: Observing the orientation of the intermediate steering shaft (1) with reference to the pinion shaft (3) will minimize the potential of incorrect steering column assembly alignment.
Note: The front wheels of the vehicle must be maintained in the straight ahead position and the steering column must be in the LOCK position before disconnecting the steering column or intermediate shaft. If these procedures are not followed incorrect alignment of some components during installation will result and damage to the SIR coil assembly will occur.
1. Turn the ignition key to the LOCK position.
Warning: Refer to Battery Disconnect Warning Battery Disconnect Warning.
2. Disconnect the negative battery cable. Refer to Battery Negative Cable Disconnection and Connection (Primary) Battery Negative Cable Disconnection and Connection (Primary)Battery Negative Cable Disconnection and Connection (Auxiliary) Battery Negative Cable Disconnection and Connection (Auxiliary).
3. Recover the air conditioning (A/C) refrigerant. Refer to Refrigerant Recovery and Recharging Refrigerant Recovery and Recharging.
4. Remove the air intake duct. Refer to Air Cleaner Inlet Duct Replacement Air Cleaner Inlet Duct Replacement.
5. Depressurize the fuel system. Refer to Fuel Pressure Relief Service and Repair.
6. Drain the cooling system. Refer to Cooling System Draining and Filling Cooling System Draining and Filling.
7. Remove the radiator outlet hose. Refer to Radiator Outlet Hose Replacement (V8) Radiator Outlet Hose Replacement (V8).
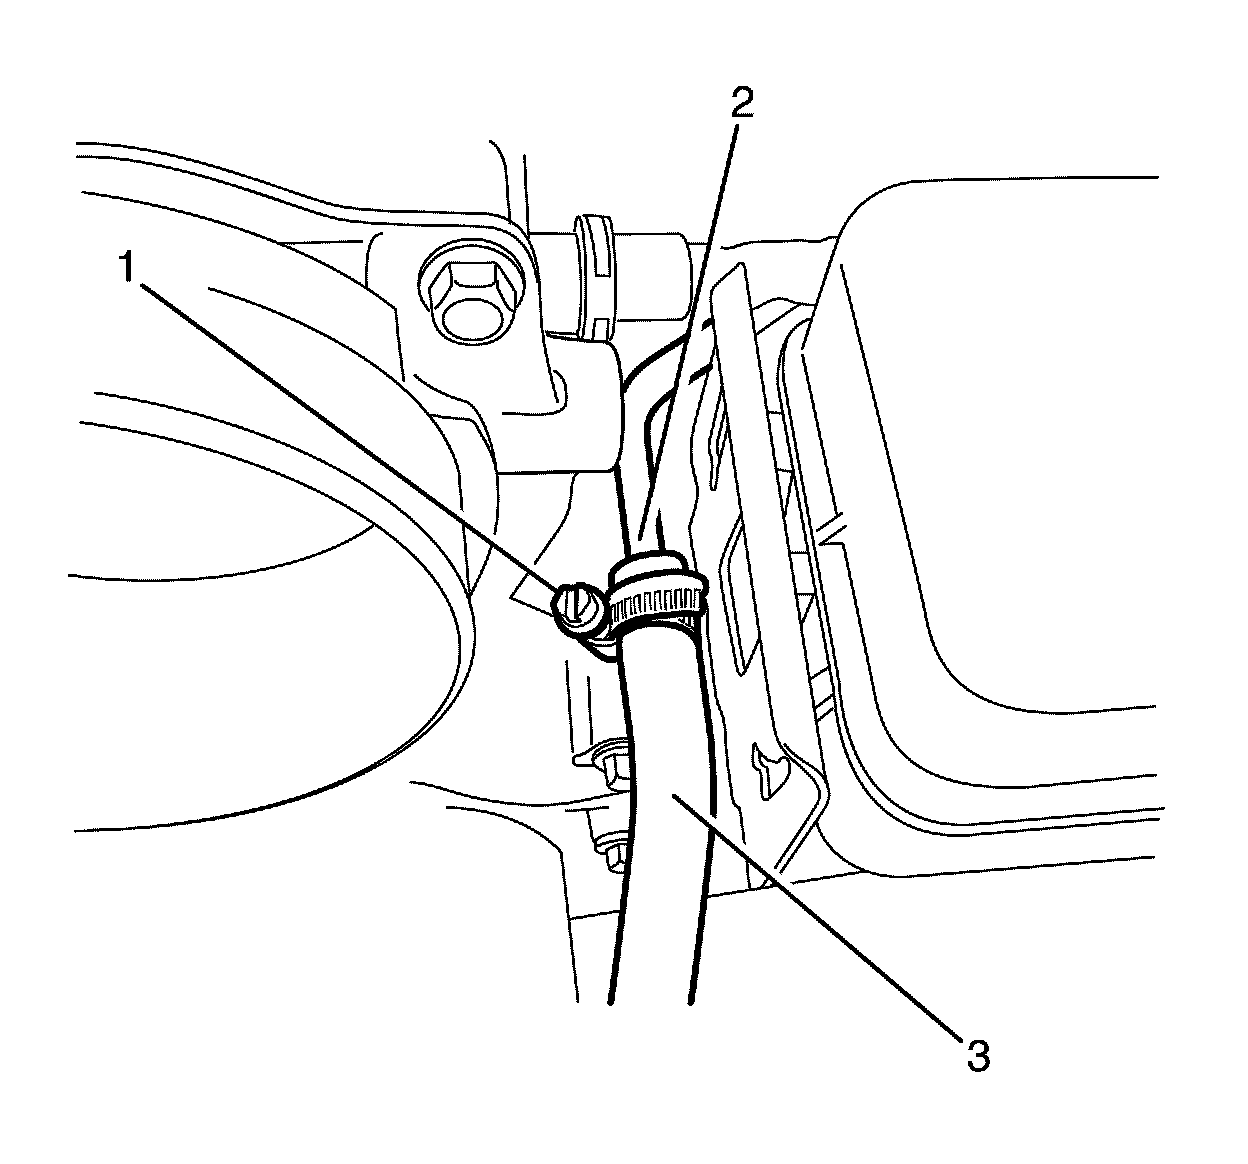
8. Loosen the coolant bleed hose retaining clamp (1) at the cylinder head end and slide 50 mm (2 in) along the coolant bleed hose (3).
9. Disconnect the coolant air bleed hose (3) from the coolant bleed pipe (2).
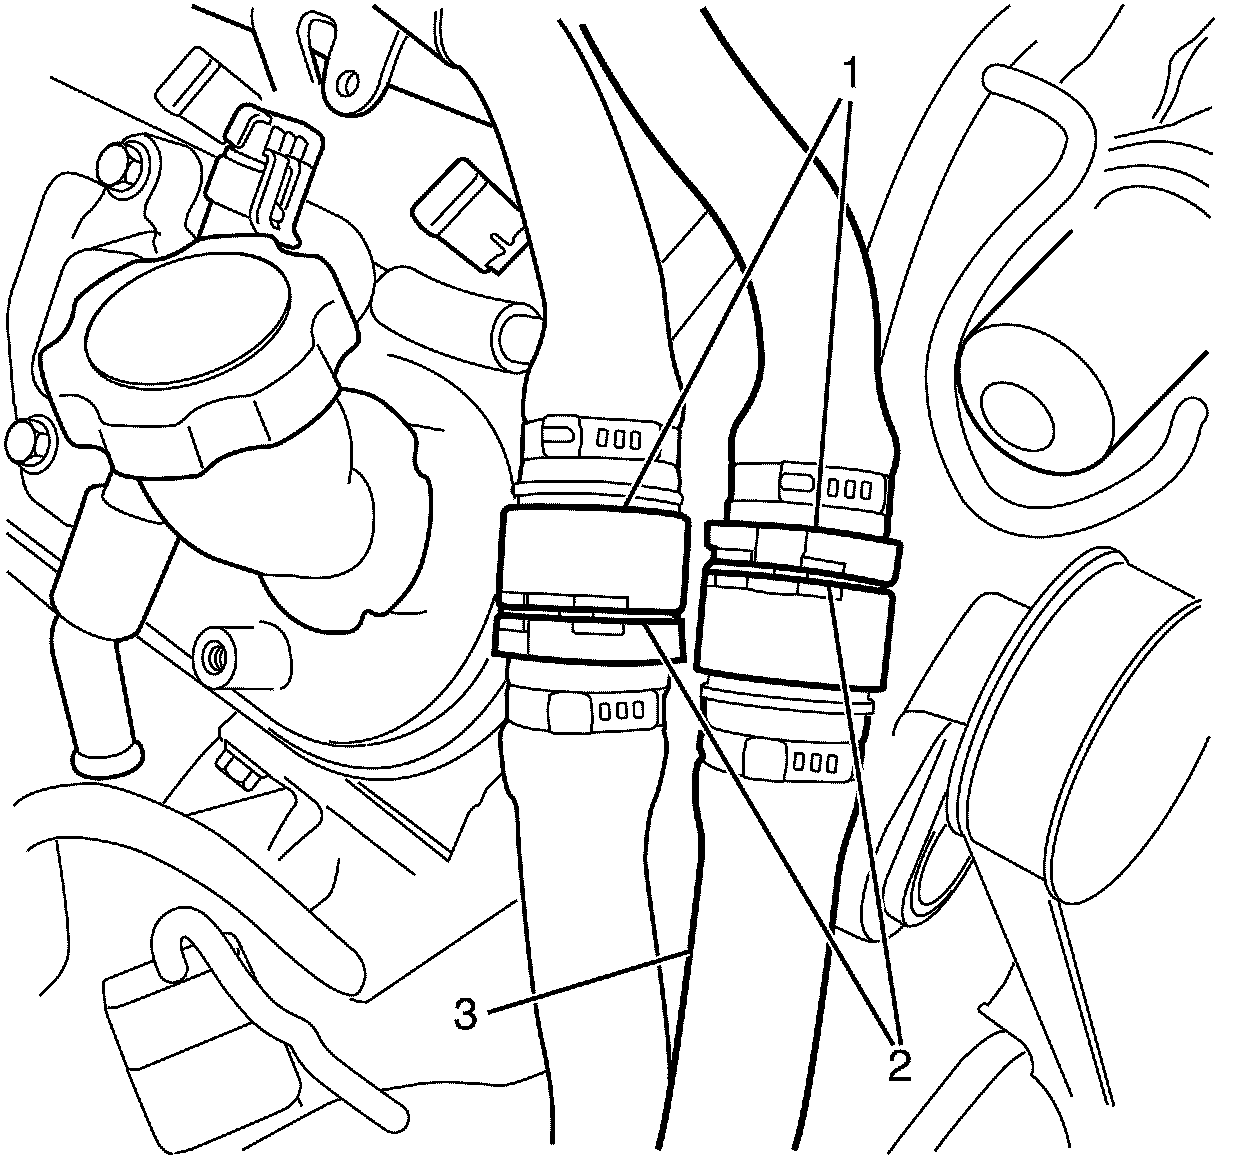
Note: Disconnect the heater hose assembly quick connect fittings (1) by releasing the retaining clips (2) using a suitable tool.
10. Disconnect the inlet and outlet heater hoses (3) from the heater hose assembly quick connect fittings (1).
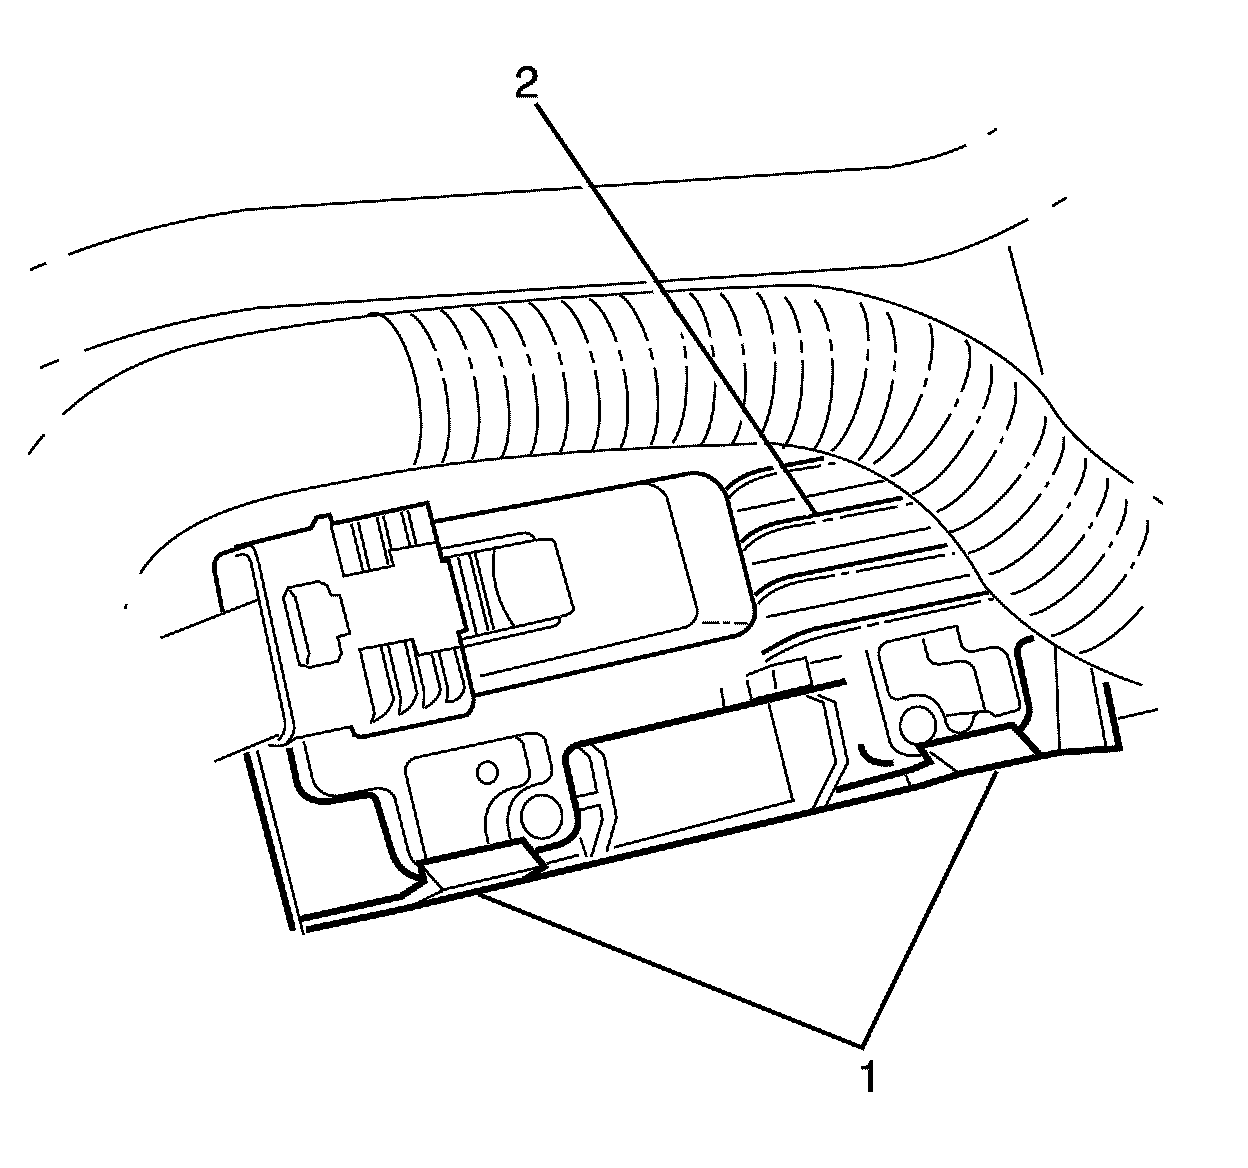
Caution: Refer to Powertrain Control Module and Electrostatic Discharge Caution Service Precautions.
11. Release the ECM retaining clips (1) and detach the ECM (2).
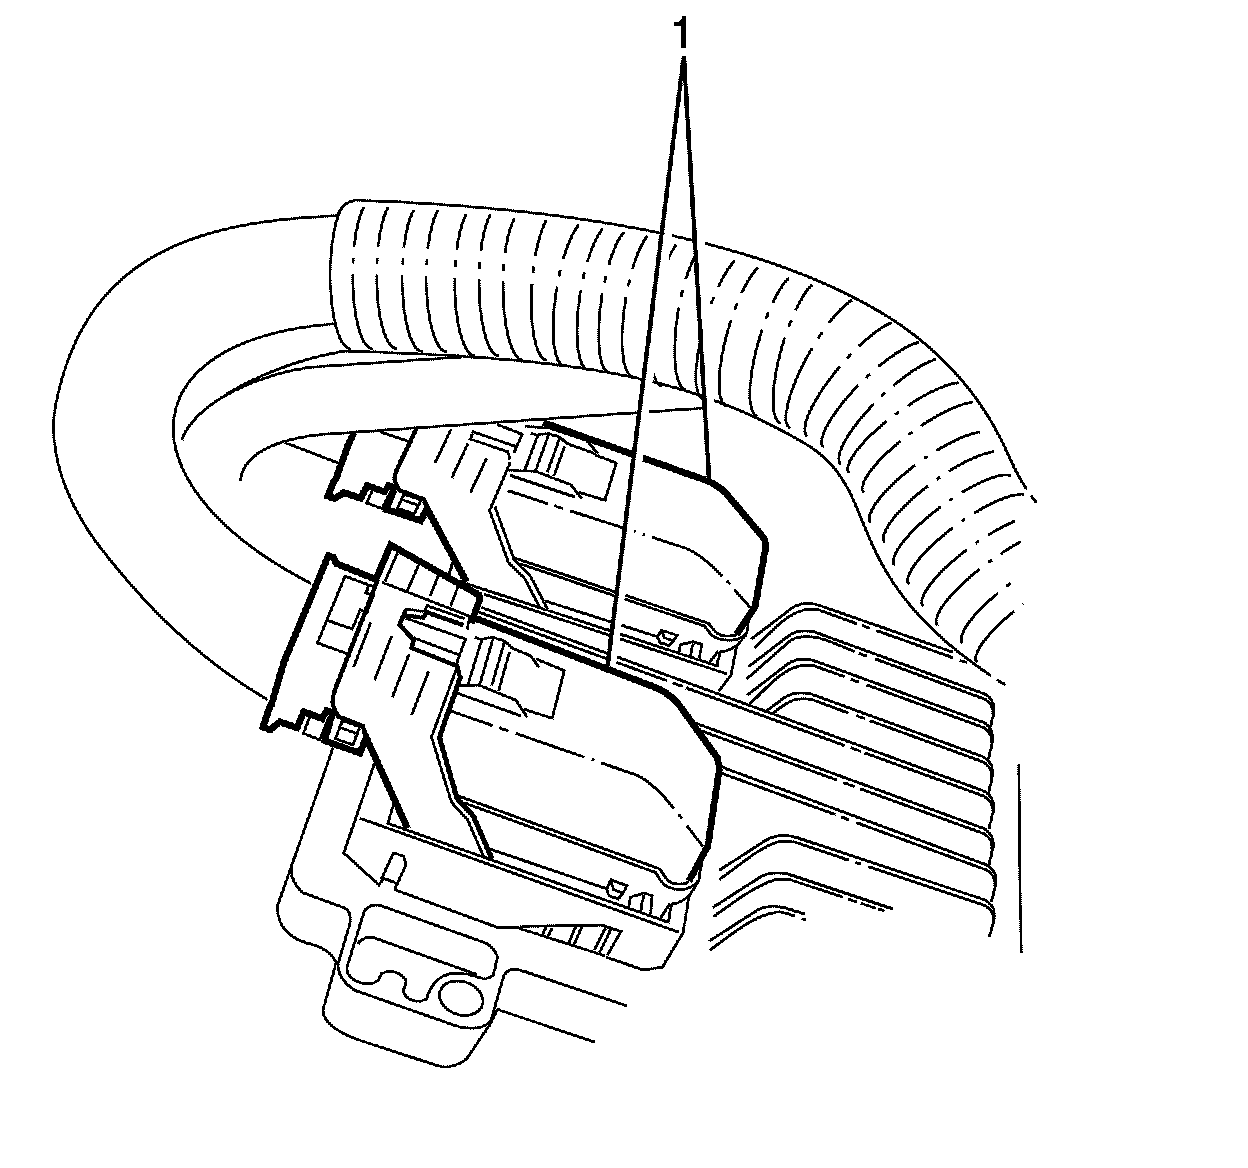
12. Move the connector lock levers to the unlock position and disconnect the ECM electrical connectors (1).
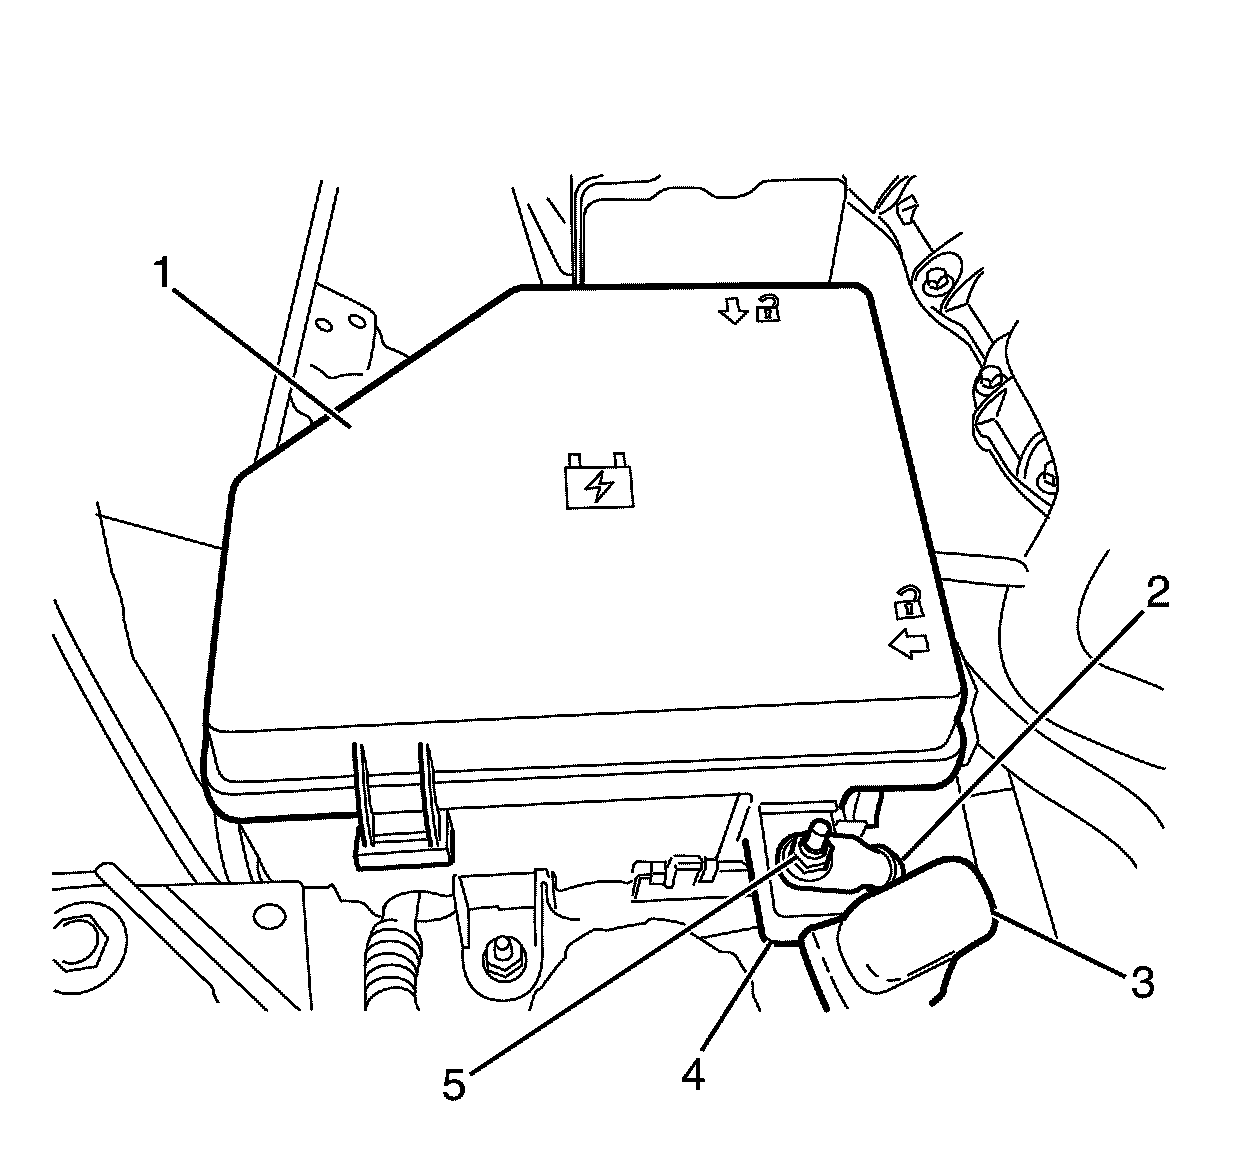
13. Remove the under hood Body Electrical Centre (BEC) cover (1).
14. Remove the positive cable protective cover (3).
15. Remove the positive cable to under hood BEC plate retaining bolt (5).
16. Disconnect the positive cable (2) from the upper under hood BEC plate (4).
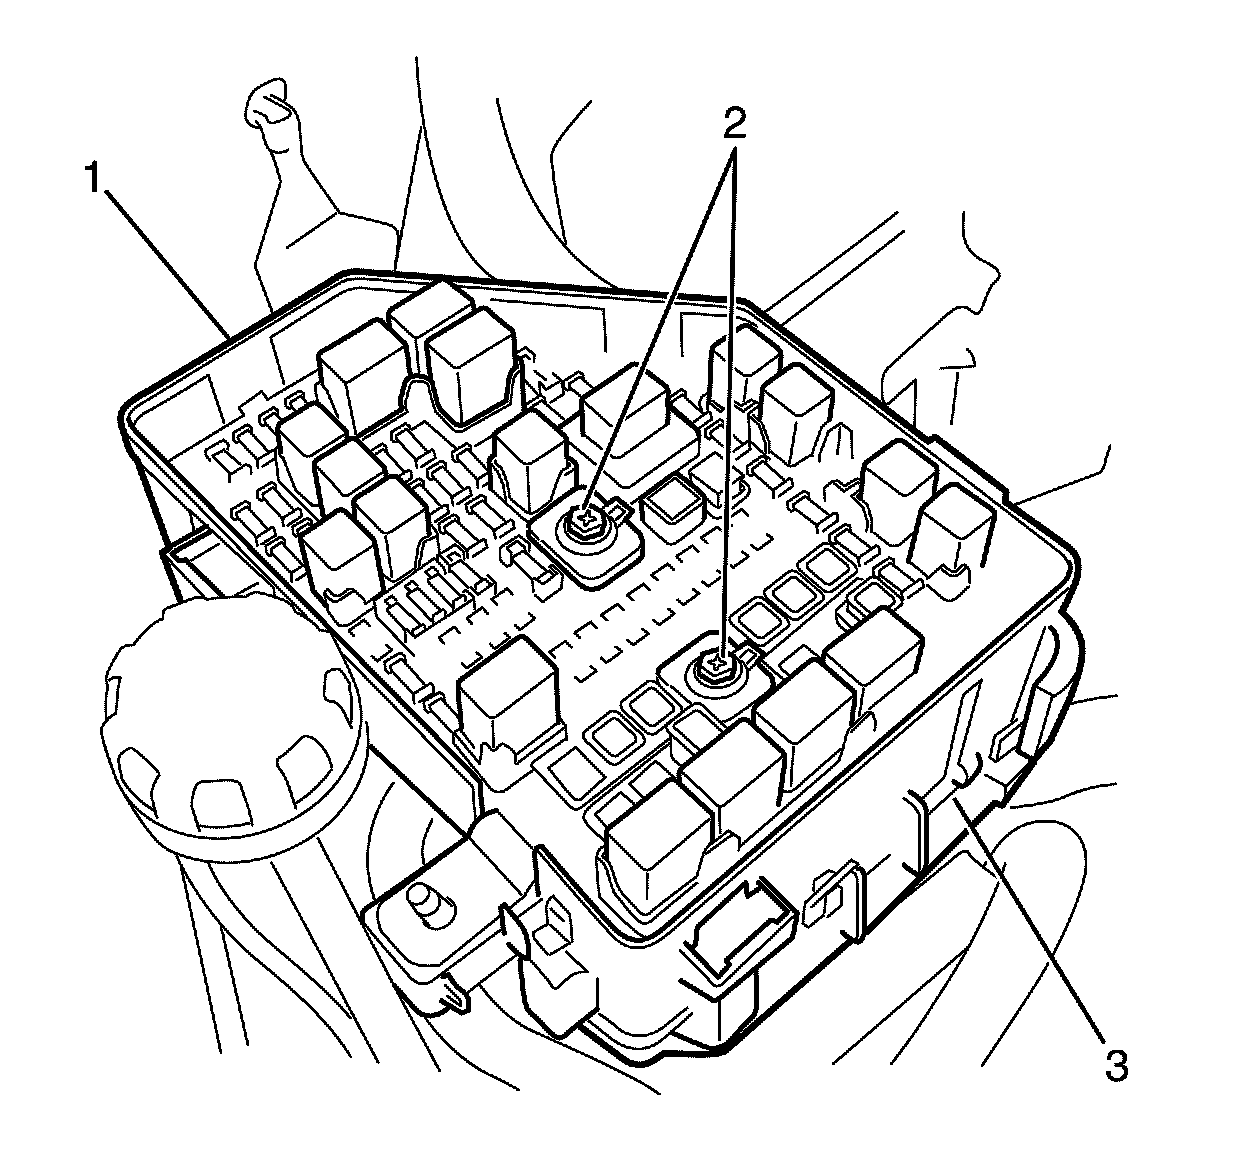
17. Remove the under hood BEC upper plate to lower plate retaining bolts (2).
18. Raise the upper under hood BEC plate (1) from the lower under hood BEC plate (3).
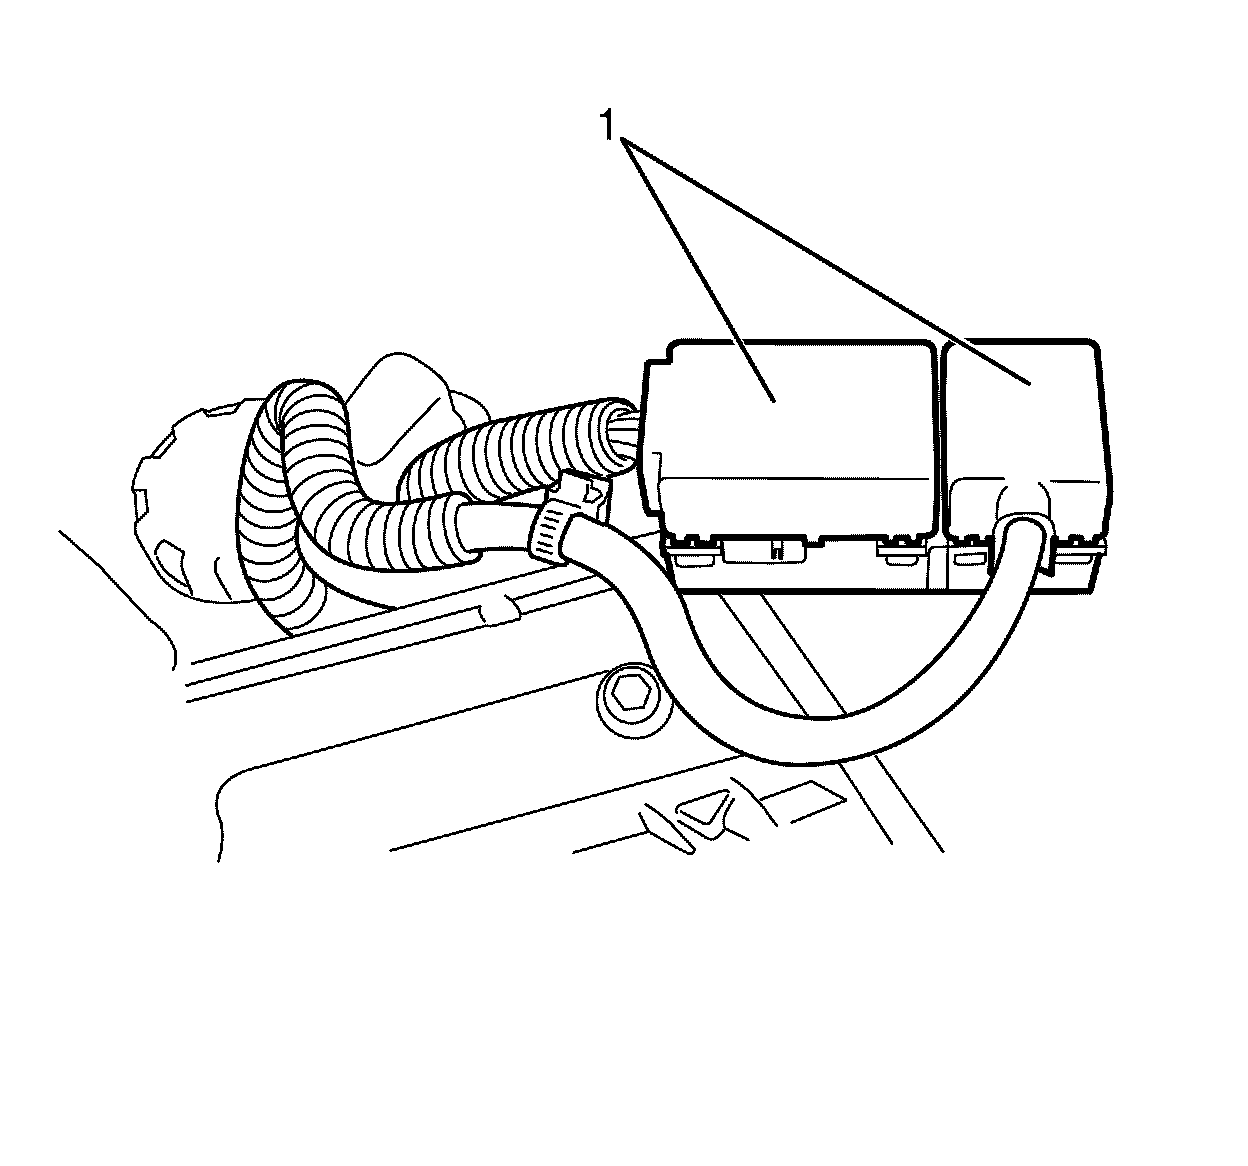
19. Detach the protector (1) from the base of the under hood BEC connector (2).
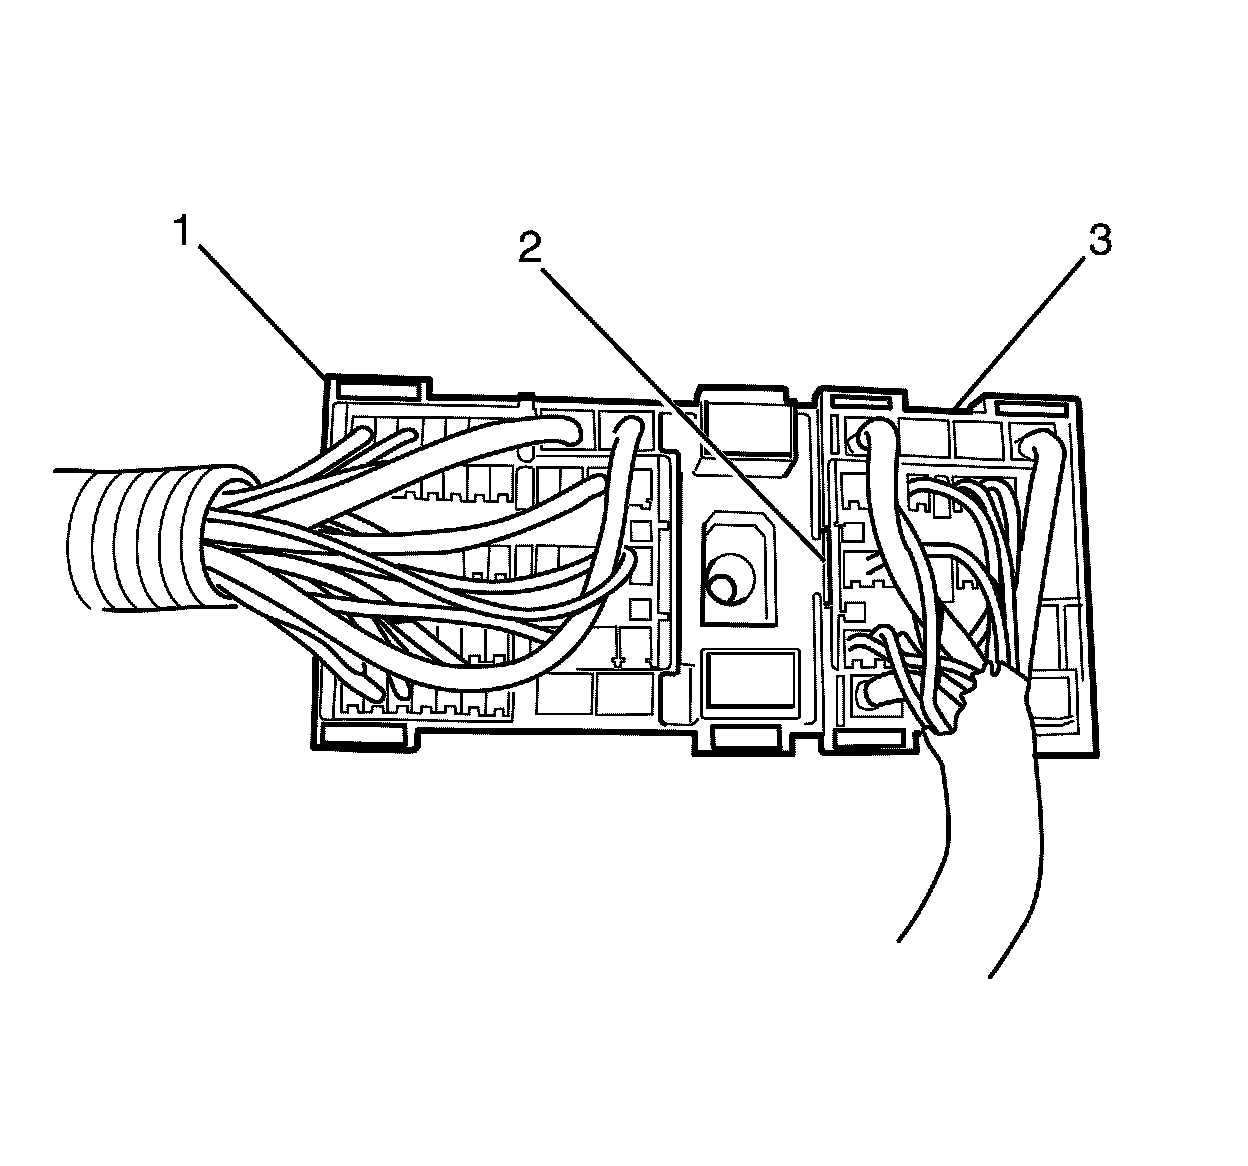
Note: Use a suitable tool to depress the connector locking tang (2), then pull the body harness connector (1) upward and the engine connector (3) downward to separate the body harness connector (1) from the engine connector (3).
20. Separate the body harness connector (1) from the engine connector (3).
21. Reposition and secure the engine wiring harness and connector (3) on the engine.
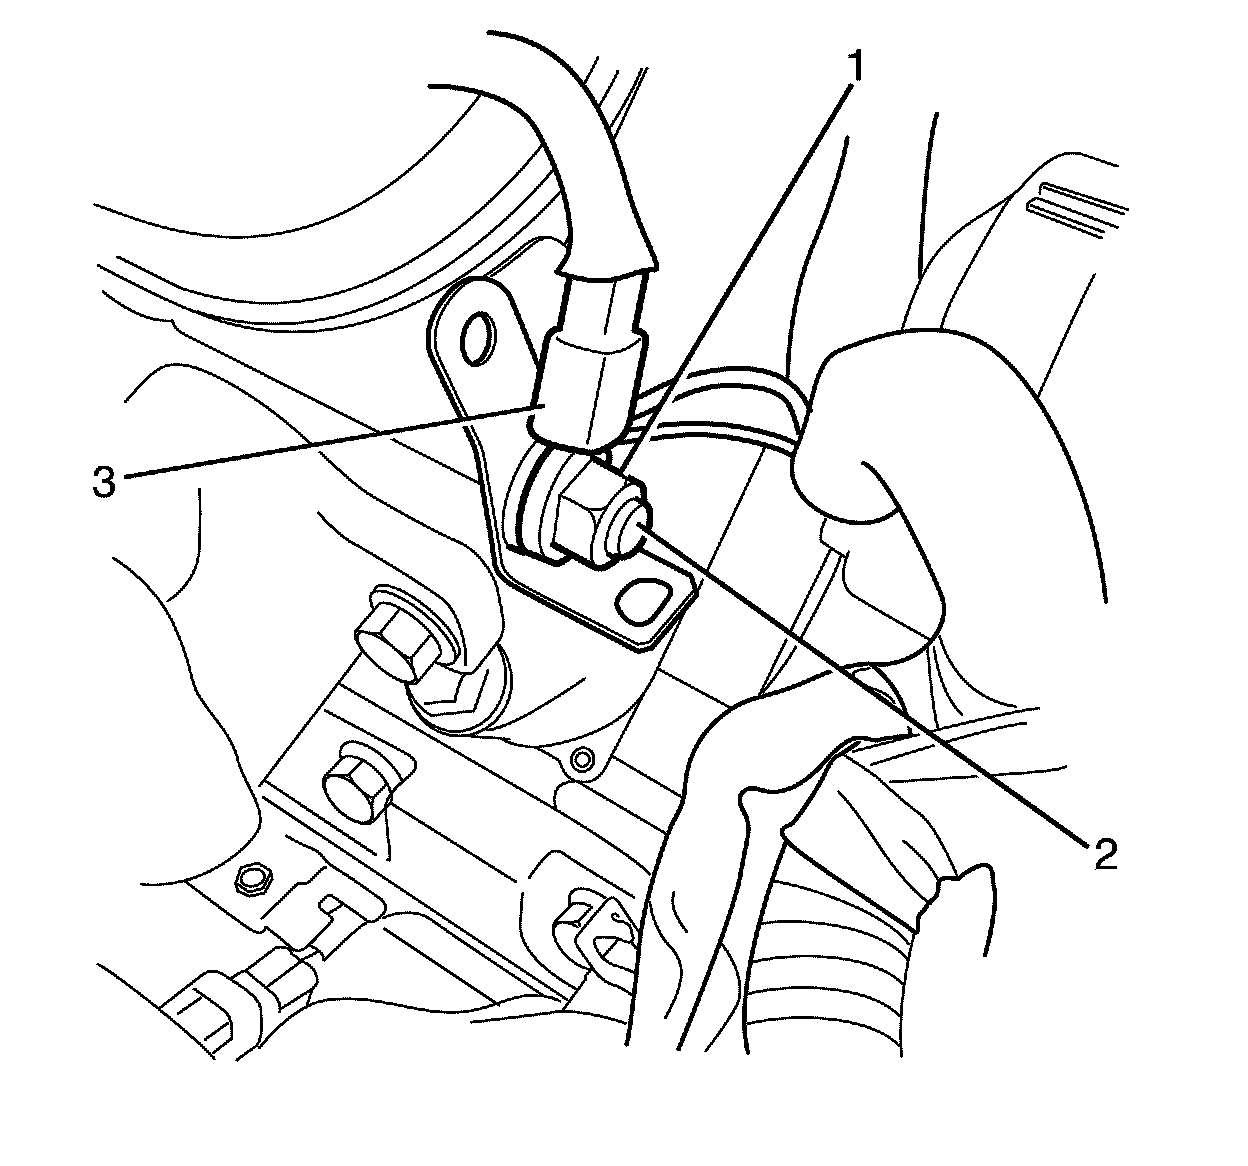
22. Remove the vehicle body ground cable to cylinder head retaining nut (1).
23. Remove the vehicle body ground cable (3) from the cylinder head stud (2).
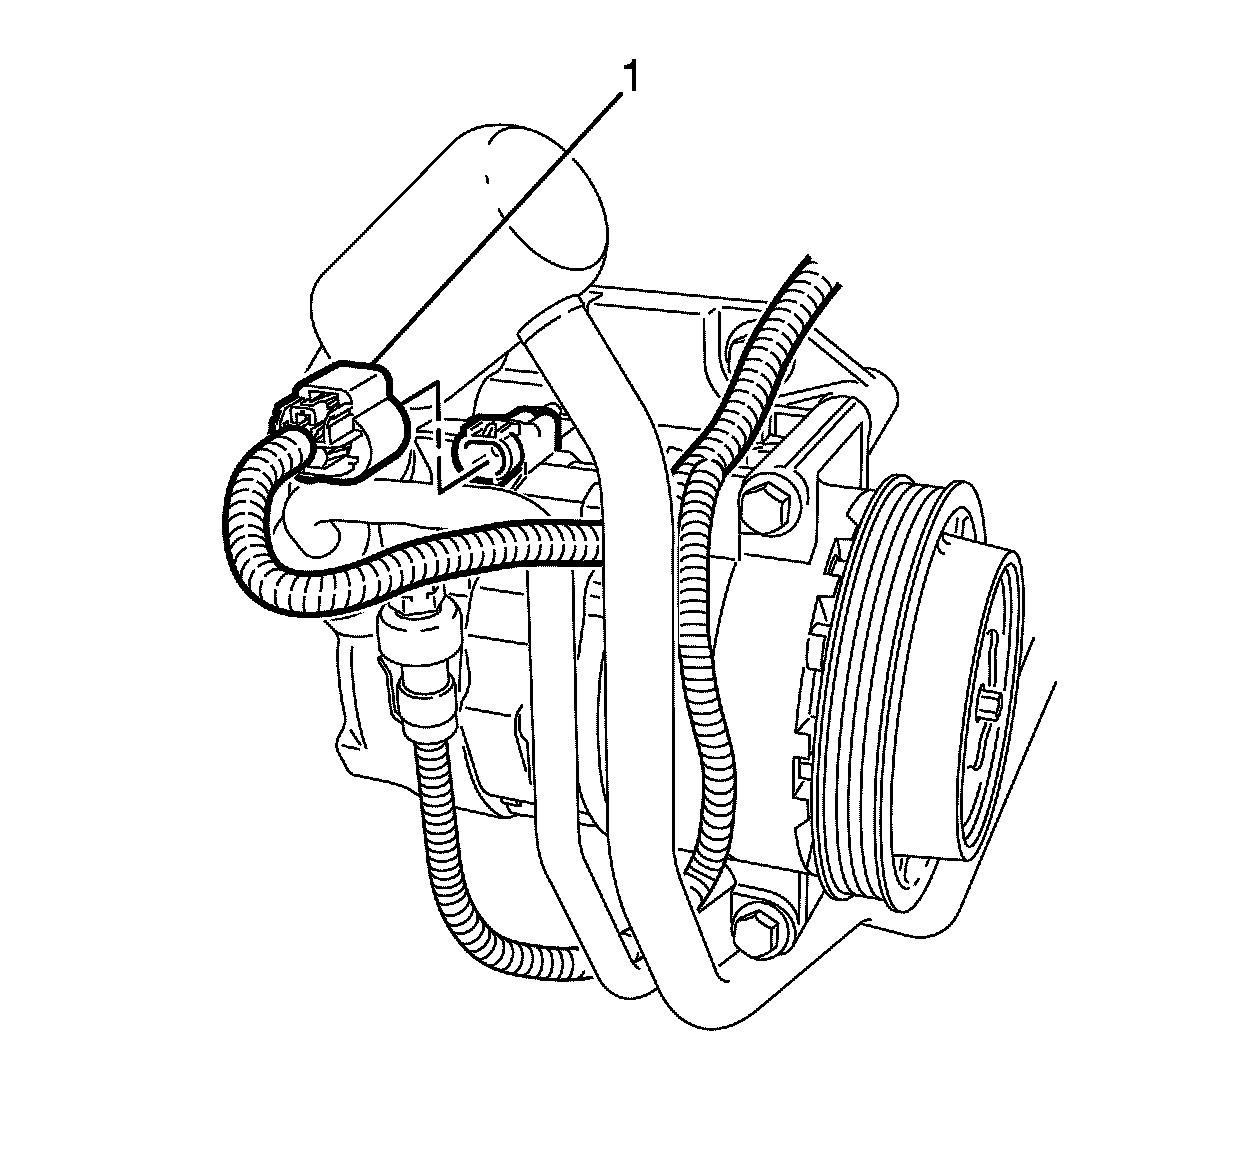
24. Disconnect the A/C electrical connector (1) from the A/C compressor.
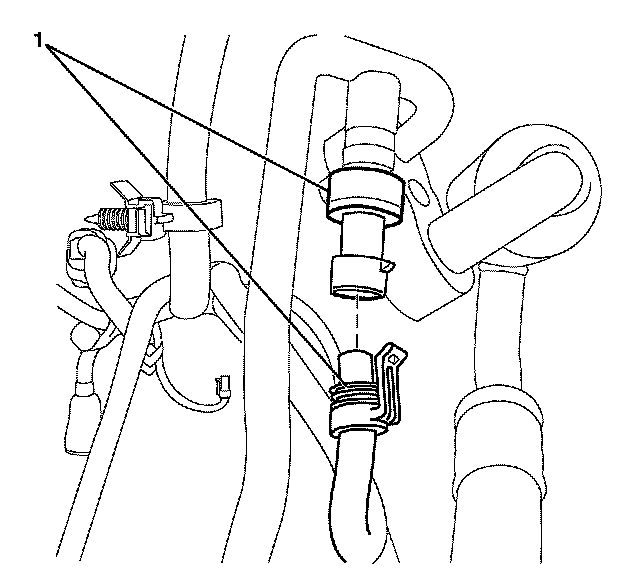
25. Disconnect the electrical connector from the A/C Refrigerant Pressure Sensor (1).
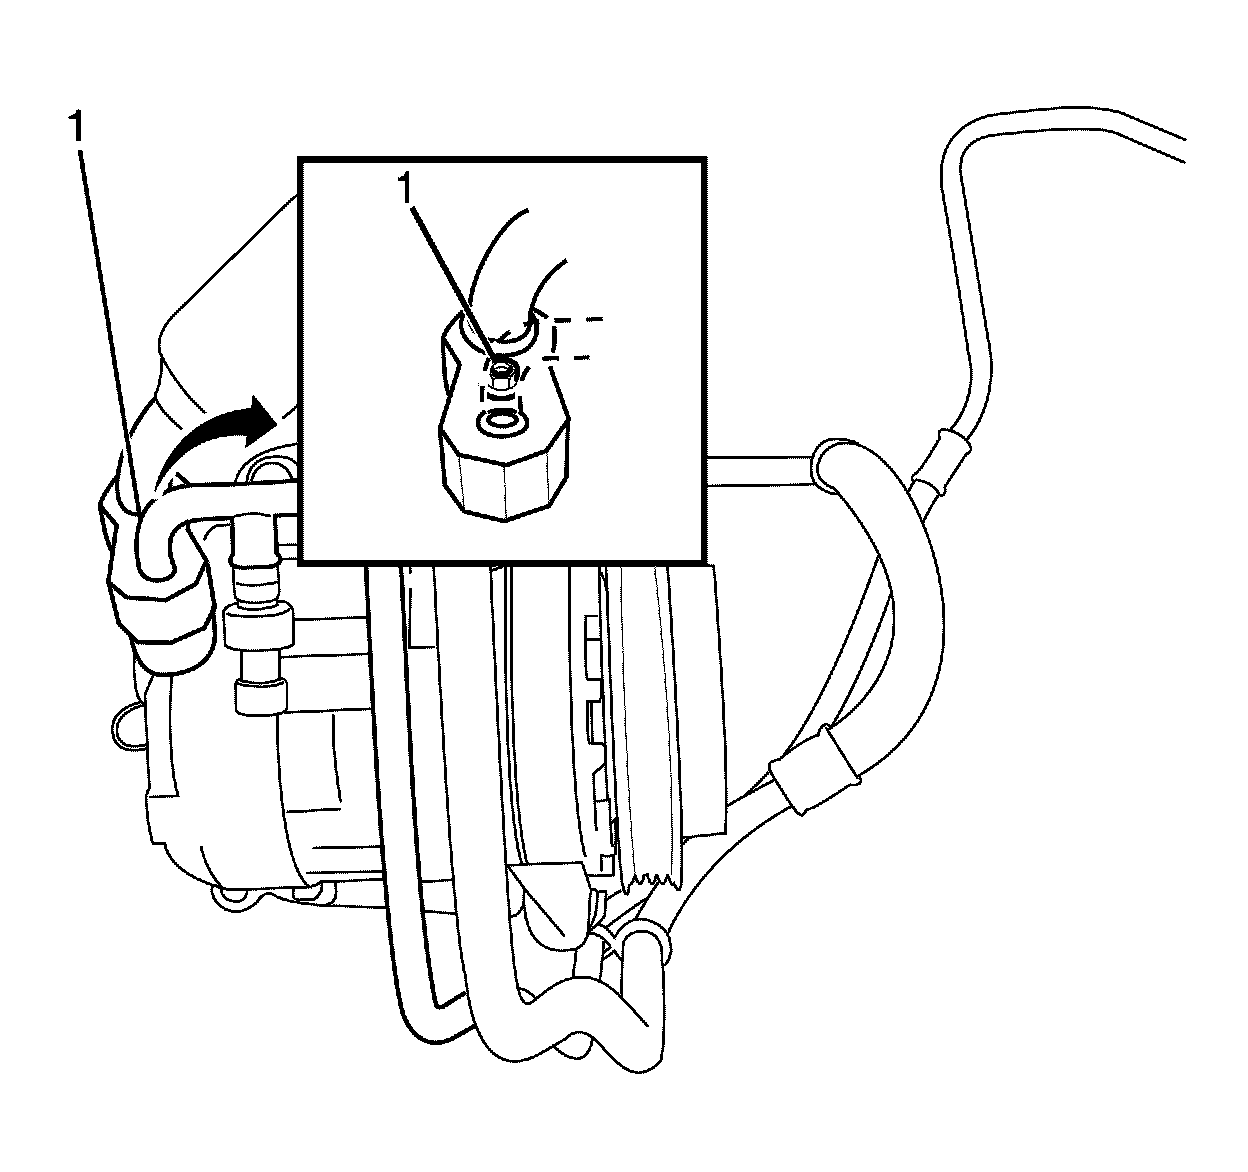
26. Remove the suction/discharge pipes pad (1) to compressor retaining bolt.
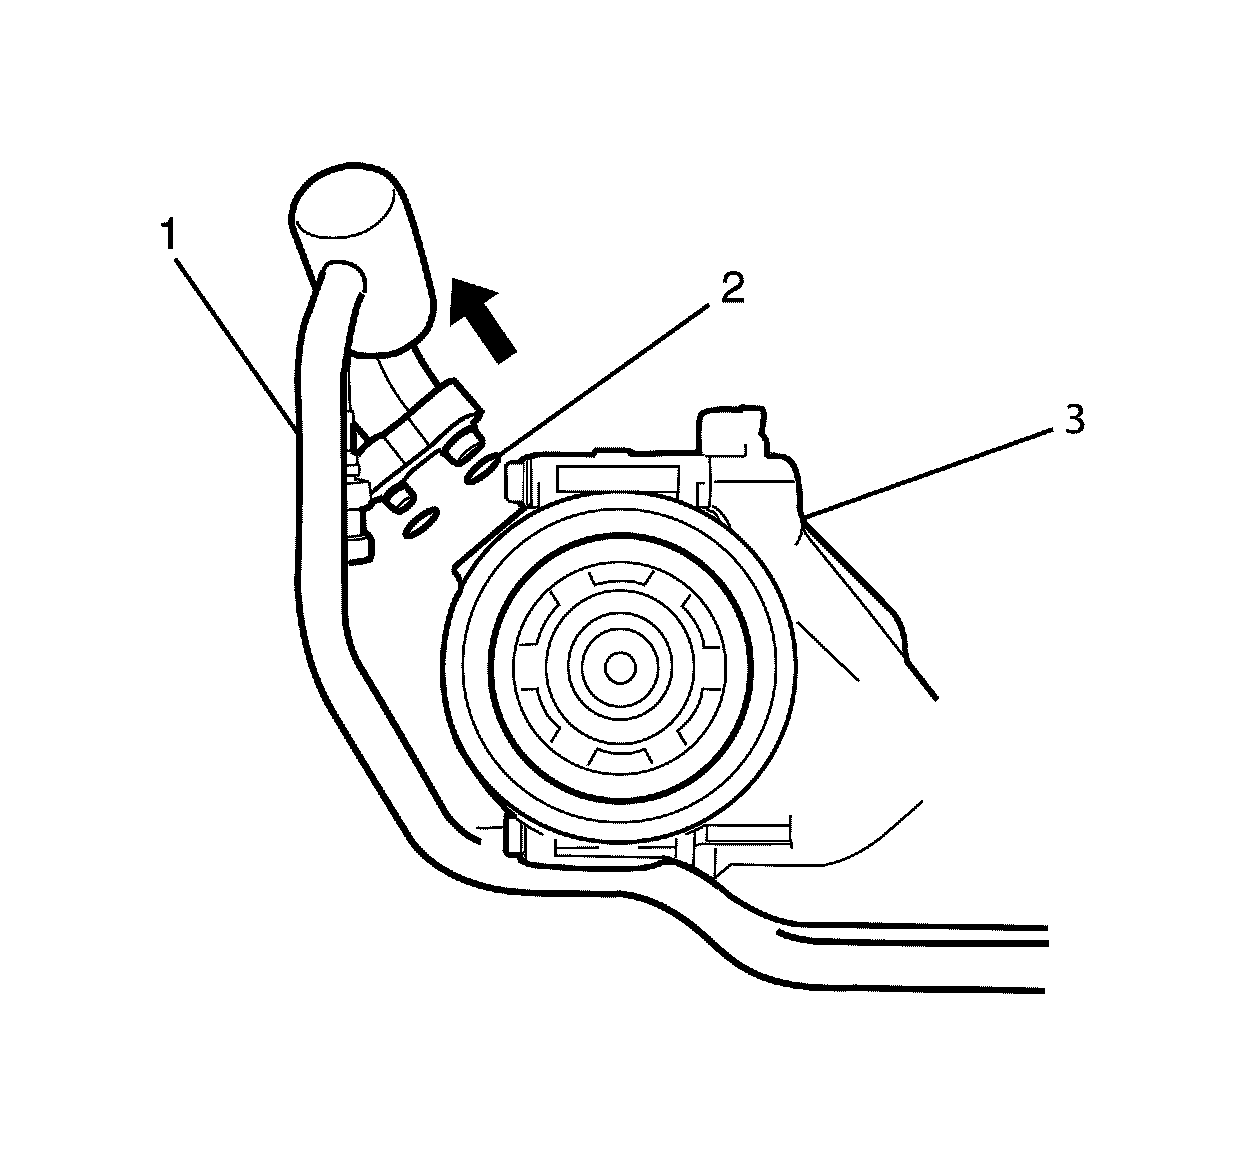
27. Disconnect the suction/discharge pipes (1) from the compressor (3).
Note: Sealing washers are single use and must be discarded after use.
Note: Seal pipes immediately to prevent absorption of moisture from the atmosphere.
Note: The plugs for A/C compressor ports must be sufficient to stop oil escaping when tilting A/C compressor for removal.
28. Remove and discard the port sealing washers (2).
Discard the port sealing washers (2).
Note: Cap or plug the ports immediately to prevent absorption of moisture from the atmosphere.
29. Cap or plug the A/C compressor (3) ports.
30. Cap or plug the A/C hoses (1).
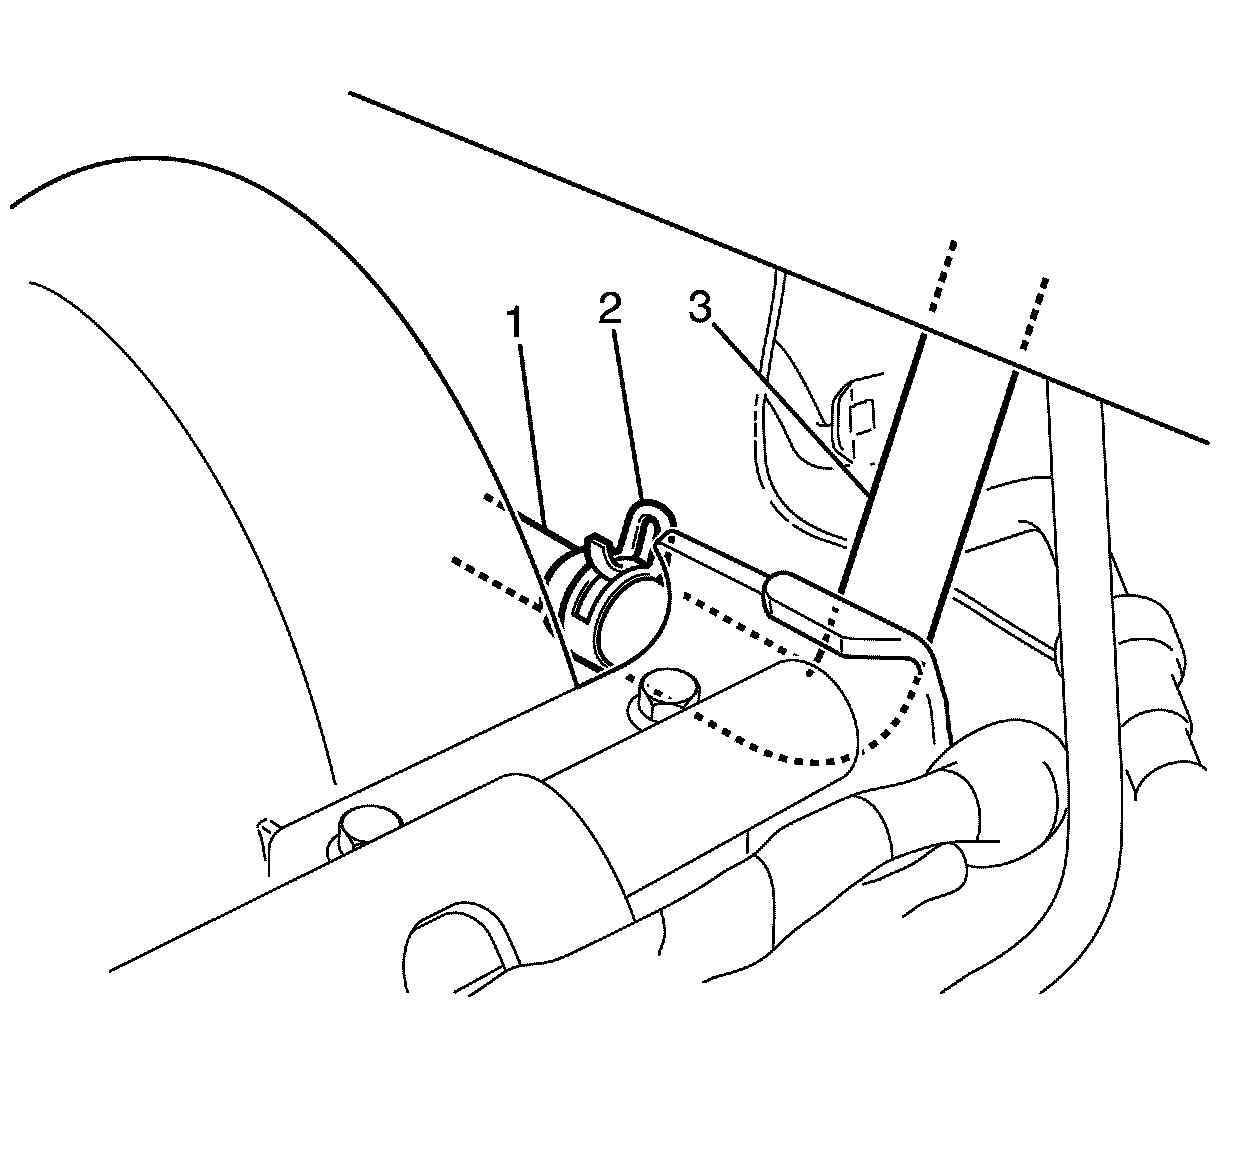
31. Compress the vacuum hose retaining clamp (2) at the intake manifold vacuum port (1) and slide 50 mm (2 in) back along the vacuum hose (3).
32. Disconnect the vacuum hose (3) from the intake manifold vacuum port (1).
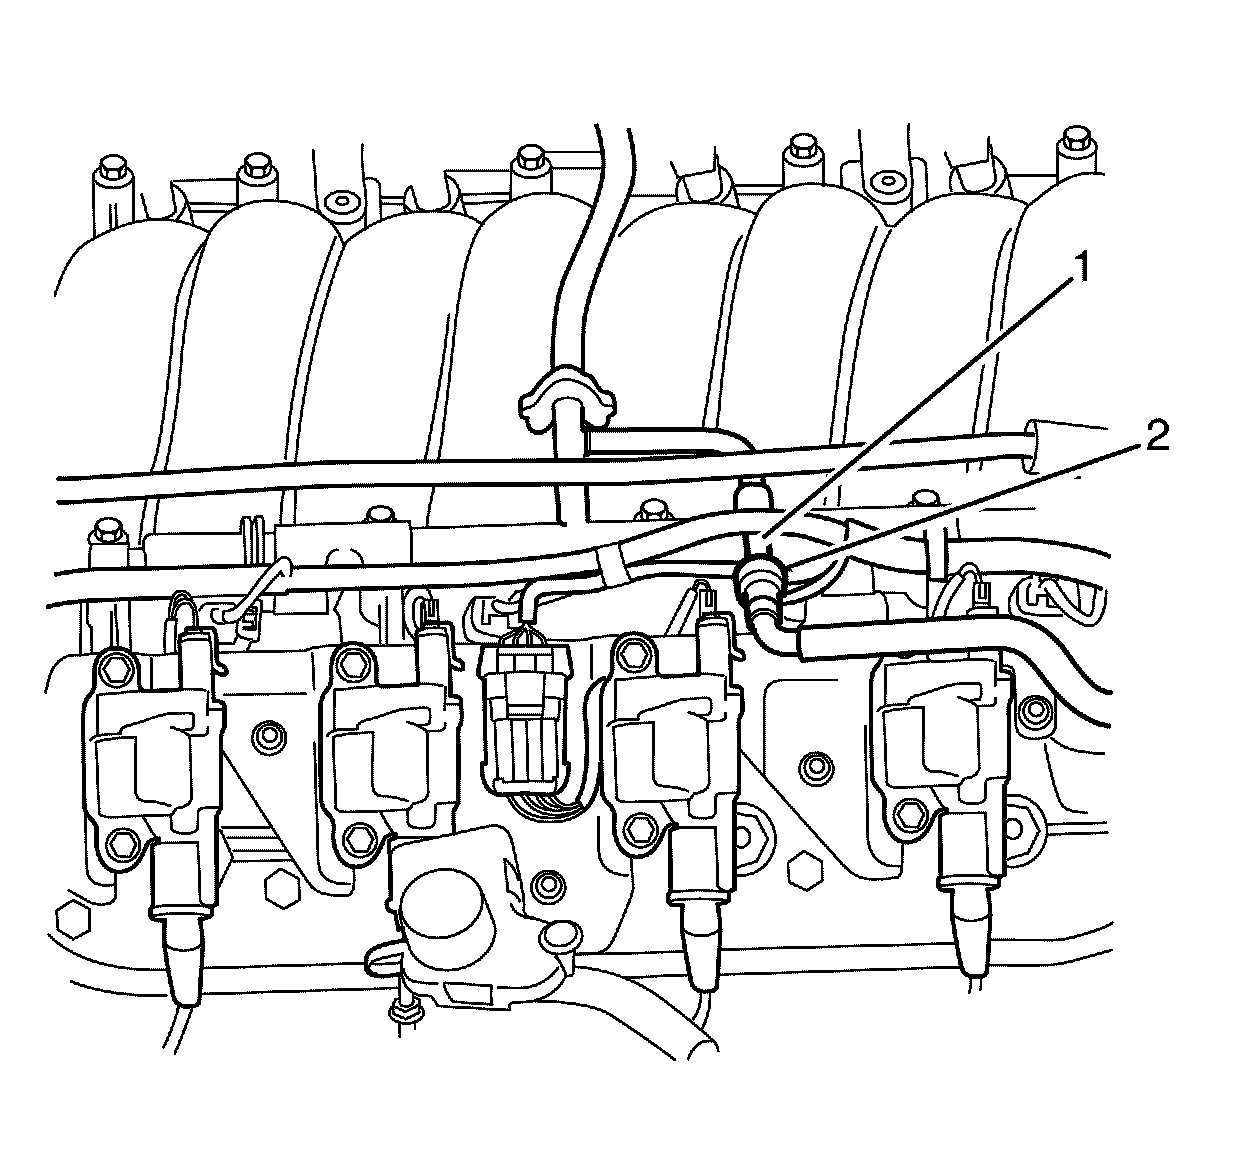
Note: Plug or cap the fuel feed pipe (2) and fuel rail tube (1) ends to prevent fuel leaks and/or contamination.
33. Disconnect the fuel rail feed pipe (2) quick connect fitting.
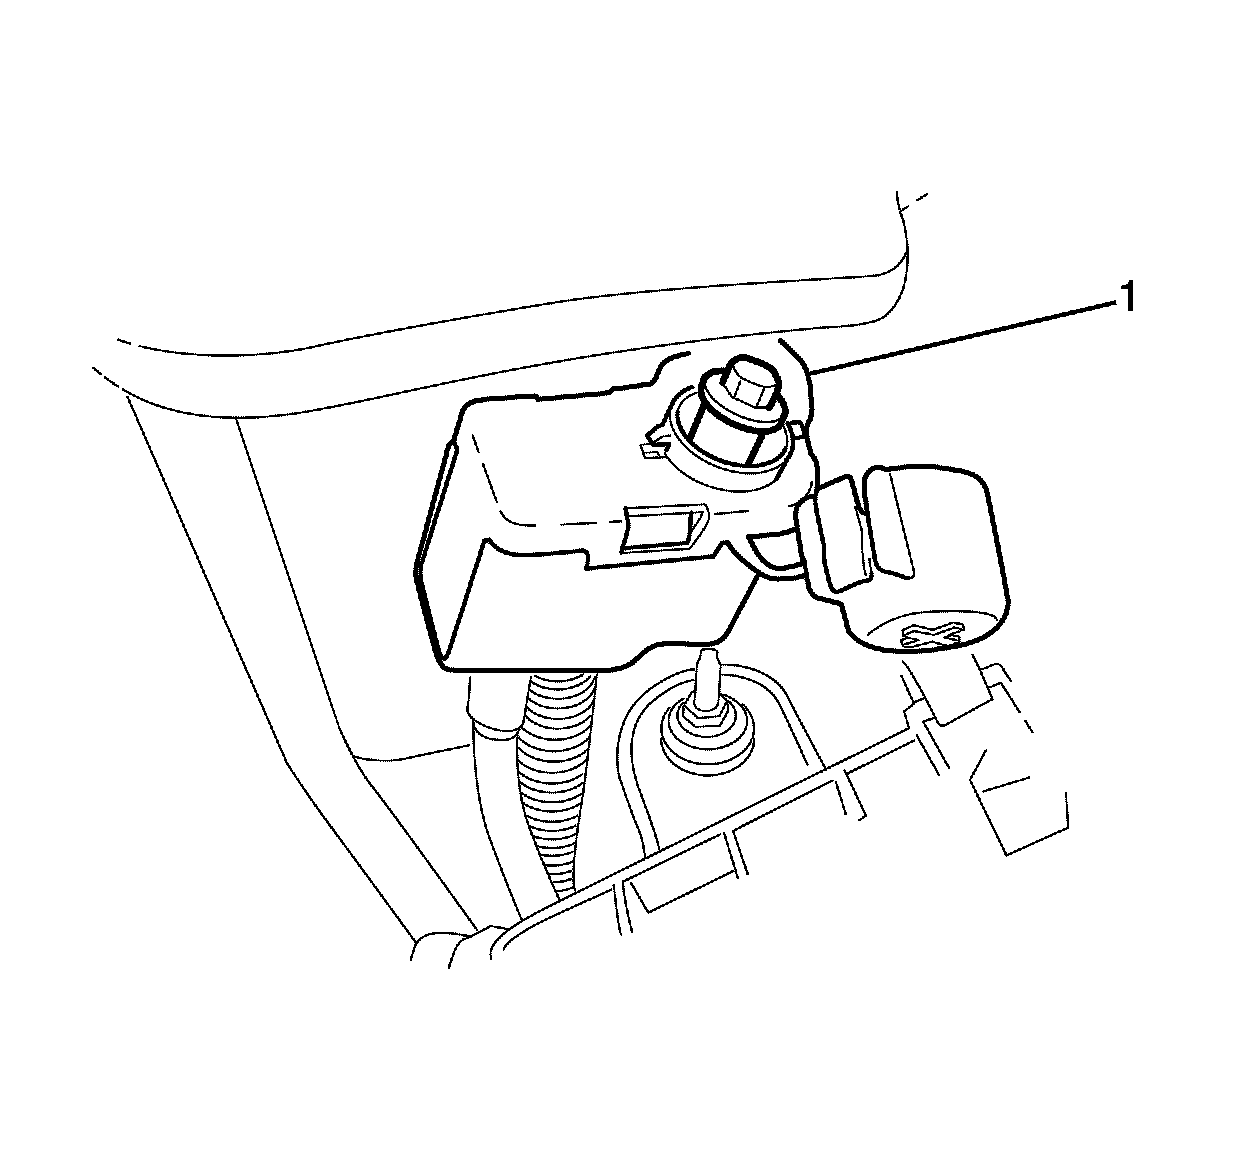
34. Remove the remote positive battery post cover (1) from the remote positive battery post.
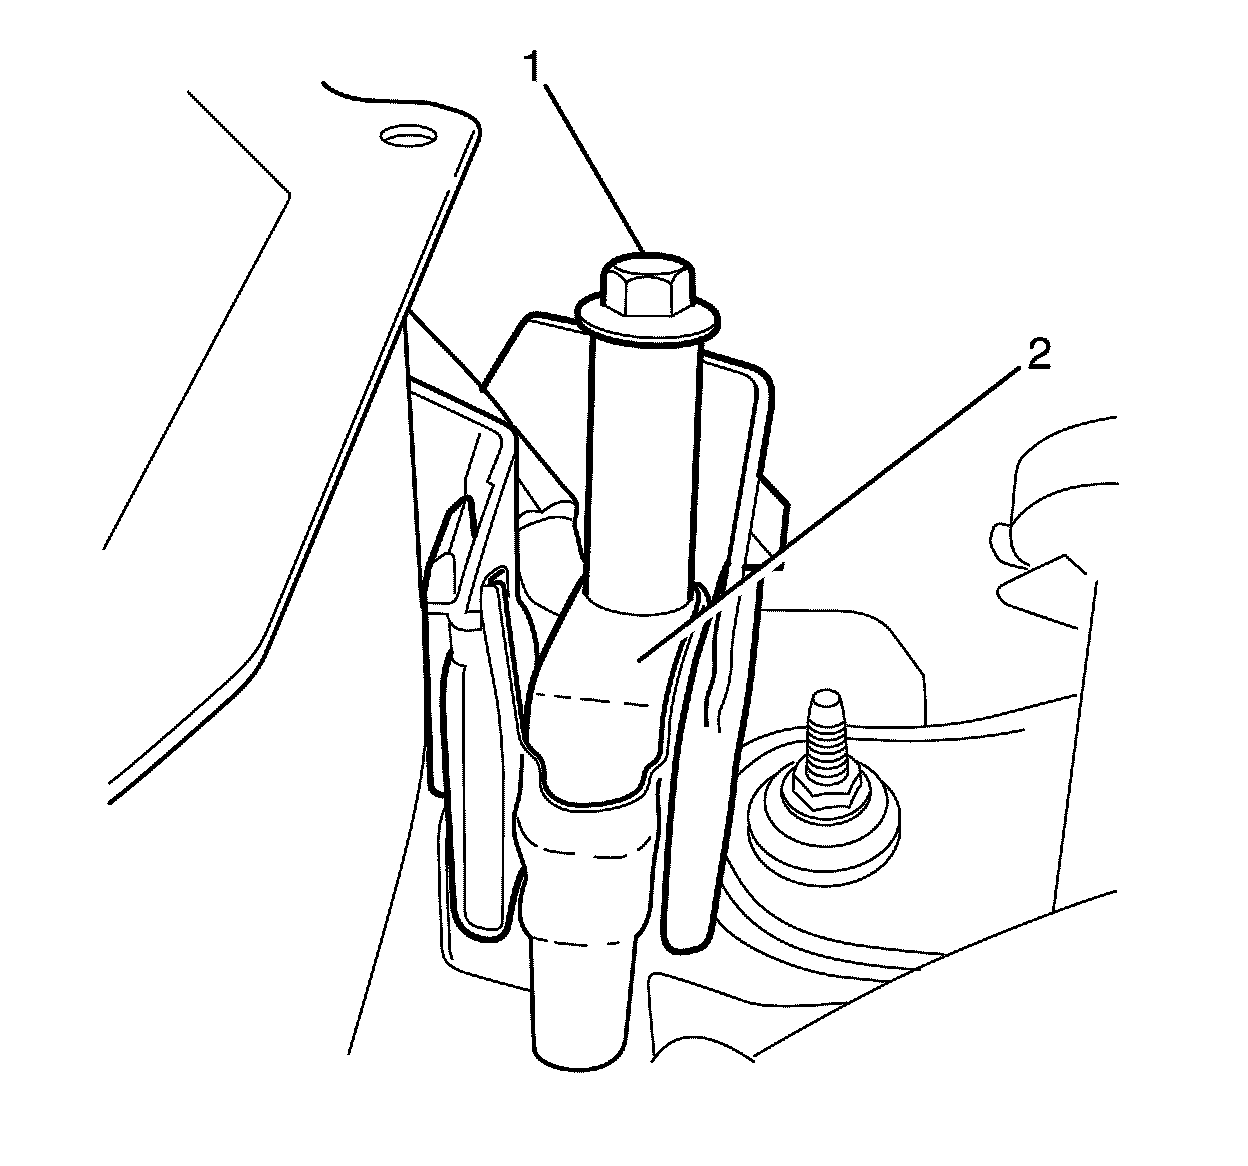
35. Remove the remote positive battery post to wiring harness retaining nut (1).
36. Remove the wiring harness (2) from the remote positive battery post.
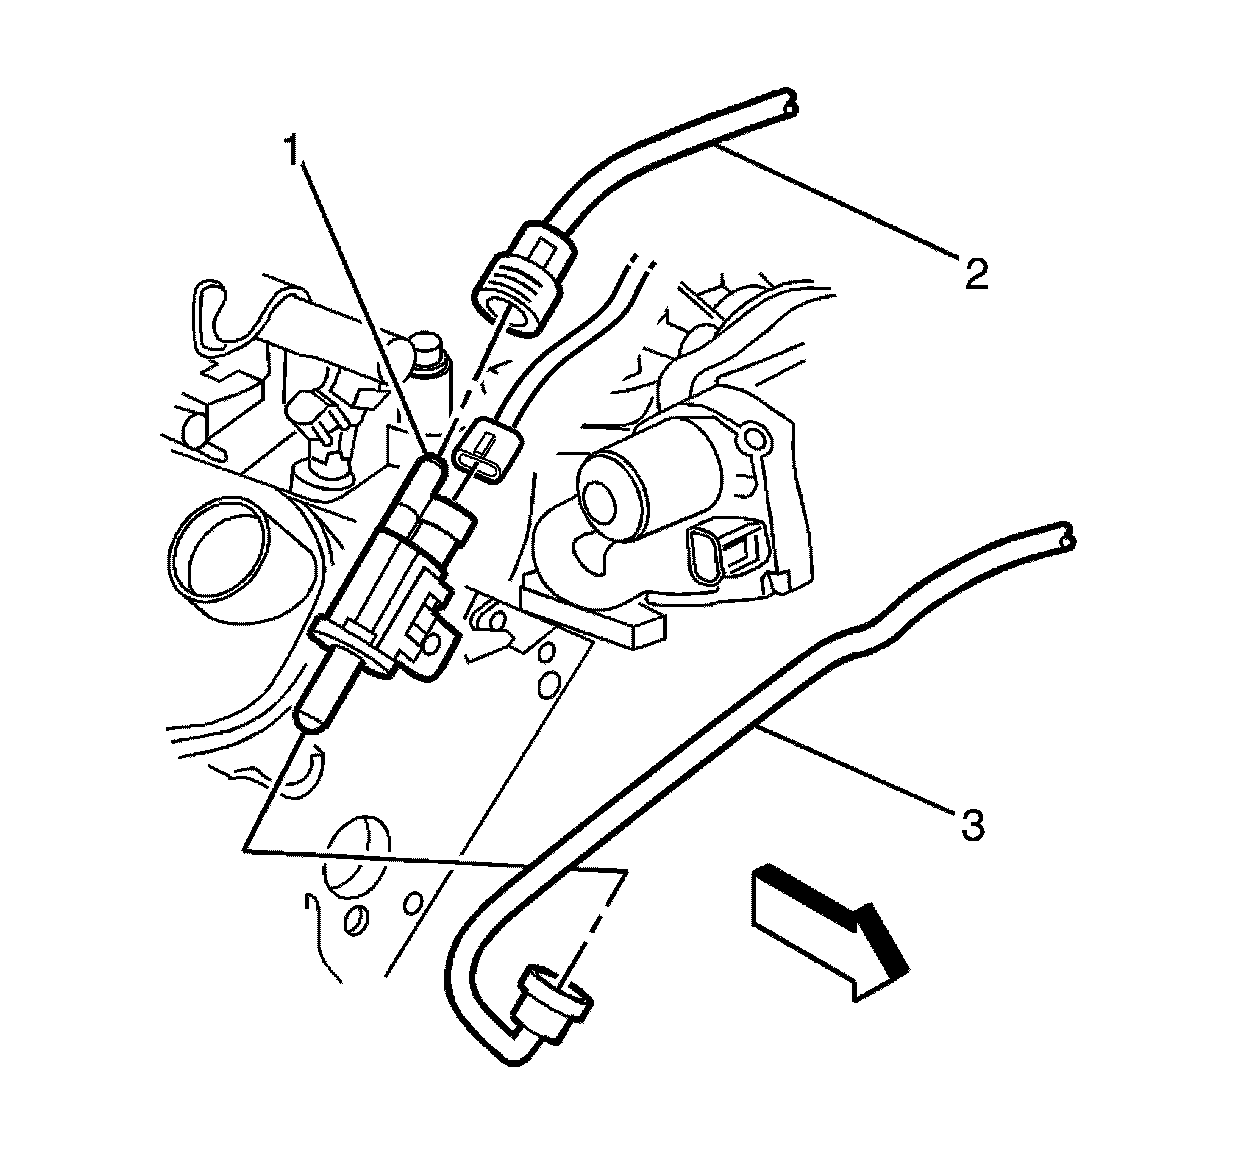
Note: Plug or cap the throttle body to EVAP purge valve hose (3) and EVAP purge valve (1) ends to prevent fuel leaks and/or contamination.
37. Disconnect the throttle body to EVAP purge valve hose (3) from the EVAP purge valve (1).
Note: Plug or cap the EVAP purge valve to fuel tank hose (2) and EVAP purge valve (1) ends to prevent fuel leaks and/or contamination.
38. Disconnect the EVAP purge valve to fuel tank hose (2) from the EVAP purge valve (1).
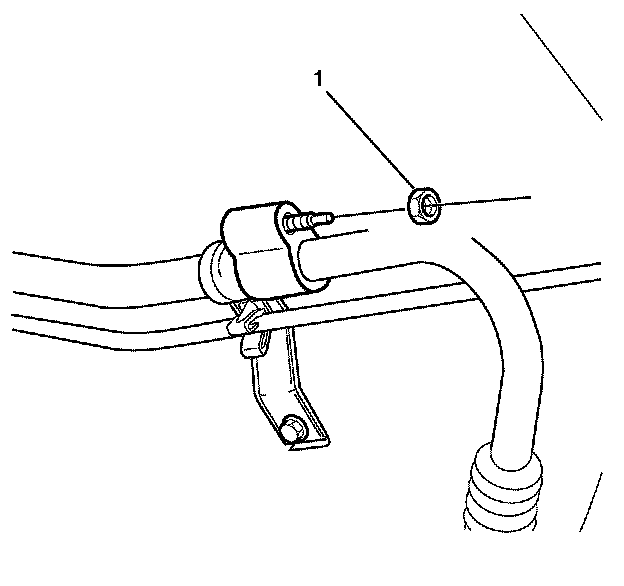
39. Remove the A/C suction pipe pad to lower A/C suction pipe retaining nut (1).
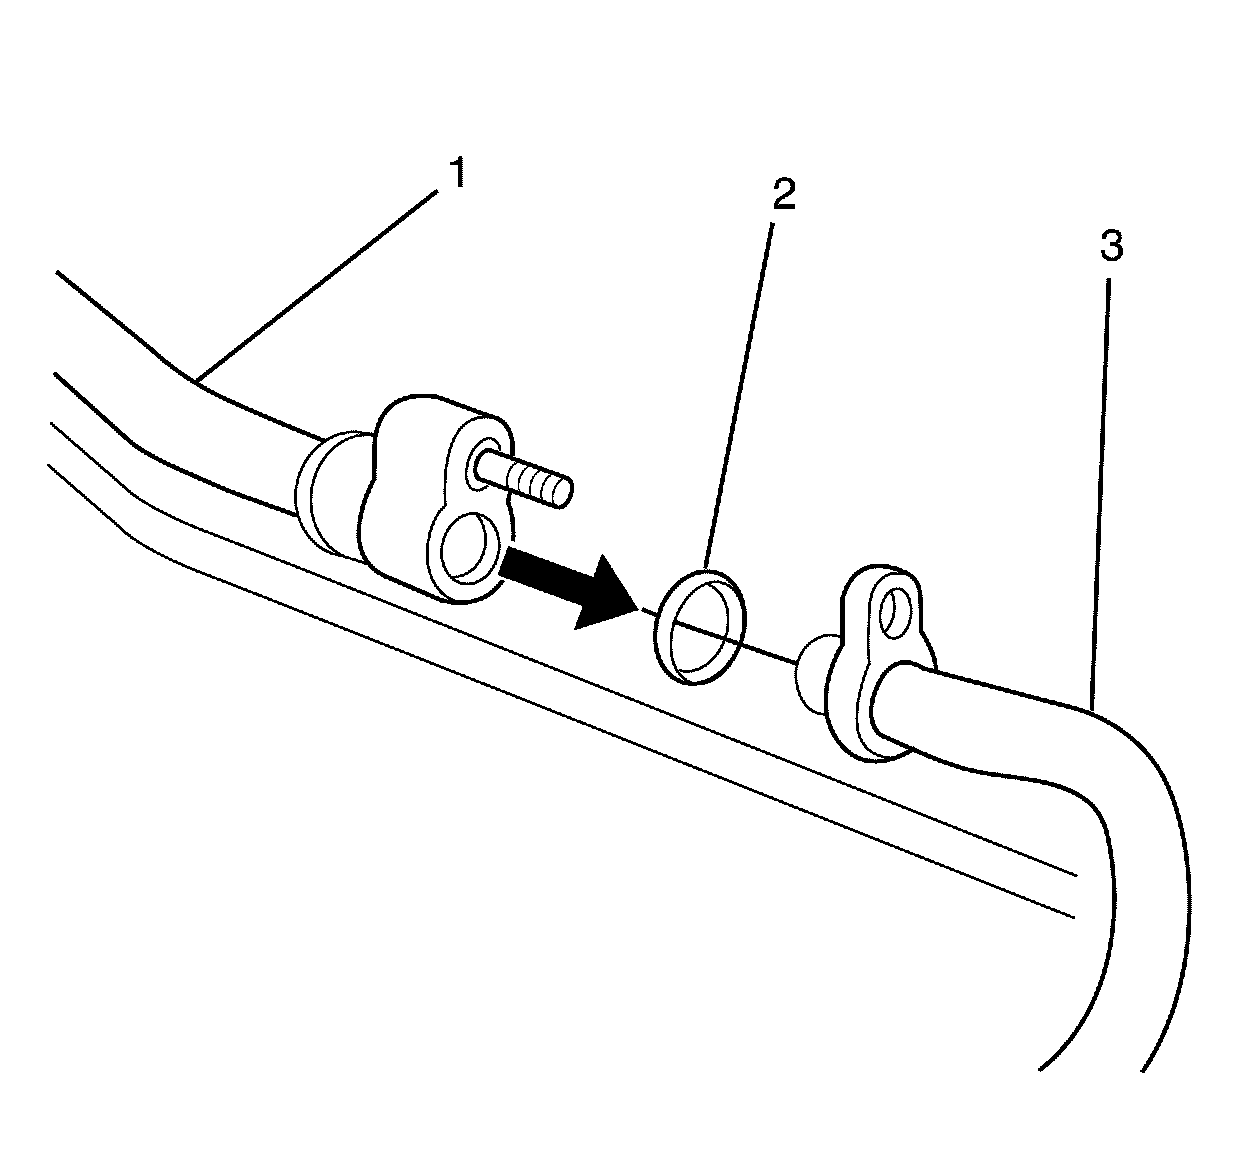
40. Disconnect the upper A/C suction pipe (1) from the lower A/C suction pipe (3).
Note: Plug or cap the A/C suction pipe ends (1 and 3) immediately to prevent contamination and absorption of moisture from the atmosphere.
41. Plug or cap the A/C suction pipe ends.
Note: The A/C suction pipe sealing O-ring (2) is a single use component and will not reseal. Install a NEW A/C suction pipe sealing O-ring (2) whenever the upper A/C suction pipe (1) is removed from the lower A/C suction pipe (3).
42. Remove and discard the A/C suction pipe sealing O-ring (2).
Discard the A/C suction pipe sealing O-ring (2).
43. Reposition and retain the A/C suction/discharge pipes away from the engine.
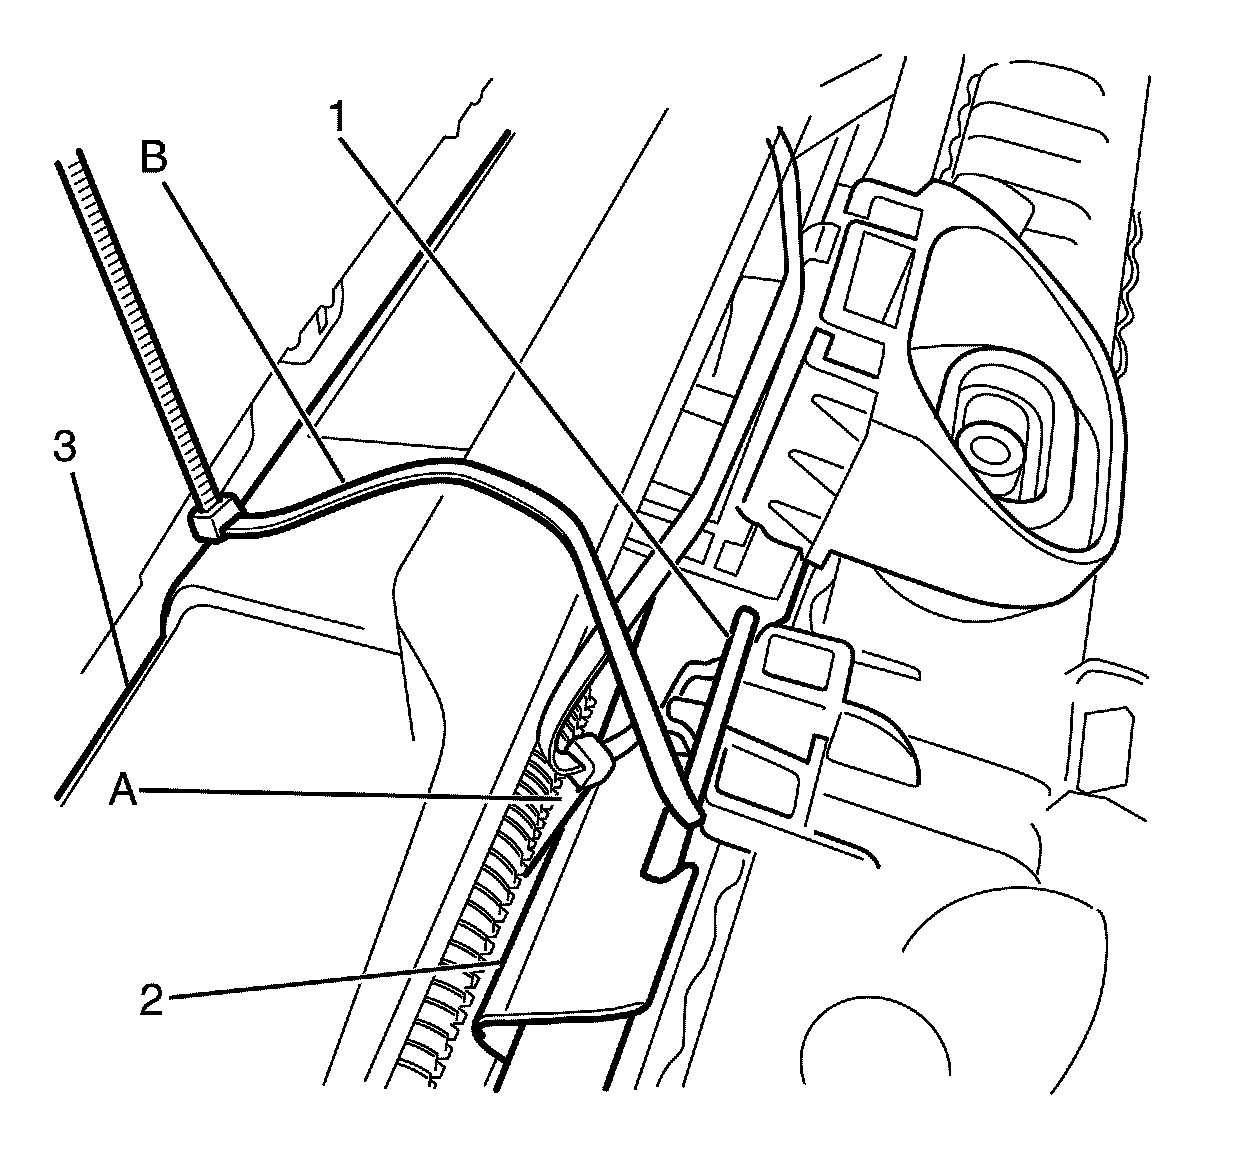
Note: It is necessary to secure the radiator and condenser assembly (2) to the front end assembly (3) as the radiator and condenser assembly is supported to the subframe.
Note: Thread zip tie A around the front end assembly and zip tie B through the radiator and condenser mount (1). Insert zip tie A into the retainer of zip tie B and insert zip tie B into the retainer of zip tie A.
44. Secure radiator and condenser assembly (2) to the front end assembly (3) with large zip ties or equivalent.
Note: Ignore steps 47 - 49 for vehicles equipped with a manual transmission.
Note: The flexible hoses are not serviced separately. Therefore if the hose's require replacement, then the hose and radiator to hose cooler hose assembly must be fitted.
Note: When removal is complete plug hose openings with a clean lint free cloth to prevent foreign matter entry.
45. Place a suitable container beneath the radiator and engine.
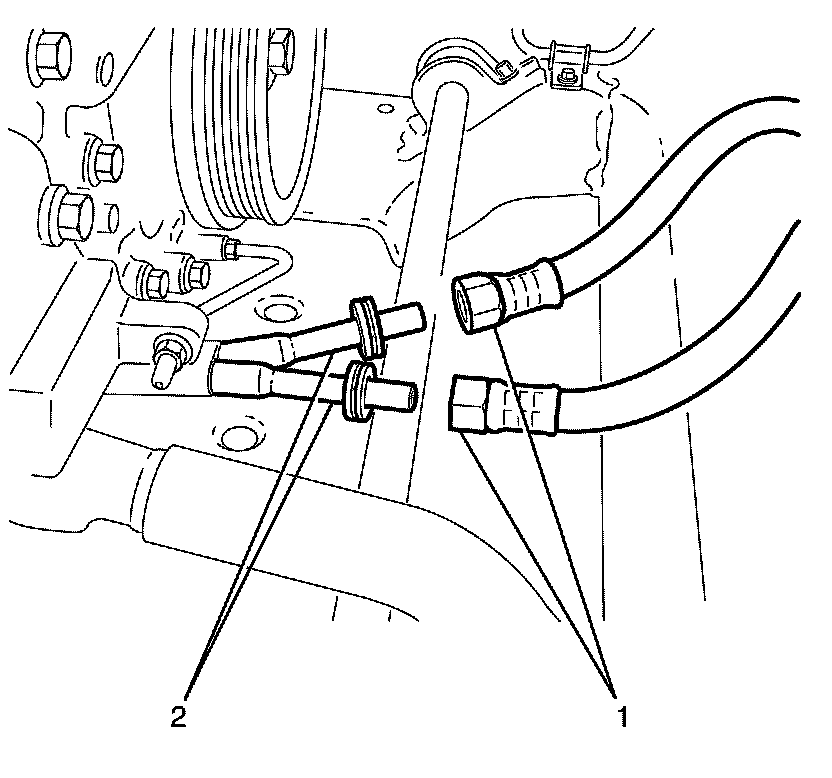
46. Using theJ 41623-B - cooler quick connect tool, disconnect the automatic transmission cooler pipe (2) from the flexible hose (1).
* Open the J 41623-B - cooler quick connect tool, then close and clip around the hose to be disconnected.
* While holding the flexible hose (1) push the hose inwards with one hand, then pull back to separate from the steel hose piping (2).
* Repeat for the second fitting if required.
47. Reposition and secure the flexible hoses (1) away from the engine and subframe.
Danger:
To avoid any vehicle damage, serious personal injury or death when major components are removed from the vehicle and the vehicle is supported by a hoist, support the vehicle with jack stands at the opposite end from which the components are being removed and strap the vehicle to the hoist.
Warning: Refer to Safety Glasses Warning Safety Glasses Warning.
48. Raise and support the vehicle. Refer to Lifting and Jacking the Vehicle Service and Repair.
49. Remove the front air deflector. Refer to Front Air Deflector Replacement .
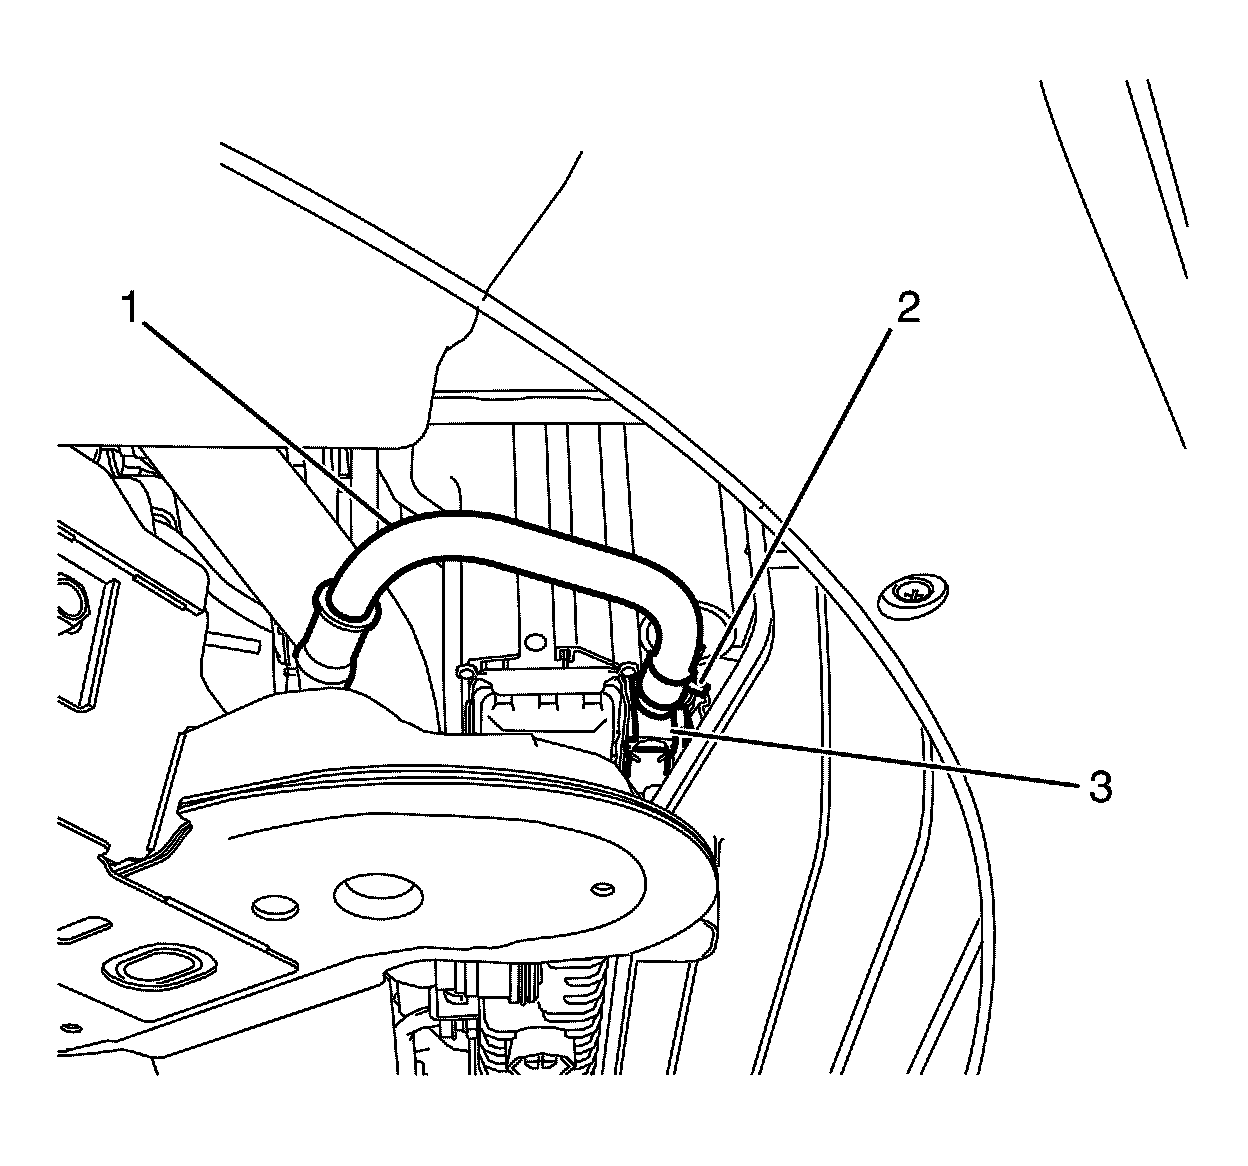
50. Place a suitable container under the power steering cooler.
Note: The power steering cooler (3) must be plugged to prevent the entry of foreign particles into the power steering system.
51. Release the power steering gear outlet hose spring clamp (2) and disconnect the power steering gear outlet hose (1) from the power steering cooler (3).
Plug the power steering cooler (3) and power steering gear outlet hose (1).
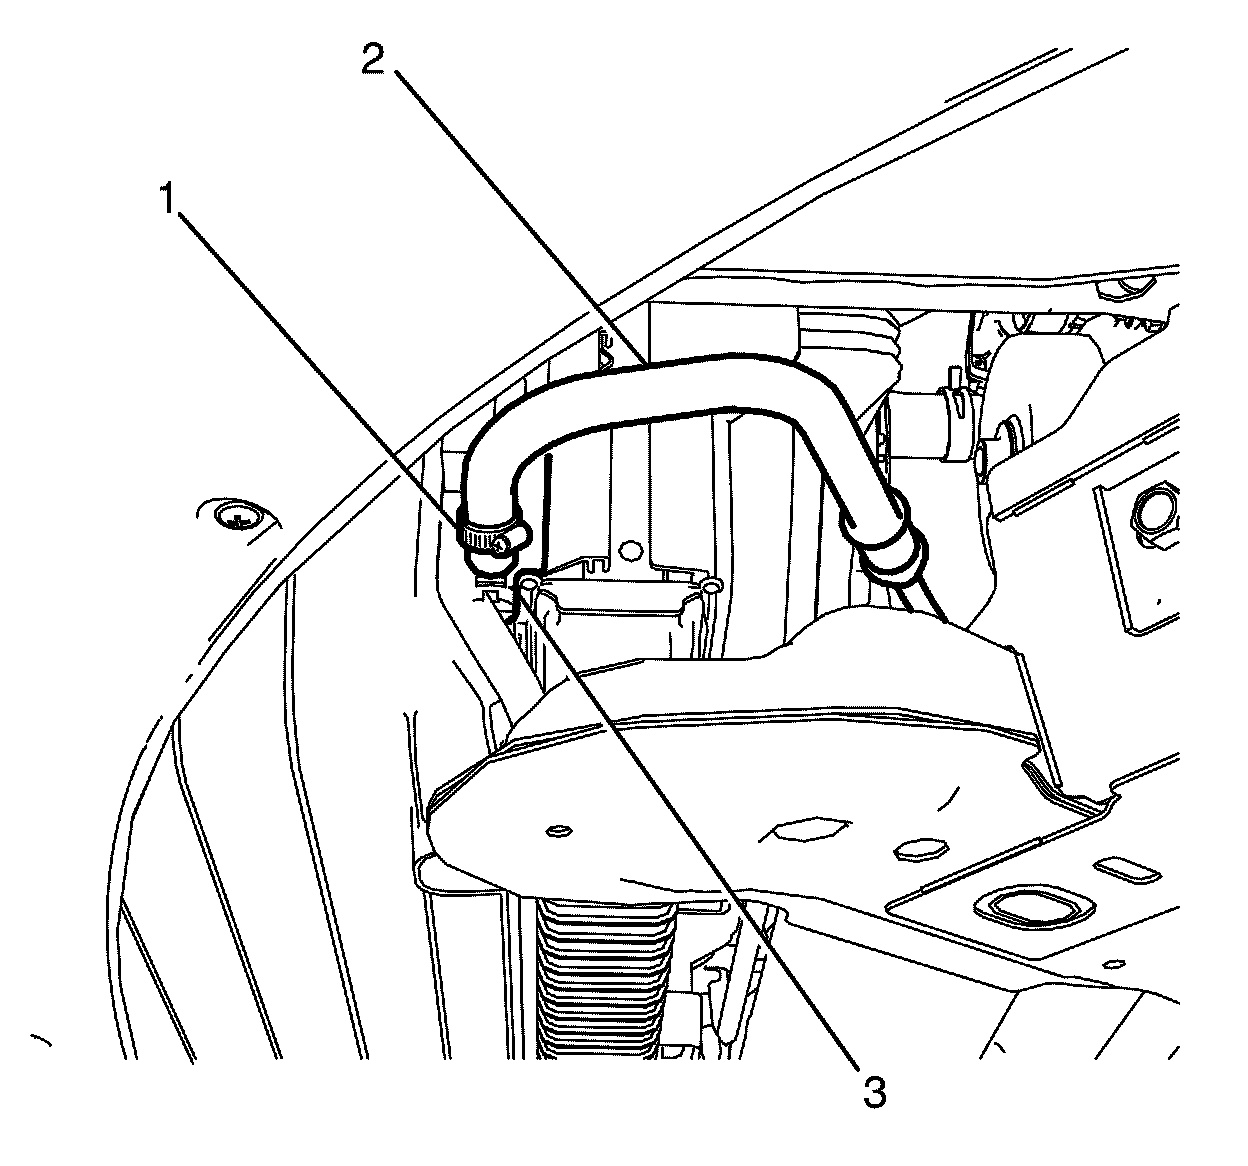
Note: The power steering cooler (3) must be plugged to prevent the entry of foreign particles into the power steering system.
52. Release the power steering reservoir inlet hose spring clamp (1) and disconnect the power steering reservoir inlet hose (2) from the power steering cooler (3).
Plug the power steering cooler (3) and power steering reservoir inlet hose (2).
53. Remove the exhaust system. Refer to Exhaust System Replacement Service and Repair.
54. Remove the centre heat shield. Refer to Exhaust Heat Shield Replacement - Center Exhaust Heat Shield Replacement - Center.
55. Remove the propeller shaft. Refer to Propeller Shaft Replacement (Except 4L60) Propeller Shaft Replacement (Except 4L60).
56. Remove the starter. Refer to Starter Replacement Service and Repair.
Note: Ignore steps 60 to 61 for vehicles fitted with an manual transmission.
57. Remove the shift selector linkage rod to shift selector shaft retaining nut (3).
58. Remove the shift selector linkage rod (1) from the shift selector shaft (2).
Note: Ignore steps 62 to 64 for vehicles fitted with an automatic transmission.
59. Remove the shift control assembly.
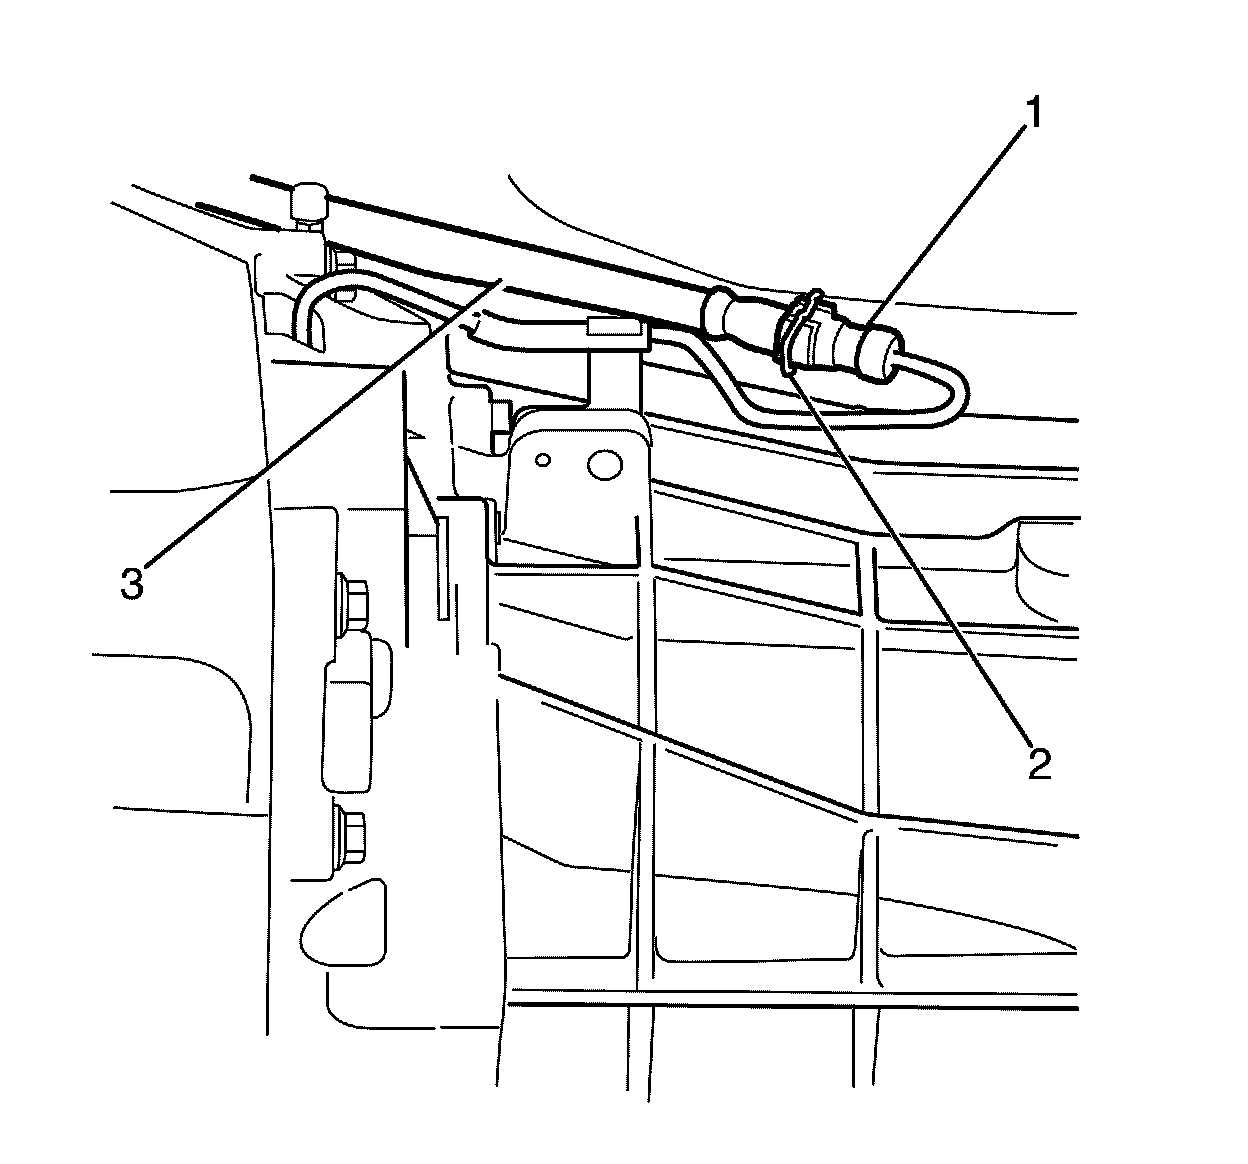
Note: Use a suitable tool to remove the flexible hose securing clip (2), take care not to lose the flexible hose securing clip (2) on removal.
60. Remove the flexible hose securing clip (2).
61. Disconnect the to concentric actuator cylinder feed hose (3) from the concentric actuator cylinder feed pipe (1).
62. Remove the front wheels. Refer to Tire and Wheel Removal and Installation Service and Repair.
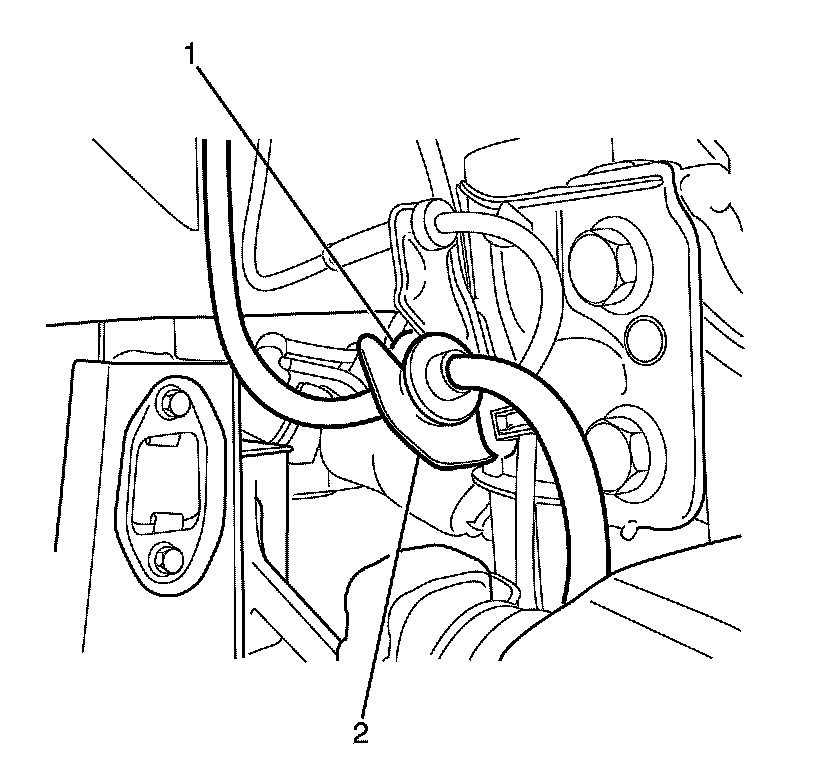
63. Detach the front brake hose (1) from the front strut mounted brake hose retaining bracket (2). Repeat for opposite side.
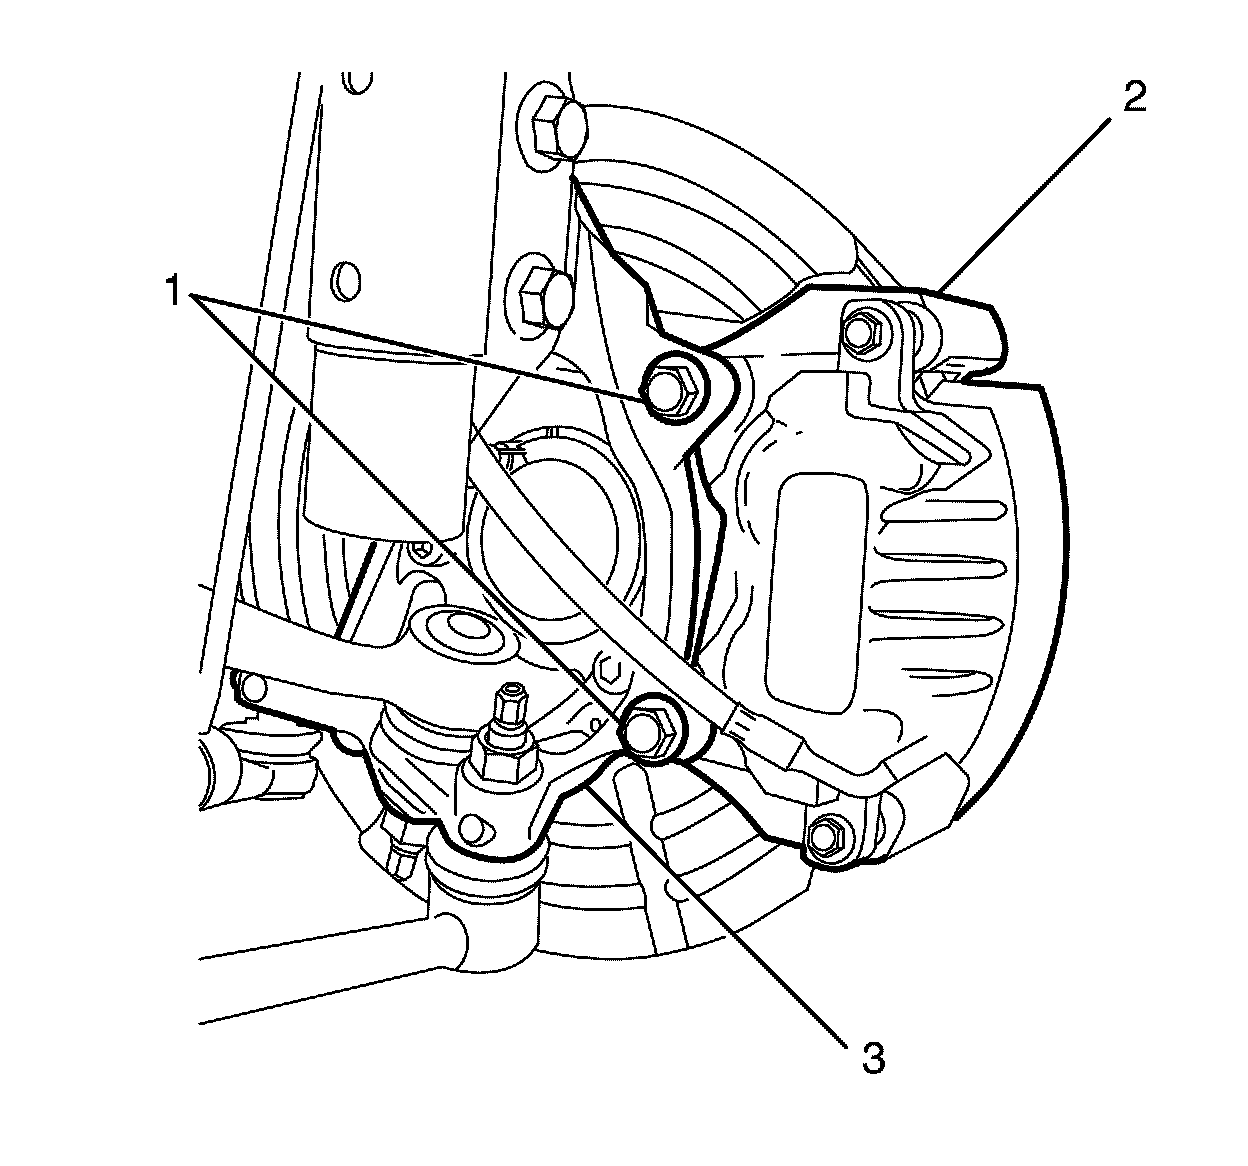
Note: Nuts with micro-encapsulated thread sealant must be discarded after removal.
64. Remove the front brake caliper anchor plate to knuckle retaining bolts (1). Repeat for opposite side.
Discard the bolts.
Note: DO NOT disconnect the hydraulic brake flexible hose from the brake caliper otherwise complete bleeding of the braking system will be necessary.
65. Remove the front brake caliper (2) from the front steering knuckle (3). Repeat for opposite side.
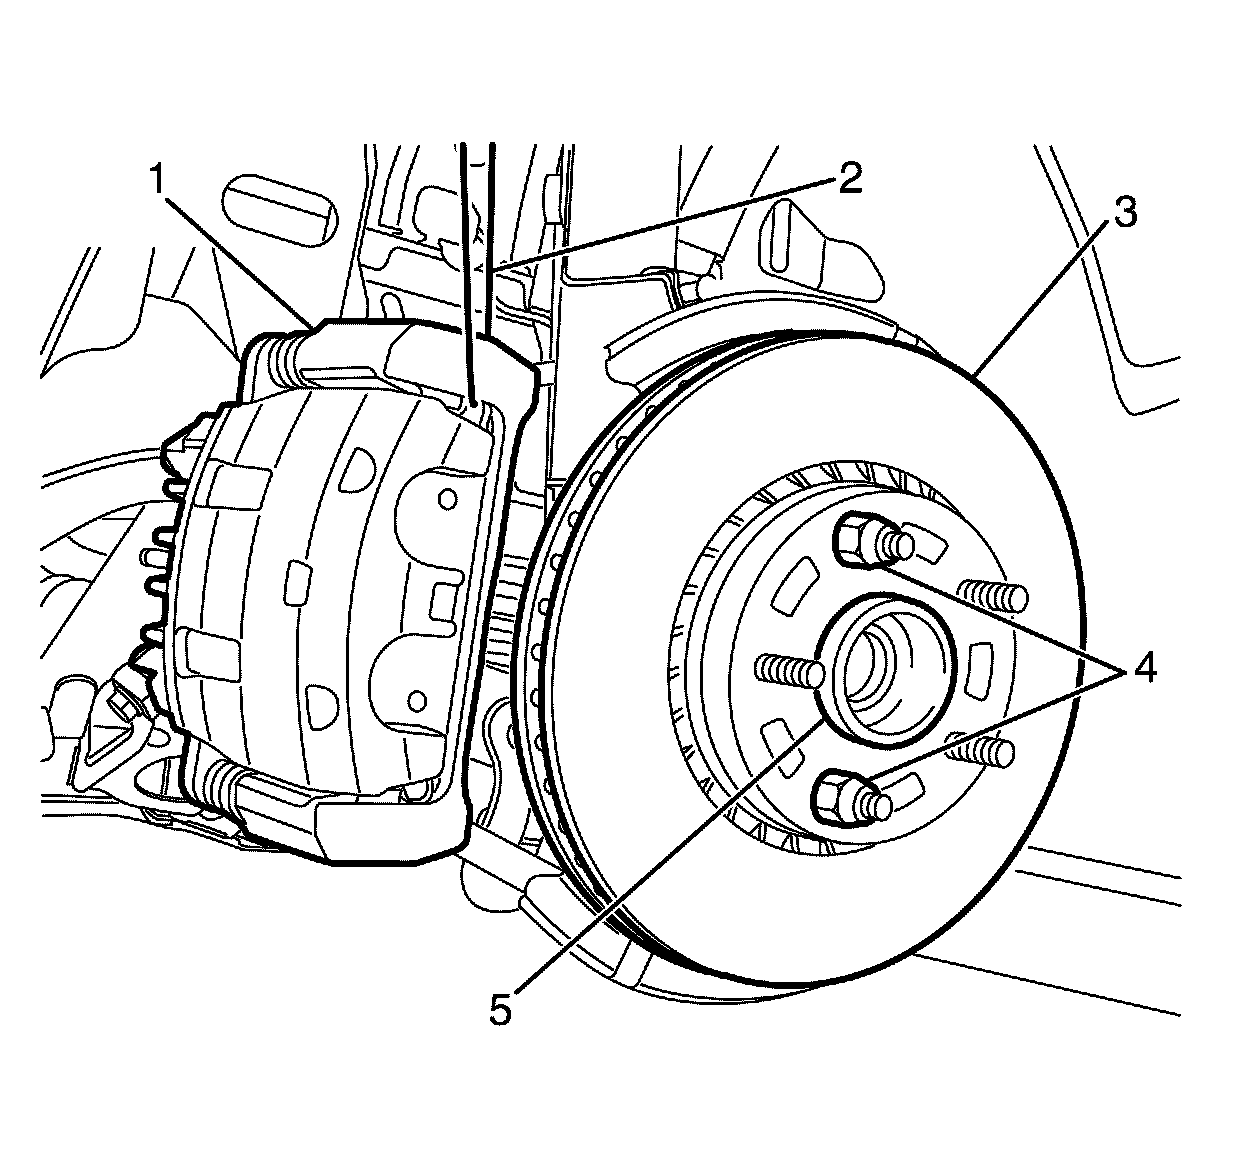
Caution:
Support the brake caliper with heavy mechanic wire, or equivalent, whenever it is separated from its mount and the hydraulic flexible brake hose is still connected. Failure to support the caliper in this manner will cause the flexible brake hose to bear the weight of the caliper, which may cause damage to the brake hose and in turn may cause a brake fluid leak.
66. Support the front brake caliper (1) with heavy mechanic's wire, or equivalent (2). Repeat for opposite side.
67. Remove the two wheel nuts (4) retaining the front brake disc (3) to the hub (5). Repeat for opposite side.
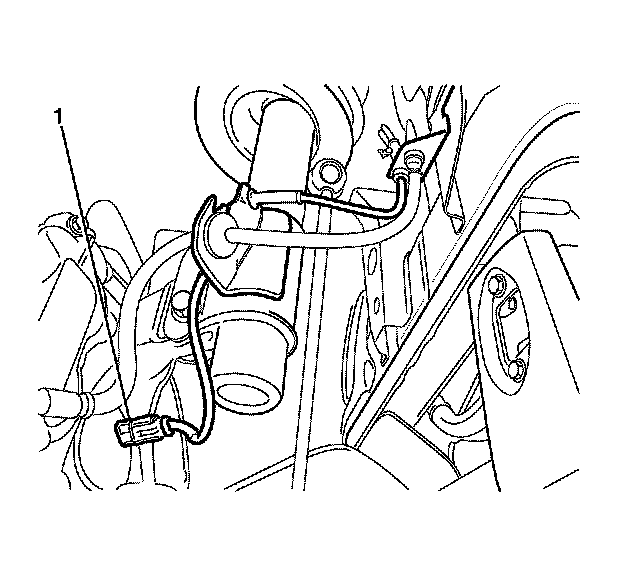
68. Disconnect the front wheel speed sensor jumper harness electrical connector (1) and secure away from the front subframe and suspension components. Repeat for opposite side.
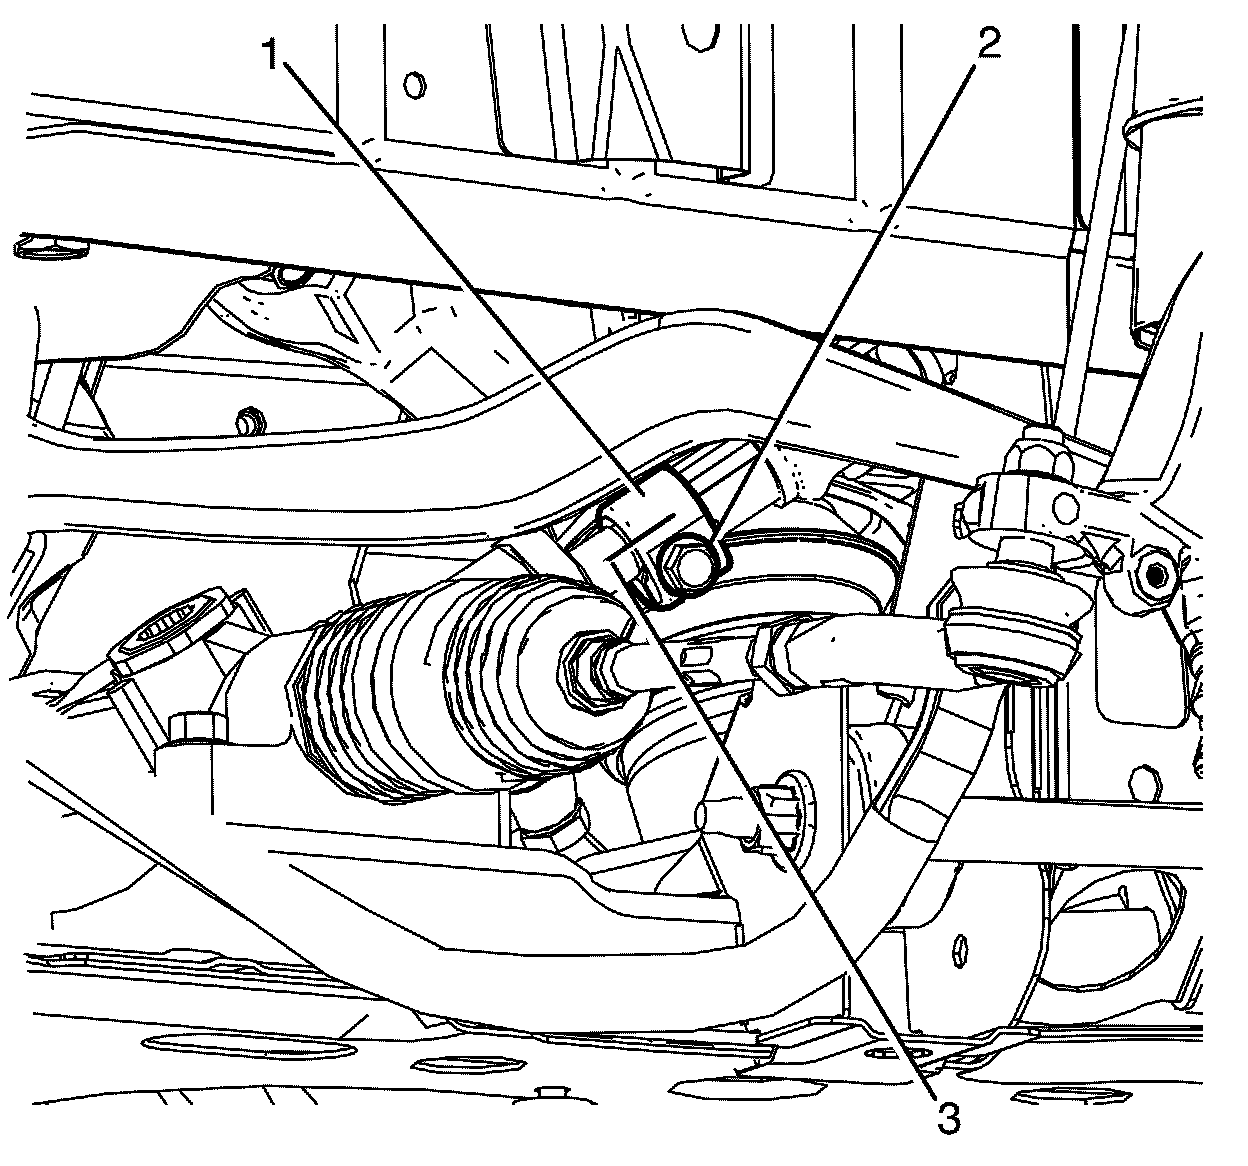
Note: Observing the orientation of the intermediate steering shaft (1) with reference to the pinion shaft (3) will minimize the potential of incorrect steering column assembly alignment.
69. Mark the intermediate steering shaft (1) in relation to the pinion shaft (3).
70. Remove the intermediate steering shaft to pinion shaft retaining bolt (2).
Note: Bolts with micro-encapsulated thread sealant must be discarded after removal.
71. Disconnect the intermediate shaft (2) from the pinion shaft (3).
Discard the bolt.
72. Lower the vehicle.
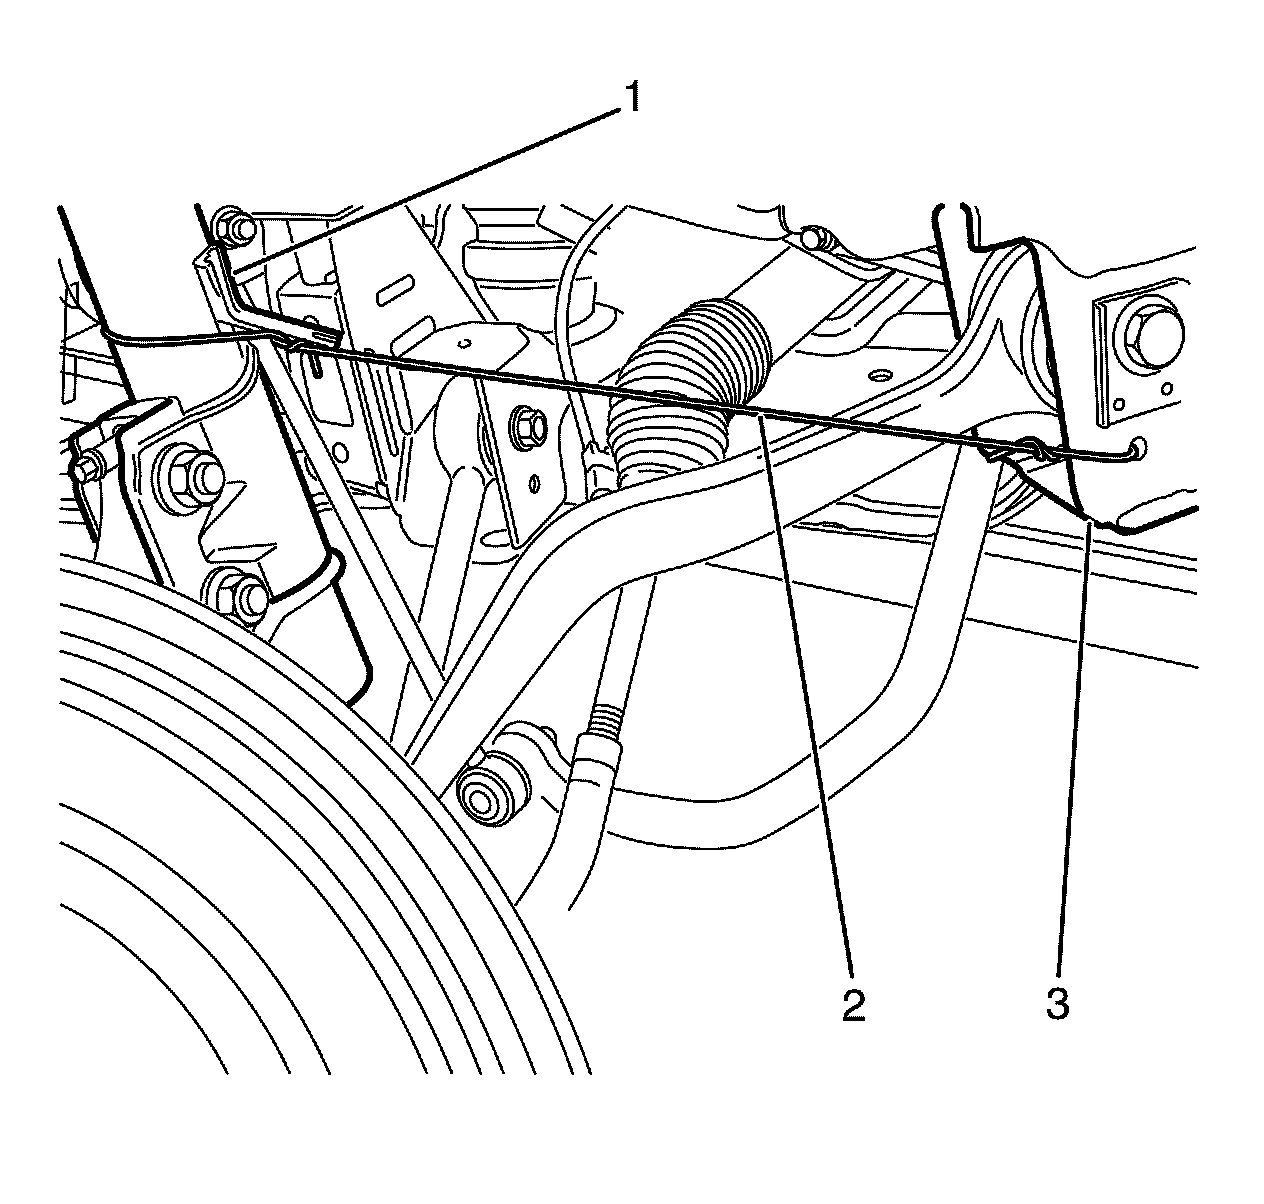
Note: The strut assembly (1) must be secured to the subframe (3) to prevent damage to the front wheelhouse liner, fenders and suspension components.
73. Retain the front strut assembly (1) to the front subframe (3) using heavy mechanics wire or equivalent (2). Repeat for opposite side.
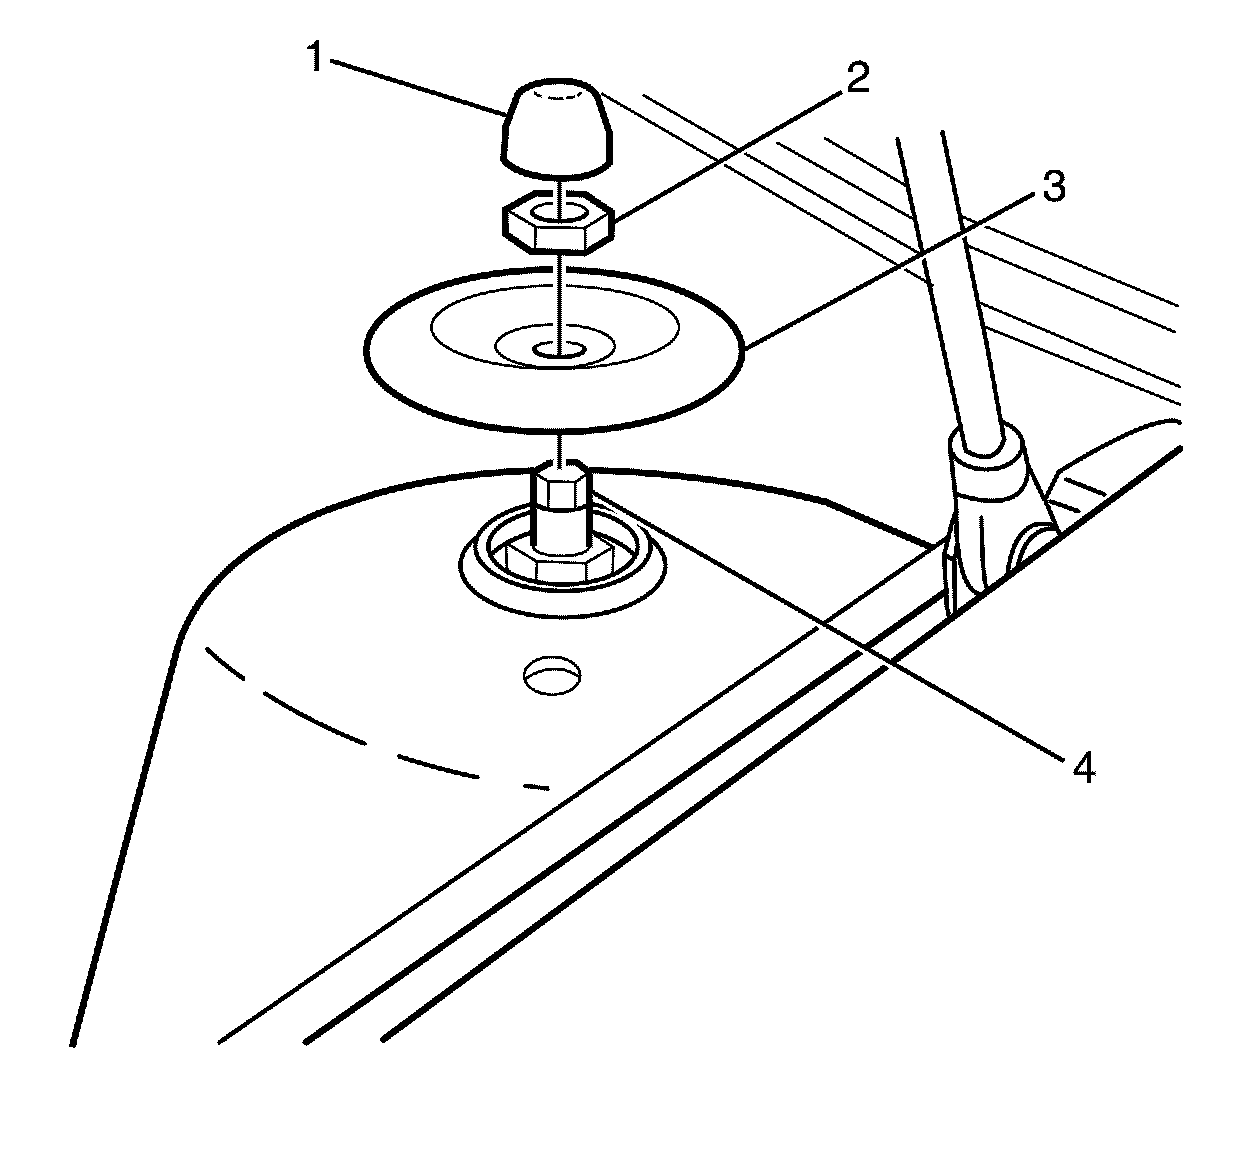
74. Remove the stud dust cover (1) from the strut assembly to front wheelhouse retaining nut (2). Repeat for opposite side.
Note: The strut assembly (4) must be supported from underneath before the strut assembly to body retaining nut (2) is removed.
75. Remove the strut assembly to front wheelhouse retaining nut (2) while holding the strut piston shaft (4). Repeat for opposite side.
Discard the nut.
76. Remove the strut assembly to front wheelhouse retaining plate (3). Repeat for opposite side.
77. Position a suitable powertrain and/or engine lift table below the frame, engine and transmission.
78. Raise the lift table and/or lower the vehicle to support the frame, engine and transmission.
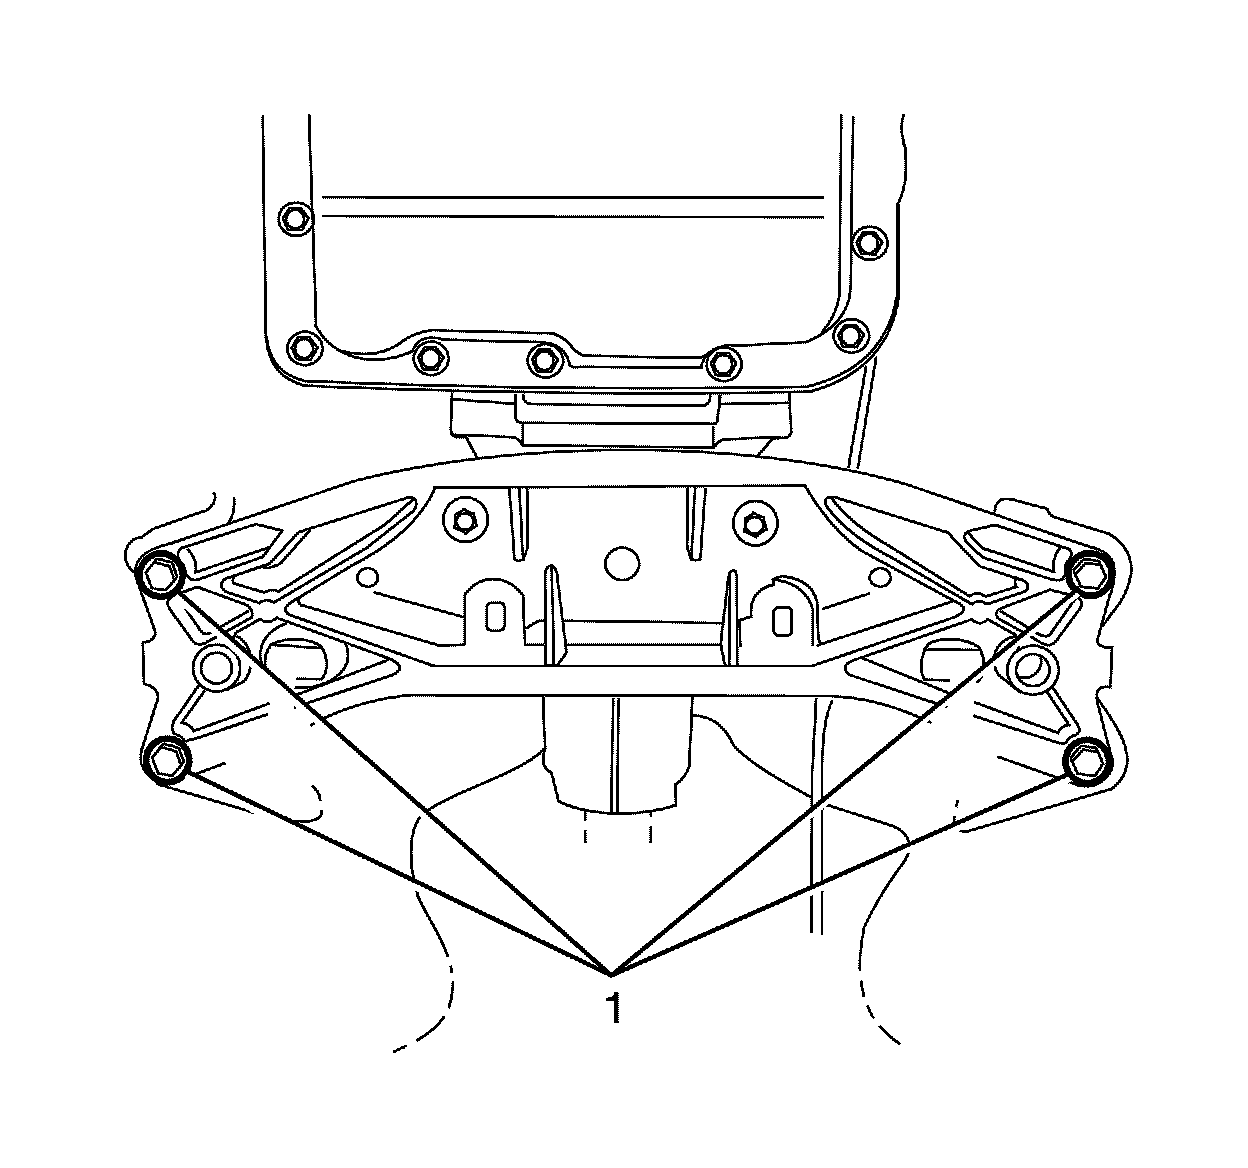
79. Remove the transmission support to body retaining bolts (1).
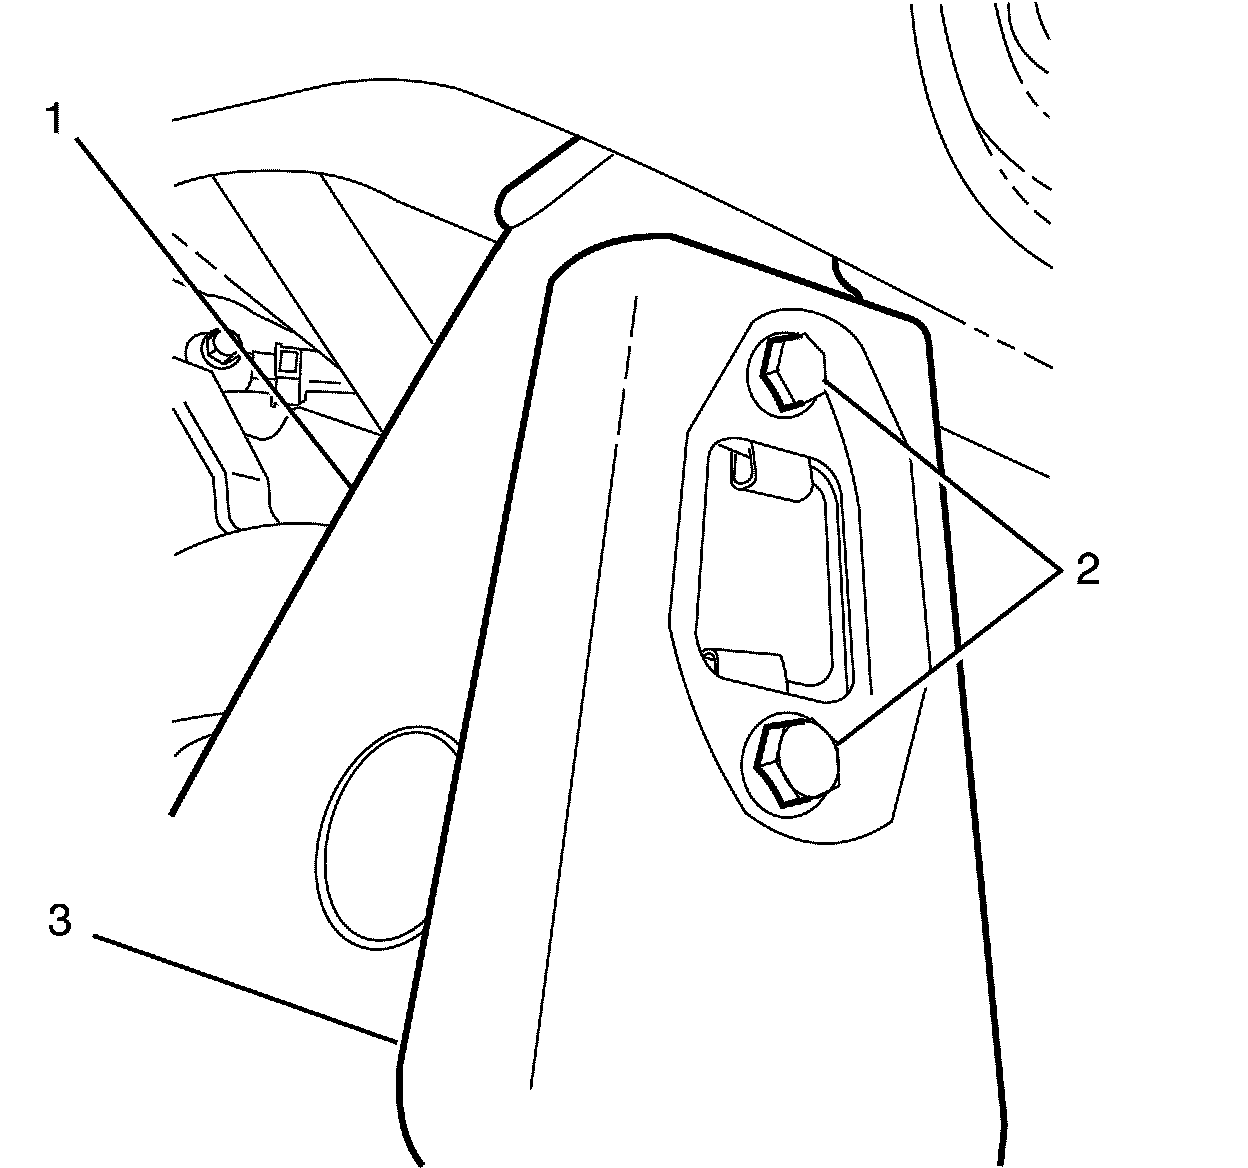
80. Remove the front subframe reinforcement plate to front subframe retaining bolts (2).
81. Remove the front subframe reinforcement plate (3) from the front subframe (1).
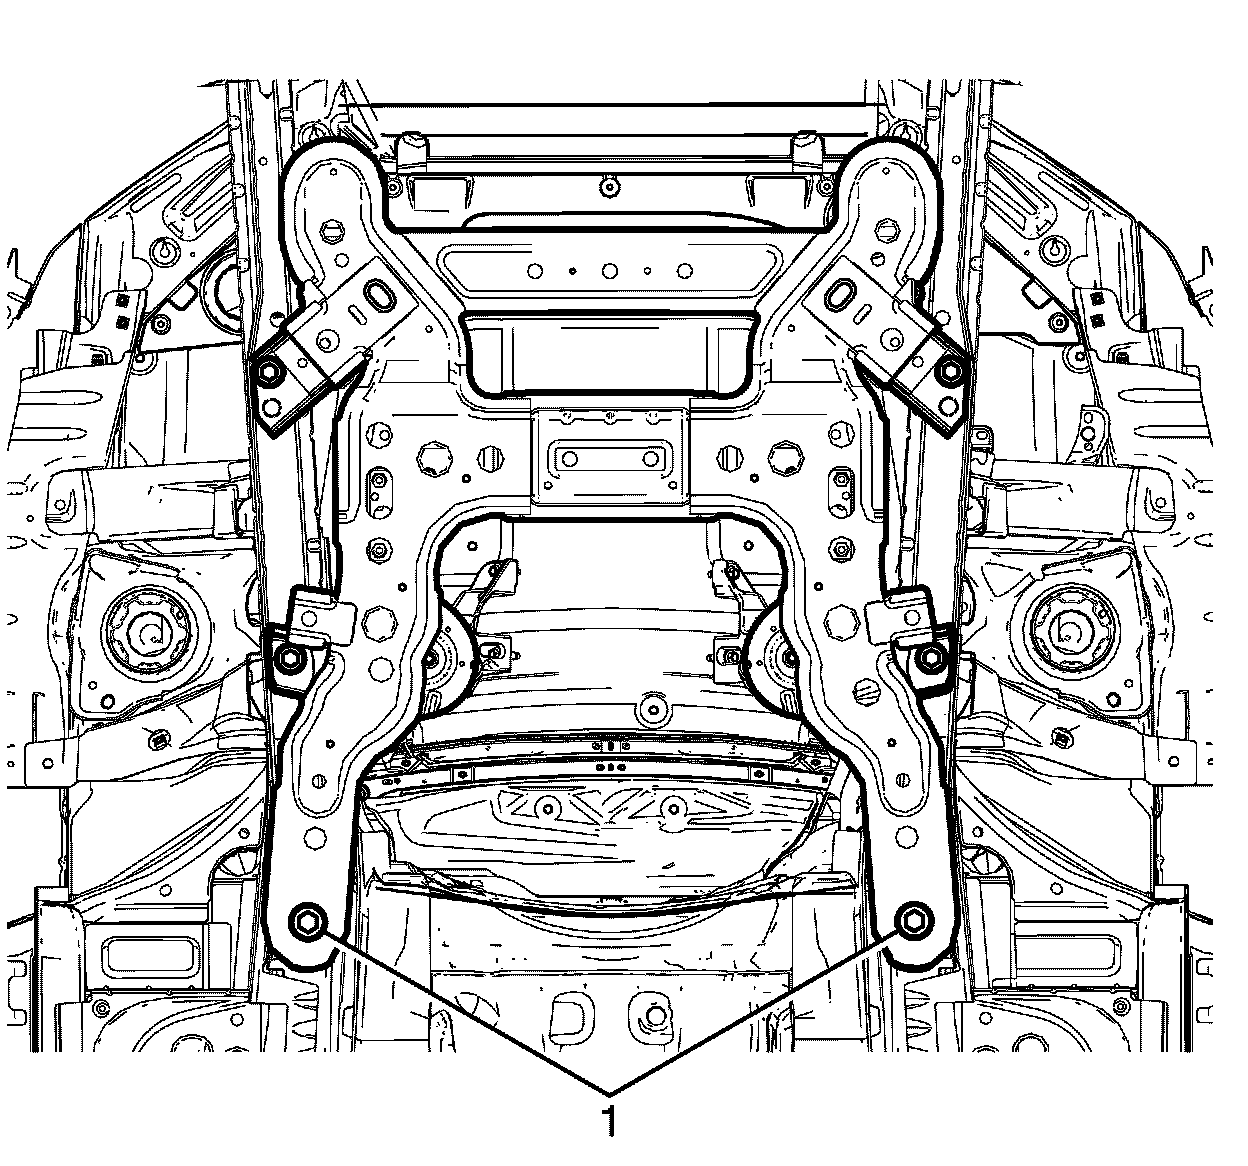
82. Remove the front subframe to body rear retaining bolts (1).
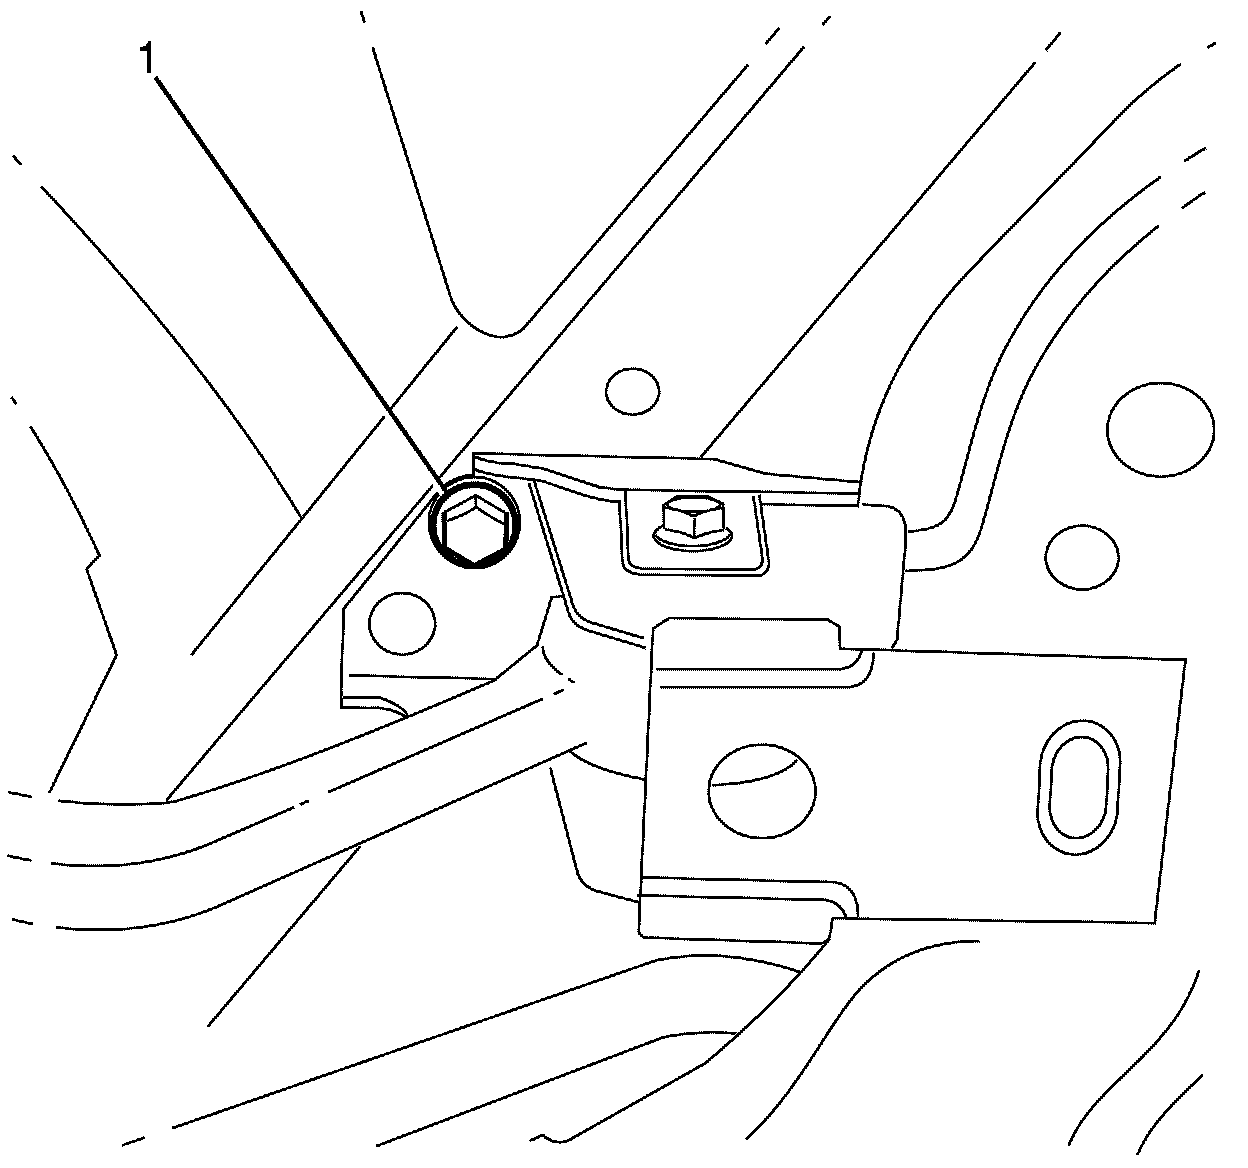
Note: Only right side depicted in graphic, left side similar.
83. Remove the front subframe to body front retaining bolt (1). Repeat for opposite side.
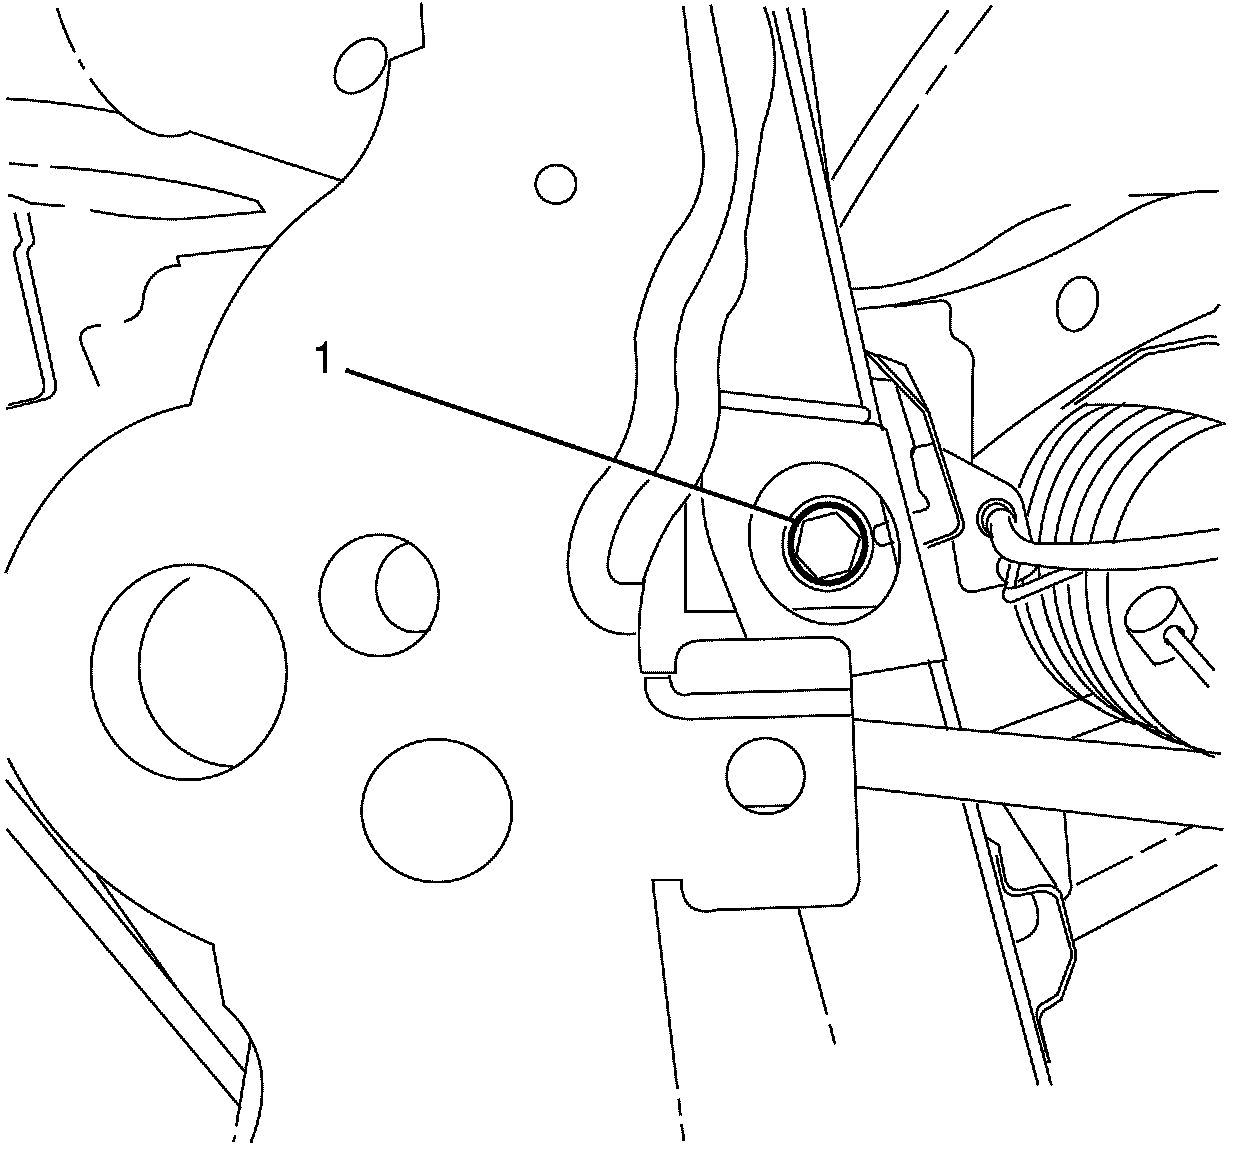
Note: Only right side depicted in graphic, left side similar.
84. Remove the front subframe to body retaining bolt (1). Repeat for opposite side.
Note: Make sure that all the hoses, wires, pipes and front struts clear the vehicle during the removal process.
85. With the aid of an assistant, lower the table and/or raise the vehicle to remove the engine, transmission, front suspension and subframe assembly from the vehicle.
86. Remove the engine and transmission wiring harness and related components.
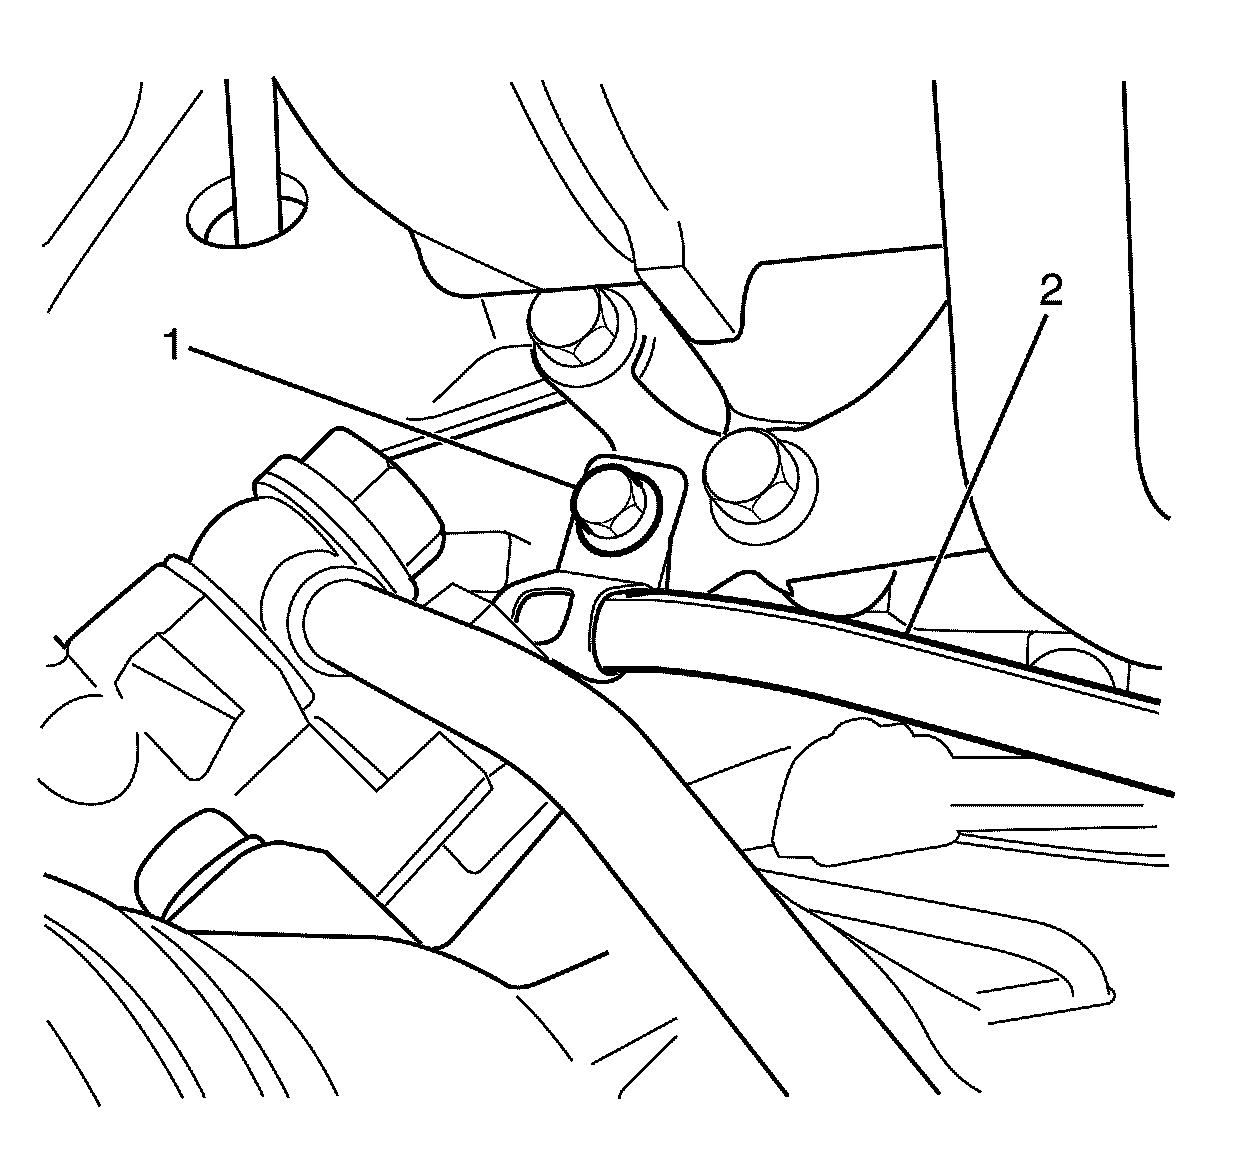
87. Remove the automatic transmission cooler pipe clamp to A/C bracket bolt (1) and position the automatic transmission cooler pipes (2) aside.
88. Connect a suitable lifting crane to the engine lift brackets and raise the suitable lifting crane to support the engine.
89. Position a second powertrain lift table below the transmission.
90. Remove the automatic transmission flex plate. Refer to Automatic Transmission Flex Plate Removal 3. Automatic Transmission Flex Plate Removal
91. Remove the accessory drive belt. Refer to Drive Belt Replacement - Accessory Drive Belt Replacement - Accessory.
92. Remove the A/C drive belt. Refer to Air Conditioning Compressor Belt Replacement Air Conditioning Compressor Belt Replacement.
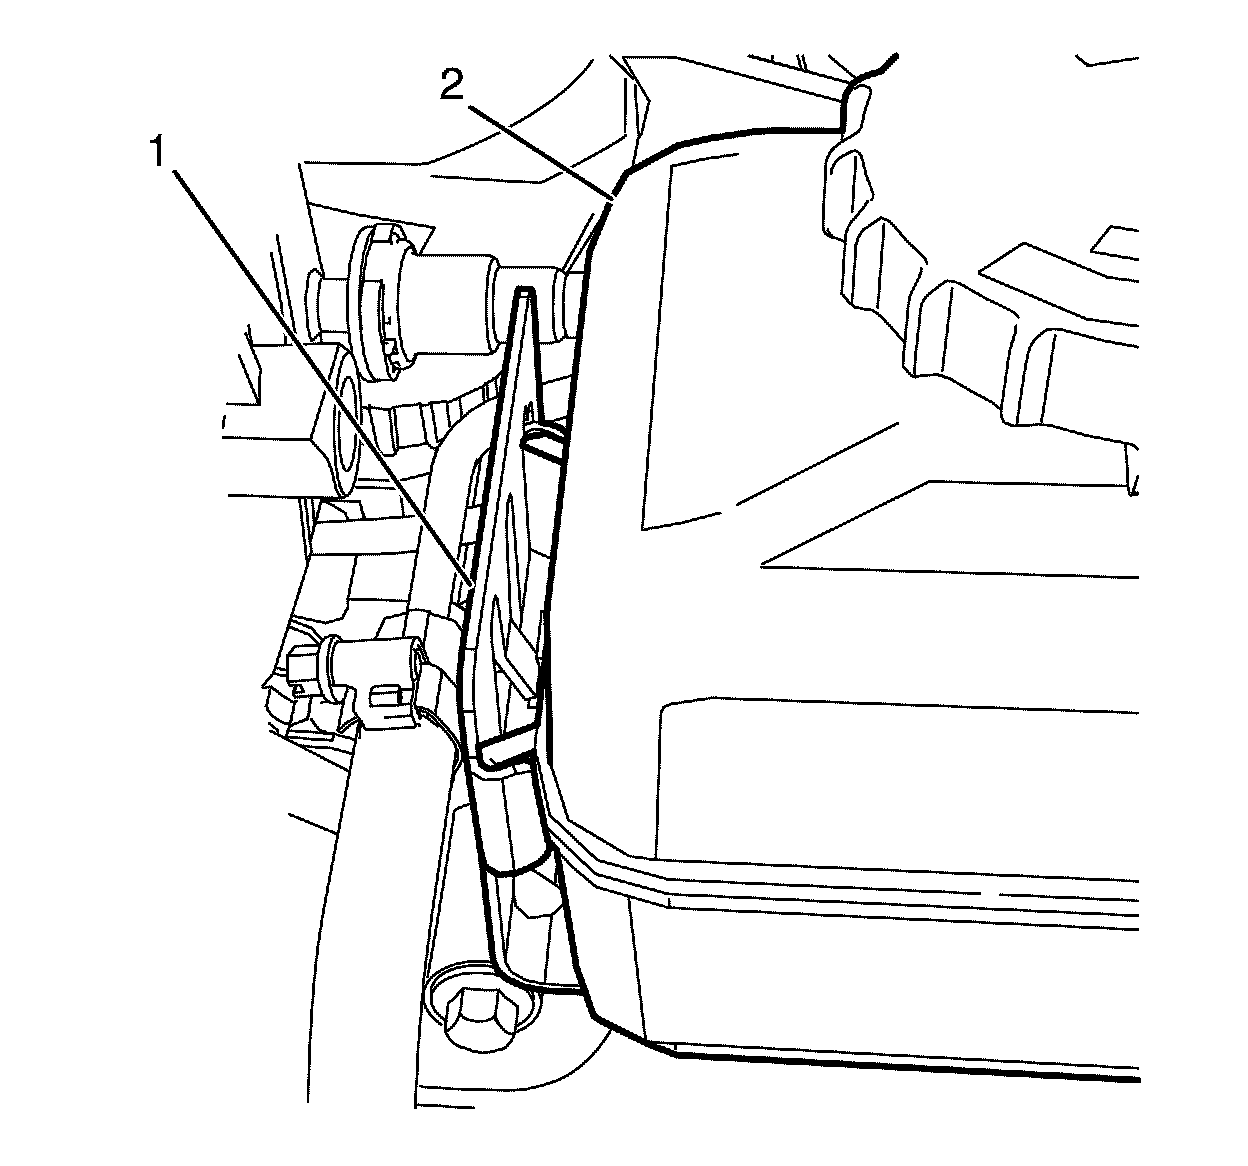
Note: The locking tang on the power steering reservoir bracket (1) must be released before removing the power steering reservoir (2).
93. Remove the power steering reservoir (2) from the power steering pump power steering reservoir bracket (1) and position the power steering reservoir (2) aside.
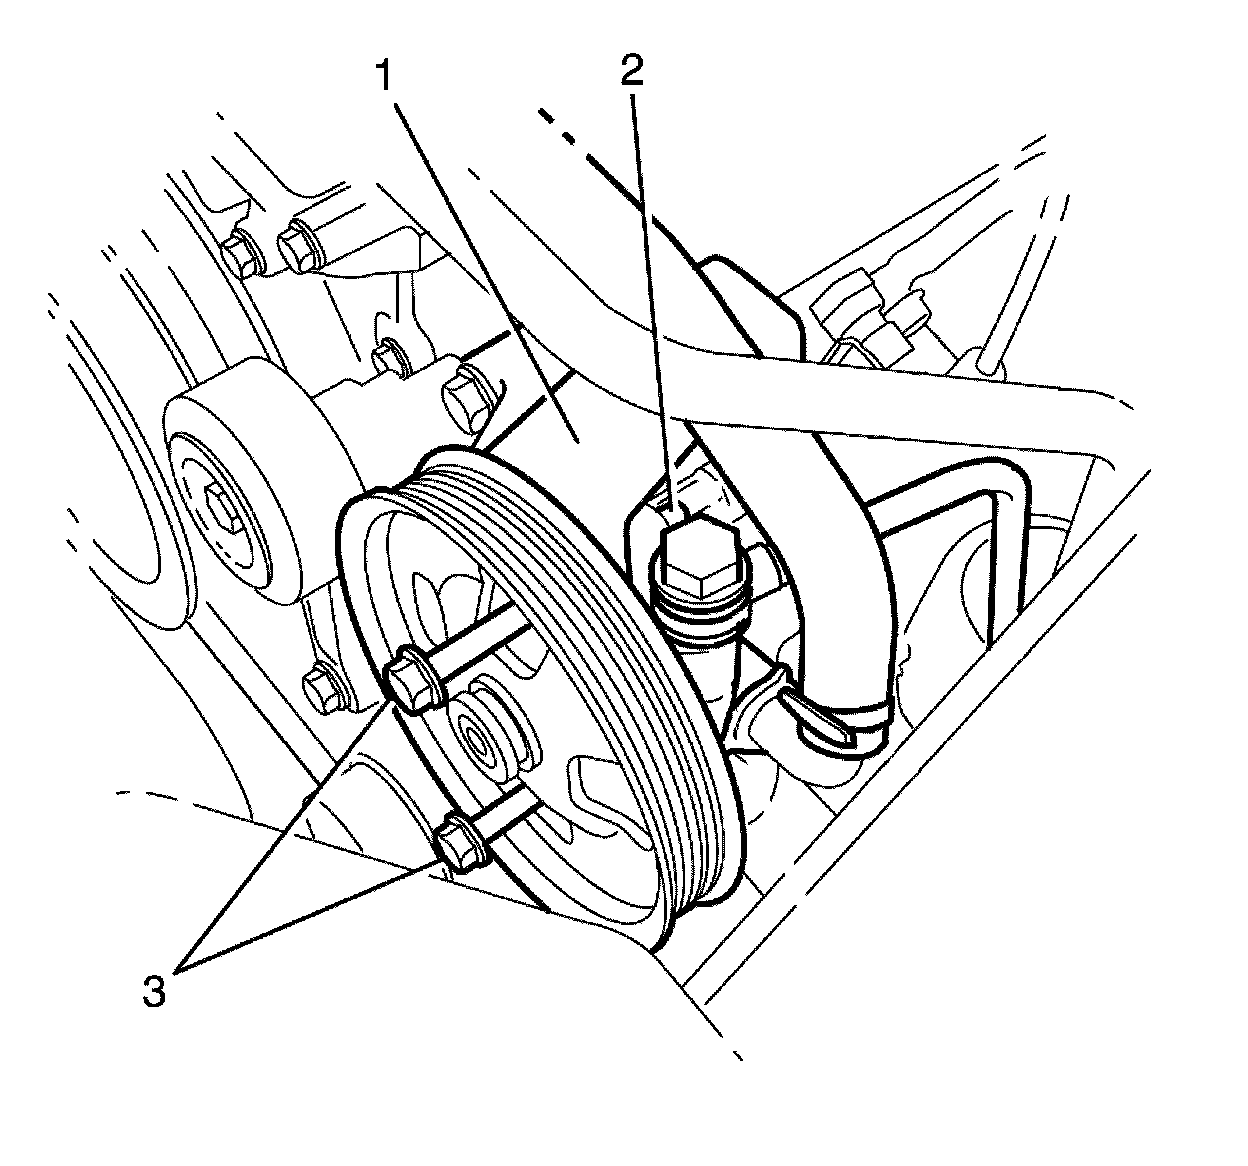
94. Remove the power steering pump (2) to power steering pump bracket retaining bolts (3) and position the power steering pump (2) away from the power steering pump bracket (1).
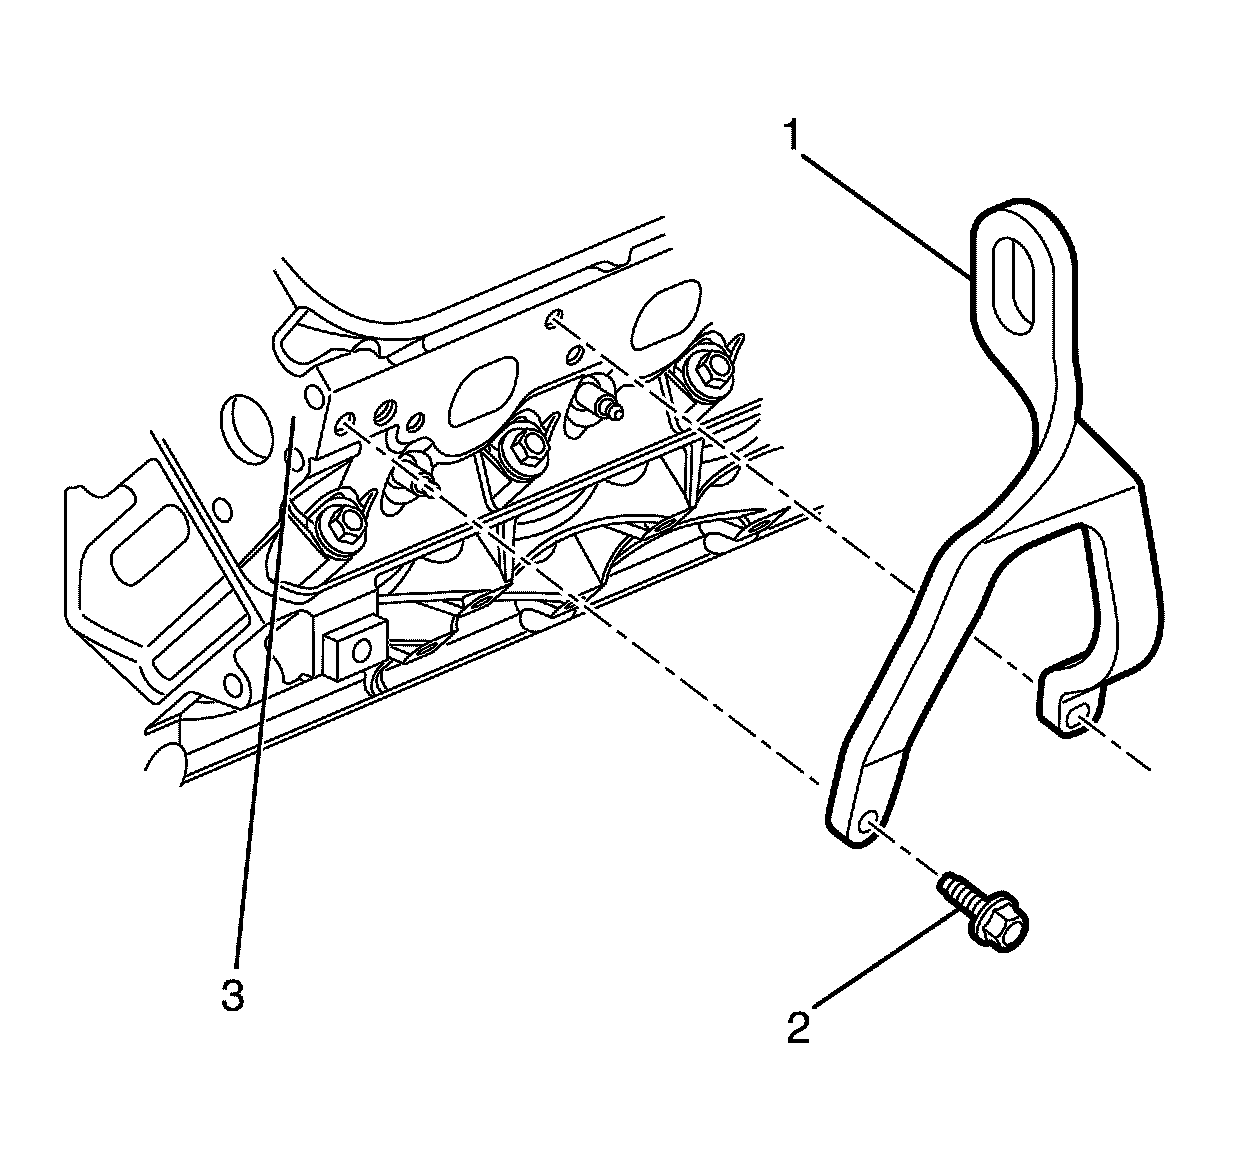
95. Position the J 41798 - engine lift brackets (1) on the cylinder head (3).
Caution: Refer to Fastener Caution Fastener Caution.
96. Install the J 41798 - engine lift brackets to cylinder head retaining bolts (2).
Tighten the bolts to 50 Nm (36 lb ft).
97. Attach a suitable lifting chain and hooks to the engine lifting brackets (1).
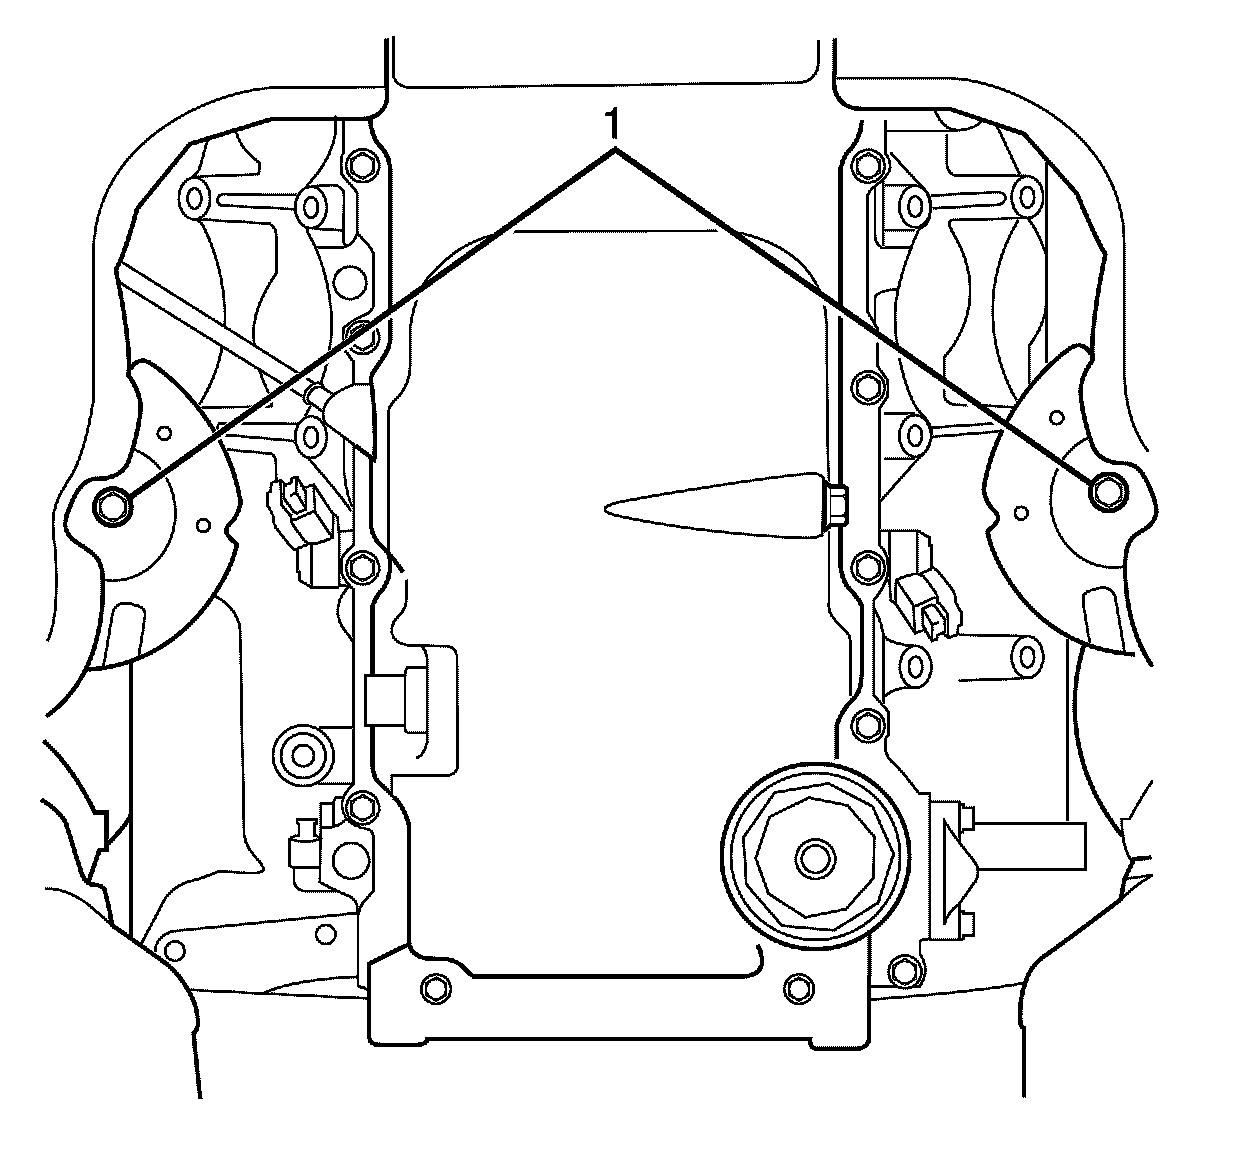
98. Remove the lower engine mount to front subframe retaining nut (1) from both engine mounts.
99. Using a suitable lifting crane, raise the engine to clear the engine mount stud.
100. Remove the engine from the subframe.
If required mount the engine on a suitable engine stand.
101. Remove the left side spark plug leads. Refer to Spark Plug Wire Replacement Service and Repair.
102. Remove the left side spark plugs from the cylinder head. Refer to Spark Plug Replacement Service and Repair.
Warning: Refer to Exhaust Service Warning Exhaust Service Warning.
Warning: Refer to Protective Goggles and Glove Warning Protective Goggles and Glove Warning.
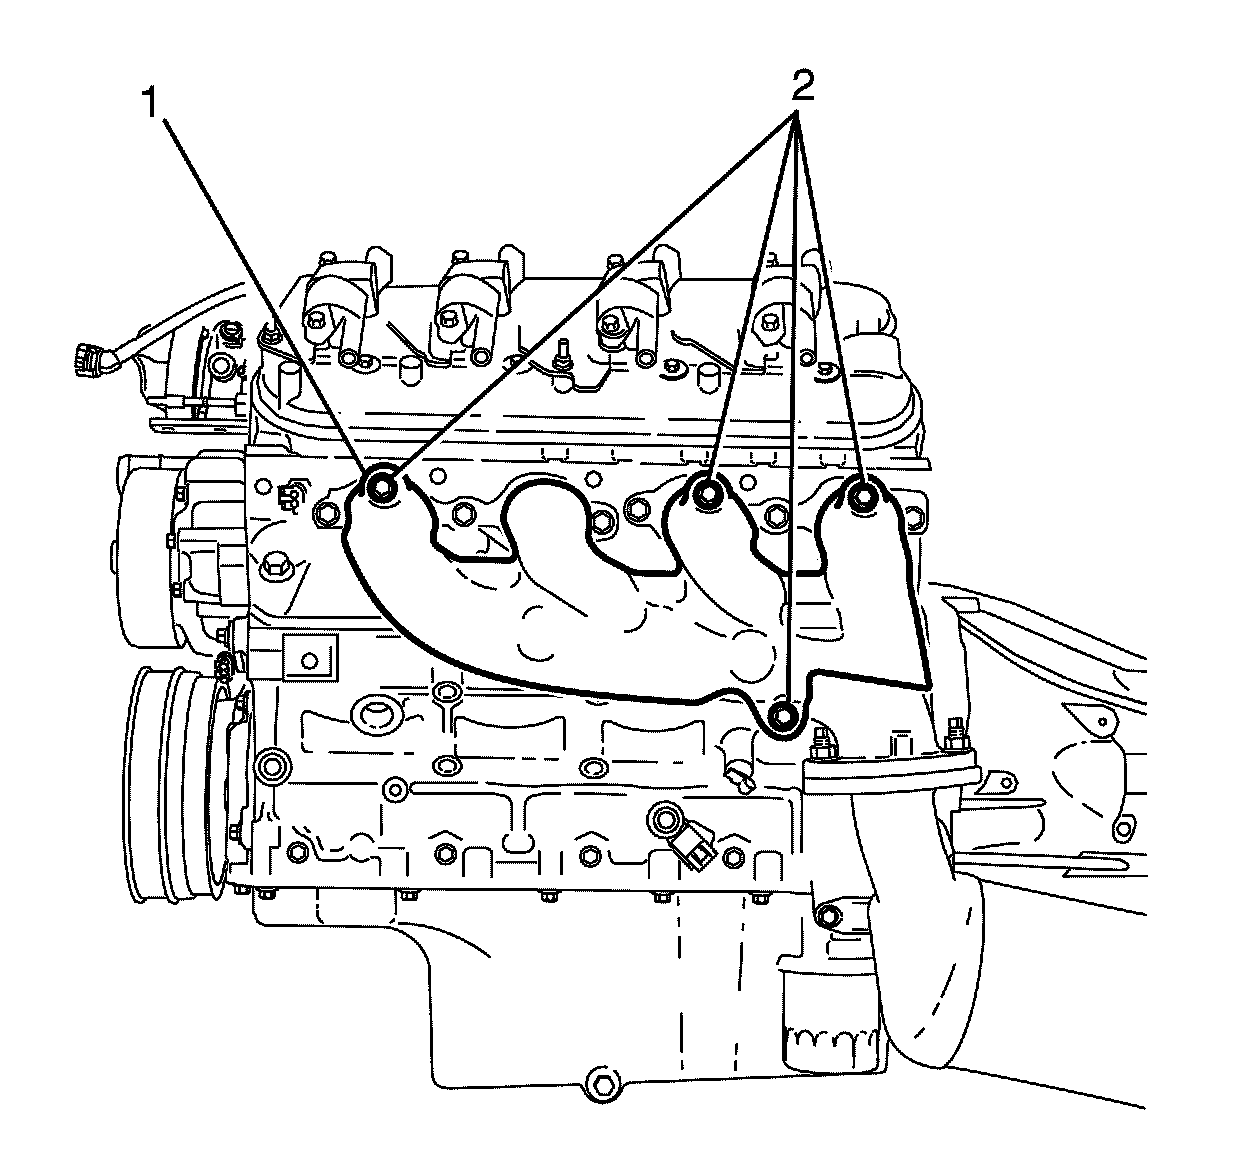
103. Remove the left side exhaust manifold heat shield to left side exhaust manifold retaining bolts (2).
104. Remove the left side exhaust manifold heat shield (1).
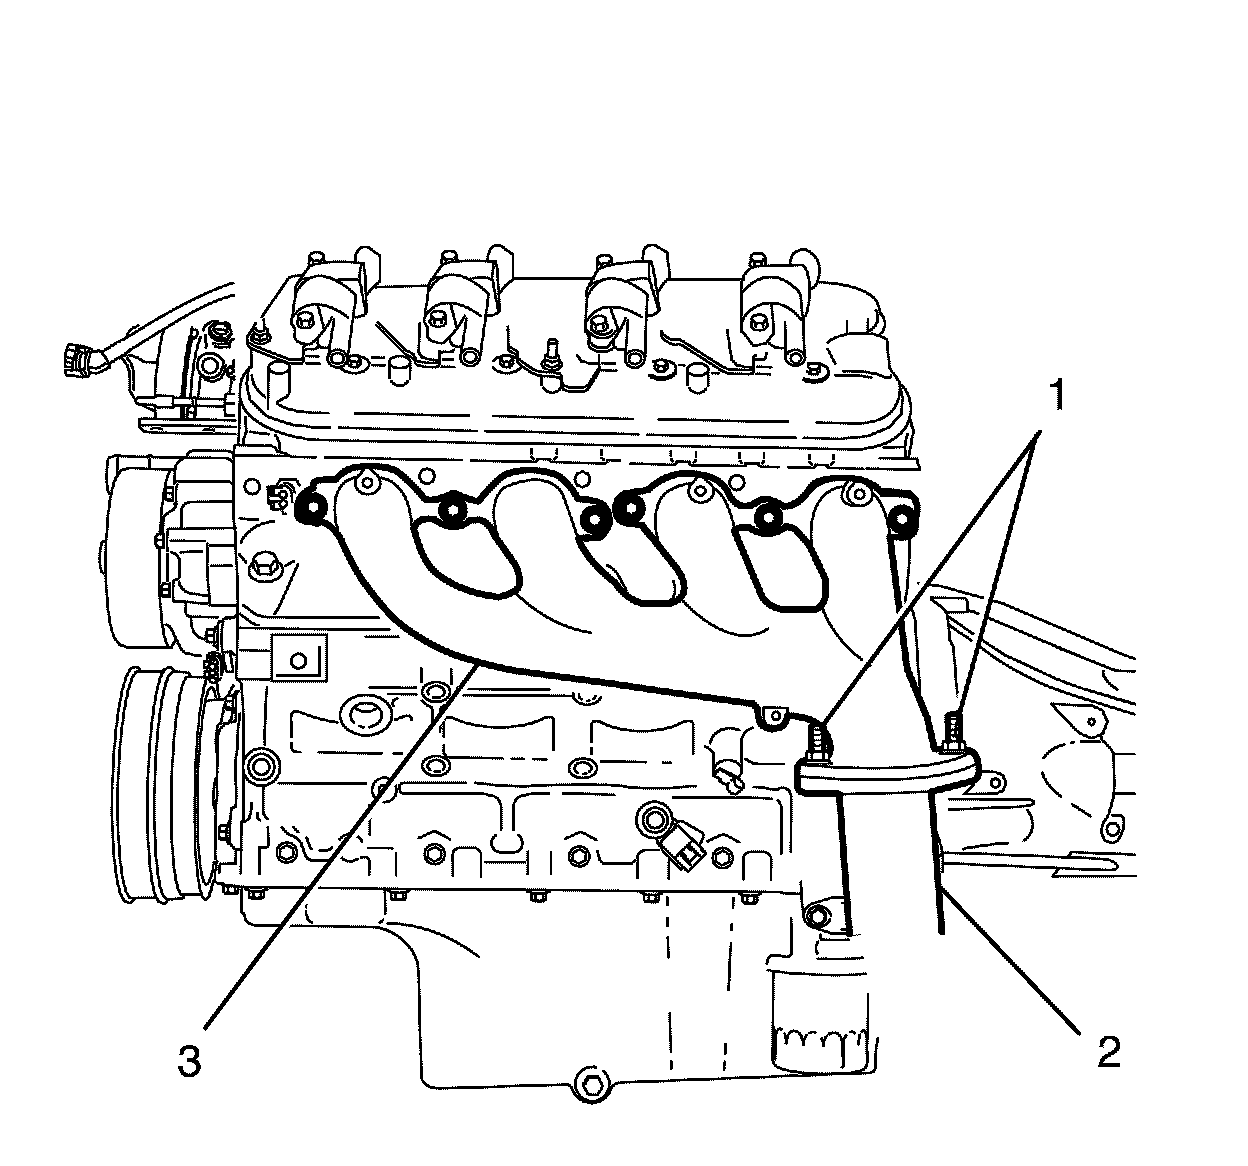
Note: The left side catalytic converter to exhaust manifold retaining nuts (1) are single use parts. They must be discarded after removal.
105. Remove the left side catalytic converter to exhaust manifold retaining nuts (1).
Discard the nuts.
106. Disconnect the left side catalytic converter (2) from the exhaust manifold (3).
Discard the gasket.
107. Remove the right side spark plug leads. Refer to Spark Plug Wire Replacement Service and Repair.
108. Remove the right side spark plugs from the cylinder head. Refer to Spark Plug Replacement Service and Repair.
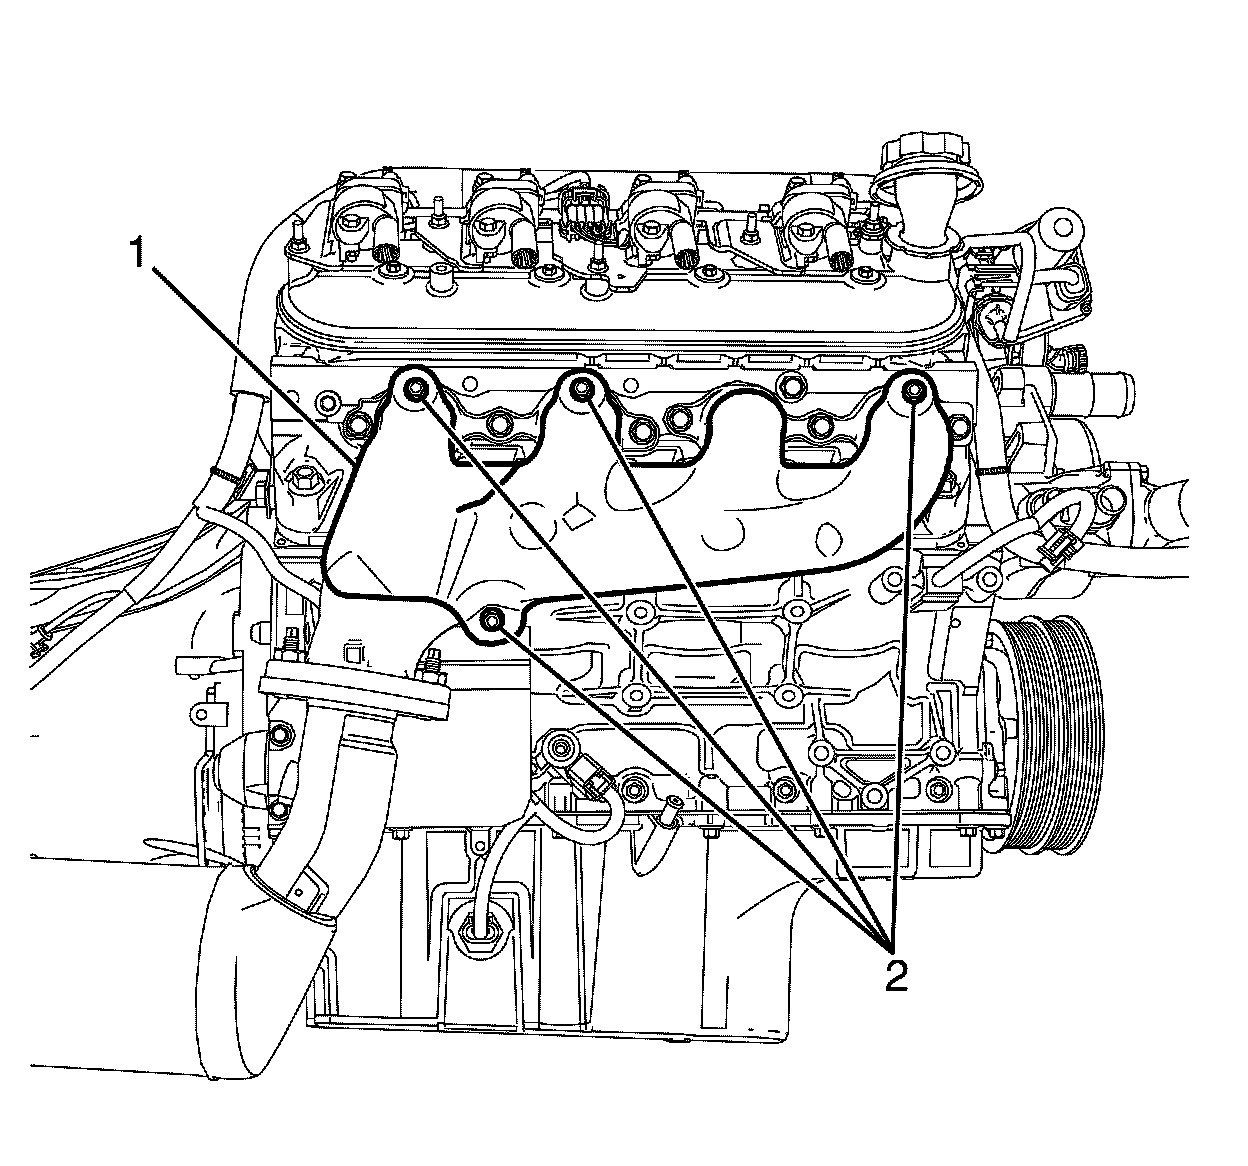
Warning: Refer to Exhaust Service Warning Exhaust Service Warning.
Warning: Refer to Protective Goggles and Glove Warning Protective Goggles and Glove Warning.
109. Remove the right side exhaust manifold heat shield to right side exhaust manifold retaining bolts (2).
110. Remove the right side exhaust manifold heat shield (1).
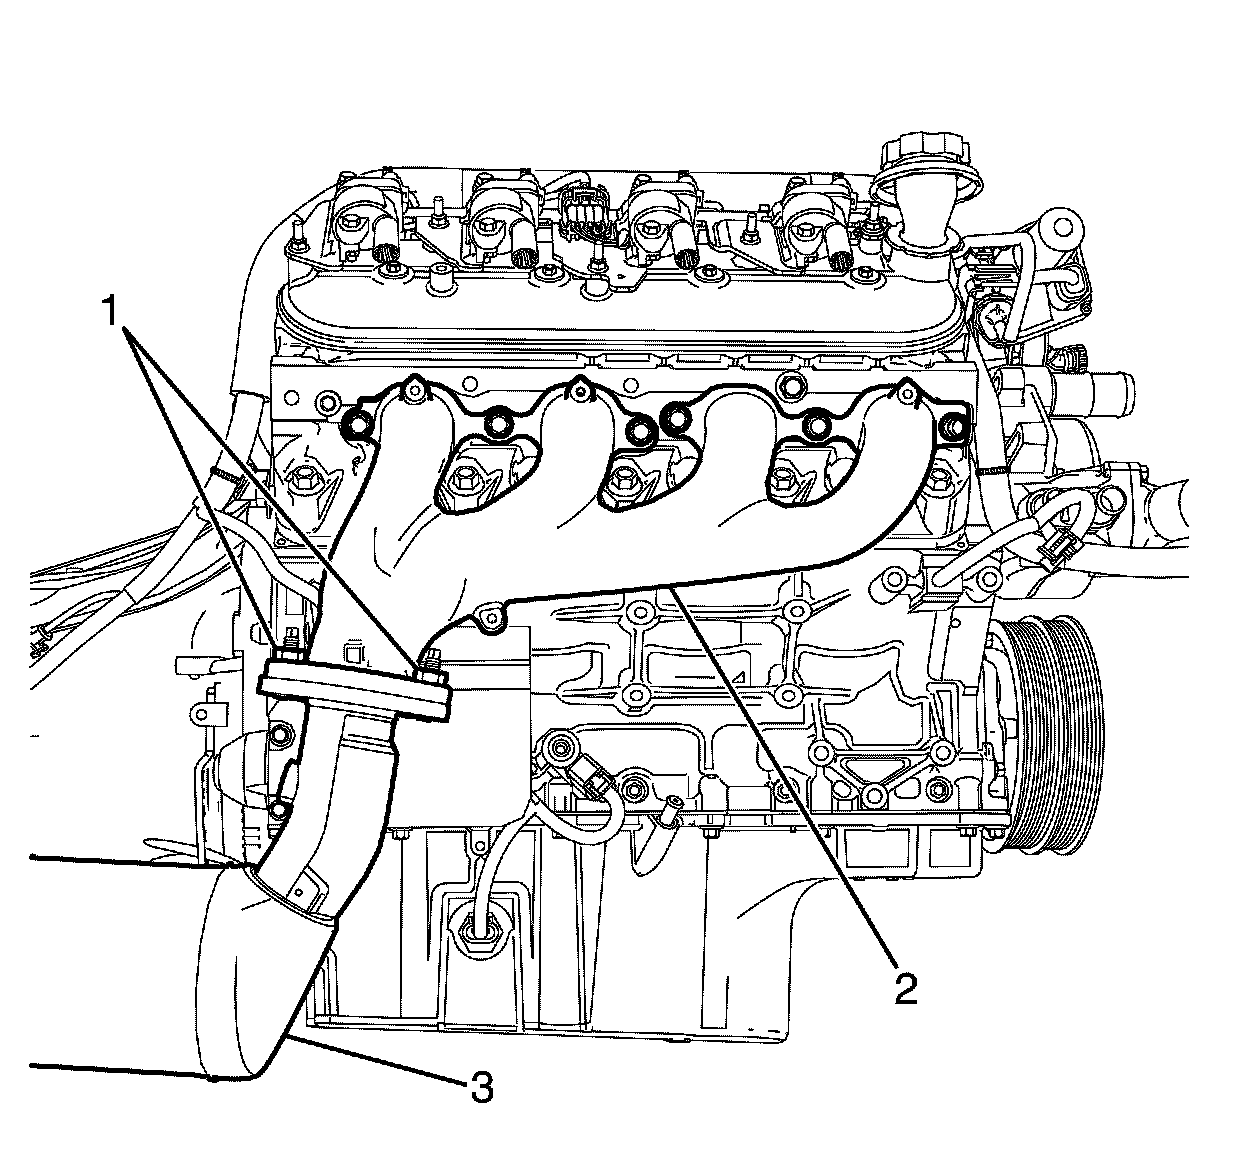
Note: The right side catalytic converter to exhaust manifold retaining nuts (1) are single use parts. They must be discarded after removal.
111. Remove the right side catalytic converter to exhaust manifold retaining nuts (1).
Discard the nuts.
112. Disconnect the right side catalytic converter (3) from the exhaust manifold (2).
Discard the gasket.
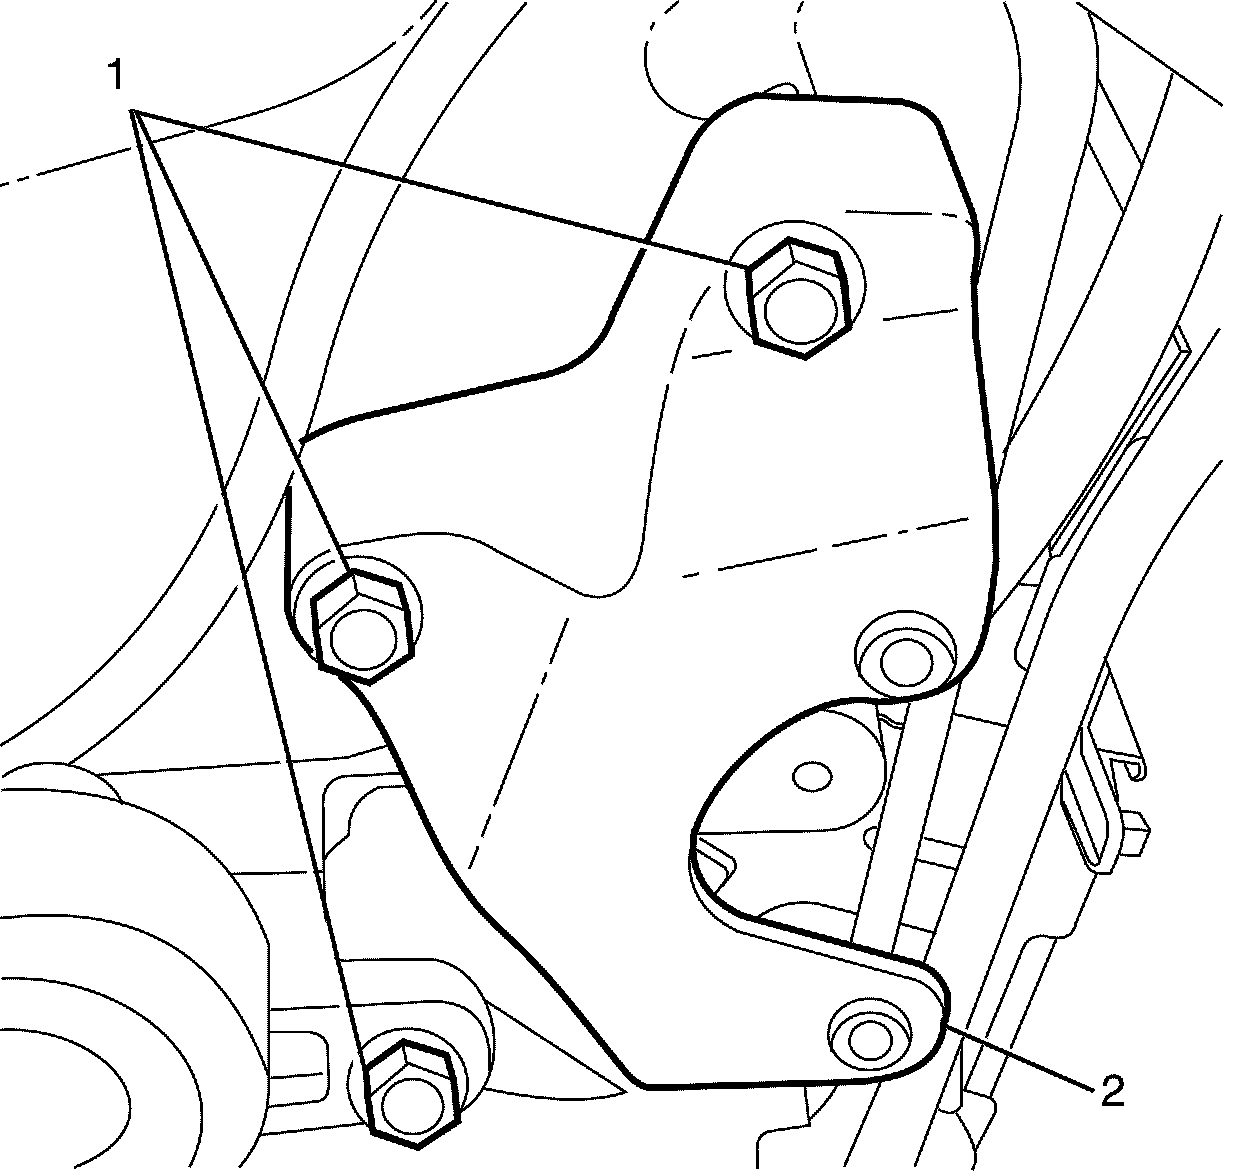
113. Remove the power steering pump bracket to engine retaining bolts (1).
114. Remove the power steering pump bracket (2).
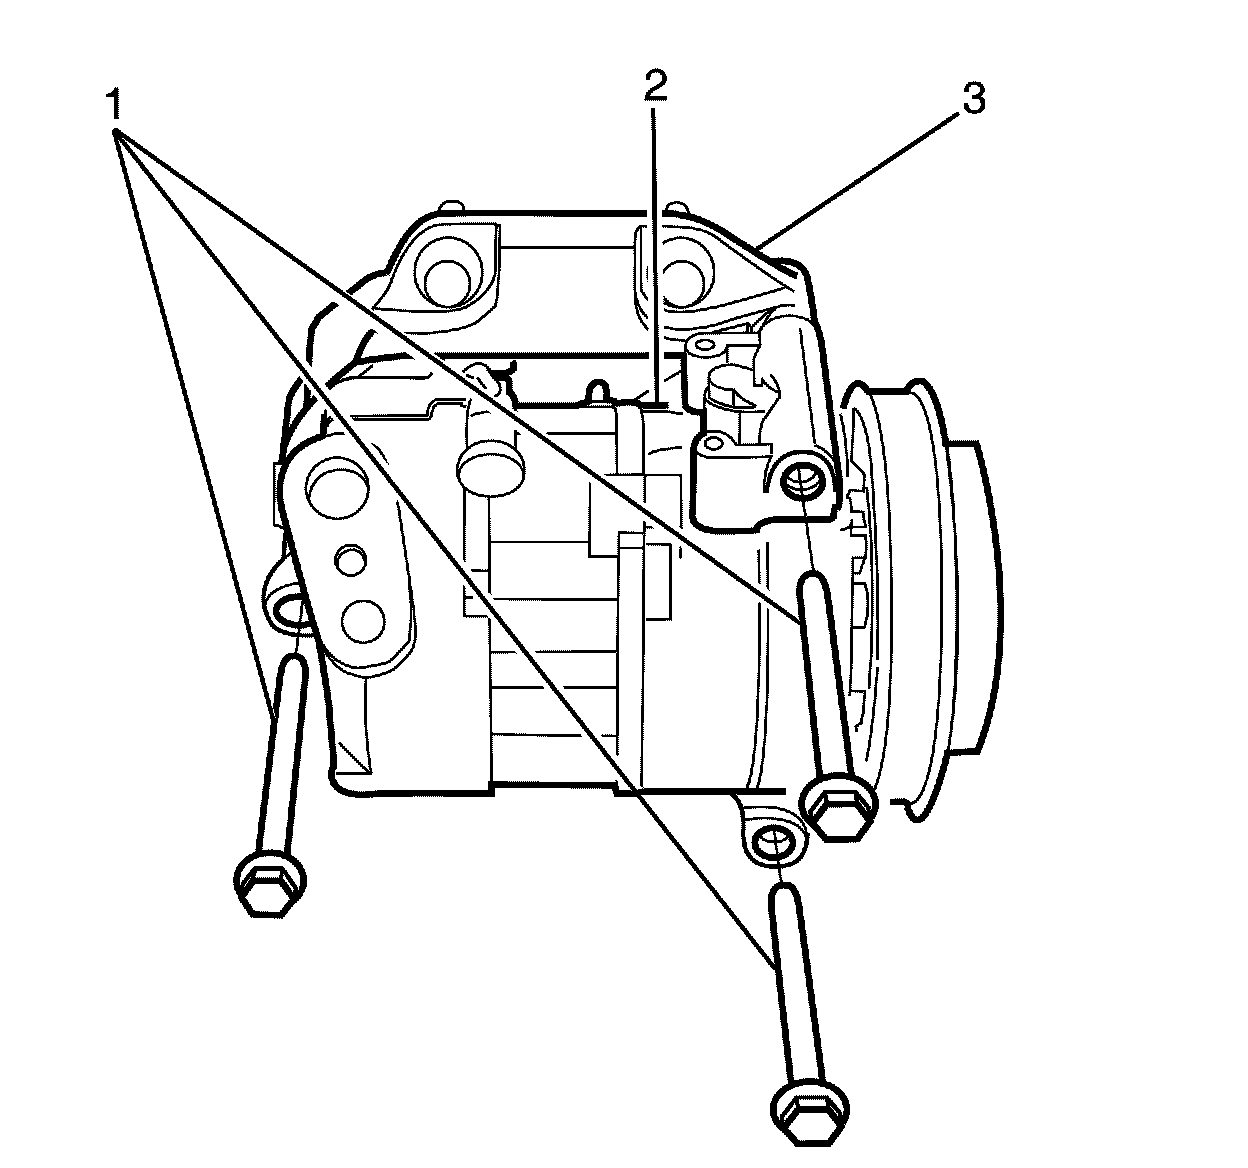
115. Remove the compressor to A/C compressor mounting bracket retaining bolts (1).
116. Remove the compressor (2) to the A/C compressor bracket (3).
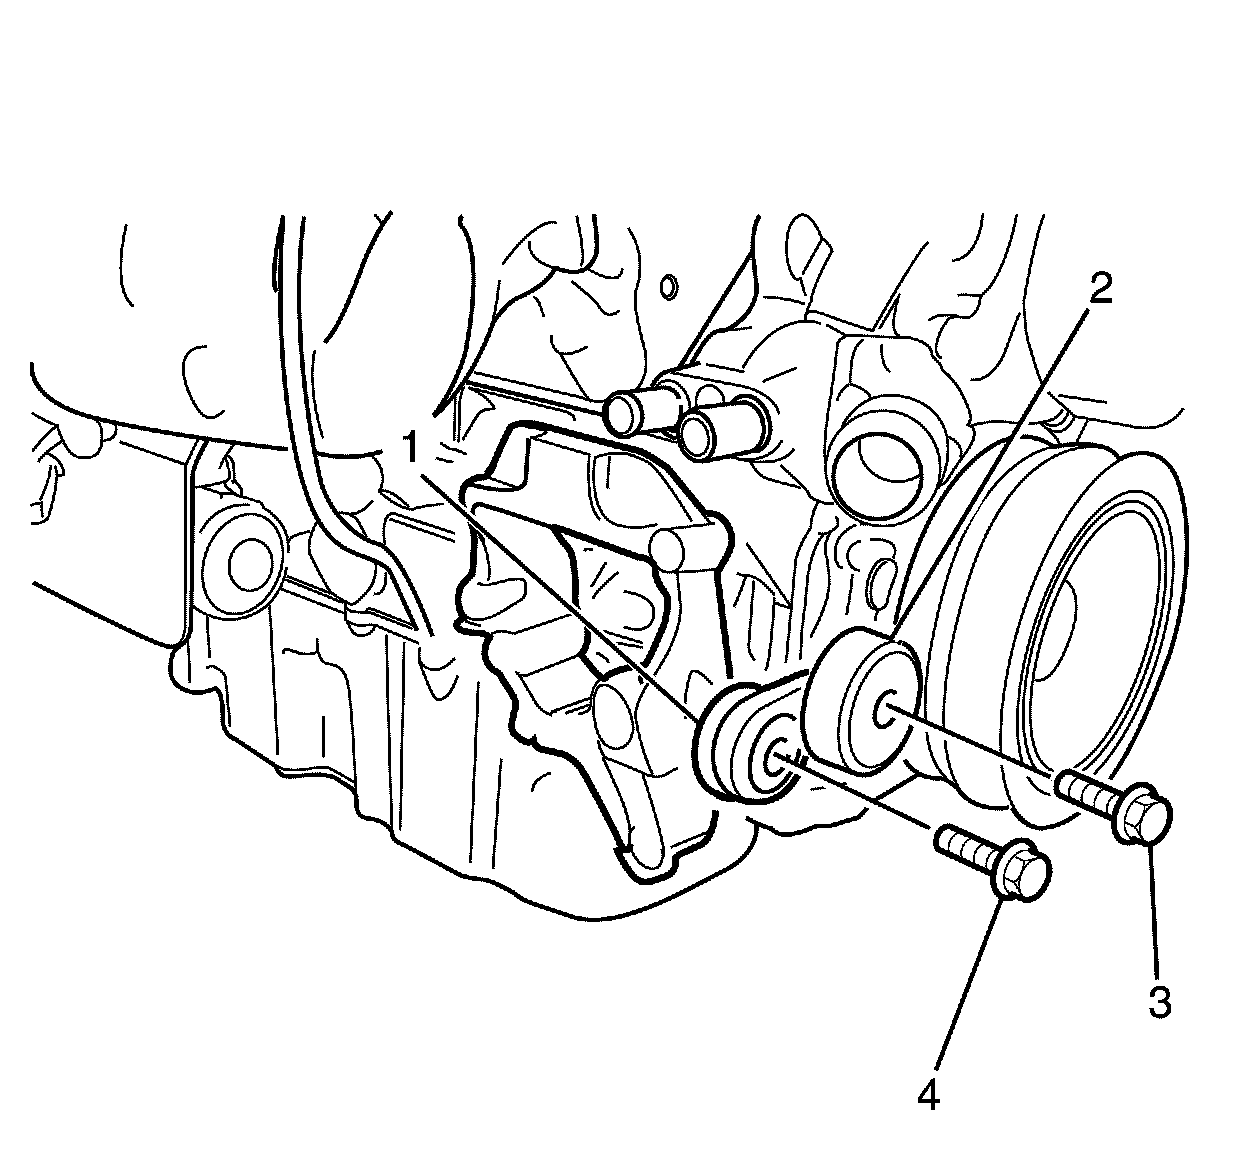
117. Remove the A/C tensioner pulley to A/C tensioner retaining bolt (3).
118. Remove the A/C tensioner pulley (2).
119. Remove the A/C drive belt tensioner to A/C compressor bracket retaining bolt (4).
120. Remove the A/C drive belt tensioner (1).
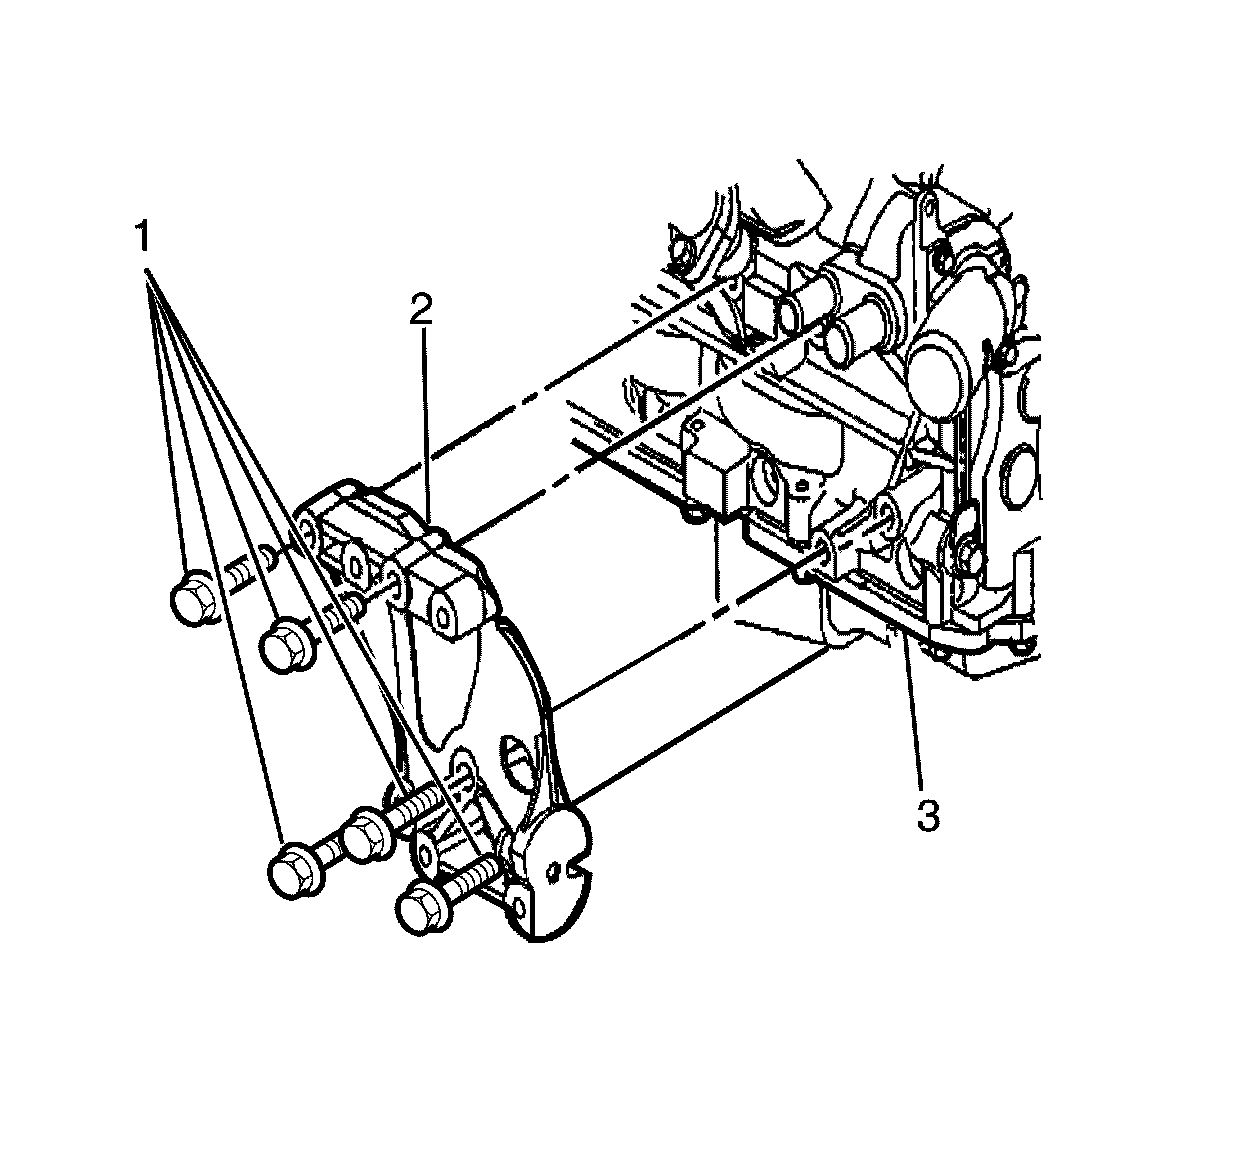
121. Remove the A/C compressor bracket to cylinder head retaining bolts (1).
122. Remove the A/C compressor bracket (2).
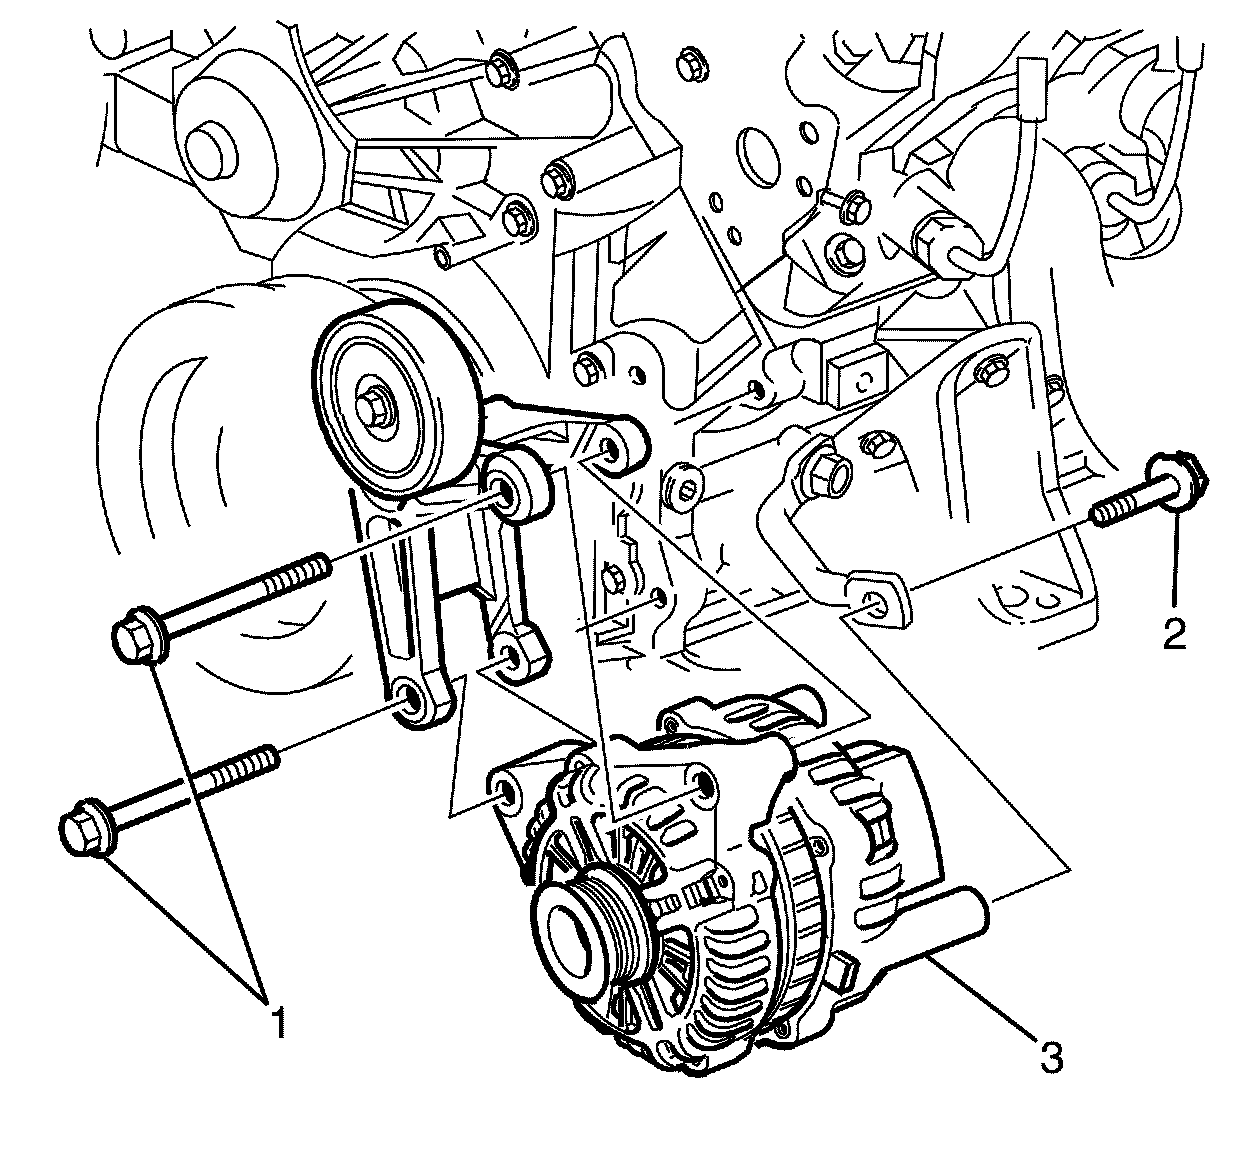
123. Remove alternator to alternator bracket retaining bolts (1 and 2).
124. Remove the alternator (3) from the alternator bracket.
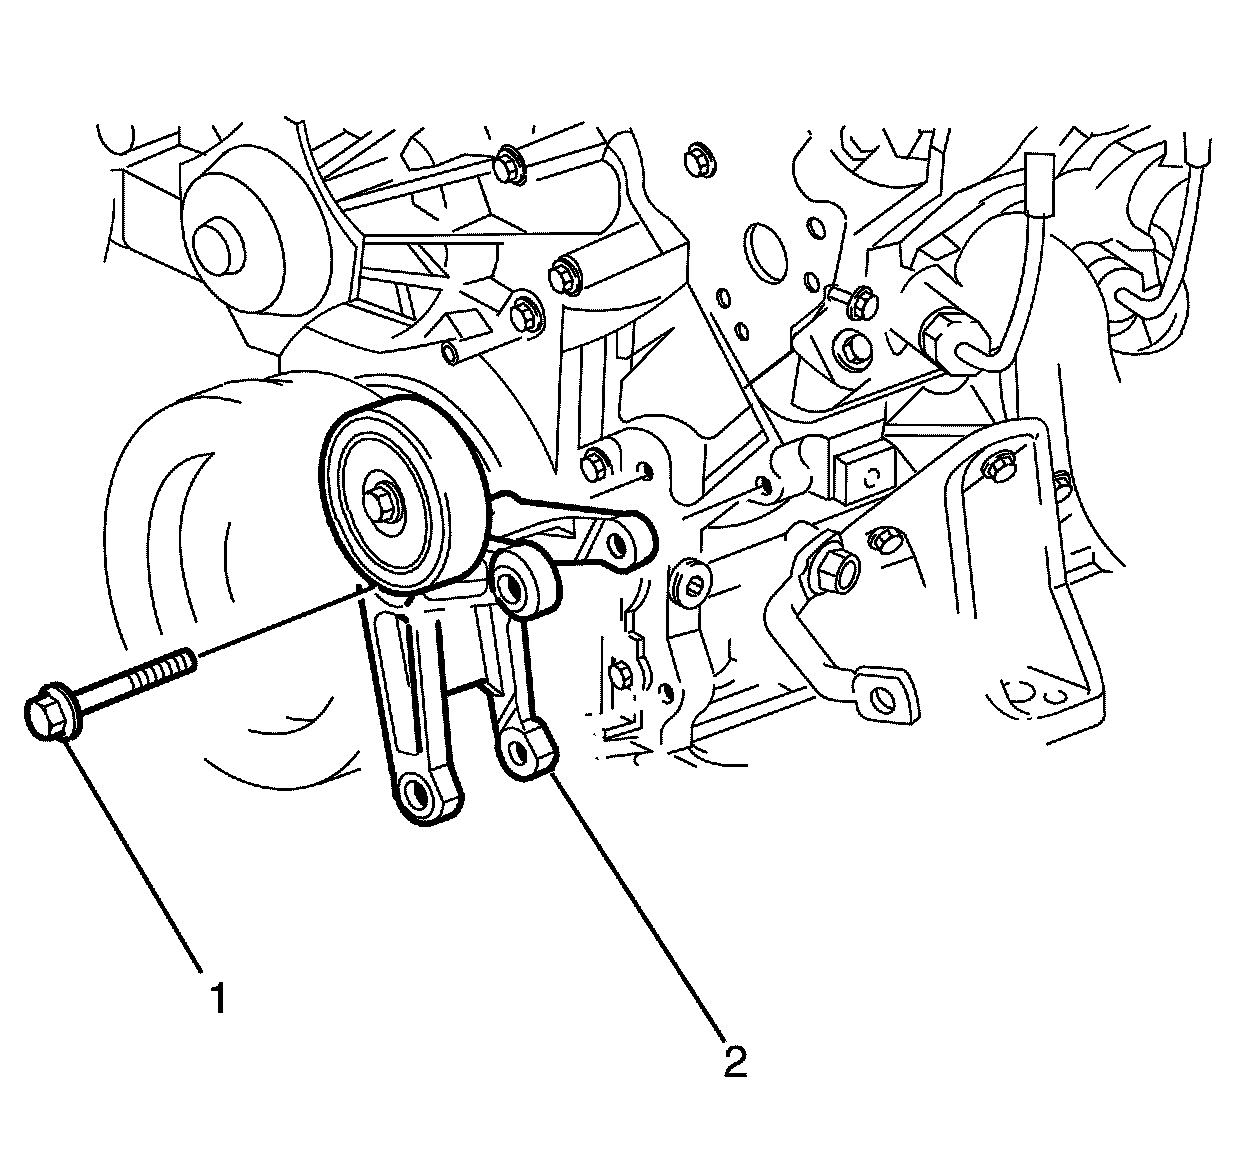
125. Remove the alternator bracket to engine block retaining bolt (1).
126. Remove the alternator bracket (2) from the engine.
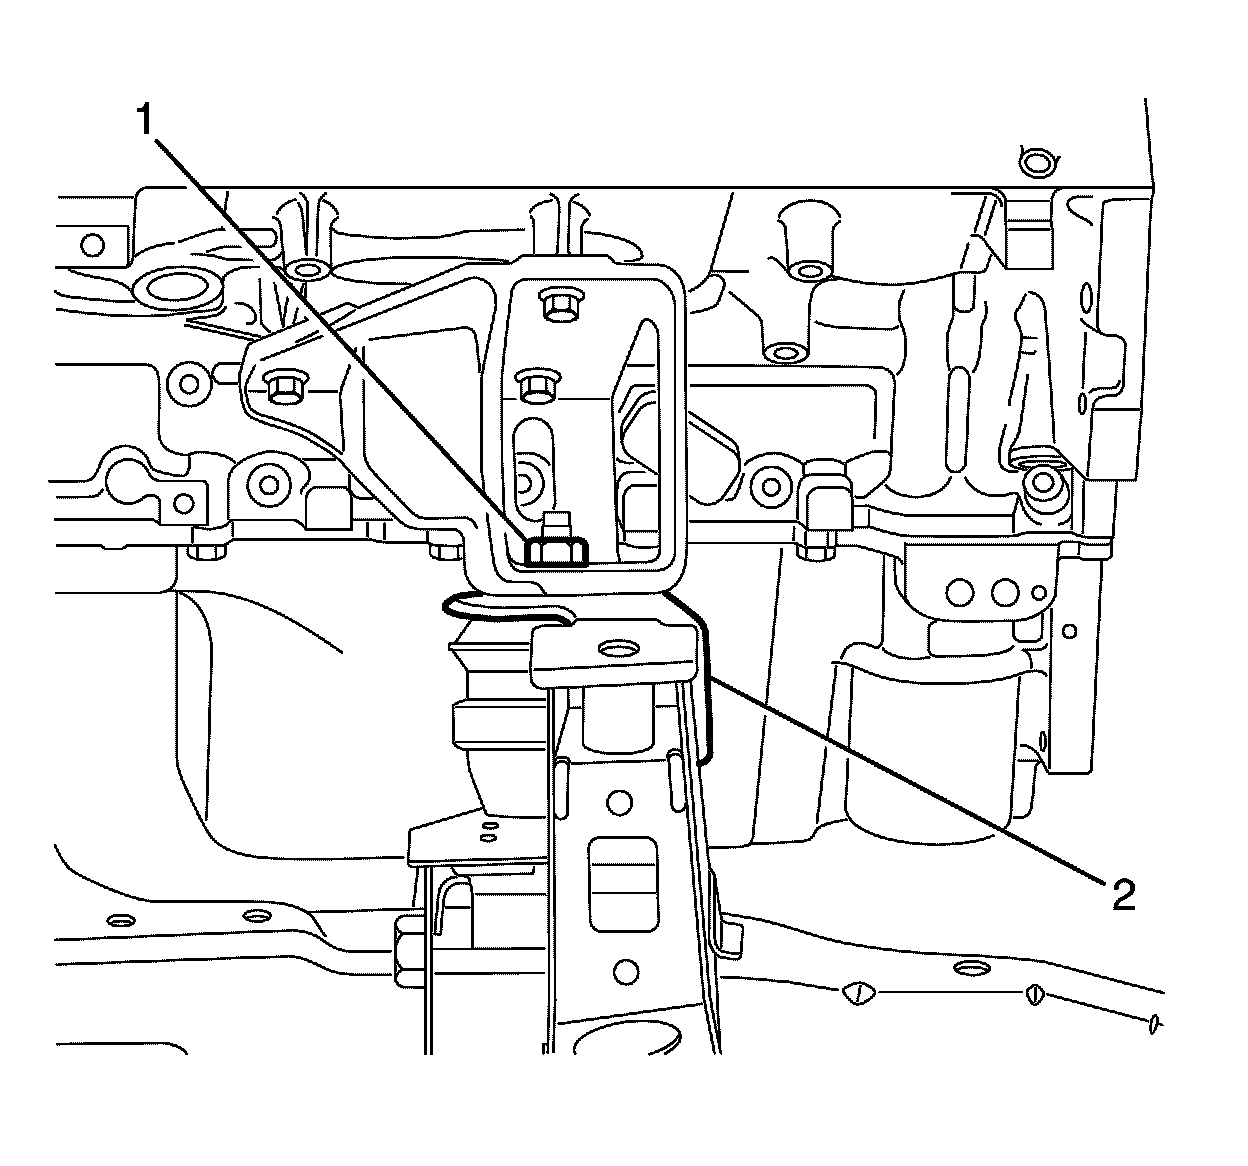
Note: DO NOT bend or distort the left side engine mount heat shield (2).
127. Remove the left side engine mount to engine mount bracket retaining nut (1).
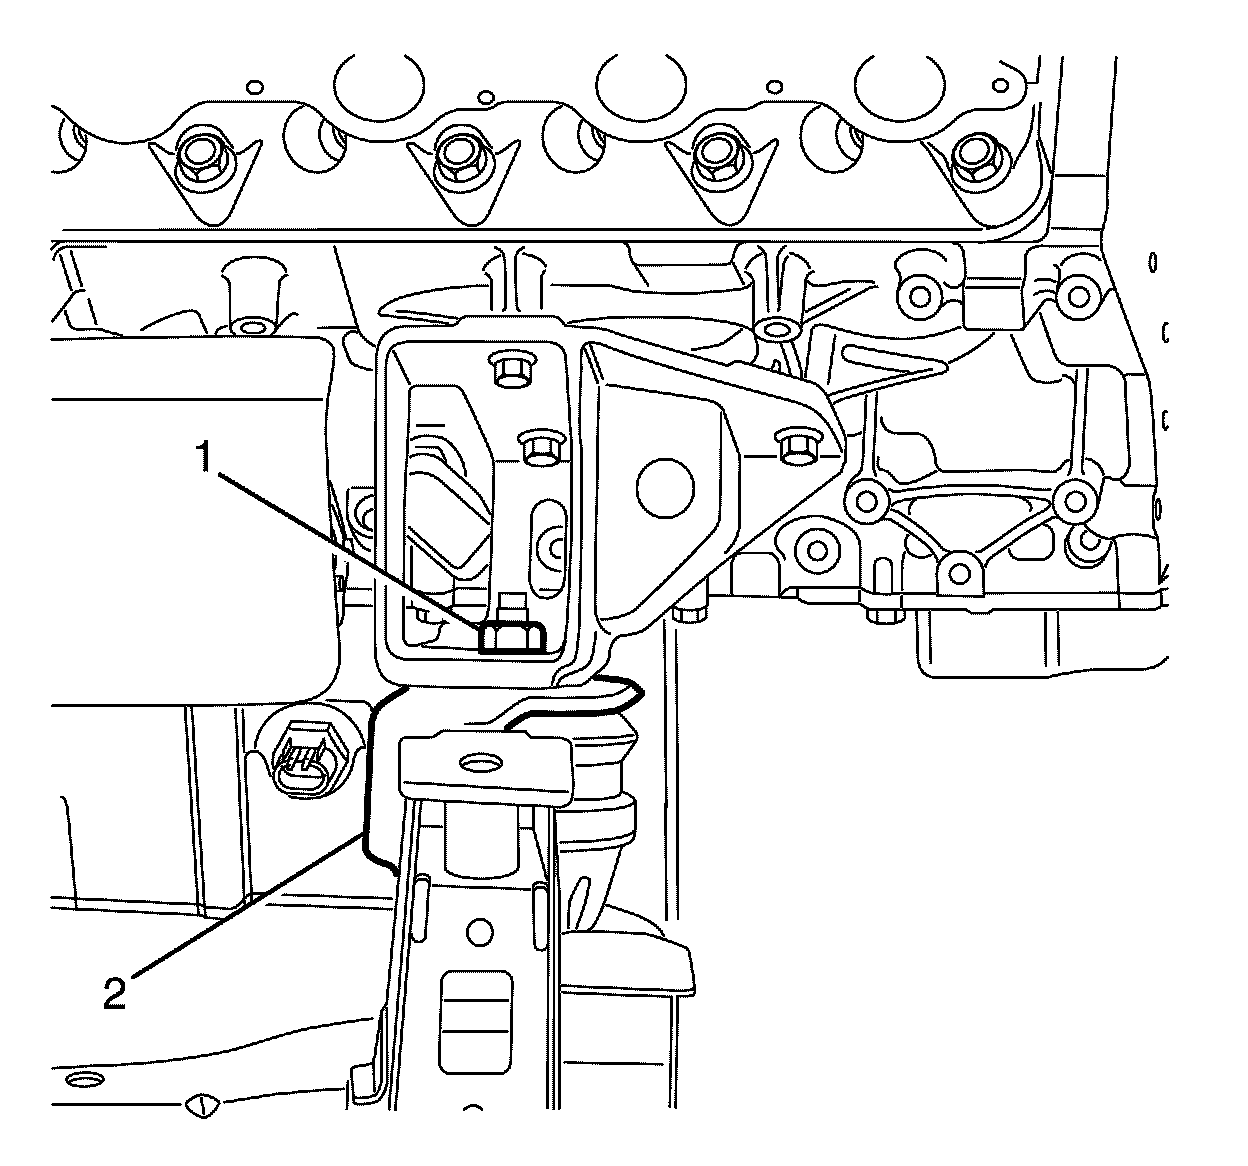
Note: DO NOT bend or distort the right side engine mount heat shield (2).
128. Remove the right side engine mount to engine mount bracket retaining nut (1).
129. Attach a suitable lifting chain and hooks to the 2 J 41798 - engine lift brackets.
130. Using a suitable lifting crane, remove the engine from the subframe.
If required, mount engine to a suitable engine stand.
131. Remove the lifting equipment as required.
Installation Procedure
Caution: Refer to Fastener Caution Fastener Caution.
Note: DO NOT bend or distort the left side engine mount heat shield.
1. Install the left side engine mount to engine mount bracket retaining nut (1)
Tighten the nut to 80 Nm (59 lb ft).