Timing Mechanism Drive Chain Overview
Timing Mechanism Drive Chain Overview
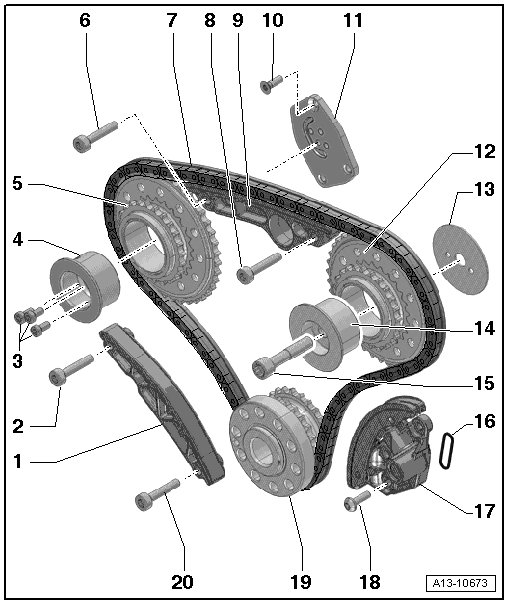
1 Guide Rail
2 Bolt
• 10 Nm plus an additional 90° turn
• Replace
3 Bolts
• 5 Nm plus an additional 60° turn
• Replace
4 Pivot Pin for Drive Sprocket
5 Drive Sprocket for Left Timing Chain
6 Bolt
• 10 Nm plus an additional 90° turn
• Replace
7 Power Take-Off Drive Chain
• Mark the running direction with paint for reinstallation
• Removing and installing, refer to => [ Timing Mechanism Drive Chain ] Timing Mechanism Drive Chain
8 Bolt
• 10 Nm plus an additional 90° turn
• Replace
9 Guide Rail
10 Bolt
• 8 Nm plus an additional 45° turn
• Replace
11 Drive Chain Sprocket Bearing Plate
• For the right camshaft timing chain
• Asymmetrical version
12 Drive Sprocket for Right Timing Chain
• Installed position, refer to => [ Installation Location of the Mounting Pins for the Right Camshaft Timing Chain Drive Sprocket ]
13 Thrust Washer
• asymmetrical version
• Installed position, refer to => [ Installation Location of the Mounting Pins for the Right Camshaft Timing Chain Drive Sprocket ]
14 Pivot Pin for Drive Sprocket
• Asymmetrical version
• Installed position, refer to => [ Installation Location of the Mounting Pins for the Right Camshaft Timing Chain Drive Sprocket ]
15 Bolt
• 30 Nm plus an additional 90° turn
16 Gasket
• Replace
17 Chain Tensioner
• Removing and installing, refer to => [ Timing Mechanism Drive Chain ] Timing Mechanism Drive Chain
18 Bolt
• 9 Nm
19 Crankshaft
20 Bolt
• 10 Nm plus an additional 90° turn
• Replace
Installation Location of the Mounting Pins for the Right Camshaft Timing Chain Drive Sprocket
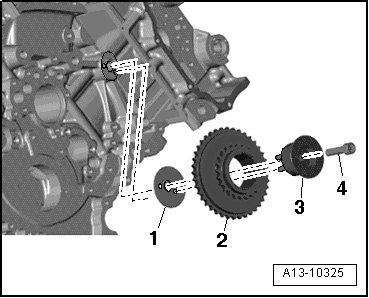
• The alignment bushings in the right camshaft timing chain drive sprocket mounting pins - 3 - must engage in the holes in the thrust washer - 1 - and cylinder block.
2 Right camshaft timing chain drive sprocket
4 Bolt