Compressor Belt Pulley, Version 2
Compressor Belt Pulley, Version 2
• If overload safeguard of pulley triggers, check compressor for ease of motion before replacing the pulley, replace it completely if compressor moves with resistance.
• The function of overload protection for pulley is described in for example, Self Study Program No. 240; Audi A2 Technical.
• To remove belt pulley, it depends on engine version if it is necessary to remove compressor from engine, refer to => [ Compressor, Removing and Installing on Bracket ] Compressor, Removing and Installing on Bracket.
• The compressor can be removed and installed at the bracket without opening the refrigerant lines.
• Currently, the A/C compressor with belt pulley version 2 is installed in vehicles with 6 cylinder gasoline engine. Refer to Electronic Parts Catalog.
• On vehicles with a 6 cylinder engine, the compressor can be removed and installed at the bracket without opening the refrigerant lines. Refer to => [ Compressor, Removing and Installing on Bracket ] Compressor, Removing and Installing on Bracket.
• Mark direction of rotation of ribbed belt using chalk or felt-tip marker before removing. Running a used belt in the opposite direction could destroy it.
• Depending on the engine and the country, different A/C compressors are installed (6 or 8 cylinder gasoline or diesel engines). Refer to the Electronic Parts Catalog.
• Depending on the version of the engine, it may be necessary to bring the lock carrier - C - into the service position (pulled approximately 10 cm forward) so there is enough space to remove the belt pulley. Radiator Support
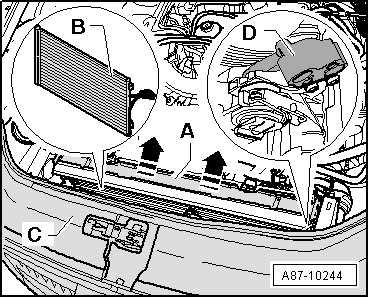
Belt Pulley, Removing
- Remove the noise insulation.
- Move the lock carrier - C - into the service position (for example, on a 12-cylinder TDI engine). Radiator Support
- Release tension on ribbed belt and remove it.
- If necessary, remove the power steering pump (only on vehicles with a 6 cylinder gasoline engine).
- Remove bolt - A - (tightening torque 20 Nm).
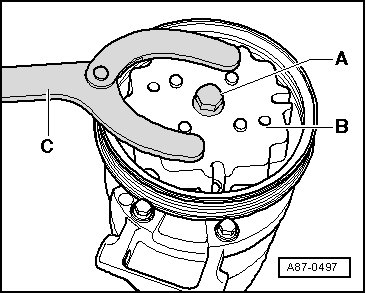
• To loosen and tighten bolt - A -, counter-hold it at drive plate - B - using a commercially available pin wrench - C - (pin diameter 5.0 mm).
• Bolt - A - is to be replaced (because of locking compound).
• Clean thread in compressor shaft before inserting new bolt.
• If the belt pulley cannot be removed while the A/C compressor is installed, loosen the A/C compressor from the engine (only on 6 cylinder vehicles). Refer to => [ Compressor, Removing and Installing on Bracket ] Compressor, Removing and Installing on Bracket.
- Carefully and uniformly pry off drive plate - A - using 2 screwdrivers - B -.
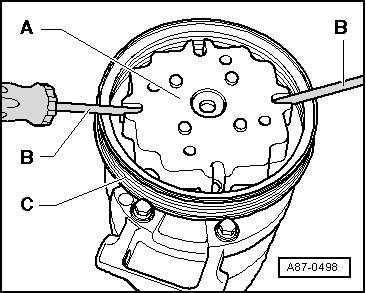
• Make sure that the collar for pulley - C - is not damaged when prying off drive plate - A -.
• There are different versions of the belt pulley - C - and the drive plate - A -. Pay attention to the exact allocation. Refer to the Electronic Parts Catalog.
- Remove circlip - A -.
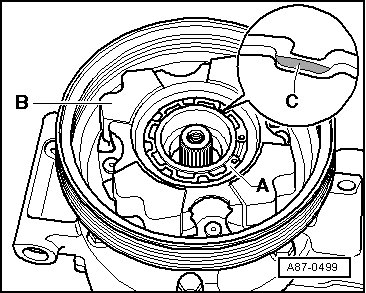
- Remove pulley - B -.
Belt Pulley, Installing
Installation is carried out in the reverse order while noting the following:
• Replace circlip - A -.
• When installing circlip - A -, note that it cannot be bent open more than is necessary for installation.
• Insert circlip - A - on proper side, the side with beveled insertion edge - C - faces away from compressor (install flat side facing compressor).
• Make sure the locking ring fits correctly into the groove on the A/C compressor flange.
• Clean compressor flange before fitting the pulley on, pulley must be able to be fitted easily. (fitting must be possible without much force).