Power Output Module 3, Right and Left Headlamp
Power Output Module 3, Right and Left Headlamp
Danger of causing damage to the vehicle electronics.
• Requirement: Make sure nothing, especially metal or other light weight particles, can get into the headlamp housing.
• Make sure also no oil, grease, silicone or other such materials can get into an open headlamp, otherwise they can turn into steam and fog up the headlamp.
• Touching electronic circuits with bare hands can lead to migration.
• ESD (electrostatic discharge) protection: Always follow DIN EN 613-40-5-1 when handling.
• Do not use any components or electronics that have fallen down.
• ESD work surface (VAS 6613).
Removing
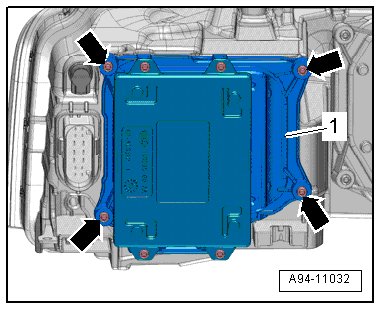
- Remove headlamp housings, refer to => [ Headlamp Housing ] Headlamp Housing.
- Remove the screws - arrows - diagonally.
- Remove the housing cover - 1 - from the headlamp housing.
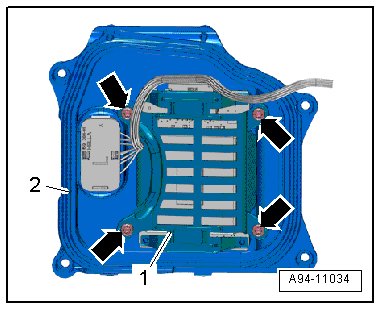
- Remove the screws - arrows - and the frame - 1 - from the housing cover.
- Remove the power output stage - 2 - from the housing cover - 3 -.
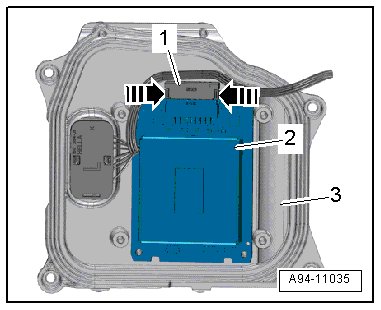
- Press the release buttons - arrows - and disconnect the connector - 1 -.
Installing
• For the correct tightening specification, refer to => [ LED Headlamp Overview ] LED Headlamp Overview and => [ Housing Cover With Power Output Stage 1 For Led Headlamps - Tightening Specification and Sequence ] LED Headlamp Overview.
Install in reverse order of removal, observing the following:
- Close the housing cover and tighten the bolts.
- Install the headlamp housing, refer to => [ Headlamp Housing ] Headlamp Housing.