Front Center Console Assembly Overview
Front Center Console Assembly Overview
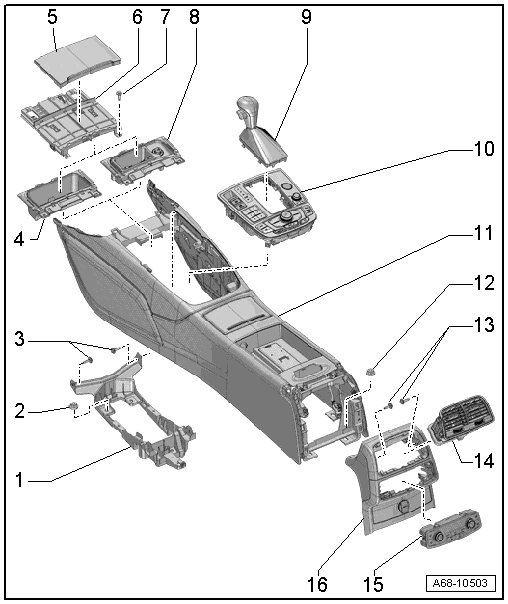
1 Bracket
• For the center console
• Removing and Installing, refer to => [ Center Console Front Bracket ] Center Console Front Bracket
2 Nut
• Quantity: 4
3 Bolt
• Quantity: 4
• 3 Nm
4 Storage compartment
• Removing and Installing, refer to => [ Front Ashtray/Storage Compartment ] Front Ashtray/Storage Compartment
5 Trim
• For the front ashtray/storage compartment
• Attach trim to the cover and press on it until it audibly engages
• Removing and Installing, refer to => [ Front Ashtray/Storage Compartment Cover Trim ] Front Ashtray/Storage Compartment Cover Trim
6 Cover
• For the front ashtray/storage compartment
• Removing and Installing, refer to => [ Front Ashtray/Storage Compartment ] Front Ashtray/Storage Compartment
7 Bolt
• Quantity: 2
• 3 Nm
8 Front ashtray
• Removing and Installing, refer to => [ Front Ashtray/Storage Compartment ] Front Ashtray/Storage Compartment
9 Gearshift lever or selector lever
10 Insert
• For the center console
• Removing and Installing, refer to => [ Center Console Insert ] Center Console Insert
• Replace damaged or deformed clips
• Press the center console insert in until it audibly locks into place.
11 Center Console
• Removing and Installing, refer to => [ Center Console ] Center Console
12 Nut
• Quantity: 2
• 4 Nm
• Tightening specification for vehicles with a center armrest => [ (Item 10) Nut ] Front Center Armrest
13 Bolts
• 3 Nm
14 Rear vent
• Removing and Installing, refer to => [ Rear Vents ] Rear Vents
• Replace damaged or deformed clips
• Press into the installation opening as far as the stop.
15 Rear A/C display control head (E265)
• If equipped
16 Rear cover
• For the center console
• Removing and Installing, refer to => [ Center Console Rear Cover ] Center Console Rear Cover