Front Wheel Drive (FWD)
Subframe Bonded Rubber Bushing
Special tools, testers and auxiliary items required
• Torque wrench (V.A.G 1332)
• Engine-/transmission jack (V.A.G 1383 A) with universal transmission support (V.A.G 1359/2)
• Hydraulic cylinder (VAS 6178)
• Pneumatic/hydraulic foot pump (VAS 6179)
• Shop Crane Drip Tray (VAS 6208)
• Assembly tool (T10205)
• Assembly tool (T10263)
• Assembly tool (T40033)
• Thrust piece (T40141)
• Before replacing malfunctioning bushing, check other bushings as well.
• If cracks, leaks or other damage is visible, this bearing must be replaced too.
Pressing Out Bonded Rubber Bushing, Front
Affects vehicles with Air Suspension
- Place the vehicle on a hoist. Refer to => [ Positioning Vehicle on Hoist and Wheels ] Positioning Vehicle on Hoist and Wheels.
Affects All Vehicles
- Remove wheels.
- Remove left and right wheel house trim.
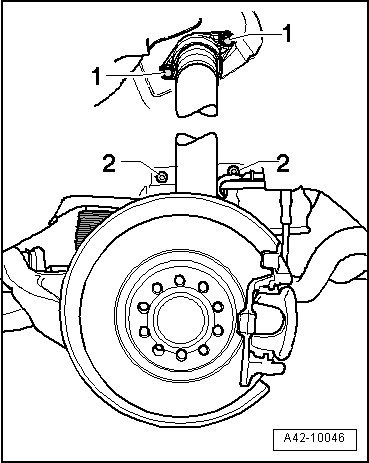
- Remove the bolts - 1 - from left and right shock absorbers.
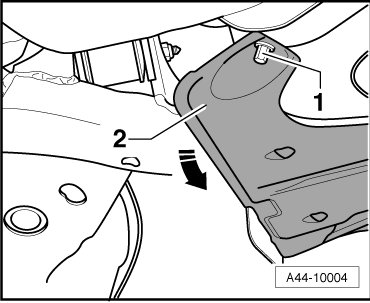
- Remove cover - 2 -.
- Remove rear exhaust system.
Affects Vehicles with Air Suspension
- Remove air spring. Refer to => [ Air Spring ] Air Spring.
Applies to Vehicles with Coil Spring Suspension
- Remove coil spring. Refer to => [ Coil Spring ] Coil Spring.
Affects All Vehicles
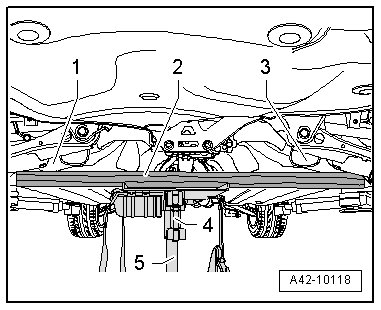
- Install (V.A.G 1383 A) with (V.A.G 1359/2) and a suitable wooden block - 2 - at subframe and support at front.
- Remove bolts - 1 - and - 3 -.
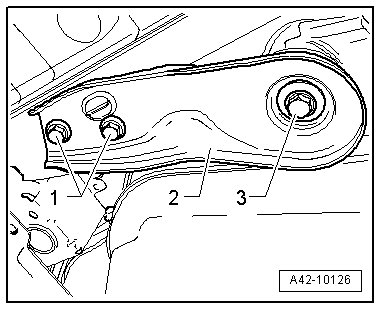
- Remove the reinforcement - 2 -.
- Lower subframe only as far as necessary.
- Mark position of bearings to subframe - arrow A -.
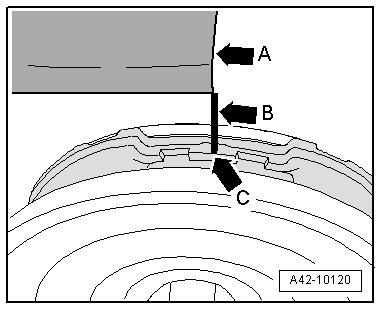
- Apply marking - arrow B - of bearing bar - arrow C - to subframe mount - arrow A -.
• Marking - arrow B - is needed for installation of new bearing.
- Install tools at subframe as shown in illustration.
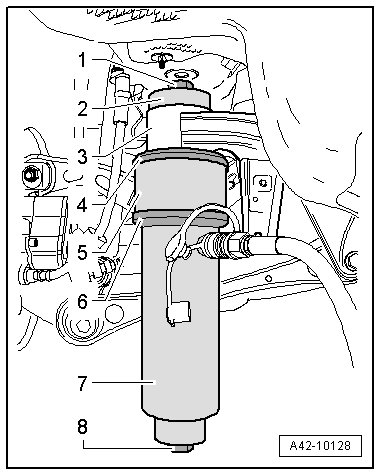
1. Spindle (T10263/4) with nut (T10263/5)
2. Washer (T40033/1). Conical side faces body.
3. Subframe
4. Washer (T40033/2). Conical side faces body.
5. Sleeve (T40033/3)
6. Washer (T10205/4)
7. (VAS 6178)
8. (T10263/4) with (T10263/5)
• Secure (VAS 6178) while pressing out.
• Bonded rubber bushing loosens abruptly. There is the risk of injuries by tools and bonded rubber bushing coming off!
- Place (VAS 6208) underneath.
- Press out bonded rubber bushing and collect escaping oil.
Pressing In the Bonded Rubber Bushing
- Observe installation position of bonded rubber bushing.
- Observe your marking - arrow B - on subframe - arrow A -.
- Marking - arrow B - and bar - arrow C - of bearing must align with subframe mount - arrow A -.
- Install tools at subframe as shown in illustration.
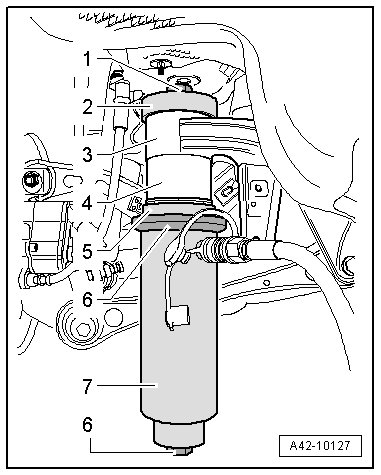
1. (T10263/4) with (T10263/5)
2. (T40141). Conical side faces body.
3. Subframe
4. Bonded rubber mount
5. Washer (T10205/15)
6. Washer (T10205/4)
7. (VAS 6178)
8. (T10263/4) with (T10263/5)
- Press front bearing into subframe until stop.
Further installation is in the reverse sequence to removal. Note the following:
• Install coil springs or air springs, respectively, only if threaded connection of subframe has been tightened to specified tightening specification.
- Install springs. Refer to => [ Coil Spring ] Coil Spring or => [ Air Spring ] Air Spring.
Tightening specifications, refer to => [ Subframe, Stabilizer Bar and Coupling Rod Assembly Overview, AWD ] .
- On vehicles with air suspension, position vehicle on wheels. Refer to => [ Positioning Vehicle on Hoist and Wheels ] Positioning Vehicle on Hoist and Wheels.
- Tighten wheels.
Pressing Out Rear Bonded Rubber Bushing
Affects Vehicles with Air Suspension
- Place the vehicle on a hoist. Refer to => [ Positioning Vehicle on Hoist and Wheels ] Positioning Vehicle on Hoist and Wheels.
Affects All Vehicles
- Remove wheels.
- Remove left and right wheel house trim.
- Remove the bolts - 1 - from left and right shock absorbers.
- Remove rear exhaust system.
Affects Vehicles with Air Suspension
- Remove air spring. Refer to => [ Air Spring ] Air Spring.
Applies to Vehicles with Coil Spring Suspension
- Remove coil spring. Refer to => [ Coil Spring ] Coil Spring.
Affects All Vehicles
- Remove stabilizer. Refer to => [ Stabilizer Bar Coupling Rod ] .
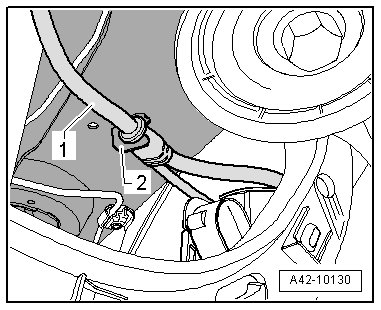
- Disengage electrical wiring harness - 1 - left and right from brackets - 2 - at body.
- Install (V.A.G 1383 A) with (V.A.G 1359/2) and a suitable wooden block - 2 - at rear final drive and support at rear.
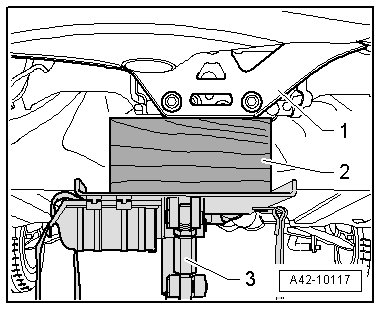
- Remove only rear bolts of subframe.
- Lower subframe only as far as necessary.
- Mark position of bearings to subframe - arrow A -.
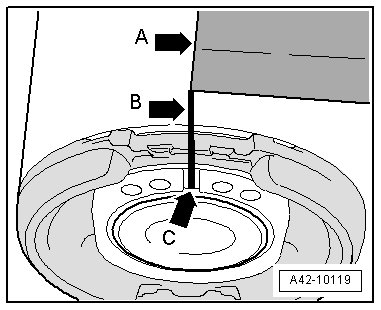
- Apply marking - arrow B - of bearing groove - arrow C - to subframe mount - arrow A -.
• Marking - arrow B - is needed for installation of new bearing.
- Install tools at subframe as shown in illustration.
1. (T10263/4) with (T10263/5)
2. Washer (T40033/1). Conical side faces body.
3. Subframe
4. Washer (T40033/2). Conical side faces body.
5. Sleeve (T40033/3)
6. Washer (T10205/4)
7. (VAS 6178)
8. (T10263/4) with (T10263/5)
• Secure (VAS 6178) while pressing out.
• Bonded rubber bushing loosens abruptly. There is the risk of injuries by tools and bonded rubber bushing coming off!
- Place (VAS 6208) underneath.
- Press out bonded rubber bushing and collect escaping oil.
Pressing In the Bonded Rubber Bushing
• Only bearings with the same part number may be installed on the left and right.
- Observe installation position of bonded rubber bushing.
- Observe your marking - arrow B - on subframe - arrow A -.
- Marking - arrow B - and bar - arrow C - of bearing must align with subframe mount - arrow A -.
- Install tools at subframe as shown in illustration.
1. (T10263/4) with (T10263/5)
2. (T40141). Conical side faces body.
3. Subframe
4. Bonded rubber mount
5. Washer (T10205/15)
6. Washer (T10205/4)
7. (VAS 6178)
8. (T10263/4) with (T10263/5)
- Press front bearing into subframe until stop.
Further installation is in the reverse sequence to removal. Note the following:
• Install coil springs or air springs, respectively, only if threaded connection of subframe has been tightened to specified tightening specification.
- Install springs. Refer to => [ Coil Spring ] Coil Spring or => [ Air Spring ] Air Spring.
Tightening specifications: => [ Subframe, Stabilizer Bar and Coupling Rod Assembly Overview, AWD ]
- On vehicles with air suspension, position vehicle on wheels => [ Positioning Vehicle on Hoist and Wheels ] Positioning Vehicle on Hoist and Wheels.
- Tighten wheels.