Fuel Level Sensor (G), Checking
Fuel Level Sensor (G), Checking
Special tools, testers and auxiliary items required
• Multimeter (V.A.G 1526E)
• Connector Test Set (V.A.G 1594C)
• Carpet knife, commercially available
Procedure
- Remove the right single seat in the second row of seats.
Risk of injury.
• Wear protective gloves.
- Cut the floor covering along the perforation - arrows - on the right side with a carpet knife - 1 -.
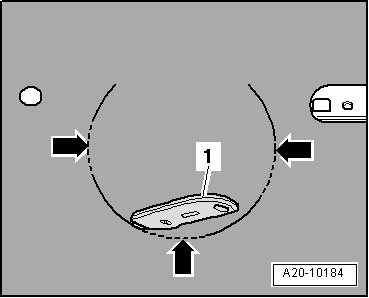
- Fold carpet cut-out to side - arrow -.
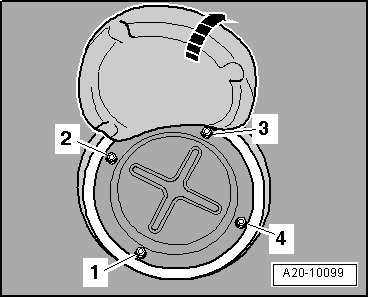
- Remove nuts - 1 to 4 - and remove right locking flange cover.
Vehicles with Vertical Fuel Filter
- Disconnect the connector - 3 - on the right locking flange.
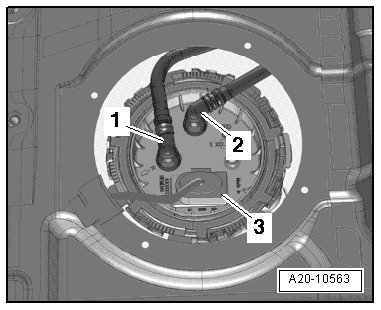
• Ignore - 1 and 2 -.
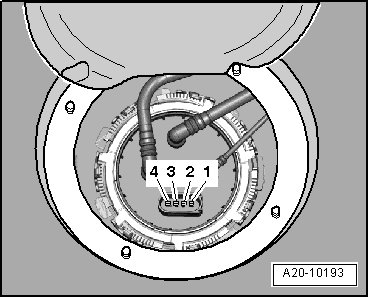
- Connect multimeter between terminals - 2 - and - 3 - to measure resistance.
Vehicles with Horizontal Fuel Filter
- Disconnect the fuel return line - 1 - and the fuel supply line - 2 - from the right locking flange by pressing the release buttons.
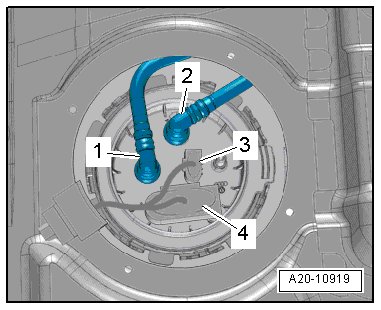
• Ignore - 1, 2 and 4 -.
- Connect multimeter between terminals - 1 - and - 2 - to measure resistance.
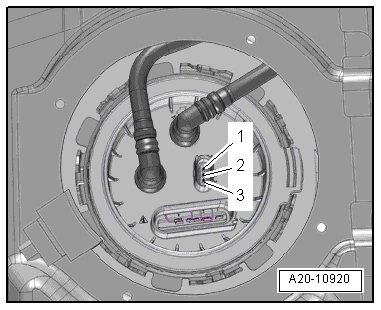
All Vehicles
Fuel level sensor installed:
• Sensor at lower stop: 863 to 960 ohms.
• Sensor at upper stop: 67 to 86 ohms.
• If measured value is 0 ohms there is a short circuit. If measured value is there and open circuit in the wiring.
• To check resistance values "tank full" or "tank empty", the fuel level sensor must be removed. Refer to => [ Fuel Level Sensor (G) ] Fuel Level Sensor (G) and the floater of the sensor must be placed in the upper or lower end position.
• With fuel level sensor removed, the following values are obtained because of the greater deflection of the floater arm:
Fuel level sensor removed:
• Sensor at lower stop: approximately 990 ohms.
• Sensor at upper stop: approximately 51 ohms.
Assemble in reverse order of disassembling. Note the following:
Vehicles with Vertical Fuel Filter
- Connect the connector - 3 - at right locking flange.
• Ignore - 1 and 2 -.
Vehicles with Horizontal Fuel Filter
- Connect the connector - 3 - at right locking flange.
• Ignore - 1, 2 and 4 -.
All Vehicles
- Install the right locking flange cover. Refer to => [ Locking Flange Cover - Tightening Specifications ] Fuel Tank With Attachments With Reducing Agent Metering System Overview.
- Install the frame into the floor covering.
- Install the right single seat in the second row of seats.