Variable Valve Timing Actuator: Testing and Inspection
Diagnostic Procedures
Camshaft Adjustment Valve, Checking
Camshaft Adjustment Valve 1
The following procedure is used to diagnose Camshaft Adjustment Valve 1 (N205) which is controlled by Motronic Engine Control Module (ECM) (J623).
Special tools, testers and auxiliary items required
• Multimeter.
• Wiring diagram.
Test requirements
• Fuse (SC8) OK.
• Motronic Engine Control Module (ECM) Power Supply Relay (J271) OK.
• Battery voltage at least 12.5 volts.
• All electrical consumers such as, lights and rear window defroster, switched off.
• Vehicles with automatic transmission, shift selector lever into position " P" or "N".
• A/C switched off.
• Ground (GND) connections between engine/transmission/chassis OK.
• Ignition switched off.
Procedure
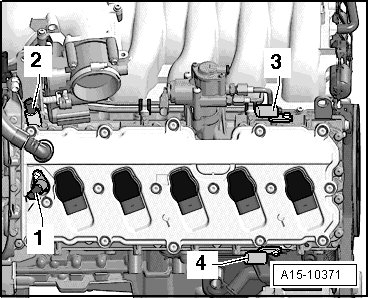
- Disconnect the Camshaft Adjustment Valve 1 (N205) electrical harness connector - 2 -
Checking internal resistance
- Using a Multimeter, check the Camshaft Adjustment Valve 1 (N205) terminals 1 to 2 for resistance.
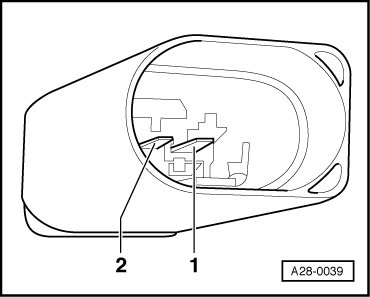
Specified value: 5.0 to 8.0 ohms (at approx. 20 °C)
If the specified value was not obtained:
- Replace Camshaft Adjustment Valve 1 (N205).
If the specified value was obtained:
Checking voltage
- Switch the ignition on.
- Using a Multimeter, Check the Camshaft Adjustment Valve 1 (N205) electrical harness connector terminal 2 to Ground (GND) for voltage.
- Switch the ignition off.
Specified value: battery voltage.
If the specified value was not obtained:
- Check the wiring connection from the Camshaft Adjustment Valve 1 (N205) electrical harness connector terminal 2 to the Motronic Engine Control Module (ECM) Power Supply Relay (J271) socket 2/87 for an open circuit, short circuit to Battery (+) or Ground (GND).
- Check the wiring connection for damage, corrosion, lose or broken terminals.
- If necessary, repair the faulty wiring connection.
If the specified value was obtained:
Checking wiring
If the manufacturers test box is being used. Perform the following step.
- Install the test box.
If the manufacturers test box is not being used. Perform the following step.
- Remove the Motronic Engine Control Module (ECM) (J623).
- Using a Multimeter, check the Camshaft Adjustment Valve 1 (N205) electrical harness connector terminal 1 to the Motronic Engine Control Module (ECM) (J623) electrical harness connector T60a for an open circuit.
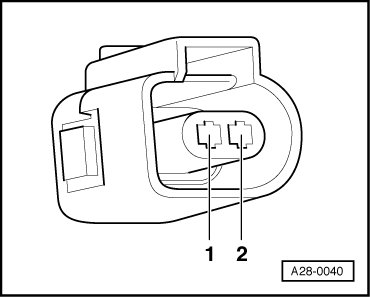

Specified value: 1.5 ohms Max.
If the specified value was not obtained:
- Check the wiring connection for an open circuit, short circuit to Battery (+) or Ground (GND).
- Check the wiring connection for damage, corrosion, lose or broken terminals.
- If necessary, repair the faulty wiring connection.
If no malfunction is found in the wiring and voltage supply was not OK:
- Replace the Motronic Engine Control Module (ECM) (J623).
- Assembly is performed in the reverse order of removal.
Final procedures
After repair work, the following work steps must be performed in the following sequence:
1. Check the DTC memory. Refer to => [ Diagnostic Mode 03 - Read DTC Memory ] Diagnostic Modes 01 - 09.
2. If necessary, erase the DTC memory. Refer to => [ Diagnostic Mode 04 - Erase DTC Memory ] Diagnostic Modes 01 - 09.
3. If the DTC memory was erased, generate readiness code. Refer to => [ Readiness Code ] Monitors, Trips, Drive Cycles and Readiness Codes.
- End of diagnosis.
Camshaft Adjustment Valve 1, Exhaust
The following procedure is used to diagnose Camshaft Adjustment Valve 1 (exhaust) (N318) which is controlled by Motronic Engine Control Module (ECM) (J623).
Special tools, testers and auxiliary items required
• Multimeter.
• Wiring diagram.
Test requirements
• Fuse (SC8) OK.
• Motronic Engine Control Module (ECM) Power Supply Relay (J271) OK.
• Battery voltage at least 12.5 volts.
• All electrical consumers such as, lights and rear window defroster, switched off.
• Vehicles with automatic transmission, shift selector lever into position " P" or "N".
• A/C switched off.
• Ground (GND) connections between engine/transmission/chassis OK.
• Ignition switched off.
Procedure
- Disconnect the Camshaft Adjustment Valve 1 (exhaust) (N318) electrical harness connector - 1 -
Checking internal resistance
- Using a Multimeter, check the Camshaft Adjustment Valve 1 (exhaust) (N318) terminals 1 to 2 for resistance.
Specified value: 5.0 to 8.0 ohms (at approx. 20 °C)
If the specified value was not obtained:
- Replace Camshaft Adjustment Valve 1 (exhaust) (N318).
If the specified value was obtained:
Checking voltage
- Switch the ignition on.
- Using a Multimeter, Check the Camshaft Adjustment Valve 1 (exhaust) (N318) electrical harness connector terminal 2 to Ground (GND) for voltage.
- Switch the ignition off.
Specified value: battery voltage.
If the specified value was not obtained:
- Check the wiring connection from the Camshaft Adjustment Valve 1 (exhaust) (N318) electrical harness connector terminal 2 to the Motronic Engine Control Module (ECM) Power Supply Relay (J271) socket 2/87 for an open circuit, short circuit to Battery (+) or Ground (GND).
- Check the wiring connection for damage, corrosion, lose or broken terminals.
- If necessary, repair the faulty wiring connection.
If the specified value was obtained:
Checking wiring
If the manufacturers test box is being used. Perform the following step.
- Install the test box.
If the manufacturers test box is not being used. Perform the following step.
- Remove the Motronic Engine Control Module (ECM) (J623).
- Using a Multimeter, check the Camshaft Adjustment Valve 1 (exhaust) (N318) electrical harness connector terminal 1 to the Motronic Engine Control Module (ECM) (J623) electrical harness connector T60a for an open circuit.

Specified value: 1.5 ohms Max.
If the specified value was not obtained:
- Check the wiring connection for an open circuit, short circuit to Battery (+) or Ground (GND).
- Check the wiring connection for damage, corrosion, lose or broken terminals.
- If necessary, repair the faulty wiring connection.
If no malfunction is found in the wiring and voltage supply was not OK:
- Replace the Motronic Engine Control Module (ECM) (J623).
- Assembly is performed in the reverse order of removal.
Final procedures
After repair work, the following work steps must be performed in the following sequence:
1. Check the DTC memory. Refer to => [ Diagnostic Mode 03 - Read DTC Memory ] Diagnostic Modes 01 - 09.
2. If necessary, erase the DTC memory. Refer to => [ Diagnostic Mode 04 - Erase DTC Memory ] Diagnostic Modes 01 - 09.
3. If the DTC memory was erased, generate readiness code. Refer to => [ Readiness Code ] Monitors, Trips, Drive Cycles and Readiness Codes.
- End of diagnosis.
Camshaft Adjustment Valve 2
The following procedure is used to diagnose Camshaft Adjustment Valve 2 (N208) which is controlled by Engine Control Module (ECM) 2 (J624).
Special tools, testers and auxiliary items required
• Multimeter.
• Wiring diagram.
Test requirements
• Fuse (SC8) OK.
• Motronic Engine Control Module (ECM) Power Supply Relay (J271) OK.
• Battery voltage at least 12.5 volts.
• All electrical consumers such as, lights and rear window defroster, switched off.
• Vehicles with automatic transmission, shift selector lever into position " P" or "N".
• A/C switched off.
• Ground (GND) connections between engine/transmission/chassis OK.
• Ignition switched off.
Procedure
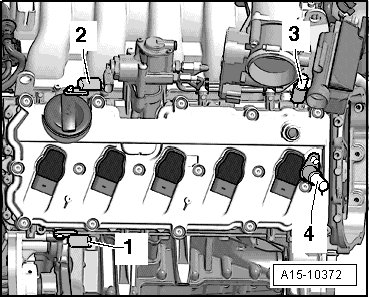
- Disconnect the Camshaft Adjustment Valve 2 (N208) electrical harness connector - 3 -
Checking internal resistance
- Using a Multimeter, check the Camshaft Adjustment Valve 2 (N208) terminals 1 to 2 for resistance.
Specified value: 5.0 to 8.0 ohms (at approx. 20 °C)
If the specified value was not obtained:
- Replace Camshaft Adjustment Valve 2 (N208).
If the specified value was obtained:
Checking voltage
- Switch the ignition on.
- Using a Multimeter, Check the Camshaft Adjustment Valve 2 (N208) electrical harness connector terminal 2 to Ground (GND) for voltage.
- Switch the ignition off.
Specified value: battery voltage.
If the specified value was not obtained:
- Check the wiring connection from the Camshaft Adjustment Valve 2 (N208) electrical harness connector terminal 2 to the Motronic Engine Control Module (ECM) Power Supply Relay (J271) socket 2/87 for an open circuit, short circuit to Battery (+) or Ground (GND).
- Check the wiring connection for damage, corrosion, lose or broken terminals.
- If necessary, repair the faulty wiring connection.
If the specified value was obtained:
Checking wiring
If the manufacturers test box is being used. Perform the following step.
- Install the test box.
If the manufacturers test box is not being used. Perform the following step.
- Remove the Engine Control Module (ECM) 2 (J624).
- Using a Multimeter, check the Camshaft Adjustment Valve 2 (N208) electrical harness connector terminal 1 to the Engine Control Module (ECM) 2 (J624) electrical harness connector T60d for an open circuit.

Specified value: 1.5 ohms Max.
If the specified value was not obtained:
- Check the wiring connection for an open circuit, short circuit to Battery (+) or Ground (GND).
- Check the wiring connection for damage, corrosion, lose or broken terminals.
- If necessary, repair the faulty wiring connection.
If no malfunction is found in the wiring and voltage supply was not OK:
- Replace the Engine Control Module (ECM) 2 (J624).
- Assembly is performed in the reverse order of removal.
Final procedures
After repair work, the following work steps must be performed in the following sequence:
1. Check the DTC memory. Refer to => [ Diagnostic Mode 03 - Read DTC Memory ] Diagnostic Modes 01 - 09.
2. If necessary, erase the DTC memory. Refer to => [ Diagnostic Mode 04 - Erase DTC Memory ] Diagnostic Modes 01 - 09.
3. If the DTC memory was erased, generate readiness code. Refer to => [ Readiness Code ] Monitors, Trips, Drive Cycles and Readiness Codes.
- End of diagnosis.
Camshaft Adjustment Valve 2, Exhaust
The following procedure is used to diagnose Camshaft Adjustment Valve 2 (exhaust) (N319) which is controlled by Engine Control Module (ECM) 2 (J624).
Special tools, testers and auxiliary items required
• Multimeter.
• Wiring diagram.
Test requirements
• Fuse (SC8) OK.
• Motronic Engine Control Module (ECM) Power Supply Relay (J271) OK.
• Battery voltage at least 12.5 volts.
• All electrical consumers such as, lights and rear window defroster, switched off.
• Vehicles with automatic transmission, shift selector lever into position " P" or "N".
• A/C switched off.
• Ground (GND) connections between engine/transmission/chassis OK.
• Ignition switched off.
Procedure
- Disconnect the Camshaft Adjustment Valve 2 (exhaust) (N319) electrical harness connector - 4 -
Checking internal resistance
- Using a Multimeter, check the Camshaft Adjustment Valve 2 (exhaust) (N319) terminals 1 to 2 for resistance.
Specified value: 5.0 to 8.0 ohms (at approx. 20 °C)
If the specified value was not obtained:
- Replace Camshaft Adjustment Valve 2 (exhaust) (N319).
If the specified value was obtained:
Checking voltage
- Switch the ignition on.
- Using a Multimeter, Check the Camshaft Adjustment Valve 2 (exhaust) (N319) electrical harness connector terminal 2 to Ground (GND) for voltage.
- Switch the ignition off.
Specified value: battery voltage.
If the specified value was not obtained:
- Check the wiring connection from the Camshaft Adjustment Valve 2 (exhaust) (N319) electrical harness connector terminal 2 to the Motronic Engine Control Module (ECM) Power Supply Relay (J271) socket 2/87 for an open circuit, short circuit to Battery (+) or Ground (GND).
- Check the wiring connection for damage, corrosion, lose or broken terminals.
- If necessary, repair the faulty wiring connection.
If the specified value was obtained:
Checking wiring
If the manufacturers test box is being used. Perform the following step.
- Install the test box.
If the manufacturers test box is not being used. Perform the following step.
- Remove the Engine Control Module (ECM) 2 (J624).
- Using a Multimeter, check the Camshaft Adjustment Valve 2 (exhaust) (N319) electrical harness connector terminal 1 to the Engine Control Module (ECM) 2 (J624) electrical harness connector T60d for an open circuit.

Specified value: 1.5 ohms Max.
If the specified value was not obtained:
- Check the wiring connection for an open circuit, short circuit to Battery (+) or Ground (GND).
- Check the wiring connection for damage, corrosion, lose or broken terminals.
- If necessary, repair the faulty wiring connection.
If no malfunction is found in the wiring and voltage supply was not OK:
- Replace the Engine Control Module (ECM) 2 (J624).
- Assembly is performed in the reverse order of removal.
Final procedures
After repair work, the following work steps must be performed in the following sequence:
1. Check the DTC memory. Refer to => [ Diagnostic Mode 03 - Read DTC Memory ] Diagnostic Modes 01 - 09.
2. If necessary, erase the DTC memory. Refer to => [ Diagnostic Mode 04 - Erase DTC Memory ] Diagnostic Modes 01 - 09.
3. If the DTC memory was erased, generate readiness code. Refer to => [ Readiness Code ] Monitors, Trips, Drive Cycles and Readiness Codes.
- End of diagnosis.