Ambient Temperature Sensor / Switch HVAC: Service and Repair
Temperature Sensors
=> [ Fresh Air Intake Duct ]
=> [ Left Vent ]
=> [ Right Vent ]
=> [ Evaporator Vent ]
=> [ Interior Temperature Fan ]
=> [ Center Outlet Temperature ]
=> [ Left/Right Rear Center Console Temperature ]
Fresh Air Intake Duct
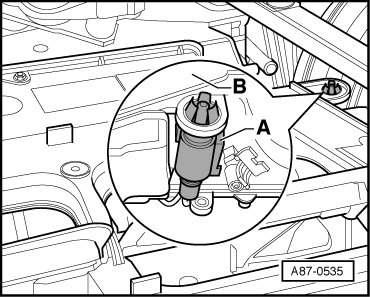
- Remove left and right plenum chamber covers.
- Remove dust and pollen filter. Refer to => [ Dust and Pollen Filter ] Air Distributor Housing.
- Remove temperature sensor - A - from intake housing - B -
Left Vent
Removing
- Switch off ignition.
- Remove the driver side storage compartment. Refer to => Body Interior 70 Removal and Installation
- Remove left footwell vent driver's side.
- Disconnect harness connector - A - from temperature sensor.
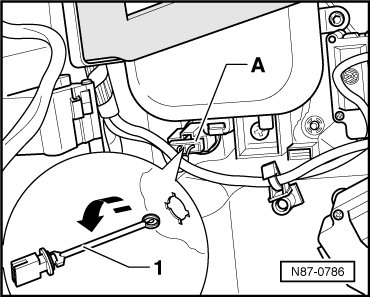
- Turn temperature sensor - 1 - in direction of arrow approximately 90°.
- Take temperature sensor out of heating and A/C unit.
Installing
- Install in reverse order of removal.
Right Vent
Removing
- Switch off ignition.
- Remove glove box.
- Remove right footwell vent.
- Disconnect harness connector - A - from temperature sensor.
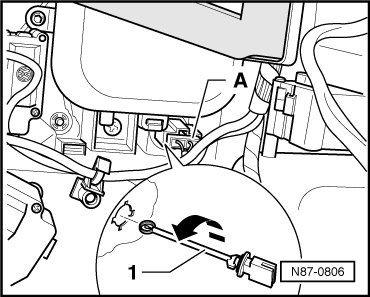
- Turn temperature sensor - 1 - in direction of arrow approximately 90°.
- Take temperature sensor out of heating and A/C unit.
Installing
- Install in reverse order of removal.
Evaporator Vent
Removing
- Switch off ignition.
- Remove glove compartment.
- Remove right footwell vent.
- Disconnect harness connector - A - from sensor.
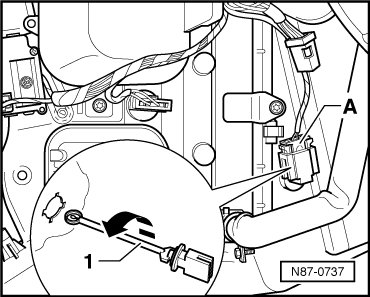
- Turn sensor - 1 - in direction of arrow approximately 90°.
- Take temperature sensor out of heating and A/C unit.
Installing
- Install in reverse order of removal.
Interior Temperature Fan
- Remove front A/C control head Climatronic Control Module (J255). Refer to => [ Front A/C Control Head Climatronic Control Module ] Front A/C Control Head Climatronic Control Module.
- Remove bolts - A -.
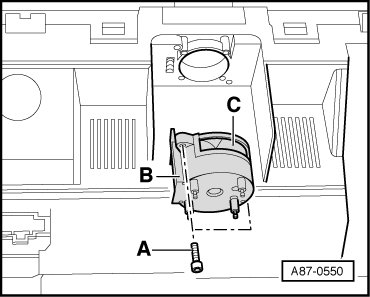
- Pull Interior Temperature Sensor Fan (V42) - B - out of front A/C control head Climatronic Control Module (J255).
• When installing Interior Temperature Sensor Fan (V42), do not press on motor - C -, hold fan firmly at housing instead.
Center Outlet Temperature
- Switch off ignition.
- Remove the center console.
- Remove the compartment under the left instrument panel and the steering column support to the center tunnel.
- Disconnect connector - A -.
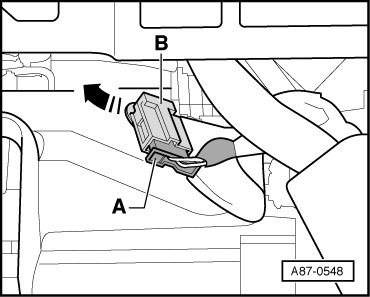
- Turn vent temperature sensor - B - approximately 90° in direction of arrow.
- Remove vent temperature sensor out of air guide.
• Depending on design of air duct, sensor may also be installed at different location in air duct.
Left/Right Rear Center Console Temperature
- Switch off ignition.
- Remove the rear center console cover. Refer to => 68 Removal and Installation.
- Disconnect connector from temperature sensor - A - or - B -.
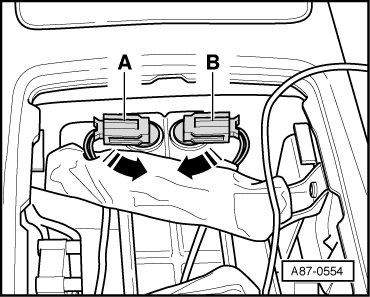
- Rotate - A - (Left Rear Center Console Temperature Sensor (G311)) or - B - (Right Rear Center Console Temperature Sensor (G312)) approximately 90° in direction of arrow.
- Remove appropriate temperature sensor from air guide.
• Left Rear Center Console Temperature Sensor (G311) and Right Rear Center Console Temperature Sensor (G312) are installed only on vehicles with Rear A/C Control Head (Climatronic) (E265) (optional equipment). On vehicles without Rear A/C Control Head (Climatronic) (E265), openings in air guide are sealed with plugs.
• Observe connector arrangement to Left Rear Center Console Temperature Sensor (G311) and Right Rear Center Console Temperature Sensor (G312) and mark them if necessary to avoid possible interchange.
• If the correct connector pin assignment is not certain, disconnect a connector for example from a temperature sensor and check the DTC memory for the Rear A/C Control Head (Climatronic) (E265) vehicle diagnosis, testing and information system VAS 5051 in the "Guided Fault Finding" function.