Engine Component Overviews
Engine Component Overviews
Do not bore, hone, grind or rework the cylinder bores with shop tools. Reworking damages the surface of the cylinder bore.
• If large quantities of metal particles or abraded material are detected during engine repairs, it may mean the crankshaft or rod bearings are damaged. To prevent further damage, perform the following steps after the repair:
• Clean the oil passages carefully.
• Replace the oil spray jets.
• Replace the engine oil cooler.
• Replace the oil filter element.

I - => [ Ribbed Belt ]
II - => [ Toothed Belt ]
III - => [ Cylinder Block ]
Ribbed Belt

1 Accessory Bracket
• Follow the tightening sequence, refer to => [ Accessory Bracket Tightening Sequence ].
2 Bolt
• 23 Nm
3 Nut
• 23 Nm
4 Generator
• To make it easier to position the generator, push the threaded bushing for the generator bolt back slightly.
5 Bolt
• 40 Nm
• Follow the tightening sequence, refer to => [ Accessory Bracket Tightening Sequence ].
6 Bushing
• Quantity: 2
7 Bolt
• 25 Nm
8 Air Conditioning (A/C) Compressor
9 Ribbed Belt
• Before removing, mark the rotation direction using chalk or a felt tip pen.
• Check for wear.
• Do not kink.
• Removing and installing, refer to => [ Ribbed Belt ] Service and Repair.
10 Vibration Damper
11 Bolt
• 20 Nm + an additional 90° (1/4) turn.
• Always replace.
12 Bolt
• 23 Nm
13 Ribbed Belt Tensioner
• Rotate the tensioner using an open end wrench to release the tension on the ribbed belt.
Accessory Bracket Tightening Sequence

Toothed Belt
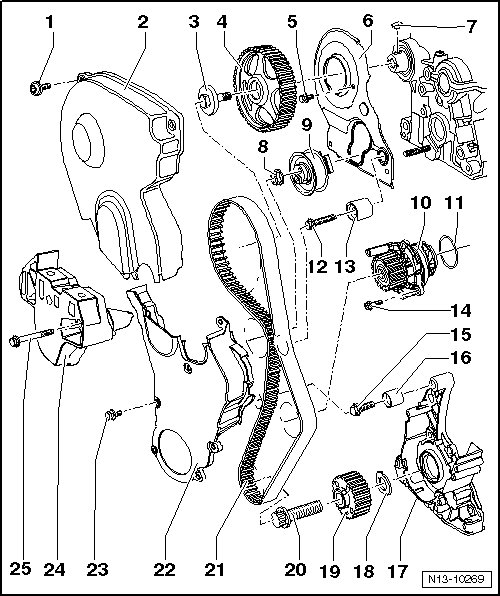
1 Bolt
• 10 Nm
2 Upper Toothed Belt Guard
3 Bolt
• 50 Nm + an additional 180° (1/2) turn.
• Always replace.
• Use the retainer (3036) to loosen and tighten.
4 Camshaft Sprocket
• Installed position: secured by a woodruff key.
5 Bolt
• 10 Nm
• Install using locking fluid.
6 Rear Toothed Belt Guard
7 Woodruff Key
• Make sure it is secure.
8 Nut
• 25 Nm
9 Toothed Belt Tensioner
10 Coolant Pump
• Removing and installing, refer to => [ Coolant Pump ] Service and Repair.
11 O-ring
• Always replace.
12 Bolt
• 25 Nm
13 Idler Roller
14 Bolt
• 15 Nm
15 Bolt
• 35 Nm
16 Idler Roller
17 Sealing Flange
18 Disc (Diamond Coated)
• Replace
19 Crankshaft Toothed Belt Gear
• The contact surfaces between the toothed belt gear, diamond disc and crankshaft must be free of oil.
• Only possible to install in one position.
20 Bolt
• 90 Nm + an additional 90° (1/4) turn.
• Always replace.
• Do not lubricate.
• Use the counter support (3415) to loosen and tighten.
21 Toothed Belt
• Before removing, mark the rotation direction using chalk or a felt tip pen.
• Check for wear.
• Removing and installing, refer to => [ Toothed Belt ] Service and Repair.
22 Lower Toothed Belt Guard
23 Bolt
• 8 Nm
• For the lower toothed belt guard.
• Quantity: 7
24 Engine Mount Bracket
25 Bolt
• 45 Nm
Cylinder Block
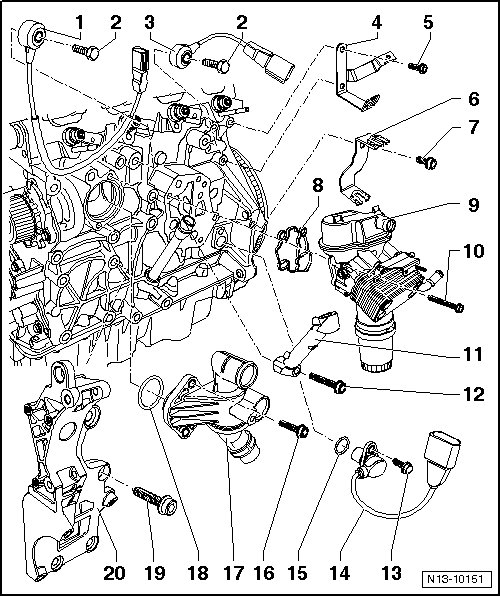
1 Knock Sensor 1 (G61)
• It is necessary to remove the thermostat first in order to remove the sensor. Refer to => [ Coolant Thermostat Housing with Thermostat ] Service and Repair.
• Contacts are gold plated.
2 Bolt
• 20 Nm
• The tightening specification affects the function of the knock sensor.
3 Knock Sensor 2 (G66)
• It is necessary to remove the oil filter bracket first in order to remove knock sensor 2. Refer to=> [ Oil Filter Adapter ] Service and Repair.
• Contacts are gold plated.
4 Wire Bracket
5 Bolt
6 Wire Bracket
7 Bolt
8 Gasket
• Always replace.
9 Oil Filter Adapter
• Overview, refer to => [ Oil Filter Adapter ] Service and Repair.
10 Bolt
• 15 Nm + an additional 90° (1/4) turn.
• Always replace.
11 Intake Manifold Support
12 Bolt
• 23 Nm
13
• 10 Nm
14 Engine Speed Sensor (G28)
15 Seal
• Always replace.
16 Bolt
• 15 Nm
17 Coolant Thermostat Housing with Thermostat
• Removing and installing, refer to => [ Coolant Thermostat Housing with Thermostat ] Service and Repair.
18 O-ring
• Always replace.
19 Bolt
• 40 Nm
20 Accessory Bracket
• Tightening sequence, refer to => [ Accessory Bracket Tightening Sequence ].