Piston: Service and Repair
Piston and Connecting Rod Overview
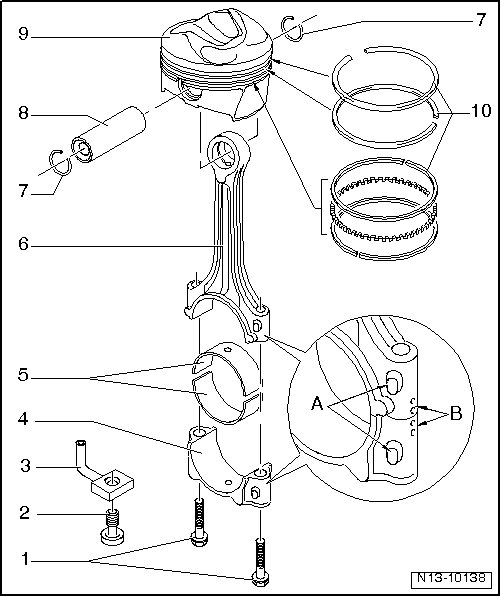
1 Bolt
• 45 Nm + an additional 90° (1/4) turn.
• Always replace.
• Lubricate the threads and contact surfaces.
• Tighten to 30 Nm to measure the radial play, do not tighten the additional torque.
2 Bolt with Pressure Relief Valve
• 27 Nm
• Opening pressure: 1.3 to 1.6 bar pressure.
3 Oil Spray Jet
• For piston cooling.
4 Connecting Rod Bearing Cap
• Pay attention to the installed position.
• Due to the separation procedure (cracking) of the connecting rod, the cap only fits in one position and only to the corresponding connecting rod.
• Mark which cylinder to which it belongs - B -.
• Installed position: The marks - A - point to the belt pulley side.
5 Bearing Shell
• Note the installed position, refer to => [ Bearing Shell, Installed Position ] Bearing Shell, Installed Position.
• Do not interchange used bearing shells (mark them).
• Axial play:
New: 0.10 to 0.35 mm
Wear limit: 0.4 mm
• Measure the radial clearance using Plastigage(R):
New: 0.02 to 0.06 mm
Wear limit: 0.09 mm
• Do not rotate the crankshaft when measuring the radial play.
6 Connecting Rod
• With a cracked bearing cap.
• Always replace as a set.
• Mark which cylinder to which it belongs - B -.
• Installed position: The marks - A - point to the belt pulley side.
• Separating the new connecting rod. Refer to => [ New Connecting Rod, Separating ] Procedures.
7 Circlip
8 Piston Pin
• If difficult to move, heat the piston to 60 °C (140 °F).
• Remove and install using a pilot drift (VW 222 A).
9 Piston
• Checking, refer to => [ Piston, Checking ] Testing and Inspection.
• Mark the installed position and cylinder allocation.
• The arrow on the piston face points toward the belt pulley side.
• Install using a piston ring compressor.
• Cylinder bore checking, refer to => [ Cylinder Bore, Checking ] Testing and Inspection.
• For the correct piston and cylinder dimensions, refer to => [ Piston and Cylinder Dimensions ] Piston and Cylinder Dimensions.
10 Piston Rings
• Offset gaps by 120°.
• Use piston ring pliers for removal and installation.
• Marks face toward the piston crown.
• Ring gap checking, refer to => [ Piston Ring Gap, Checking ] Testing and Inspection.
• Piston ring groove clearance checking, refer to => [ Piston Ring Groove Clearance, Checking ] Testing and Inspection.