Air Injection: Service and Repair
Secondary Air Injection Assembly Overview
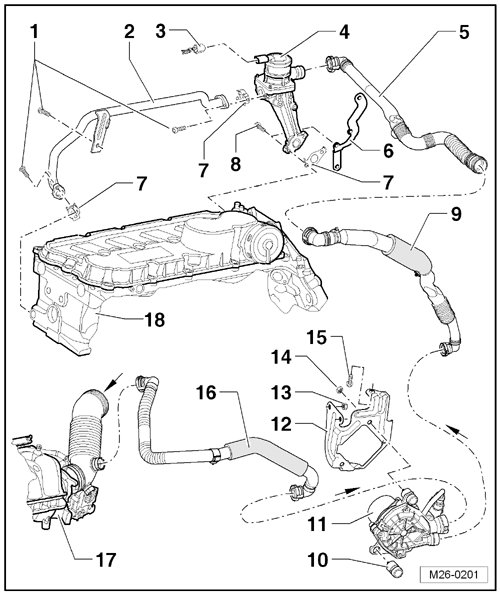
1 Bolt, 10 Nm
2 Connecting Pipe
• Observe the tightening sequence, refer to => [ Connecting Pipe- Tightening Sequence ].
3 Connector
• For the Secondary Air Injection (AIR) solenoid valve (N112).
4 Secondary Air Injection (AIR) Solenoid Valve (N112).
• Do not disassemble.
• Checking, refer to => [ Secondary Air Injection Solenoid Valve, Checking ] Testing and Inspection.
5 Pressure Pipe
• Ensure the pipe is securely seated.
• To disengage, squeeze together the securing ring.
6 Bracket
7 Gasket
8 Bolt, 10 Nm
9 Pressure Pipe
• For the AIR pump.
• Ensure the pipe is securely seated.
• To disengage, squeeze together the securing ring.
10 Rubber Bushing
• Is removed and installed together with the AIR pump motor - item 11 - and bracket - item 12 -.
11 Secondary Air Injection (AIR) Pump Motor (V101 )
• Is removed and installed together with the rubber bushing - item 10 - and bracket - item 12 -.
• Removal and installation, refer to => [ Secondary Air Injection Pump Motor ] Service and Repair.
12 Bracket
• For the AIR pump motor.
• For the double signal horn.
• Is removed and installed together with the AIR pump motor - item 11 - and rubber bushing - item 10 -.
13 Nut, 25 Nm
14 Nut, 10 Nm
15 Bolt, 10 Nm
16 Intake Pipe
• Ensure the pipe is securely seated.
• To disengage, squeeze together the securing ring.
17 Intake Manifold
Connecting Pipe- Tightening Sequence
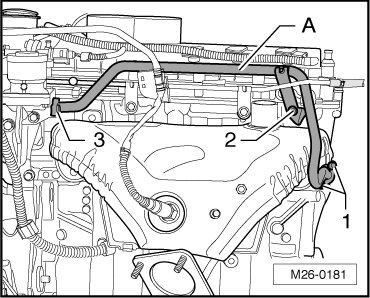
- Replace all seals for the connecting pipe - A -.
- Install all bolts hand tight only.
- Tighten the bolts - 1 - first, then bolt - 2 - and then bolt - 3 - to 10 Nm.