Ceramic Glow Plugs, Removing and Installing, Checking
Ceramic Glow Plugs, Removing and Installing, Checking
Special tools, testers and auxiliary items required
• Connector test set (V.A.G 1594 C)
• Voltage tester (V.A.G 1527 B)
• Flex wrench (3220)
Test Conditions
• Engine is cold
• Ignition is switched off
Test Prerequisites
• Battery voltage min. 11.5 V
• Ignition switched off
Test Sequence
Check the electrical activation for the ceramic glow plugs.
- Disconnect the connectors - 1 - from the ceramic glow plugs.
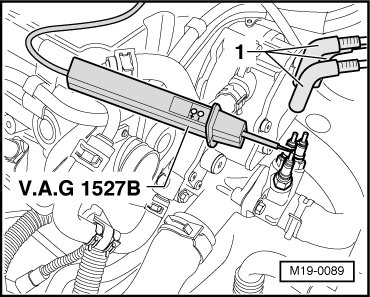
- Connect the lead of the voltage testers (V.A.G 1527B) to battery positive (+) with the adapter clips from the connector test set (V.A.G 1594C).
- Attach the test lead of the voltage tester to each ceramic glow plug in succession.
• LED lights up: Ceramic glow plug OK
• LED does not light up: Replace the ceramic glow plug.
Procedure
CAUTION!
• The ceramic glow plugs => [ Optical Characteristics of
Glow Plugs ] Glow Plugs, are very sensitive to impacts and bending.
• For this reason, do not use sheathed element glow plugs which have dropped (even from a height of approximately 2 cm) under any circumstances, even if no visible damage can be detected.
• Installation instructions must be performed in sequence, otherwise there is a danger the plug breaks and will cause damage to the engine.
• When removing and installing, do not bend the ceramic glow plugs.
- Remove the engine cover and, if present, remove the upper engine noise insulation => [ Engine, Removing ] Engine, Removing.
- Disconnect glow plug connectors from glow plugs.
- Remove ceramic sheathed element glow plugs using flex wrench (3220).
Installation is performed in the reverse order of removal, noting the following:
- Cylinder head bore and thread must be completely cleaned of deposits before installing.
• Never oil or grease thread of bore in cylinder head and ceramic sheathed element glow plugs.
- Screw ceramic sheathed element glow plugs into cylinder head by hand using flex wrench (3220).
- Then tighten ceramic sheathed element glow plugs.
Tightening specification: 15 Nm
CAUTION!
After installing and before first engine start with a cold engine, always perform a resistance test at all ceramic sheathed element glow plugs.
• Specified value: max. 1 ohms
- If specified value is exceeded, replace malfunctioning ceramic sheathed element glow plug.
• If the malfunctioning ceramic sheathed element glow plug is broken, remove all broken pieces from engine, otherwise they can cause damage to engine.