Rear Window Defogger System Does Not Operate
WINDOW / GLASS: WINDOW DEFOGGER SYSTEM: Rear Window Defogger System does not Operate
- Rear Window Defogger System does not Operate
DESCRIPTION
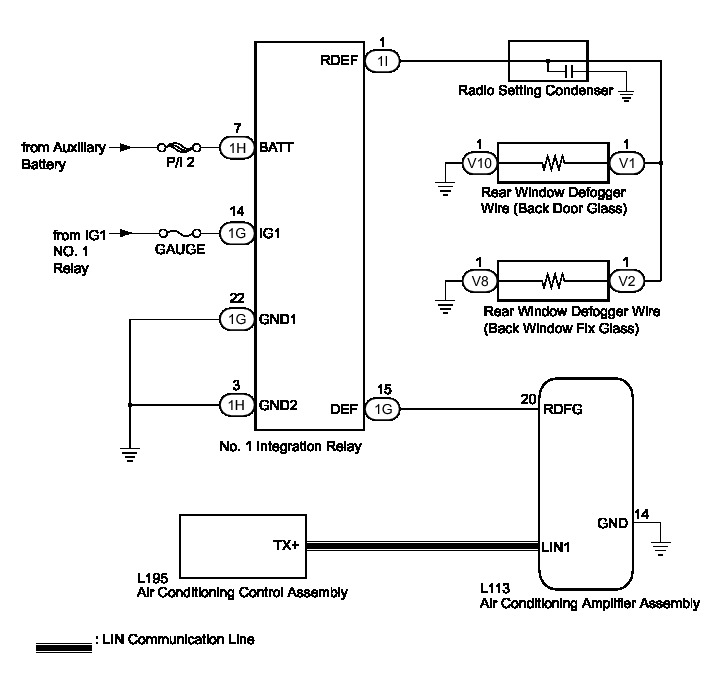
When the rear window defogger switch on the air conditioning control assembly is pressed, the operation signal is transmitted to the air conditioning amplifier assembly through a LIN communication line. When the air conditioning amplifier assembly receives the signal, it turns on the No. 1 integration relay to operate the rear window defogger.
WIRING DIAGRAM
INSPECTION PROCEDURE
NOTICE:
* Inspect the fuses for circuits related to this system before performing the following inspection procedure.
* If the auxiliary battery voltage becomes low, rear window defogger operation is canceled to prioritize supplying power to the power steering system.
PROCEDURE
1. CHECK REAR WINDOW DEFOGGER SYSTEM
(a) Activate the rear defogger system and check the symptoms.
Result:
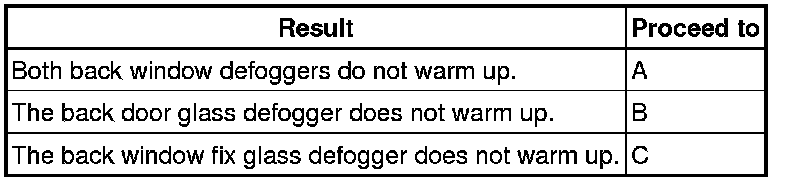
B -- CHECK HARNESS AND CONNECTOR (NO.1 INTEGRATION RELAY - REAR WINDOW DEFOGGER WIRE (BACK DOOR GLASS))
C -- CHECK HARNESS AND CONNECTOR (NO.1 INTEGRATION RELAY - REAR WINDOW DEFOGGER WIRE (BACK WINDOW FIX GLASS))
A -- Continue to next step.
2. CHECK AIR CONDITIONING SYSTEM
(a) Check the air conditioning system.
HINT
Both the window defogger system operation signal and air conditioning system operation signal are transmitted to the air conditioning amplifier assembly through the same communication line.
OK:
The air conditioning system operates normally.
NG -- GO TO AIR CONDITIONING SYSTEM How To Proceed With Troubleshooting
OK -- Continue to next step.
3. PERFORM ACTIVE TEST USING TECHSTREAM (DEFOGGER RELAY)
(a) Connect the Techstream to the DLC3.
(b) Turn the power switch on (IG).
(c) Turn the Techstream on.
(d) Enter the following menus: Body Electrical / Air Conditioner / Active Test.
(e) Perform the Active Test according to the display on the Techstream.
Air Conditioner (Air Conditioning Amplifier Assembly)

OK:
The rear window defogger system operates normally.
NG -- CHECK HARNESS AND CONNECTOR (NO. 1 INTEGRATION RELAY - AUXILIARY BATTERY AND BODY GROUND)
OK -- Continue to next step.
4. REPLACE AIR CONDITIONING AMPLIFIER ASSEMBLY
(a) Temporarily replace the air conditioning amplifier assembly with a new or known good one Removal.
(b) Check that the rear window defogger system operates normally.
OK:
The rear window defogger system operates normally.
NG -- REPLACE AIR CONDITIONING CONTROL ASSEMBLY Removal
OK -- END (AIR CONDITIONING AMPLIFIER ASSEMBLY WAS DEFECTIVE)
5. CHECK HARNESS AND CONNECTOR (NO. 1 INTEGRATION RELAY - AUXILIARY BATTERY AND BODY GROUND)
(a) Disconnect the 1G and 1H No. 1 integration relay connectors.
(b) Measure the voltage and resistance according to the value(s) in the table below.
Standard Voltage:
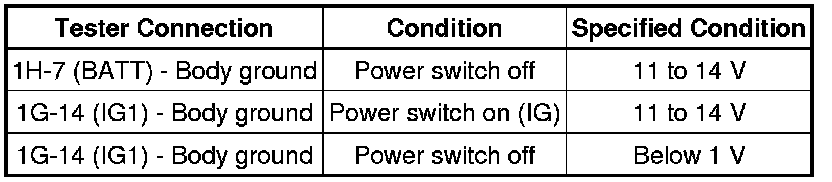
Standard Resistance:

NG -- REPAIR OR REPLACE HARNESS OR CONNECTOR
OK -- Continue to next step.
6. CHECK HARNESS AND CONNECTOR (AIR CONDITIONING AMPLIFIER - NO. 1 INTEGRATION RELAY)
(a) Disconnect the L113 air conditioning amplifier assembly connector.
(b) Measure the resistance according to the value(s) in the table below.
Standard Resistance:
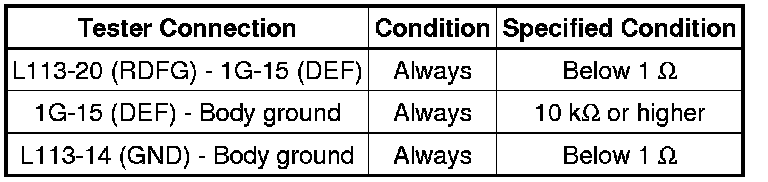
NG -- REPAIR OR REPLACE HARNESS OR CONNECTOR
OK -- Continue to next step.
7. CHECK NO. 1 INTEGRATION RELAY
(a) Reconnect the 1G and 1H No. 1 integration relay connectors.
(b) Measure the voltage according to the value(s) in the table below.
Standard Voltage:

NG -- REPLACE NO. 1 INTEGRATION RELAY Removal
OK -- Continue to next step.
8. CHECK AIR CONDITIONING AMPLIFIER ASSEMBLY
(a) Reconnect the L113 air conditioning amplifier assembly connector.
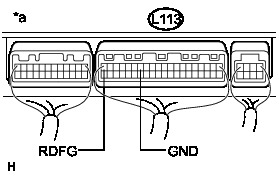
(b) Measure the voltage according to the value(s) in the table below.
Standard Voltage:

Text in Illustration

NG -- REPLACE AIR CONDITIONING AMPLIFIER ASSEMBLY Removal
OK -- Continue to next step.
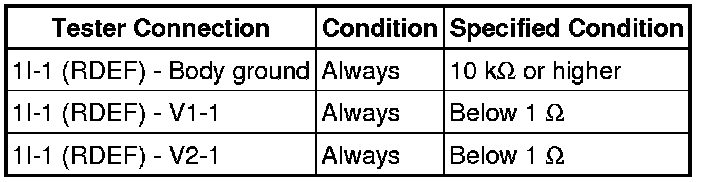
9. CHECK HARNESS AND CONNECTOR (NO. 1 INTEGRATION RELAY - REAR WINDOW DEFOGGER WIRE)
(a) Disconnect the V1 rear window defogger wire (back door glass) connector.
(b) Disconnect the V2 rear window defogger wire (back window fix glass) connector.
(c) Disconnect the 1I No. 1 integration relay connector.
(d) Measure the resistance according to the value(s) in the table below.
Standard Resistance:
NG -- REPAIR OR REPLACE HARNESS OR CONNECTOR
OK -- REPLACE NO.1 INTEGRATION RELAY Removal
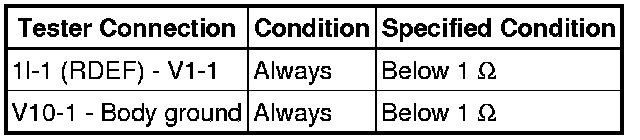
10. CHECK HARNESS AND CONNECTOR (NO.1 INTEGRATION RELAY - REAR WINDOW DEFOGGER WIRE (BACK DOOR GLASS))
(a) Disconnect the V1 and V10 rear window defogger wire (back door glass) connectors.
(b) Disconnect the 1l No.1 integration relay connector.
(c) Measure the resistance according to the value(s) in the table below.
Standard Resistance:
NG -- REPAIR OR REPLACE HARNESS OR CONNECTOR
OK -- REPAIR OR REPLACE REAR WINDOW DEFOGGER WIRE (BACK DOOR GLASS) Removal
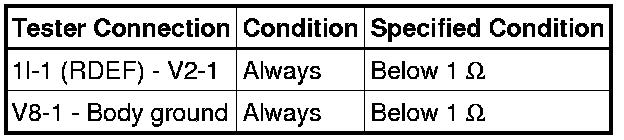
11. CHECK HARNESS AND CONNECTOR (NO.1 INTEGRATION RELAY - REAR WINDOW DEFOGGER WIRE (BACK WINDOW FIX GLASS))
(a) Disconnect the V2 and V8 rear window defogger wire (back window fix glass) connectors.
(b) Disconnect the 1l No.1 integration relay connector.
(c) Measure the resistance according to the value(s) in the table below.
Standard Resistance:
NG -- REPAIR OR REPLACE HARNESS OR CONNECTOR
OK -- REPAIR OR REPLACE REAR WINDOW DEFOGGER WIRE (BACK WINDOW FIX GLASS) Removal