G - Charts
Seat Belt Warning Light: Seat belt warning light does not work normally.NOTE: This troubleshooting procedure requires the use of scan tool MB99 1502 and SWS monitor kit MB99 1862. For details on how to use the SWS monitor, refer to "How to use SWS monitor."
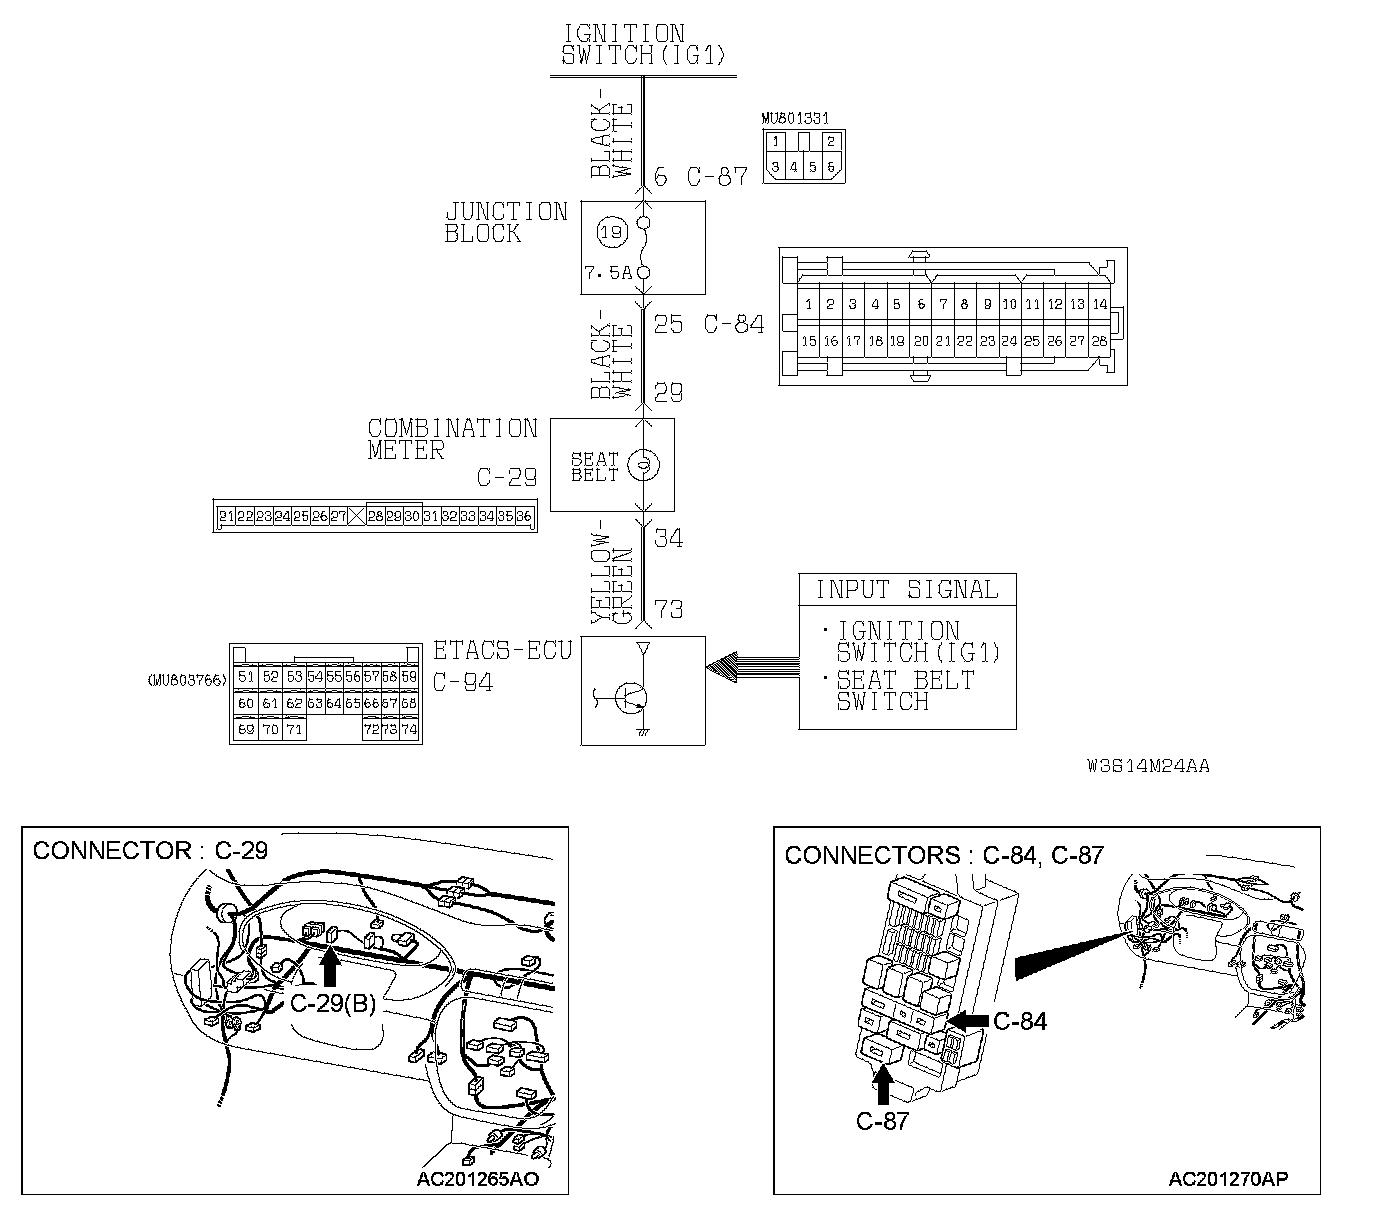
Seat Belt Warning Light Circuit Part 1:
Seat Belt Warning Light Circuit Part 2:
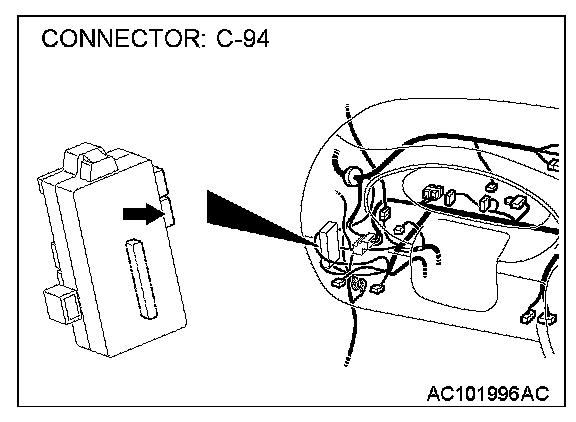
CIRCUIT OPERATION
- The ETACS-ECU operates the seat belt warning light according to the following switch signals:
- Ignition switch (IG1)
- Driver's seat belt switch
- If the driver turns the ignition switch to the "ON" position without fastening the seat belt, the seat belt warning light illuminates.
TECHNICAL DESCRIPTION (COMMENT)
If the seat belt warning light does not illuminate, the input circuit, the combination meter (seat belt warning light bulb or printed-circuit board) or the ETACS-ECU may be defective.
TROUBLESHOOTING HINTS
- The driver's side seat belt switch may be defective
- The combination meter (seat belt warning light bulb or printed-circuit board) may be defective
- The ETACS-ECU may be defective
- The wiring harness or connectors may have loose, corroded, or damaged terminals, or terminals pushed back in the connector
DIAGNOSIS
Required Special Tools:
- MB991223: Harness Set
- MB991502: Scan Tool (MUT-II)
- MB991862: SWS monitor kit
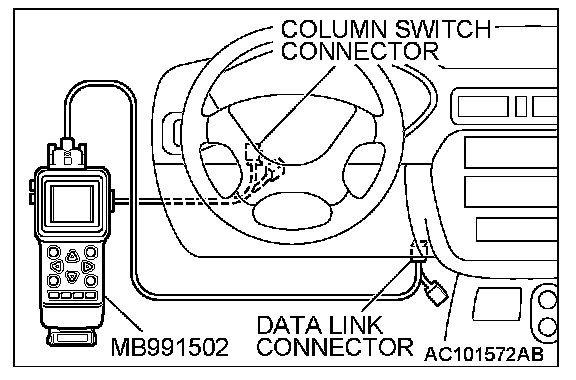
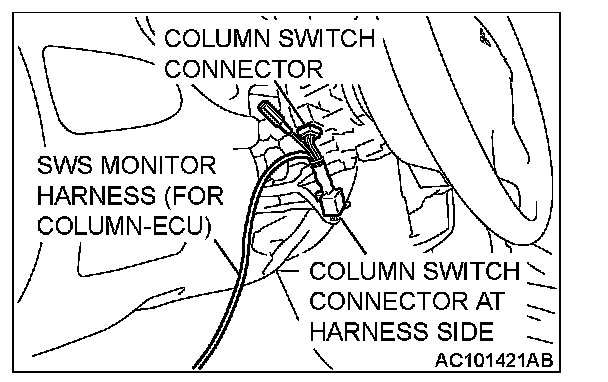
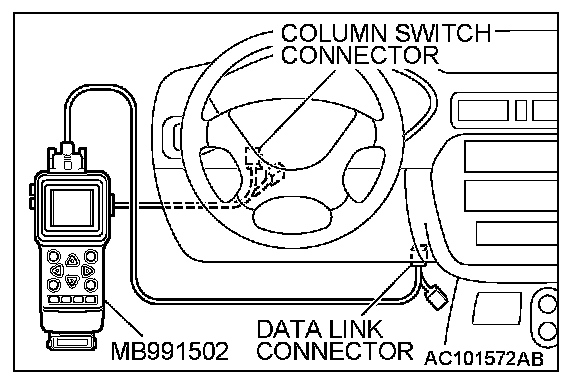
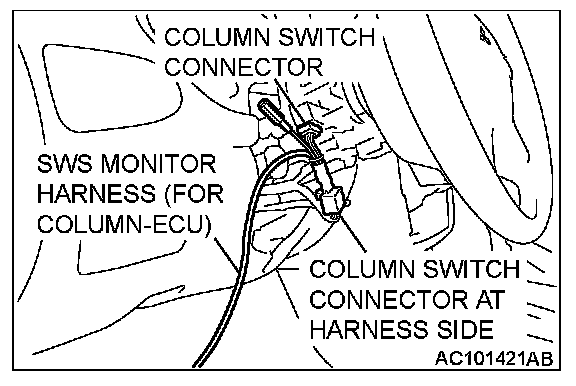
STEP 1. Use scan tool MB991502 to select "ECU COMM CHK" on the SWS monitor display.
Check the ETACS-ECU.
CAUTION:
To prevent damage to scan tool MB991502, always turn the ignition switch to the "LOCK" (OFF) position before connecting or disconnecting scan tool MB991502. Connect the DLC harness before connecting the column-ECU harness. Be sure to connect SWS monitor kit MB991862 after turning on scan tool MB991502.
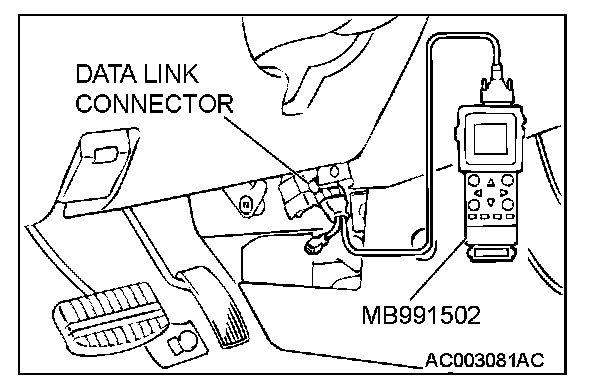
1. Connect scan tool MB991502 to the data link connector.
2. Connect SWS monitor kit MB991862 to the column switch connector.
3. Operate scan tool MB991502 according to the procedure below to display "ECU COMM CHK."
1. Select "SYSTEM SELECT."
2. Select "SWS."
3. Select "SWS MONITOR."
4. Select "ECU COMM CHK."
4. Scan tool MB991502 should show "OK" on the "ECU COMM CHK" menu for the "ETACS ECU" menu.
Q: Is "OK" displayed on the "ETACS ECU" menu?
YES: Go to Step 2.
NO: Refer to Inspection Procedure A-3 "Communication with ETACS-ECU is not possible."
STEP 2. Check the input signal by using "DATA LIST" menu of the SWS monitor.
Turn the ignition switch to the "ON" position before checking input signals from the ignition switch (IG1).
Operate scan tool MB991502 according to the procedure below to display "ETACS ECU."
1. Select "SYSTEM SELECT."
2. Select "SWS."
3. Select "SWS MONITOR."
4. Select "DATA LIST."
5. Select "ETACS ECU."

Check that normal conditions are displayed on the items described in the table.
Q: Does the scan tool display "IG SW (IG1)" as normal condition?
YES: Go to Step 3.
NO: Refer to Inspection Procedure M-2 "ETACS-ECU does not receive any signal from the ignition switch (IG1)."
STEP 3. Check the input signal by using the pulse check mode of the monitor.
Check input signal from the driver's side seat belt switch.
Operate scan tool MB991502 according to the procedure below to display "PULSE CHECK."
1. Select "SYSTEM SELECT."
2. Select "SWS."
3. Select "PULSE CHECK."
Q: Does scan tool MB991502 sound when the driver's side seat belt is fastened?
YES: Go to Step 4.
NO: Refer to Inspection Procedure N-3 "ETACS-ECU does not receive any signal from the driver's seat belt switch."
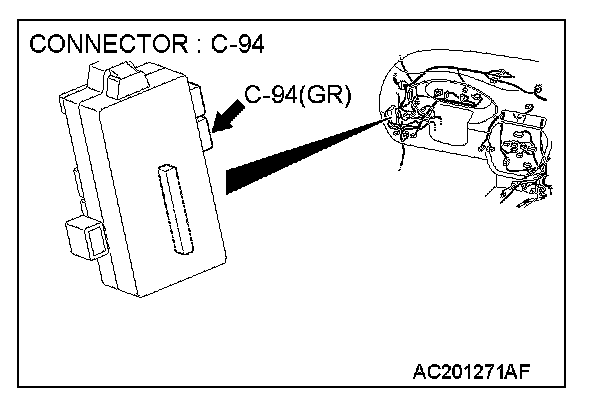
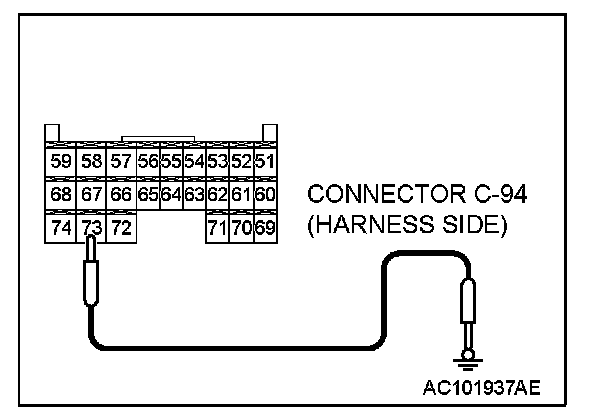
STEP 4. Check at ETACS-ECU connector C-94 in order to check the ground circuit to the seat belt warning light.
1. Disconnect ETACS-ECU connector C-94, and measure at the wiring harness side.
2. Turn the ignition switch to the "ON" position.
3. Connect terminal 73 to ground.
Q: Does the seat belt warning light illuminate?
YES: Replace the ETACS-ECU. Verify that the seat belt warning light illuminates normally.
NO: Go to Step 5.
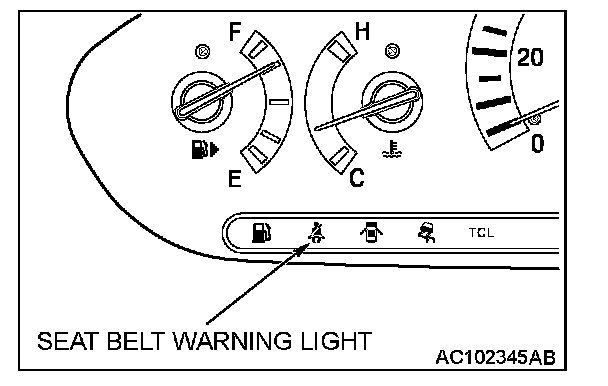
STEP 5. Check the seat belt warning light bulb.
Q: Is the seat belt warning light bulb in good condition?
YES: Go to Step 6.
NO: Replace the bulb. Verify that the seat belt warning light illuminates normally.
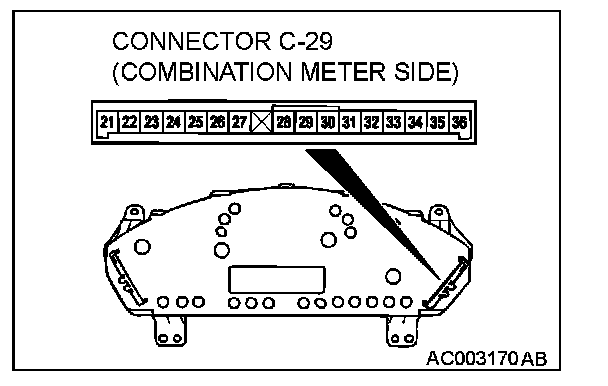
STEP 6. Check the combination meter (printed-circuit board).
1. Remove the combination meter.
2. Remove the seat belt warning light bulb. Then measure the resistance value between the bulb terminals.
3. Install a bulb to the combination meter, and measure the resistance between connector C-29 terminal Nos.29 and 34. The measured resistance value should be roughly the same as the value measured in Step (2).
Q: Are these two resistance values extremely different?
YES: Repair or replace the combination meter (printed circuit board). Check that the seat belt warning light illuminates normally.
NO (much the same): Go to Step 7.
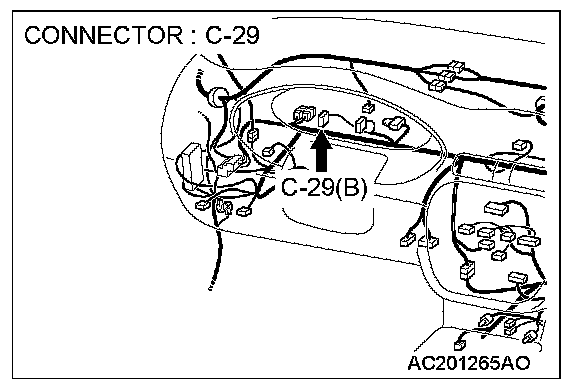
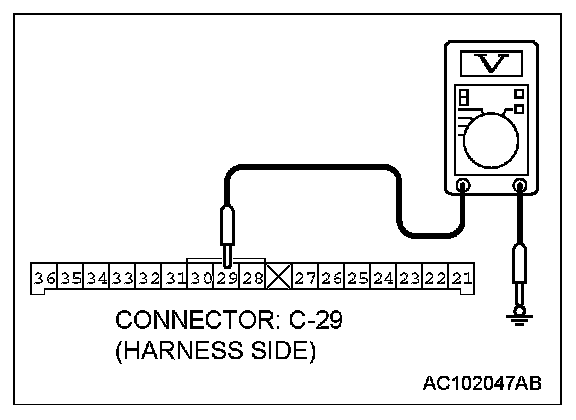
STEP 7. Check the ignition switch (IG1) line of the power supply circuit to the combination meter. Test at combination meter connector C-29.
1. Disconnect combination meter connector C-29 and measure the voltage available at the wiring harness side of the connector.
2. Turn the ignition switch to the "ON" position.
3. Measure the voltage between terminal 29 and ground.
- The voltage should measure approximately 12 volts (battery positive voltage).
Q: Is the measured voltage approximately 12 volts (battery positive voltage)?
YES: Go to Step 10.
NO: Go to Step 8.
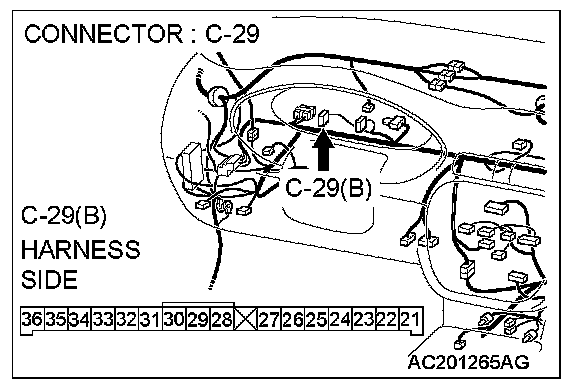
STEP 8. Check combination meter connector C-29 for loose, corroded or damaged terminals, or terminals pushed back in the connector.
Q: Is combination meter connector C-29 in good condition?
YES: Go to Step 9.
NO: Repair or replace the damaged component(s). Refer to Harness Connector Inspection. Check that the seat belt warning light illuminates normally.
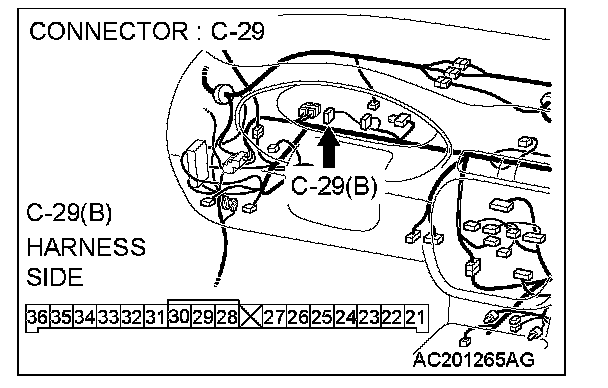
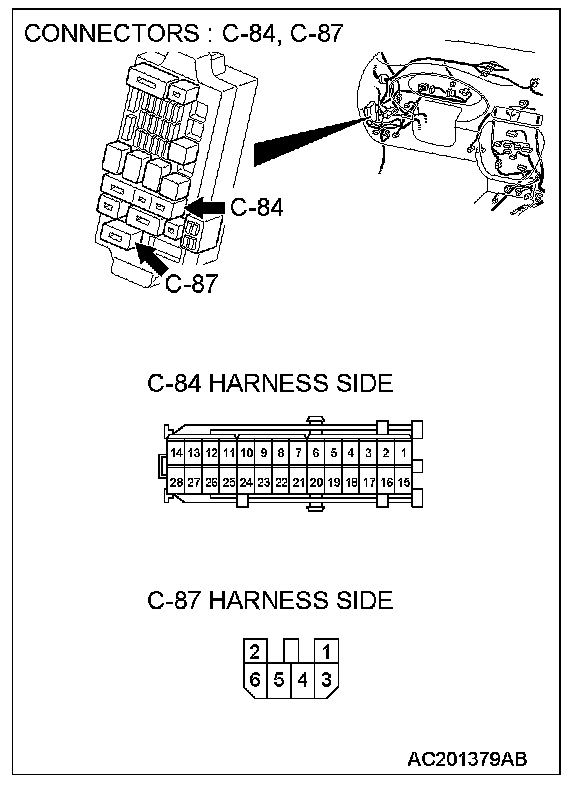
STEP 9. Check the wiring harness between combination meter connector C-29 (terminal 29) and the ignition switch (IG1).
NOTE: Also check junction block connectors C-84 and C-87 for loose, corroded, or damaged terminals, or terminals pushed back in the connector. If junction block connector C-84 or C-87 is damaged, repair or replace the damaged component(s) as described in Harness Connector Inspection.
Q: Is the wiring harness between combination meter connector C-29 (terminal 29) and the ignition switch (IG1)in good condition?
YES: No action is necessary and testing is complete.
NO: The wiring harness may be damaged or the connector(s) may have loose, corroded or damaged terminals, or terminals pushed back in the connector. Repair the wiring harness as necessary. Verify that the seat belt warning light illuminates normally.
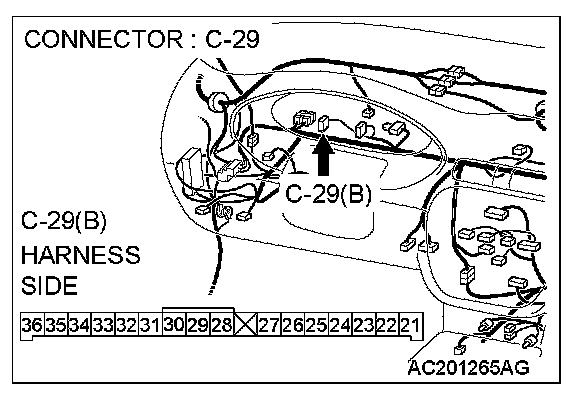
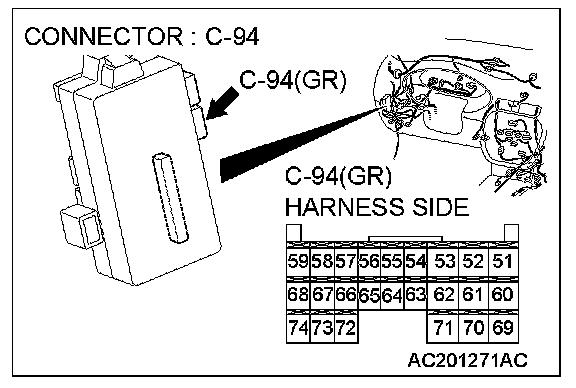
STEP 10. Check combination meter connector C-29 and ETACS-ECU connector C-94 for loose, corroded or damaged terminals, or terminals pushed back in the connector.
Q: Are combination meter connector C-29 and ETACS-ECU connector C-94 in good condition?
YES: Go to Step 11.
NO: Repair or replace the damaged component(s). Refer to Harness Connector Inspection. Check that the seat belt warning light illuminates normally.
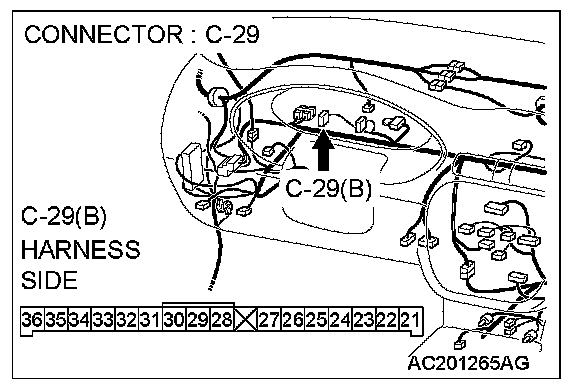
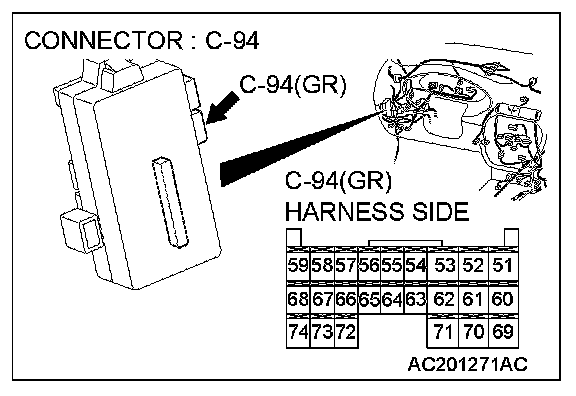
STEP 11. Check the wiring harness between combination meter connector C-29 (terminal 34) and ETACS-ECU connector C-94 (terminal 73).
Q: Is the wiring harness between combination meter connector C-29 (terminal 34) and ETACS-ECU connector C-94 (terminal 73) in good condition?
YES: No action is necessary and testing is complete.
NO: The wiring harness may be damaged or the connector(s) may have loose, corroded or damaged terminals, or terminals pushed back in the connector. Repair the wiring harness as necessary. Verify that the seat belt warning light illuminates normally.