Pinpoint Test E: A Single Power Window is Inoperative - RH Front
Glass, Frames and Mechanisms
Pinpoint Tests
Pinpoint Test E: A Single Power Window is Inoperative - RH Front, MKX
Refer to Wiring Diagram Set 100, Power Windows for schematic and connector information. Diagrams By Number
NOTE: A new RH front window motor will not operate in one-touch up or one-touch down mode until initialized. Refer to Window Motor Initialization Testing and Inspection.
NOTE: The RH front window motor must be initialized whenever a new motor is installed.
NOTE: The front window motor must be de-initialized, then initialized whenever the LH or RH (MKX) or LH (Edge) front window motor is removed from the window regulator drum housing, a new window regulator is installed, a new window glass is installed, a new top run is installed or for any operation in which grease or lubricants are applied to the window regulator or glass run.
Normal Operation
The LH and RH front window control switches receive power from the accessory delay relay through circuit CBP41 (BU). The RH window motor receives battery power through circuit SBP01 (RD) and ground through circuit GD140 (BK/GN). When the LH or RH front window control switch is pulled, the RH front window motor receives a voltage signal through circuit CPW13 (BN/YE) which causes the window to move upward. When the LH or RH front window control switch is pressed, the RH front window motor receives a voltage signal through circuit CPW12 (GN/OG) which causes the window to move downward. When the LH or RH front window control switch is pressed or pulled to the second detent position (AUTO), the RH front window motor receives a ground signal on circuit CPW31 (GN/WH) which causes the RH front window motor to enter one-touch up/down mode.
This pinpoint test is intended to diagnose the following:
- Fuse
- Wiring, terminals or connectors
- LH or RH front window control switch
- RH front window motor
PINPOINT TEST E: A SINGLE POWER WINDOW IS INOPERATIVE - RH FRONT, MKX
NOTICE: Use the correct probe adapter(s) from the Flex Probe Kit when making measurements. Failure to use the correct probe adapter(s) may damage the connector.
-------------------------------------------------
E1 CHECK THE LH FRONT WINDOW CONTROL SWITCH OPERATION
- Attempt to operate the RH window using the LH front power window control switch.
- Does the RH window operate when using the LH front power window control switch?
Yes
GO to E7.
No
GO to E2.
-------------------------------------------------
E2 CHECK THE POWER TO THE WINDOW MOTOR
- Ignition OFF.
- Disconnect: RH Front Window Motor C646.
- Measure the voltage between RH front window motor C646-1, circuit SBP01 (RD), harness side and ground.
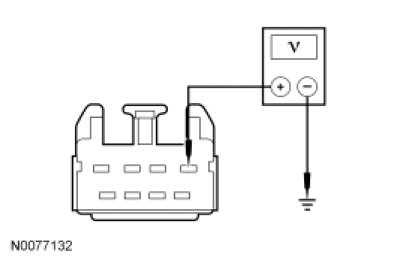
- Is the voltage greater than 10 volts?
Yes
GO to E3.
No
VERIFY Smart Junction Box (SJB) fuse 1 (30A) is OK. If OK, REPAIR the circuit. DE-INITIALIZE, then INITIALIZE the RH front window motor. REFER to Window Motor Initialization Testing and Inspection. TEST the system for normal operation.
If not OK, Refer to the Wiring Diagrams to identify the possible causes of the circuit short. REPAIR the circuit. DE-INITIALIZE, then INITIALIZE the RH front window motor. REFER to Window Motor Initialization Testing and Inspection. TEST the system for normal operation. Diagrams By Number
-------------------------------------------------
E3 CHECK CIRCUIT CBP41 (BU) FOR AN OPEN
- Ignition ON.
- Measure the voltage between RH front window motor C646-3, circuit CBP41 (BU), harness side and ground.
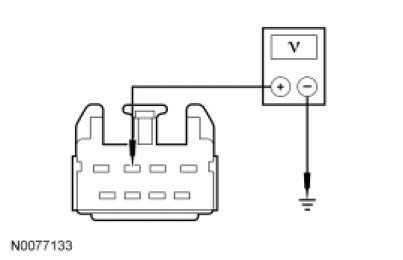
- Is the voltage greater than 10 volts?
Yes
GO to E4.
No
REPAIR the circuit. DE-INITIALIZE, then INITIALIZE the RH front window motor. REFER to Window Motor Initialization Testing and Inspection. TEST the system for normal operation.
-------------------------------------------------
E4 CHECK CIRCUIT GD140 (BK/GN) FOR AN OPEN
- Measure the resistance between RH front window motor C646-4, circuit GD140 (BK/GN), harness side and ground.
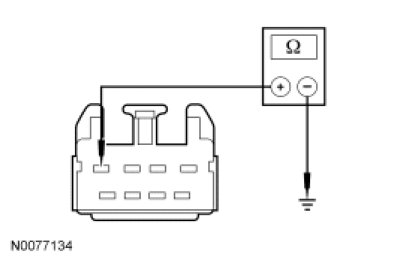
- Is the resistance less than 5 ohms?
Yes
GO to E5.
No
REPAIR the circuit. DE-INITIALIZE, then INITIALIZE the RH front window motor. REFER to Window Motor Initialization Testing and Inspection. TEST the system for normal operation.
-------------------------------------------------
E5 CHECK THE LH FRONT WINDOW CONTROL SWITCH-TO-RH FRONT WINDOW MOTOR FEEDS
- Disconnect: LH Front Window Control Switch C535A.
- Measure the resistance between RH front window motor C646-6, circuit CPW12 (GN/OG), harness side and LH front window control switch C535A-2, circuit CPW12 (GN/OG), harness side.
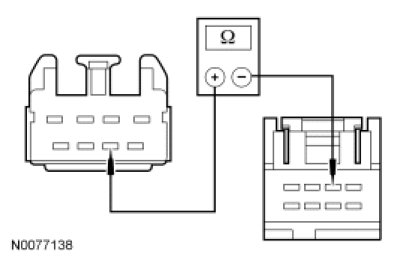
- Measure the resistance between RH front window motor C646-2, circuit CPW31 (GN/WH), harness side and LH front window control switch C535A-1, circuit CPW31 (GN/WH), harness side.
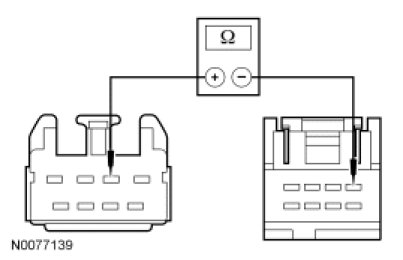
- Measure the resistance between RH front window motor C646-5, circuit CPW13 (BN/YE), harness side and LH front window control switch C535A-5, circuit CPW13 (BN/YE), harness side.
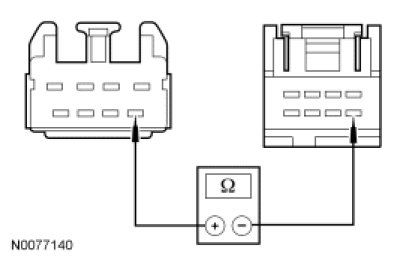
- Is the resistance less than 5 ohms?
Yes
GO to E6.
No
REPAIR the circuit. DE-INITIALIZE, then INITIALIZE the RH front window motor. REFER to Window Motor Initialization Testing and Inspection. TEST the system for normal operation.
-------------------------------------------------
E6 CHECK THE LH FRONT WINDOW CONTROL SWITCH
- Carry out the LH front window control switch component test.
- Did the LH front window control switch pass the component test?
Yes
INSTALL a new RH front window motor. REFER to Window Regulator Motor Window Regulator Motor. INITIALIZE the RH front window motor. REFER to Window Motor Initialization Testing and Inspection. TEST the system for normal operation.
No
INSTALL a new LH front window control switch. REFER to Window Control Switch Service and Repair. INITIALIZE the RH front window motor. REFER to Window Motor Initialization Testing and Inspection. TEST the system for normal operation.
-------------------------------------------------
E7 CHECK CIRCUIT CBP41 (BU) FOR VOLTAGE
- Disconnect: RH Front Window Control Switch C648.
- Ignition ON.
- Measure the voltage between RH front window control switch C648-2, circuit CBP41 (BU), harness side and ground.
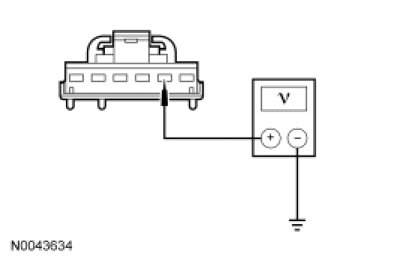
- Is the voltage greater than 10 volts?
Yes
GO to E8.
No
REPAIR the circuit. TEST the system for normal operation.
-------------------------------------------------
E8 CHECK THE LH FRONT WINDOW CONTROL SWITCH-TO-RH FRONT WINDOW CONTROL SWITCH CIRCUITS
- Ignition OFF.
- Disconnect: LH Front Window Control Switch C535A.
- Measure the resistance between RH front window control switch C648-5, circuit CPW12 (GN/OG), harness side and LH front window control switch C535A-2, circuit CPW12 (GN/OG), harness side.
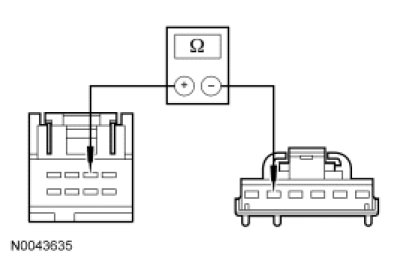
- Measure the resistance between RH front window control switch C648-4, circuit CPW31 (GN/WH), harness side and LH front window control switch C535A-1, circuit CPW31 (GN/WH), harness side.
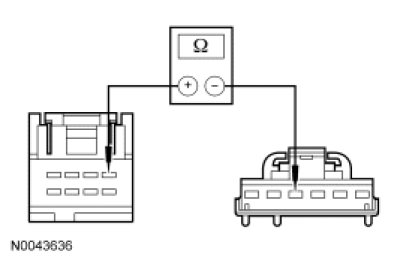
- Measure the resistance between RH front window control switch C648-3, circuit CPW13 (BN/YE), harness side and LH front window control switch C535A-5, circuit CPW13 (BN/YE), harness side.
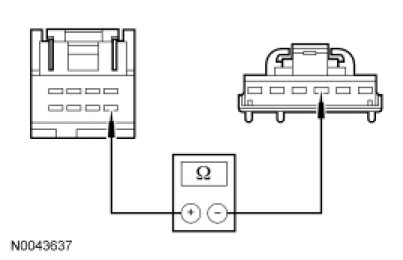
- Is the resistance less than 5 ohms?
Yes
INSTALL a new RH front window control switch. REFER to Window Control Switch Service and Repair. TEST the system for normal operation.
No
REPAIR the circuit. TEST the system for normal operation.
-------------------------------------------------