Interior Backlighting Malfunction
Interior Backlighting Malfunction
Diagnostic Instructions
* Perform the Diagnostic System Check - Vehicle Diagnostic System Check - Vehicle prior to using this diagnostic procedure.
* Review Strategy Based Diagnosis Strategy Based Diagnosis for an overview of the diagnostic approach.
* Diagnostic Procedure Instructions Diagnostic Procedure Instructions provides an overview of each diagnostic category.
Diagnostic Fault Information
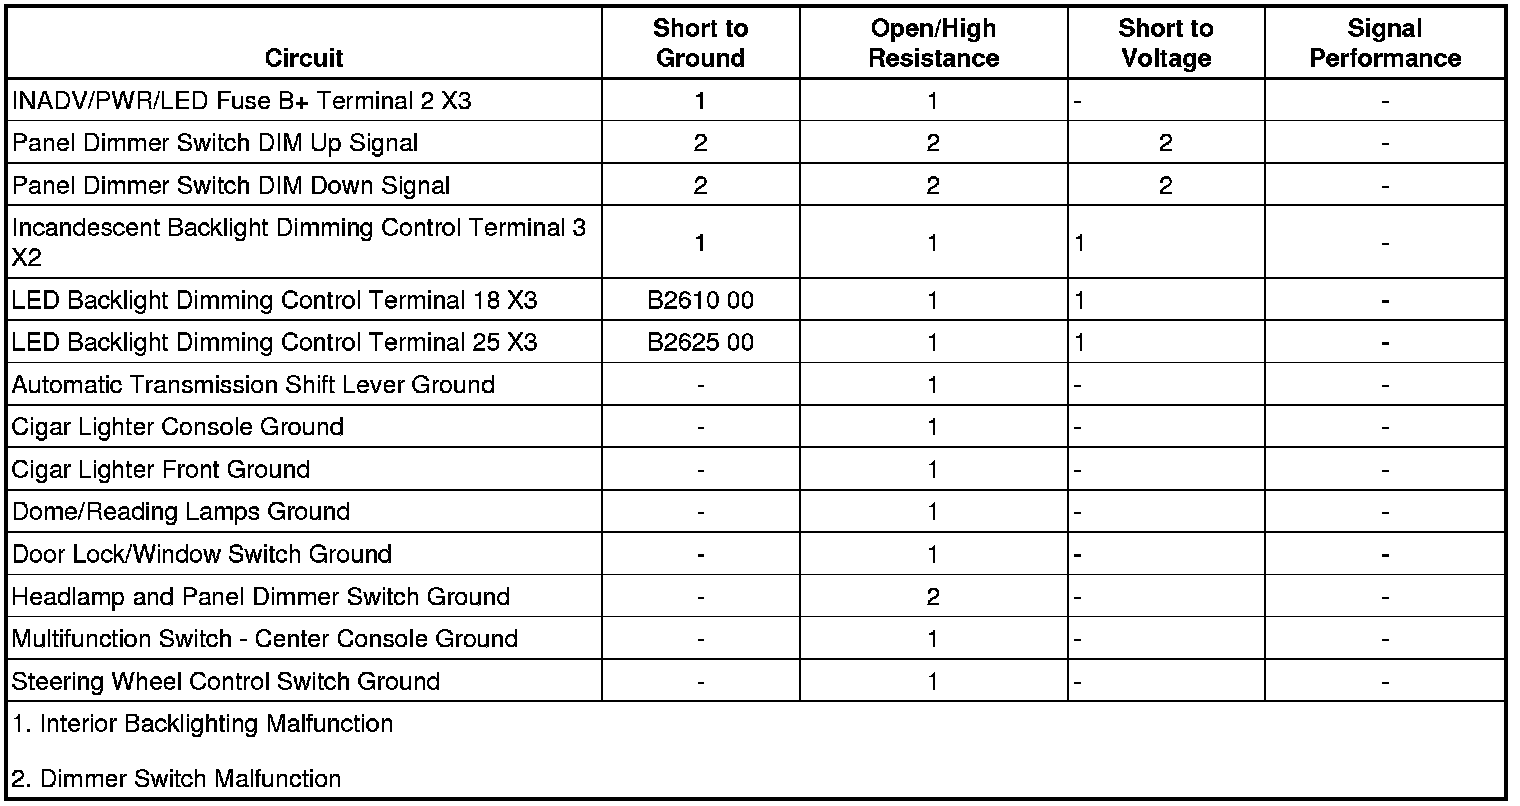
Circuit/System Description
The up/down dimmer controls located on the headlamp and panel dimmer switch is used to increase and decrease the brightness of the interior backlighting components. Each dimmer control switch provides a voltage signal that will increase as the brightness of the lights are increased and decrease as the brightness of the lights are decreased. The body control module (BCM) supplies each dimmer control switch with a signal circuit. When either the up or down dimmer control switch is placed in the desired position, the dimmed voltage setting is applied from the appropriate dimmer control switch through the dimmer switch signal circuit to the BCM. The BCM interprets the signal and applies the dimmed voltage to the LED and incandescent backlight dimming control circuits and the interior backlighting components dim to the requested level.
Reference Information
Schematic Reference
Interior Lights Dimming Schematics Interior Lights Dimming Schematics
Connector End View Reference
Component Connector End Views Fuel Pump and Level Sensor Assembly
Description and Operation
Interior Lighting Systems Description and Operation Interior Lighting Systems
Electrical Information Reference
* Circuit Testing Circuit Testing
* Connector Repairs Connector Repairs
* Testing for Intermittent Conditions and Poor Connections Testing for Intermittent Conditions and Poor Connections
* Wiring Repairs Wiring Repairs
Scan Tool Reference
Control Module References Control Module References for scan tool information
Circuit/System Verification
Ignition ON, observe the scan tool LED Dimming PWM. Cmd. and Incand Dimming PWM Command parameters while operating the dimmer switch from high to low. The parameters should change from a high percent to a low percent as the switch is activated.
If the parameters do not change, refer to Panel Dimmer Switch Malfunction.
If the parameters change, refer to Interior Backlighting Malfunction.
Circuit/System Testing
Panel Dimmer Switch Malfunction
1. Ignition OFF, disconnect the harness connector at the headlamp and panel dimmer switch.
2. Ignition OFF, test for less than 5 ohms between the ground circuit terminal 4 and ground.
• If not the specified value, test the ground circuit for an open/high resistance.
3. Ignition OFF, disconnect the X7 harness connector at the BCM.
4. Ignition ON, verify that a test lamp does not illuminate between the signal circuits listed below and ground.
* Dim down signal terminal 24
* Dim up signal terminal 10
• If the test lamp illuminates, test the signal circuit for a short to voltage.
5. Ignition OFF, connect the X7 harness connector at the BCM.
6. Ignition ON, test for B+ between the signal circuit terminal 7 and ground.
• If not the specified value, test the signal circuit for a short to ground or an open/high resistance. If the circuit tests normal, replace the BCM.
7. Ignition ON, test for B+ between the signal circuit terminal 12 and ground.
• If not the specified value, test the signal circuit for a short to ground or an open/high resistance. If the circuit tests normal, replace the BCM.
8. If all circuits test normal, test or replace the headlamp and panel dimmer switch.
Interior Backlighting Malfunction
1. Ignition OFF, disconnect the X3 harness connector at the BCM.
2. Ignition ON, verify that a test lamp illuminates between the B+ circuit terminal 2 and ground.
• If the test lamp does not illuminate, test the B+ circuit for a short to ground or an open/high resistance.
3. Ignition OFF, connect the X3 harness connector at the BCM.
4. Disconnect the harness connector at the component with the inoperative backlighting.
5. Ignition OFF, scan tool OFF, interior lamps OFF, doors CLOSED, test for less than 5 ohms between the appropriate ground circuit terminal listed below and ground.
* Automatic transmission shift lever terminal 3
* Cigar lighter - console terminal C
* Cigar lighter - front terminal C
* Dome/reading lamps terminal 1
* Door lock/window switch terminal 4 X2
* Headlamp and panel dimmer switch terminal 4
* Multifunction switch - center console terminal 2
* Multifunction switch - center console terminal 7
* Steering wheel control switch terminal 7
• If greater than the specified range, test the ground circuit for an open/high resistance.
6. Connect a test lamp between the appropriate control circuit terminal listed below and ground.
* Automatic transmission shift lever terminal 8
* Cigar lighter - console terminal A
* Cigar lighter - front terminal A
* Dome/reading lamps terminal 6
* Door lock/window switch terminal 11 X2
* Headlamp and panel dimmer switch terminal 8
* Multifunction switch - center console terminal 1
* Multifunction switch - center console terminal 8
* Steering wheel control switch terminal 8
7. Command the Dimmed Illumination Test ON and OFF with a scan tool. The test lamp should turn ON and OFF when changing between the commanded states.
• If the test lamp is always OFF, test the control circuit for a short to ground or an open/high resistance. If the circuit tests normal, replace the BCM.
• If the test lamp is always ON, test the control circuit for a short to voltage. If the circuit tests normal, replace the BCM.
8. If all circuits test normal, test or replace the component with the inoperative backlighting.
Repair Instructions
Perform the Diagnostic Repair Verification Verification Tests after completing the diagnostic procedure.
* Headlamp Switch Replacement Service and Repair
* Cigar Lighter Receptacle or 12-Volt Accessory Power Receptacle Replacement (Instrument Panel) Cigar Lighter Receptacle or 12-Volt Accessory Power Receptacle Replacement (Instrument Panel)Cigar Lighter Receptacle or 12-Volt Accessory Power Receptacle Replacement (Center Console) Cigar Lighter Receptacle or 12-Volt Accessory Power Receptacle Replacement (Center Console)
* Power Mirror Switch Replacement (9C1) Service and Repair
* Control Module References Control Module References for BCM replacement, setup, and programming