Engine Compartment E-Box
Engine Compartment E-Box
Removing
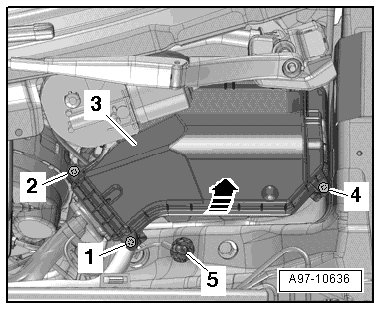
- Switch the vehicle ignition off.
- Disconnect the battery ground (GND) cable from the battery. Refer to => [ Battery, Disconnecting and Connecting ] Battery, Disconnecting and Connecting.
Damaged high voltage components may produce dangerously high voltage.
Observe the following when working near or around high voltage components and cables:
• Do not use tools that have sharp edges, that are used for cutting or shaping, or that generate heat, such as welding, soldering, hot air or thermal adhesive equipment.
• Inspect the high voltage components in the area where the work will be performed before starting the procedure.
• Perform a visual inspection of the electric drive power and control electronics (JX1) , electro-drive drive motor (V141) , the electrical A/C compressor (V470) and the high voltage cables when working in the engine compartment.
• Perform a visual inspection of the high voltage cables and the covers when working on the floor panel.
• Perform a visual inspection of the high voltage cables and the electro-box with the high voltage system maintenance connector (TW) when working in the rear of the vehicle.
• Perform a visual inspection of all of the potential equalization cables.
Note the following when performing the visual inspection:
• None of the components may display any exterior damage.
• The high voltage cable insulation and the potential equalization cables may not be damaged.
• The high voltage cables may not be deformed in any way.
• Each high voltage component muss be labeled with a red warning label.
- Remove the washer fluid reservoir filler neck. Refer to => [ Washer Fluid Reservoir Filler Neck ] Washer Fluid Reservoir Filler Neck.
- Remove the windshield wiper motor, refer to => [ Windshield Wiper Motor with Wiper Motor Control Module ] Service and Repair.
- Remove the screws - 1, 2 and 4 - and remove the engine compartment E-box cover - 3 - - arrow -.
• Disregard item - 5 - in this example.
- Release the retainers in the direction of the - A arrows - and remove the engine control module in the direction of the - B arrow -.
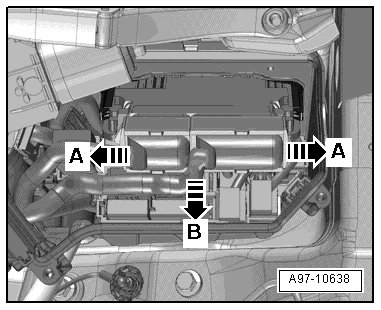
- Disconnect the electrical connector - 2 - if applicable.
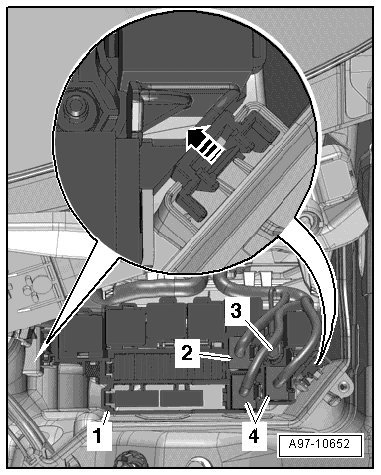
- Disconnect the electrical connectors - 4 - and remove the electrical wire - 3 -.
- Release the retainers - arrow - and remove the fuse panel B (SB) - 1 -.
- Disengage engine wiring harness at electronics box and lay bare.
- Remove the alarm horn (H12) if applicable. Refer to => [ Alarm Horn (H12) ] Alarm Horn (H12) and free up the electrical wiring harness.
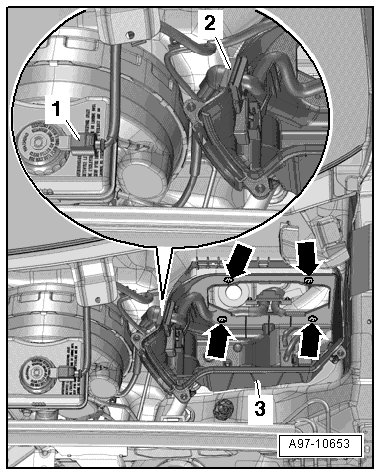
- Remove the bolts - arrows -.
- Disconnect the electrical connector - 1 - for the brake fluid level warning switch (F34).
- Disengage the wiring harness - 2 - on the engine compartment E-box.
- Remove the engine compartment E-box - 3 -.
Installing
Observe notes on contact corrosion. Refer to => [ Contact Corrosion ] Service Precautions.
• Tightening specification, refer to => [ Tightening Specifications for the Engine Compartment E-Box ] Engine Compartment E-Box, Wire Junction, Fuse Holder and Battery Overview.
Install in reverse order of removal, observing the following:
- Install the fuse panel B (SB). Refer to => [ Fuse Panel B in Engine Compartment E-Box ] Fuse Panel B in Engine Compartment E-Box.
- Install the alarm horn (H12). Refer to => [ Alarm Horn (H12) ] Alarm Horn (H12).
- Connect battery. Required actions, refer to => [ Battery, Disconnecting and Connecting ] Battery, Disconnecting and Connecting.
- Install the windshield wiper motor. Refer to => [ Windshield Wiper Motor with Wiper Motor Control Module ] Service and Repair.
- Install the washer fluid reservoir filler neck. Refer to => [ Washer Fluid Reservoir Filler Neck ] Washer Fluid Reservoir Filler Neck.