Engine, Installing
Engine, Installing
Special tools, testers and auxiliary items required
• Ring Spanner Insert AF 16 (V.A.G 1332/14)
• Transport Lock (T40170)
• Socket (T40058)
• Scissor-Type Assembly Platform (VAS 6131 A) with Support Set (VAS 6131/10) and Supplementary Set, Audi A8 (VAS 6131/11) and Supplementary Set, Audi Q7 (VAS 6131/13)
Tightening Specifications
• The tightening specifications apply only to lightly greased, oiled, phosphated or blackened nuts and bolts.
• Additional lubricant such as engine or transmission oil may be used, but do not use graphite lubricant.
• Do not use any parts that have had the lubrication removed.
• Tightening specification tolerance +/- 15%.
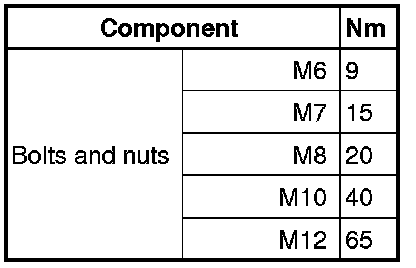
Subframe mount, refer to => [ Subframe Mount Overview ] Subframe Mount Overview.
Ground (GND) Bolt to Strut Tower - Tightening Specification
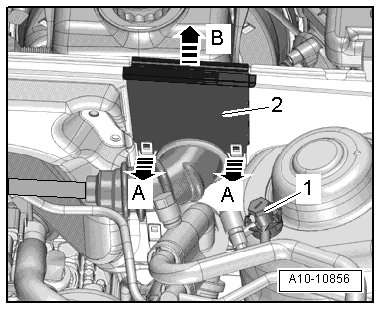
- Tighten the GND bolt - 1 - to 9 Nm.
Ground (GND) Wire to Longitudinal Member - Tightening Specification
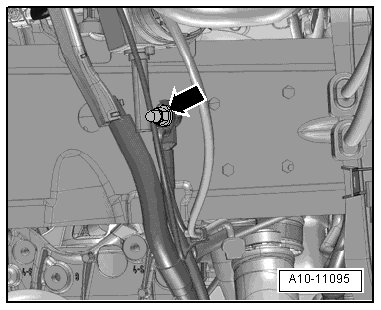
- Tighten the nut - arrow - to 9 Nm.
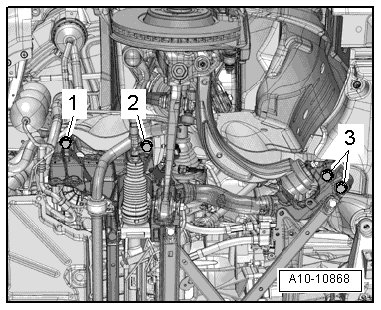
Driveshaft Heat Shield - Tightening Specification
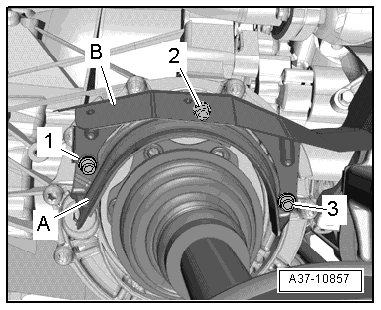
- Tighten the bolts - 1, 2 and 3 - to 23 Nm.
Engine to Automatic Transmission 0B6
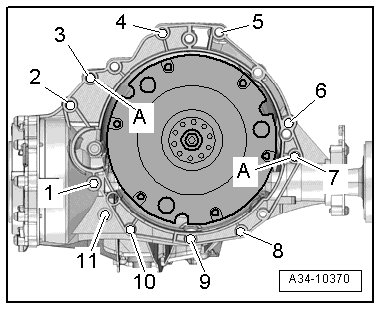
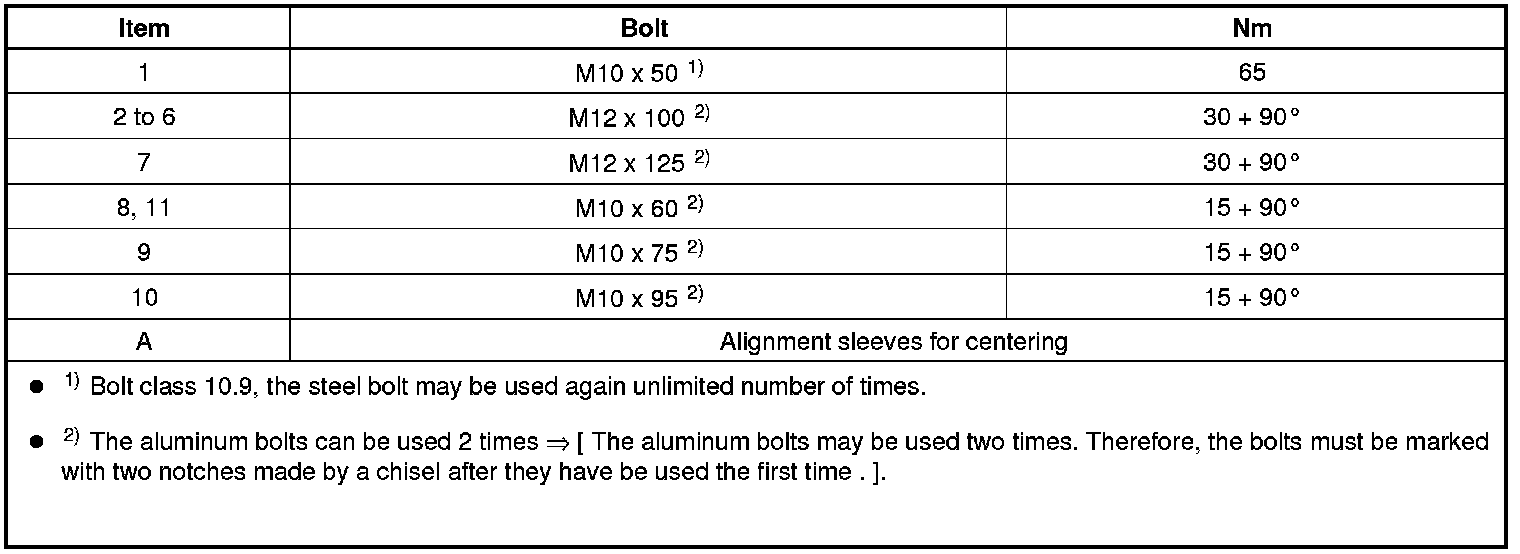
• The aluminum bolts - 2 through 11 - may be used two times. Therefore, the bolts must be marked with two notches "X" made by a chisel after they have be used the first time - arrow -.
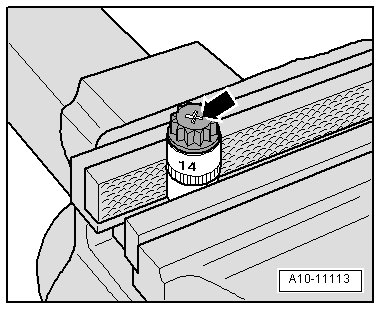
• To prevent damaging the bolts when marking them, do not clamp them in a vise. Insert the bolt using a 14 mm socket with a 1/2 drive, which is inserted in to the vise, as illustrated.
• Bolts marked with an "X" may not be used again.
Procedure
• Replace the bolts which are being tightened with an additional turn.
• Replace self-locking nuts and bolts and seals, gaskets and O-rings.
• The drive plate in the vehicles with the automatic transmission 0B6 must not have any needle bearings. Check if a needle bearing is inserted before installing. Remove the needle bearing in the drive plate. Refer to => [ Needle Bearing on Drive Plate ] Service and Repair.
• Secure all hose connections with hose clamps of the same type as those equipped by the factory. Refer to the Parts Catalog.
• In order to be able to securely mount the air guide hoses on their connectors, spray the screws on the previously used clamps with a rust remover.
• When installing, bring all cable ties back to the same positions.
- When joining the engine and subframe, hold the ATF lines in their installation position.
- Clean the threaded holes in the cylinder block for connecting the engine and transmission using a thread tap before installing the transmission.
- The following preparations must be made before connecting the engine and transmission:
- Turn the torque converter so that the hole next to the notch - arrow - is visible in the transmission housing in the lower cut-out, as illustrated.
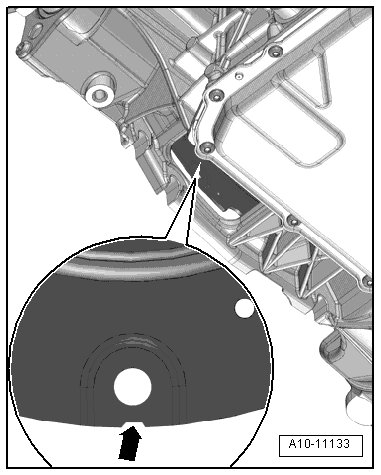
• The notch is only in one location on the circumference, so rotate the torque converter as needed.
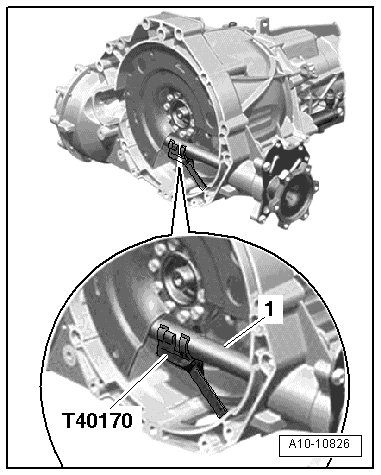
- Insert the (T40170) in the transmission housing from below and secure it on the flange shaft - 1 -.
- Inspect the aluminum bolts used to connect the engine to the transmission to see if they can be used again and mark them, if necessary.
- Check if the alignment sleeves - A - for centering the engine/transmission are in the cylinder block and insert them if they are not.
- Position the transmission on the engine and tighten the bolts - 1 through 11 -.
- Remove the (T40170).
- Install the engine supports and engine mount. Refer to => [ Subframe Mount Overview ] Subframe Mount Overview.
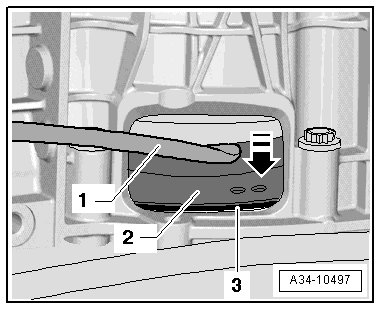
• The following procedure is necessary to assure that the torque converter contacts the drive plate evenly and does not get bent.
- Press the torque converter - 2 - slightly against the drive plate - 3 - using a pry bar - 1 - in direction of - arrow -.
- Secure the torque converter to the drive plate as follows:
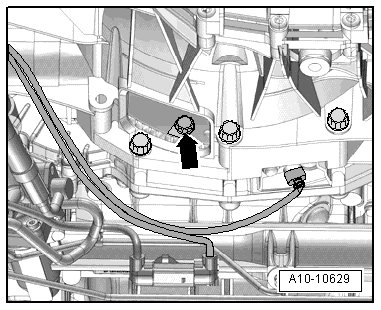
• Use the (V.A.G 1332/14) to tighten the bolt.
- Install the first bolt - arrow - and tighten by hand (2 Nm).
- Insert the (T40058) guide pins as follows:
• The large diameter - arrow 1 - faces the engine.
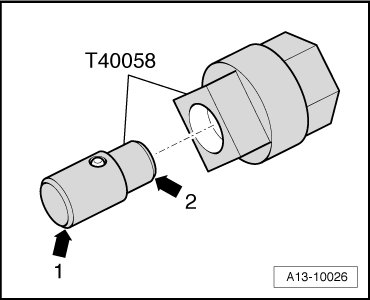
• The small diameter - arrow 2 - faces the adapter.
- Rotate the crankshaft with the (T40058) 180° in direction of engine rotation - arrow -.
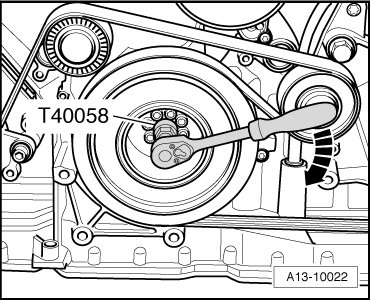
- With the crankshaft in this position, tighten the bolts - arrow - which are now accessible to the tightening specification.
- Turn the crankshaft 60° further and tighten the remaining 5 bolts to the tightening specification.
- Install the power steering hydraulic oil lines.
- Install the left and right drive axles on the transmission flange shafts.
- Install the drive axle heat shield.
- Install the catalytic converters. Refer to => [ Left Catalytic Converter ] Left Catalytic Converter, => [ Right Catalytic Converter ] Right Catalytic Converter.
- Raise the engine/transmission assembly using the (VAS 6131 A).
- Align the subframe and transmission carrier using the marks made on the longitudinal members during removal.
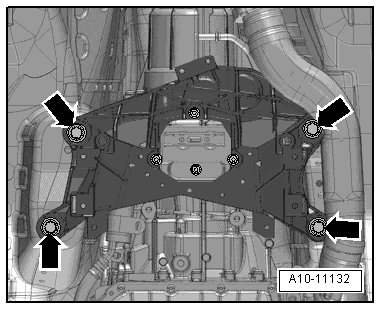
- Tighten the subframe bolts only to the tightening specifications, do not tighten them further (tighten the bolts only after axle alignment).
Risk of accident due to loose connections.
• If the bolts in the subframe are not tightened to final torque, vehicle must not be driven.
- Tighten the tunnel crossmember bolts - arrow -.
Install in reverse order of removal paying attention to the following:
- Install ATF lines.
- Install the universal joint on the steering gear.
- Install the driveshaft.
- Install selector lever cable.
- Install the front muffler. Refer to => [ Front Muffler ] Front Muffler.
- Install the subframe crossbrace, upper control arm and stabilizer bar and tighten the suspension strut on the control arm.
- Install the brake caliper.
- Install the Engine Control Module (ECM).
- Electrical connectors and wiring routing.
- Install the wires, terminal 30 wire junction 2 (TV22) and the engine compartment E-box cover. Refer to => [ Ground (GND) Bolt to Strut Tower - Tightening Specification ] , => [ Ground (GND) Wire to Longitudinal Member - Tightening Specification ].
- Install the tower brace.
- Install the washer fluid reservoir filler tube.
- Install the refrigerant lines.
- Follow the measures after connecting battery.
There is a risk of destroying the control modules with excess voltage.
• Do not use a charger as a starting aid.
- Install the fuel supply hose and air filter housing.
- Install the lock carrier braces.
- Fill engine oil and check oil level.
- Before starting engine for the first time, check the fluid level in the power steering reservoir.
• Do not run the power steering pump when it is dry.
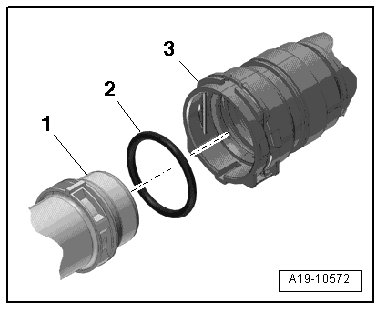
- Connect the coolant hose to the coupling. Refer to => [ Connect the Coolant Hose to the Coupling ] Radiator and Coolant Fan Overview.
- Fill the engine with coolant => [ Filling ] Service and Repair.
• Do not use drained coolant in the following situations:
• If the cylinder head or cylinder block was replaced.
• If the coolant is contaminated.
- Fill the refrigerant circuit.
- Install the front wheels and perform an alignment.
Risk of accident due to loose connections.
• Tighten the subframe bolts to the specification after performing the axle alignment.
- Check the ATF level.
- Install the noise insulation and the wheel housing liners..