Condenser Refrigerant Lines
Condenser Refrigerant Lines
• Condenser is available in different versions, depending on version of vehicle. Refer to Electronic Parts Catalog.
Removing
- Switch off ignition.
- Drain the refrigerant circuit.
- Remove the lock carrier cover and the front bumper cover.
- Remove bolt - A - and - B -.
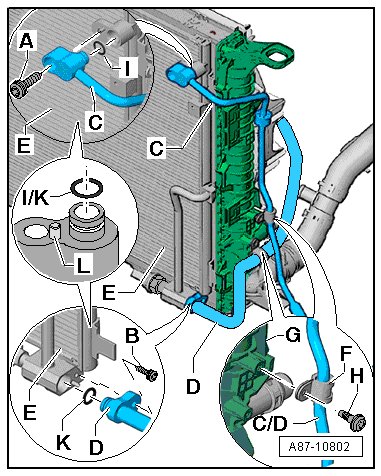
- Detach bracket - F - for refrigerant lines - C - and - D - from front end module - G -.
- Remove refrigerant lines - C - and - D - from condenser - E -.
- Close open line connections and condenser connections.
• Seal open pipes and connections at condenser with suitable caps (to prevent ingress of dirt and moisture).
Installing
Installation is done is reverse order, observe the following:
- Clean refrigerant line connections on condenser - E - and on refrigerant lines - C - and - D -, and check for damage.
- Replace O-ring seals - J - and - K -; refer to the Electronic Parts Catalog.
- Alignment pin - L - (installed in the condenser connection or the refrigerant line connection, not present in all connections) for damage and proper seating.
• Follow the instructions for installing the O-rings. Refer to => [ Refrigerant Circuit O-rings ] Refrigerant Circuit O-rings.
• Following attachment, check routing of refrigerant lines on condenser. They must be inserted in holders provided and not make contact with other components.
- Coat O-ring seals - J - and - K - lightly with refrigerant oil prior to installation, refer to => [ Refrigerant Circuit O-rings ] Refrigerant Circuit O-rings.
- Make sure O-ring seals - J - and - K - fit correctly inside the grooves in each mount.
- Install and tighten screws - A -, - B - and - H -.
• Tightening specification of bolts - A - and - B - with a thread "M6": 10 Nm.
• Tightening specification of bolts - A - and - B - with a thread "M8": 20 Nm.
• Tightening specification of bolt - H -: 5 Nm.
- Check the routing of the refrigerant lines after attachment. They must be inserted in the provided brackets in a tension-free manner and must not come in contact with other components.
- Install the front bumper cover and the lock carrier cover.
- Evacuate and fill the refrigerant circuit.
- Install the remaining removed components.
- Check the event memory of the Climatronic control module (J255) , and erase any displayed malfunctions using the Vehicle Diagnostic Tester in the "Guided Fault Finding" function.
- Operate the A/C system after filling the refrigerant circuit, refer to => [ A/C System Operating After Filling Refrigerant Circuit ] A/C System Operating After Filling Refrigerant Circuit.
• Note the information regarding operating the A/C system after filling.