Right Center Vent Motor (V111)
Right Center Vent Motor (V111)
Removal
- Note the general information => [ General Control Motor Information ] General Control Motor Information.
- Move the right front seat all the way back.
- Switch off the ignition.
- Remove the glove compartment.
- Remove the front passenger instrument panel vent air guide. Refer to => [ Right Instrument Panel Vent Air Guide - Front Passenger Side ] Right Instrument Panel Vent Air Guide - Front Passenger Side.
- Remove the footwell vent on the front passenger side. Refer to => [ Right Footwell Vent Air Guide - Front Passenger Side ] Right Footwell Vent Air Guide - Front Passenger Side.
- Label the electrical harness connector and control motor.
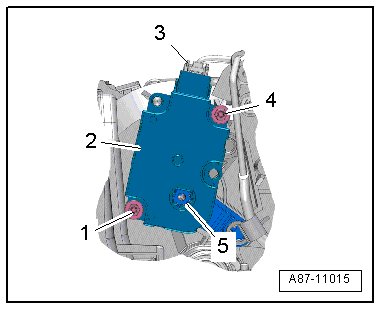
- Remove the bolts - 1, 4 -.
- Remove the control motor - 2 - from the shaft - 5 - for the actuator lever.
- Disconnect the electrical harness connector - 3 -.
Installation
Installation is done in reverse order, observe the following:
Risk of damage to the control motor.
• Do not turn the control motor mount by hand if the electrical harness connector is not connected - this can damage the electronics in the control motor.
• Only rotate the control motor mount with the electrical harness connector connected by carefully and slowly turning the mount by hand.
- The mount - E - of the control motor - C - can only be installed in one position on the actuator lever - D -.
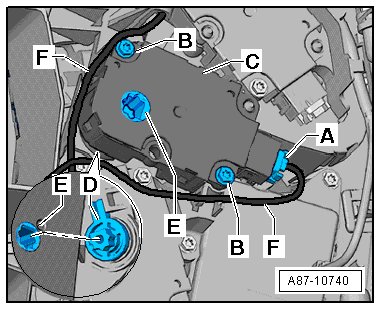
• The control motor mount must be opposite the actuator lever as shown in the figure.
• If the mount and actuator lever are not across from one another, the mount must be turned in the control motor. Note the general information => [ General Control Motor Information ] General Control Motor Information.
- Connect the electrical harness connector - A -.
- Place the control motor on the air distributor housing. The actuator lever must engage in the mount.
• There must not be any play in the connection between the control motor and the actuator lever.
- Tighten the screws - B -. Refer to => [ Basic Version - Add On Parts of A/C Unit Overview ] Basic Version - Add On Parts of A/C Unit Overview.
- Install the wiring harness - F - so that it cannot come in contact with any moving parts (for example, the lever of the control motor).
- Install the front passenger instrument panel vent air guide. Refer to => [ Right Instrument Panel Vent Air Guide - Front Passenger Side ] Right Instrument Panel Vent Air Guide - Front Passenger Side.
- Install the footwell vent on the front passenger side. Refer to => [ Right Footwell Vent Air Guide - Front Passenger Side ] Right Footwell Vent Air Guide - Front Passenger Side.
- Install the glove compartment.
After completion of the repair work, perform the following work on the control head using the Vehicle Diagnostic Tester in the "Guided Fault Finding" function:
- Read out the event memory and erase any displayed entries.
- Perform the basic setting.
- Perform the output diagnostic test mode.