Denso A/C Compressor Belt Pulley - Version 1
Denso A/C Compressor Belt Pulley - Version 1
• If the drive plate overload protection activates, check the A/C compressor for ease of movement before replacing the belt pulley. If the A/C compressor creates friction, replace it completely.
• The A/C compressor can be removed from the sub-assembly bracket and installed again without opening the refrigerant lines.
• Belt pulley is made of plastic and is sensitive to impact, therefore handle it with especial care
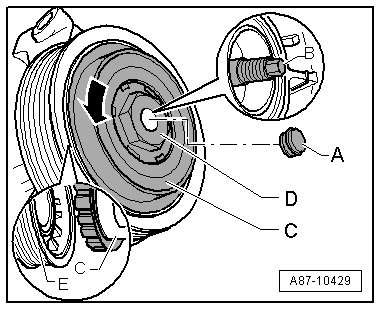
• If the overload protection of the drive plate - C - activates, rotate the belt pulley - E - using the outer part of the drive plate - C - so that the A/C compressor shaft - B - and the hexagon head on the drive plate - D - (inner part of the drive plate - C -) do not rotate.
• The belt pulley including the drive plate and sealing cap is available as a replacement part - the parts are held together by a screw which is not needed and can be disposed of. Refer to Electronic Parts Catalog (ETKA).
• When the bolt was manufactured, a predetermined amount of a specific grease was applied to the threads of the drive plate; this amount is sufficient for bolting the drive plate to the A/C compressor shaft one time - a drive plate, which has been removed, therefore cannot be reused.
Removal
- Removing ribbed belt.
- Remove the sealing cap - A -.
- Counter-hold the input shaft - B - of the A/C compressor with a commercially available 7 mm hex wrench.
- Turn the drive plate - C - with the belt pulley - E - in the - direction of the arrow -.
- Remove the drive plate.
• The torque for driving the A/C compressor is transferred to the A/C compressor shaft via the threaded connection of the drive plate.
• If the drive plate has become so tightly attached to the A/C compressor shaft during A/C compressor operation that it cannot be loosened (the 7 mm hex wrench cannot transmit the necessary torque), the A/C compressor must be replaced.
- Remove the circlip - A -.
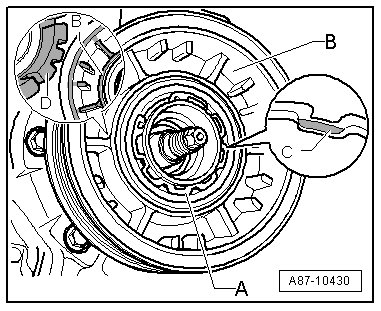
- Remove the belt pulley - B -.
Installation
Installation is done is reverse order, observe the following:
• Tightening specification, refer to=> [ Denso A/C Compressor Belt Pulley - Version 1 Overview ] Denso A/C Compressor Belt Pulley - Version 1 Overview.
- Clean the A/C compressor input shaft before sliding on the belt pulley.
- Attach the belt pulley to the A/C compressor input shaft.
• (fitting must be possible without much force).
- Install the circlip - A - on the right side.
• The beveled insertion edge - C - faces away from the A/C compressor - install the flat side facing the A/C compressor.
- Clean the A/C compressor input shaft threads prior to mounting the drive plate.
• The thread of the new drive plate has already been greased with a specific amount of a grease by the manufacturer.
- Insert the rubber element - D - in the belt pulley - B - as shown in the figure and coat lightly with tire mounting paste or a soap solution (as a lubricant), for example.
- Insert the drive plate - C - into the rubber element until it is in contact with the input shaft - B - of the A/C compressor.
- Press the rubber element of the drive plate into the belt pulley - E - until the drive plate is in contact with the threads of the A/C compressor input shaft.
- Screw the drive plate with the belt pulley onto the A/C compressor input shaft by rotating against the - direction of the arrow - while counter-holding with a hex wrench.
- Install the ribbed belt.